
Kitchen
It’s Finally Here: The Reveal of the Mountain House Kitchen
I feel like I’m about to give a wedding toast for my daughter who after four mediocre boyfriends/wedding attempts has now found and married the love of her life. There is a lot of emotion, relief, happiness and SO MUCH PRIDE wrapped up in this kitchen—and you know that’s not that easy for me to say. I pushed myself, ran into obstacles, almost gave up on the dream (remember when the cabinets were going to be a classic shaker?) was rescued (by these folks) and now get to make so much soup inside this rustic-modern-Scandinavian-contemporary-minimalist-kitchen. I feel like the luckiest person on the planet.
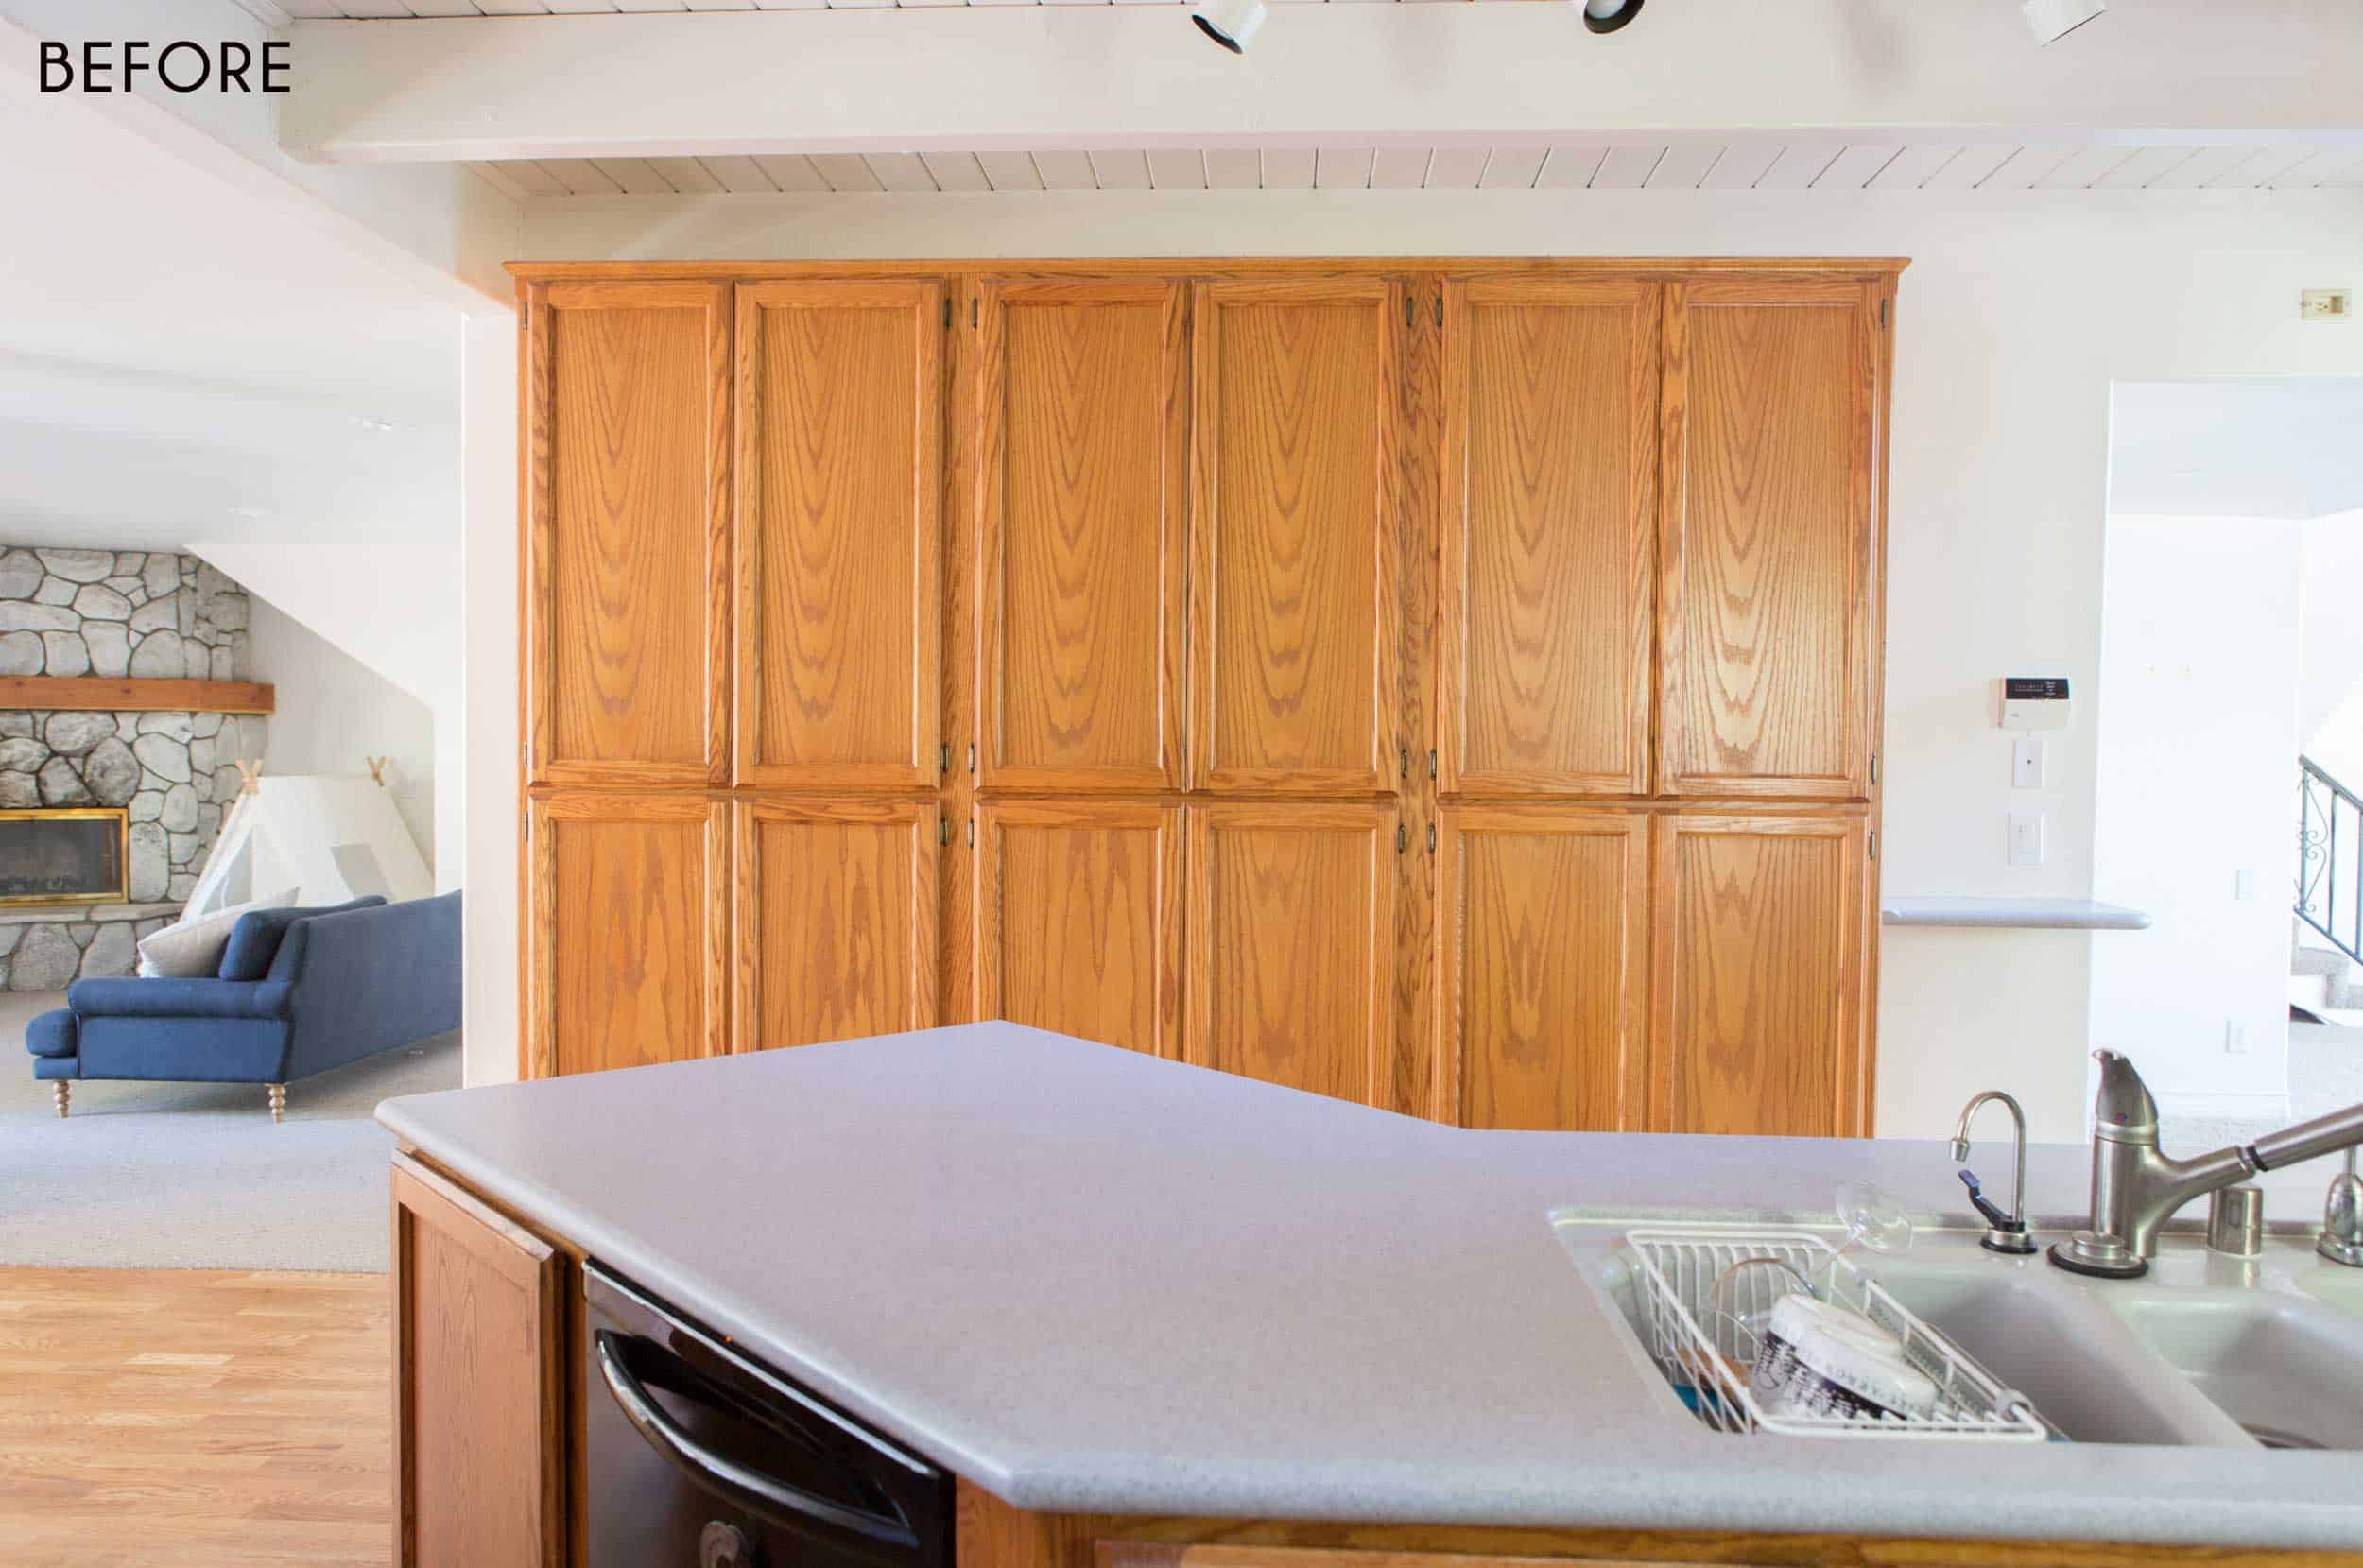
There is a lot to get into here and you might just be scrolling past this to see the rest of the photos, but STOP AND RESPECT YOUR FORE-FATHERS/KITCHENS:


Our first inspiration were these:


And then we thought we had a plan but as you can see from this post, there was a lot of design work before we even got to those final two.
But I didn’t know how to make that wood work for us and have it work with the wood flooring and ceiling (that was still TBD). All the samples that my contractor gave me of real wood just didn’t work for us – we didn’t love the tone or the look. So in the name of needing to march onward we did and scrapped the whole wood in thing.
For the I Design, You Decide, we had it down to two versions, here:
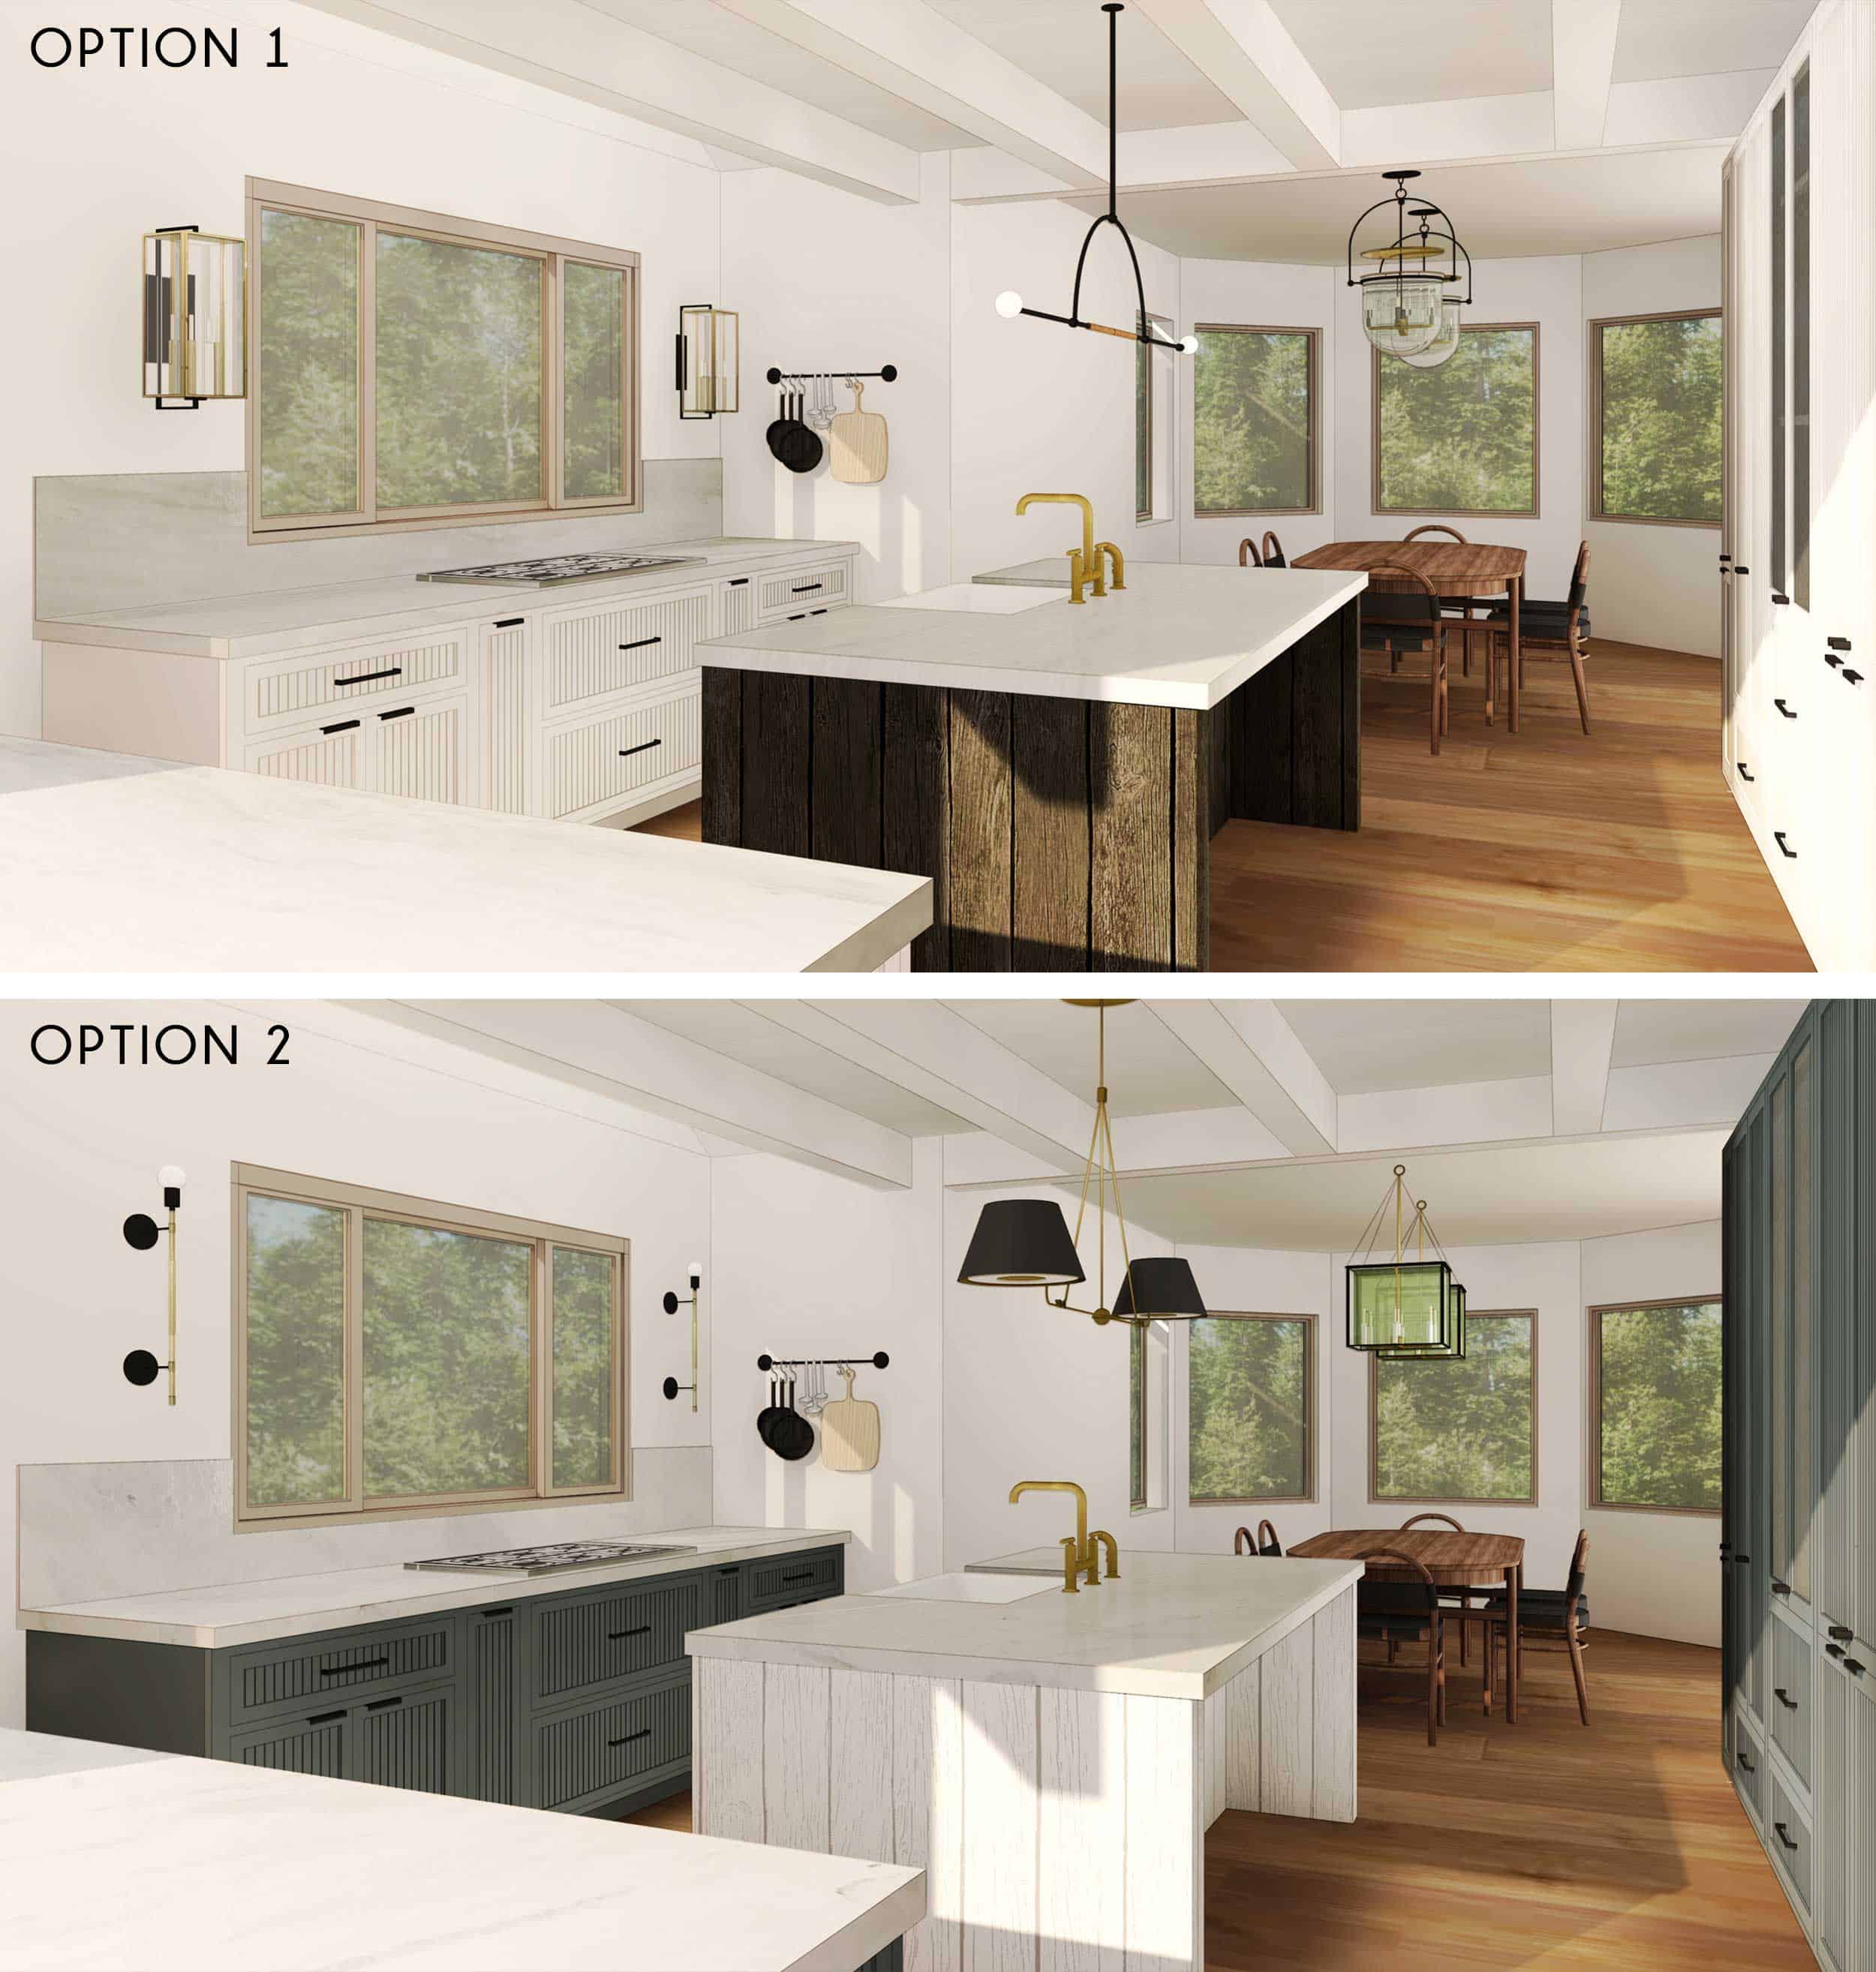
After you all voted for the white cabinet/black island combo, there were tons of comments about how all the little ridges would turn into grease and grime traps and you were right, so we made some adjustments and went with a plain white shaker:

There were a lot of “PLEASE NO!” but also a lot of “YES LOVE IT” but ultimately, it wasn’t what we really wanted. Then…I was SAVED by Ross Alan Reclaimed Wood.
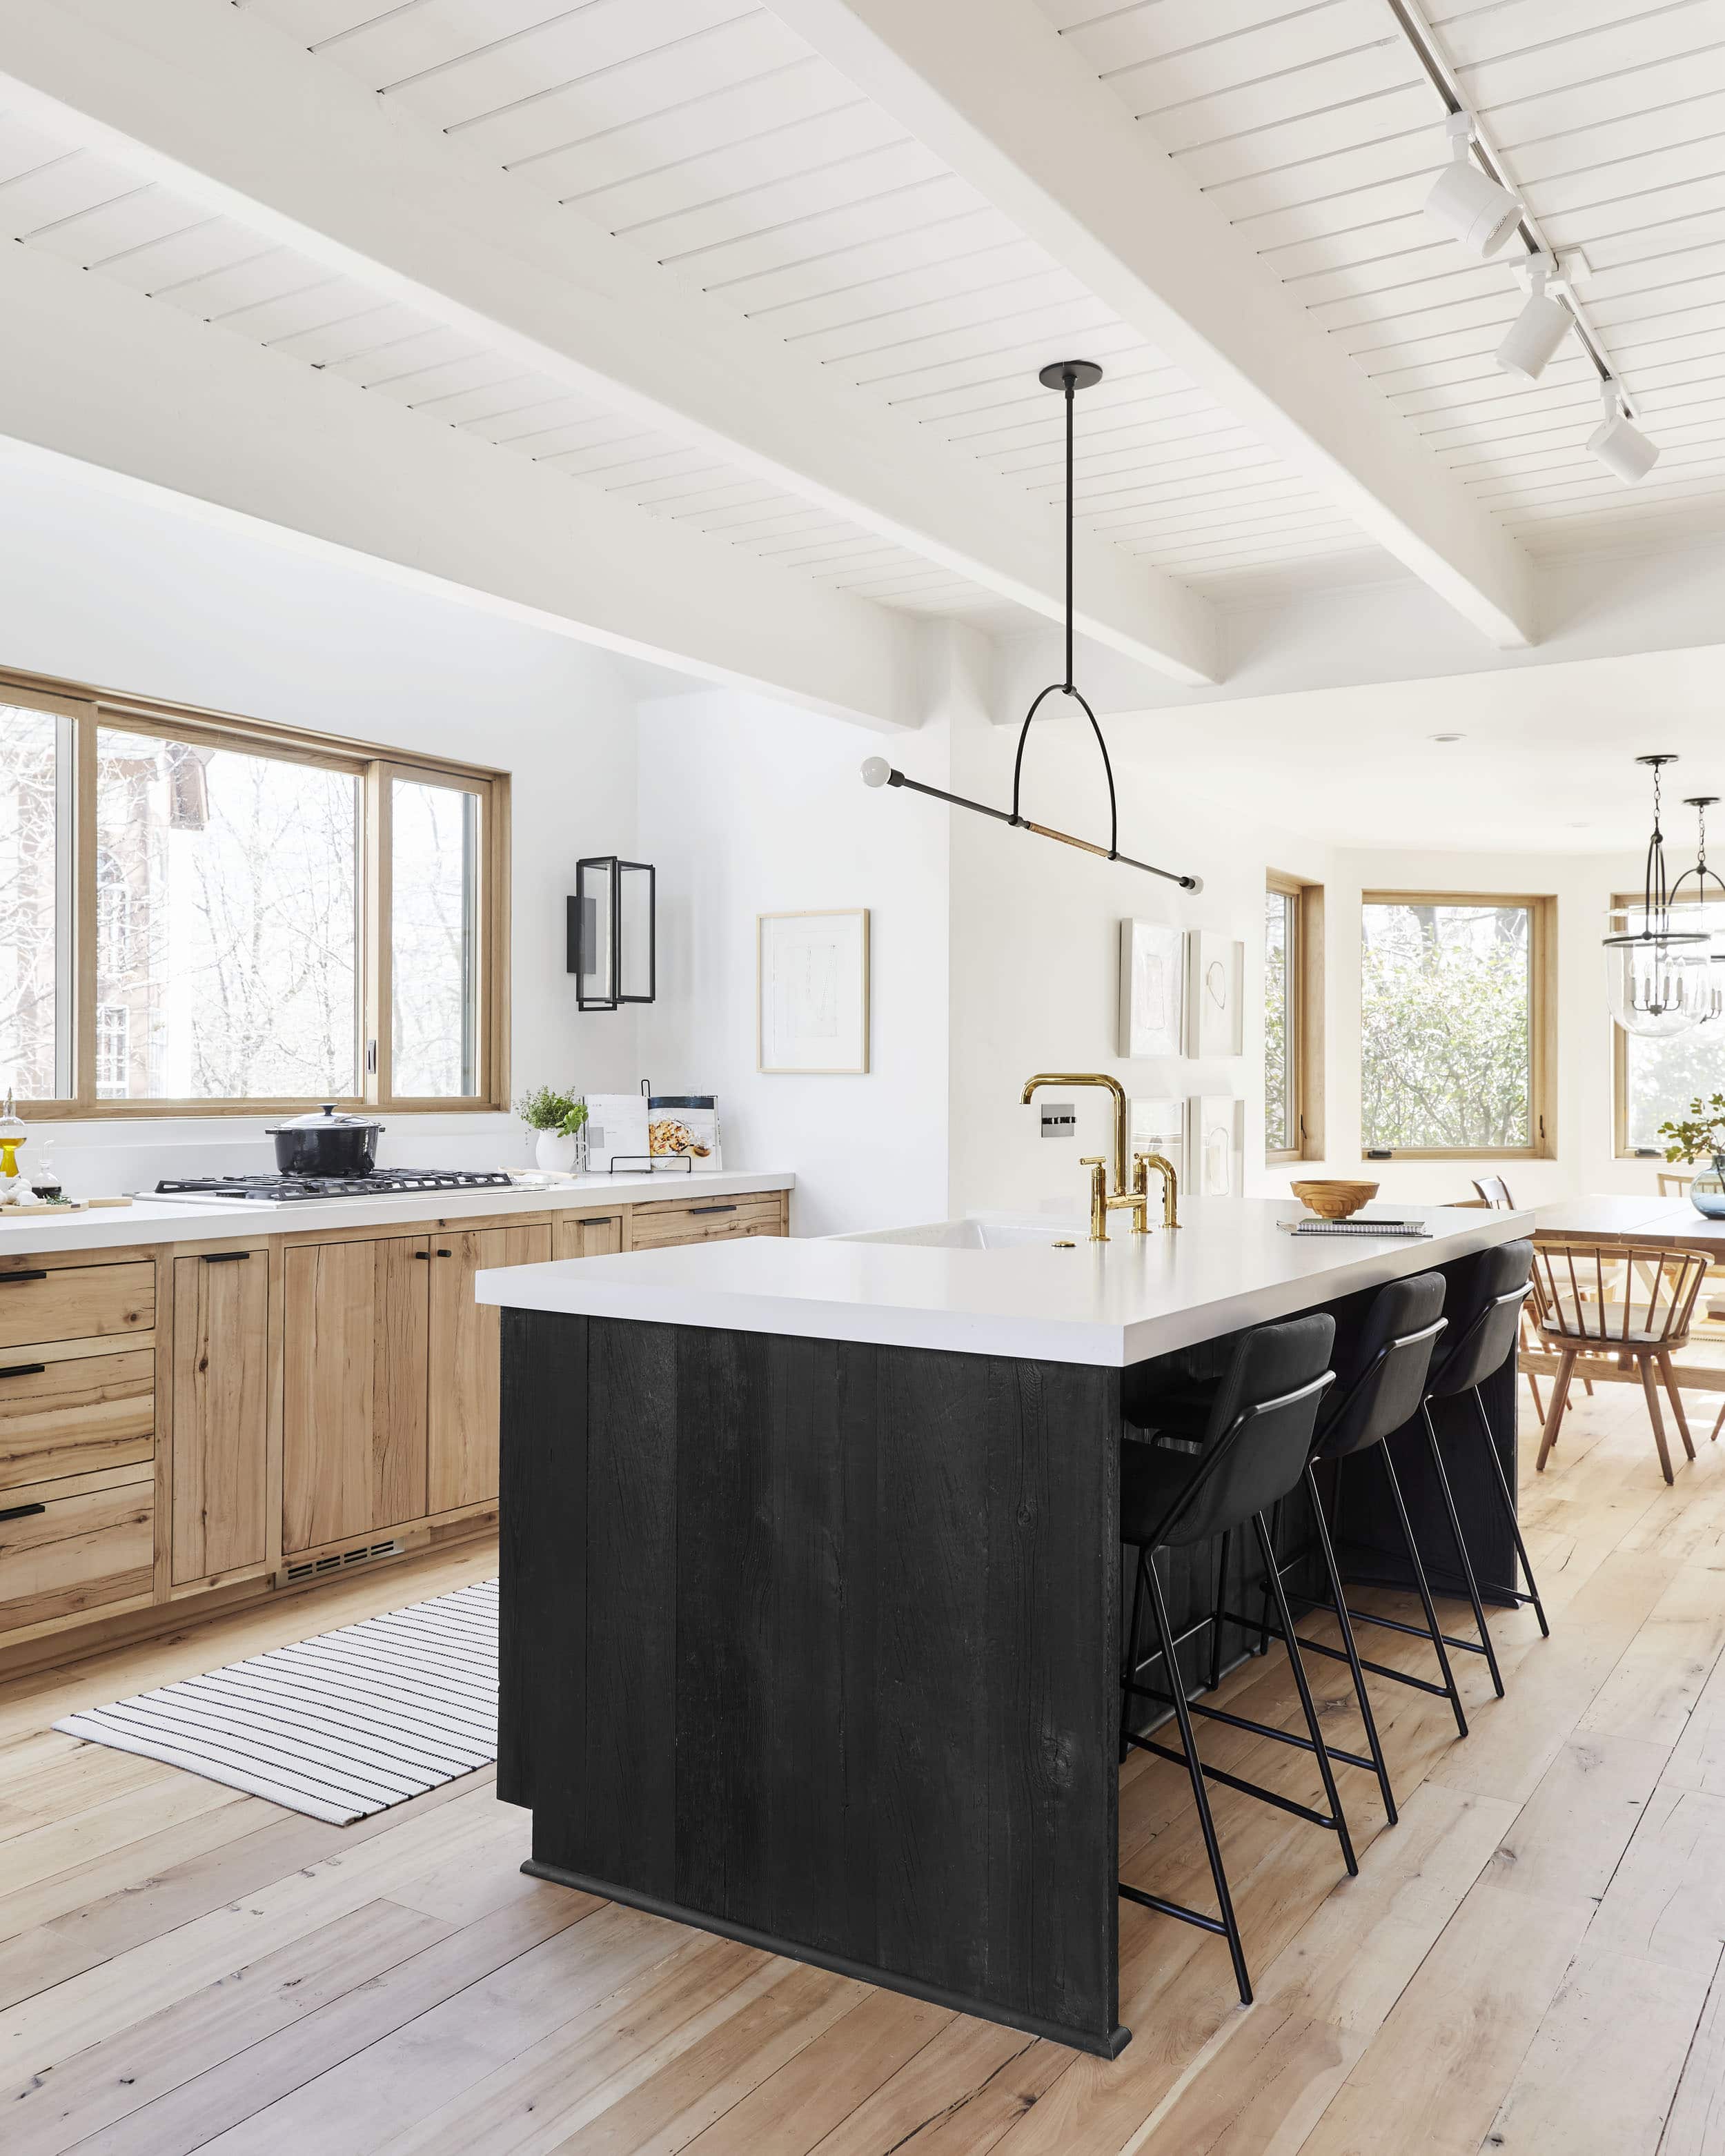
At the last minute, we were able to make it our dream kitchen with their real reclaimed wood on the cabinets AND the flooring and it turned into what it should have been all along:

So after a 3-week renovation and with a budget of $5,700, we turned it into our dream mountain house kitchen!
JUST JOKING WHAT DO YOU THINK THIS IS PROPERTY BROTHERS??? FLIP OR FLOP??
This kitchen, the whole house, took a YEAR, with one lead designer (me) + three design support/project managers (Julie, Grace and Velinda), a GC + many subs and while I don’t know how much it cost, I would say it’s anywhere between $50-$75k just for the kitchen. Yes, I’m very lucky I had some help with product placement (brands we love that we reached out to for product in exchange for exposure) but labor is labor, which is your main cost. Paying licensed, experienced craftspeople what they deserve will simply add up (and it should). I’m only telling you because perpetrating the lies of renovation costs and quick construction timing does nothing good for humanity, your marriage/budgeting nor your general mental health.
They say you can’t have “fast, affordable and good.” You can often have two out of the three, and in this case, ultimately what we got was just the one: GOOD, but to be fair, I love it and will even go as far to say it’s “VERY GOOD.” Our contractor Jeff Malcom (of Malcom Enterprises), and architect John Lyles, did a fantastic job, full of high-quality workmanship. But high-quality takes time, especially when you are working with such custom finishes and appliances.
But enough! Let’s talk finishes…AS A WARNING, there is a lot to breakdown, especially with wordy-mc-wordy here writing it, so today’s post is just about the finishes, and we’ll cover how we integrated all the appliances and the coffee bar/dry bar very soon, as well as all the interior organization of the cabinetry.

The Reclaimed Wood Cabinets & Flooring:
I have to immediately start this with Ross Alan Reclaimed Lumber, a young family-owned custom reclaimed wood and furniture builder in Los Angeles who made our kitchen (and ceiling/floor) dreams truly come true. We had the layout all done and even some of the boxes built when they came into the picture. This was the original intent for the house, but I had never done wood before nor did I know how to do it, so we ultimately had settled on a classic shaker.
They said “calm down, of course we can put our beautiful reclaimed wood on the cabinet fronts and the flooring.” What we used here is a 200-year-old reclaimed beechwood from a barn that had fallen down in Ohio and we were able to work with our local cabinetmaker to get them installed and looking, frankly PERFECT.
Ross, pictured below, happened to be up there the day that we were shooting so we got him in a photo (we missed you Georgie!):

But I don’t want this to just be a post of TADA HERE’S OUR NEW FANCY KITCHEN without respecting the process, the design agonies, the decisions, and give you tips on how it works. We touched base with Ross and Georgie so they can walk through the steps you should know about what went into making this dream kitchen a reality (with a big grid of photos of all the “ugly” stuff before it had it’s makeover montage and turned into a prom queen):

- Find a local reclaimed wood dealer (or work with Ross Alan, if you’re local—highly recommended). If you don’t want that more typical reclaimed wood (like us), they will need to mill off the top and bottom pieces to get the fresh middle. This is usually out of beams that are really thick and have been de-nailed, and then they use the offcuts for paneling or other projects.
- For the cabinet fronts, they planned 1/4″ veneers which were then applied to 3/4″ baltic birch plywood doors (this yielded a 1″ finished product). To create that continuous flow of wood grain from floor to ceiling, they had to take a sample of each piece used when they were installing the top portion of the cabinets back to the shop and find pieces with the same characteristics, coloring and sizing to line it up perfectly with the doors so it looked like one solid piece was used from ceiling to floor. It was tricky, but they made it happen.
- As mentioned, the 1/4″ veneers were applied to the plywood doors using glue and 23-gauge pin nails with a nail gun. They then filled in the cracks and crevices with a walnut wood filler.
- After the doors were assembled, they were sanded down and received two brush-on coats and two wiped-on coats of a water-based matte finish polyurethane (they sanded between every coat applied). At this point, the doors were ready to be installed onto the cabinet boxes.
- All the trim was done on site and applied the same way.
According to Ross Alan, the cost for material ranges between $9-$12.50 a square foot (depending on the accent material chosen). To clad, finish and install the cabinet doors, it was $65 a square foot, and the island cladding installation was $14 a square foot (in addition to the material costs).

For the island, we used Ross Alan’s corral and snow fence boards which were milled to 5/16″. Because that wood is naturally grayish with a lot of variation, we went with an ebony stain so that it would be more refined. The photo on the bottom left was actually us testing out what a heavily textured wood would look like in black, but for the finished product, it was NOT painted.

The wide planks are FULL of texture and character (I wish you could see how great they are IRL), but in all black, juxtaposed with the lighter beechwood throughout makes it SO special and modern. We finished it off with a few coats of water-based matte polyurethane to keep it from losing color and also to protect it from water, kids, etc.

That matte finish means there is NO shine, so all you see is the beauty of the reclaimed wood, and there was barely any color change from unfinished product to sealed product.

The Countertops:
We had a marble all picked out when we thought we were going to have shaker painted cabinets, but once we went to this reclaimed wood, we felt that we had enough texture so we switched to Cambria (in their White Cliff Matte) and I literally couldn’t be happier. I know that real marble is a lifestyle choice and it’s one that we made for our LA house but I’ll say it again: things that age look better in older style homes (unless you have a full staff to maintain and clean up after you). So for this house, which feels mid-century/brand new, going with a quartz which is less maintenance felt like the better move.
This Cambria quartz is so beautiful and far more durable than a natural high-maintenance marble (it’s a composite stone, which makes it stronger). Plus, it looks so clean and refined.

The faucet from Kohler is beautiful and brought in one of three hits of brass in the room (which is just enough for a mountain house). That bridge shape is just so pretty, and I love the Vibrant Polished Brass finish. As a reminder, as part of my partnership with the brand, I was able to preview their finish to order program which means I can personalize select faucets by first choosing a style I really loved and then bringing it to life in a finish of my choice, which is then made to order (you can visit your local Kohler Signature Store or Kohler Experience Center to learn more about the program).
For anyone wondering why we put the sink (also from Kohler) in the island, take a minute and read our kitchen layout post but I will tell you this—it was one of the best decisions I’ve ever made and here’s why:

THE DISHES ARE ALWAYS DONE…mostly because I’m always standing there waiting for my soup to cook, talking to whatever guests are sitting on the stools. So I keep the kitchen clean. all. day. Whereas if it were along the window wall, I would put it off because I wouldn’t be able to talk AND do the dishes at the same time.
The Lighting:
The island pendant is the Ellis Light from Katy Skelton (please note the leather wrapping) and is so beautiful and everyone, LITERALLY everyone, I know wants it. It isn’t meant to give off all the light in the world so we have track lighting for the island and the window wall counter. The sconces are The Urban Electric Co. and bring in that super modern lantern vibe that I love.

The matte black ties in with the island pendant and the brass plays well with the brass plate on the Allied Maker flushmounts over the peninsula (and that Kohler faucet). Because there were a lot of “lighting moments,” keeping everything linear or smaller was important as to not overwhelm the space. Those little mini dome ceiling lights were also great as not to block the view between the kitchen and the living room.


The Window & Door:
The window and door are both white oak, from Marvin and yes, as beautiful in real life as they look in these photos. You will be hearing a lot about them this year because what those windows did for the house was nothing short of transformative. The style (the pretty wood!), the different functions, the insulation, the amount of beautiful natural light in there is just insane because of the windows.

The door (this is a side door that opens up to a set of stairs leading to the driveway) was custom designed by us (which is easy to do with Marvin) and as you can tell, it’s STUNNING.

Speaking of light, look up and you’ll see two skylights (from Velux) bringing even more much-needed light into the previously very dark kitchen. They were covered in snow a week before this shoot but don’t worry, they are absolutely designed to withstand all the elements and when you are standing at the cooktop (more on appliances in another post, but this is from Viking with a built-in, pop-up downdraft that we got via Build.com), it’s the most perfect soft light ever.

The Seating:
The final mix of stools ended up being PERFECT. They both “go away” in the most perfect way, keeping the space feeling as big and open as possible but at the same time, they are BOTH so comfortable! People sit for hours and hours and hours at the island while I cook soup after soup after soup.
Had I gone with a natural wood color at the island, it might have taken away from the wow-factor of the ebony-stained wood, but with the black-on-black stool (from Industry West), they blend in seamlessly. Same goes for the Article stools are the peninsula. The tan leather (which is buttery soft, FYI) and the light wood frame work so, so well with the reclaimed wood cladding.
All the Details:

The Light Switches:
The light switches and outlets are from Forbes and Lomax and I never knew how cool I could feel dimming the lights. It’s not a necessity but if it’s in your budget, it’s lovely to look at and functions so well.

The Hardware:
We used a combination of small and large handles, knobs and ledge pulls that we sourced through Schoolhouse. They are all in the same matte black finish and the mix makes it feel so custom, special and still streamlined.


I think the big star here is Ross Alan and the integrated appliances we sourced through Build.com, which you’ll learn about next week. This kitchen is a warm modern dream of a room and I feel utterly unworthy to be cooking soup in it.
I know the work that went into it was intense. The time and budget weren’t nothing and the help was extreme. So I want to give a huge thanks to Julie, Velinda and Grace for working so hard on this project. It was such a learning curve for me, and I hope to impart all of our lessons to you, if you are interested.

I hope you guys know me well enough to know that when I say I couldn’t love this kitchen more, it’s 100% the truth. I walk into this room and breath a larger breath than I thought my lungs could hold. Nothing is perfect in life but when you get close to it, you would be remiss to not recognize how lucky you are. I can’t wait for the winner of I Design, You Decide to come up here and let me tour you around this house for hours. Speaking of which we are now opening that up to many more winners (not for a full 5 days but for a day visit/party…we’ll reveal more as soon as we start to lock logistics down). I’m just so grateful that this is my job. I kinda want one big EHD reader house party/rager. Stay tuned…

Meanwhile, I know there is a lot to cover so please ask all questions in the comments and if you are so inclined, please share. And if you want even more of the mountain house kitchen reveal, hop on over to House Beautiful who ran an exclusive interview and story on the space.
One more HUGE thanks to my design team – Julie, Grace and Velinda who were with me every step of the way and were so integral to the success of this project. Another big thanks to Ross and Georgie of Ross Alan Reclaimed – their attention to detail and high quality was really impressive (and just so lovely to be around and work with). Our general contractor is Jeff Malcom and Architect is John Lyles – I highly recommend both of them if you have a project in the San Bernardino mountains as they are lovely people and highly experienced.
Here’s all the rest of the resources – stay tuned for the big ‘inside the kitchen cabinetry’ (we partnered with Neat Method and they did MAGIC inside those cabinets) and Appliance posts. Coming soon!
Resources
Finishes:
Pure White by Sherwin-Williams | Cambria White Cliff Matte Quartz Countertop | Dry Bar & Coffee Bar Countertop by Bedrosians Tile & Stone | Brick Wall Tile by Bedrosians Tile & Stone | Reclaimed Beechwood Flooring by Ross Alan Reclaimed Lumber | Reclaimed Beechwood Cabinetry Cladding by Ross Alan Reclaimed Lumber | Island Black-Stained Reclaimed Wood Cladding by Ross Alan Reclaimed Lumber
Appliances (all via Build.com):
Viking 36″ Built-In Natural Gas Cooktop with 36″ Built-in Downdraft Ventilation | Viking Panel Ready Dishwasher | Viking Panel Ready Ice Maker | Viking Panel Ready Refrigerator | Marvel Panel Ready Refrigerator Drawers | Edgestar Wine Cool | Viking Double Electric Wall Oven
Lighting:
Ellis Pendant Light by Katy Skelton | Vic Sconces by The Urban Electric & Co. | Mini Dome Sconce in Brass and Opal by Allied Maker | LED Track Light Head from Lamps Plus | 8-Foot Track in White from Lamps Plus
Furniture & Decor:
Esse Counter-Height Stool in White Oak by Article | Sling Counter Stool in Black Leather/Black Metal by Industry West | Black & White Rug
Fixtures & Hardware:
Purist Faucet in Vibrant Polished Brass by Kohler | Whitehaven Apron Sink by Kohler | 4″ and 8″ Ledge Pulls by Schoolhouse | Knurled Knob by Schoolhouse | Edgecliff Pull by Schoolhouse | Edgecliff Appliance Pull by Schoolhouse | Switches and Outlets in Antique Bronze by Forbes and Lomax
Windows & Doors:
Sliding Picture Window by Marvin | Custom Side Door by Marvin | Skylight by Velux
*Catch up on all mountain house posts here, and don’t miss the first reveal of the kids’ bedroom here.
Check out the rest of The Mountain House reveals here: The Kids’ Bedroom | The Kitchen Organization | The Kitchen Appliances | The Powder Bath | The Living Room | The Downstairs Guest Suite | The Loft | The Hall Bath | The Upstairs Guest Bath | The Dining Room | The Family Room


That is a stunningly beautiful room. Congratulations to you and the team!
thank you thank you. xx
Emily, it turned to be a cheery, bright and light, cosy yet rustic, yet scandinavian, modern, …. a great kitchen. I am very happy for you 🙂
Gorgeous. This is really a fantastic kitchen. You were so right to go with the reclaimed wood.
Absolutely stunning. That wood! The amount of natural light! Gorgeous. The white painted ceiling was a great choice for the kitchen. The whole thing is inspirational. You have completely changed my plans for my kitchen!
ooh!! Good. let me know if you have any questions for yours 🙂
I love this reveal!
Best #mhm update yet
The invisible stools are such a good tip ??
Thank you! Brian wasn’t convinced about the stools, I think because historically i’m all about ‘contrast’ but with this house I’m not. I want as few finishes as possible (I say that now, we’ll see how the furniture turns out). But I love that they both disappear and aren’t big ‘moments’. He loves them now. thank you 🙂
Yes! My first thought would’ve been to have contrasting stools, or for them to relate to each other by both having some element of black/wood. But I love so much more this way! Same with the hardware – I may have picked contrasting knobs/pulls on the black island, but this looks so sleek!
One question – How did you determine where to put handles and where to put finger pulls? Are handles on the integrated appliances, and finger pulls on regular drawers?
Wow, this is gorgeous! The light is amazing, I love it all – the chairs are awesome! Well done team EHD
Out of curiosity, why did you decide to go with black light switches?
I am also curious about the black switches –would love to know the thought process there and whether contrasting switches is trending right now?
But I agree–SO stunning!!!! BRAVO!!!
Yeah, I saw the black outlet on the island was all Thank goodness, they went to the trouble of finding a color that blends into that surface like we’ve been telling them to for years, then was startled to see black ones on the white walls! No no, those ones are meant to be white like normal lol!
I personally love the black switches.
This is absolutely stunning. (And so is “Georgie.” Seriously, I’d find it hard to pay attention to the budget with that dude around. 😉 Ha!)
It really is the perfect kitchen for a mountain home. Wow. Just wow.
Oops, I guess that’s “Ross.” 🙂
Fun fact is that Georgie (Ross’ wife, not shown but we WILL get a photo of them up there) is equally adorable. Wait thats not the fun fact, the fun fact is that she is the voice of Goldie in Goldie and Bear, a cartoon series my kids love and they recognized her voice!! it was so cute/funny. I forget how it went down but Charlie brought it up to me when they were over for a playdate 🙂 Here she is: https://www.imdb.com/name/nm2967701/
Couldn’t love it more, it’s jaw-droppingly beautiful! While I’m sure the photos don’t compare to how spectacular it is in real life, you really get a sense of how utterly blissful it must be to exist in that space. Congrats to the team for all your hard work creating such a masterpiece!
thank you thank you. I really just don’t ever want to leave. The built-in dining banquette goes in next weekend!
Bravo! Those cabinets are breathtaking and it’s remarkable how they’re so visually interesting but you don’t feel like you’re being suffocated by wood with the flooring/beams.
Love the stool combos on the island/peninsula
I love the all black stools against the white counter. And I also like that the backs of the stools are even with the counter. The stools look cushioned too? So comfy and stylish? Win, win.
They are SO comfortable. Both sets of stools have padding, but the black ones with the back are ones that you can sit in for hours and hours (and people do).
This kitchen is stunning!! I’m so happy to hear that the black stools are comfortable! One more question on the stools.. are your floors protected from scratching underneath? Do you you pads underneath the legs? My stools from CB2 are scratching my new hardwood floors because the pads I have are not sticking 🙁
Oh hey, you can often put plastic caps on the end, which work better than pads because of the whole sticking, not sticking thing. Sometimes you can replace the foot entirely or sometimes you add them. If all else fails throw down an indoor/outdoor rug and keep that floor protected!
Just ordered the sling back counter stools in caramel! thanks for validating they are comfy. So excited! Step one in my long term plan to recreate your mountain house kitchen in every perfect detail (I kid) (Sort of).
The kitchen looks great, full stop. But the House Beautiful article is misleading. Since the voting process was abandoned, and many votes were overrided or made irrelevant by new directions. It’s not bad to say “Hey, it did not work out and we had to just decide ourselves.” Instead, the HB article says this is the house the internet designed, and makes it sound like a lot of control was yielded over to the audience. I wish HB had told a more real, if less flashy, story.
That’s probably on HB. The new leadership has really shifted the focus from “beautiful interiors” to “get millennial clicks.”
Ooh, i haven’t seen (and yah, they write the story/;choose titles). So much of the house was decided by you guys (bathrooms, especially), but I HAD to change it to reclaimed wood once it became an option. We also have a bigger/better plan to let more people come hang out in the house … stay tuned. xx
Hi Janet,
I’ve been reading this blog for years(!!) and readers have voted on every single decision. Some of the times that voters decisions have gone against Emily and Brian’s decisions, they’ve over ruled. And sometimes the vote came in and then a third idea was realized with comments and careful thought. But the end decision was always made WITH input and votes from the blog community. This IS a house made with community involvement!!!
this is the MOST beautiful kitchen i have ever seen. i love EVERYTHING you did. i can’t even get into specifics because then this comment would go on FOREVER and ever. and i’m actually supposed to be working at the moment. congratulations on an amazing kitchen. i’m so inspired by this!
thank you thank you thank you. xx
What an absolutely gorgeous kitchen. I LOVE all of the integrated appliances. Good choice. I’ve pinned nearly every image.
One question, and I may have missed this from bygone posts, but why did you choose to have the peninsula as well as the island?
It’s the Bar!! we wanted more storage, and it still keeps it super open. There are fridge drawers (you’ll learn all about them in the appliance post) and even a huge ice pellet machine + all our plates/bowls. But mostly because we liked the separation that still kept it super open. More counter space, etc.
Aha! I knew there would be a good reason.
Great job! It’s amazing how that island — a stunning focal point — magically gives the entire design that modern touch, which is carried throughout by the cabinet hardware and other elements. Using reclaimed wood was genius and gave the space a genuine rustic, organic Scandinavian vibe. Great job!
OH my, my it turned out beautiful!!! No wonder you are so happy about it!! I would have never thought about doing the dark stools against the dark island and I love that!!! You are right that so many design shows make renovations look easy, fast and affordable! Anyone who actually does this themselves realizes it really is not the case! I appreciate that you show the “real side” of renovation! Brzvo on a beautiful job!!!
I love all the projects you do, but this is my favourite reveal EVER!
Gas cooktop under a working window is a dangerous situation, and often a building code violation.
There is a downdraft. You’ll learn all about it in the appliance post. 😉
Please do go into detail about the cooktop under the window in your next post. It looks like the center panel of the window is stationary, is that why it was allowed? Was there a minimum clearance required for the window trim?
I’m currently designing a kitchen using IKEA cabinets that are 15” deep and have found that most ranges specify upper cabinets to be no deeper than 13”. It seems like outdated advice which is why I’m so curious about how you navigated code requirements and your cooktop situation.
In California it is not a code violation. I am in the process of permitting one for my own kitchen and we verified with the building department that we are good to go.
I have a cooktop in my island with a down draft and honestly this is a big mistake if you care at all about indoor air quality Put your range/cooktop on the wall and vent outside. period. I also think this kitchen is pretty but missed the mark on this issue BIG TIME.
Congratulations! It’s so beautiful!
Perfection! I LOVE the reclaimed wood. It’s stunning, has a history and reflects values of skilled craftsmanship. Sooooo glad you did the flooring to match. This whole kitchen is divine and everyone who had a role deserves applause. I’m excited for the organization discussion as I still think that design post is the most educational post ever about process and precision of good decision (dream closet a close second). But especially thank you for keeping it real about time and money. We can all read your blog and learn and dream. But irl kitchens like this are out of reach or require significant sacrifices for most people. I’m debt free in a less than perfect kitchen as I write this and just want to put out there that you can be happy in many ways (in case this beauty make you want to immediately go get a loan and copy this whole thing as I did for a hot second). I’m so happy for you and your lovely family and thank you for putting another lovely kitchen in the world and sharing it with us!
thank you 🙂 And congrats on being debt free, thats amazing, INCREDIBLE actually. xx
You Nailed it! Great job. An absolute stunner.
That wood is STUN.NING. I’m convinced that it couldn’t turn out better if you tried. I’d be sleeping in this kitchen just to wake up and stare 🙂
So beautiful! I love it. Thanks for your transparency!
^^This! Love it too.
Perfect! I love everything about your beautiful kitchen and think you have absolutely nailed scandistyle.
This is the kitchen that dreams are made of. So so beautiful!
Emily, it’s really lovely. Could you share what you decided to photoshop for the reveal pictures? And what is your thinking behind that type of editing?
we didn’t photoshop much. Just the normal editing which includes: color correcting, white balancing, straightening. Often the back of a room will look darker to the camera so we might lighten that, or maybe we can’t see the wood grain on the island as much as in person so we just try to make in the photos how it does in person. But all light switches, outlets are here and unless there was dirt on the ground its pretty much as-is. 🙂
Allll the heart eyes. Just…stunning. Goddammit that wood (and the stools!) are so good.
*GASP*
This is THE reveal. It’s glorious.
Emily!!! This is soooo beautiful!! I love everything about it, congrats!
And, as one of the readers that yelled about the seating choice from your LA kitchen reveal: This time you nailed it 100%. I almost screamed at the black ones, that are almost invisible… and the height is just exactly perfect!
GREAT JOB!
ha. thank you. Glad to know I’ve got you back 🙂
LOL! You never lost me, I’m in awe of everything you do 🙂
I’m so glad there is not gong to be another counter chair-gate! 🙂
The kitchen is the stuff of dreams. Congrats on you and the team’s hard work paying off in a BIG way! At the moment my eye is on a more personally attainable goal of finding that carpet runner ;). I’m looking for this kind of modern, warm, scandi palate for my new home. Could you share a link to the carpet runner? Congrats again on the beautiful work. Love all the inspiration the blog provides.
Beth, get ready to be so happy!! It’s from Ikea and only $20, here is the link:
Absolutley gorgeous!!!
Absolute perfection! Maybe you already mentioned this but I’d love to know where your sofa is from … thank you :).
Misha, it is from Article and I can confirm that it is very cozy! Here is the link,
Stunning!!
OMG! And that acronym doesn’t even cover it. I am usually not a fan of light wood but sheesh this kitchen takes my breath away. And the black accents so in love! Stunning.
This is SO good. I love everything about it.
This is so beautiful, and fresh, and stunning that my jaw was literally dropped for half the photos. Well done. This might be my favorite thing i’ve seen you do yet. Sigh. Such beauty.
Where is the double oven?
behind the cabinets – stay tuned for how we worked that out 🙂
It’s amazing!!! The wood is so gorgeous!
Congratulations! This is so gorgeous and personal, much much better than the traditional designs. What a lovely heart to the home! Enjoy!
The kitchen is perfection, but can we stop for a minute and talk about how hot Ross is?! A good-looking handy man who can make your kitchen dreams come true? Sign me up!
This was the highlight of my day!!! Yay! So so great!!! Trying hard not to be super jelly. Always hate cooktops in islands…so happy you put the sink there. So happy you chose quartz…it’s just perfect ??
So good I got a little teary! I am clearly invested in the mountain house and so in love with this kitchen! It is perfect – way to go guys!!!
OMG, thank you Ashley. that made me a little teary. I LOVE how invested you might be and certainly is one of the biggest reasons we do all of this. thank you. xx
this is the most beautiful kitchen i have EVER seen! it is amazing that you found a way to get your original vision. when you revealed the decision to do the white shaker cabinets i felt sort of disappointed in that this-is-the-kitchen-everyone-has sort of way, but THIS is so incredible and unique and true to your brand! i am absolutely in awe! (why am i so personally invested?? i don’t know! i just love it.)
This kitchen you’ve created… holy cow you should be so proud! It is just stunning, congratulations!!
This kitchen is perfection!!! The sets of stools are amazing- I love that they visually disappear. Well done, team EHD!
I love it!!! I love how you did something very unique and not what everyone else is doing (safe white shaker) and true to the style of the home. Modern, rustic and simple. It’s awesome. Good work!
I love everything about this kitchen. It is beautiful, looks like it has soul, and looks like “you” in a way a lot of the progress designs didn’t. Way to go team!
This might be the most beautiful kitchen I have ever seen! Also, I love how many times the word “soup” is mentioned in this post. It makes me believe you can have a dream worthy kitchen that still functions for a real life family! Congratulations to you all!!
It is beautiful! Throughout all the process posts I was a little nervous about the kitchen (as I think you were, too), but it turned out wonderfully. I really like that you painted the ceiling white so that the wall of beautiful wood cabinetry stands out. I would love to see more detailed photos of the glass cabinets and what’s inside.
thank you!! And yes. I WAS SO NERVOUS. it was such an investment that i’m so glad I don’t have to lie to myself about how much I love it (which is a good mental health self-defense tactic). When I walked in after the cabinets were installed I was almost in shock, like out-of-body because I was truly so relieved at how much I loved it.
I just splurged on a robot vacuum and feel exactly the same way — I thought I might have to lie to myself about how much I liked it. But no! I really love it! Ha! It’s all relative 🙂
Beyond stunning!!! You really outdid yourself on this kitchen. It couldn’t have turned out more beautiful!
I’m blown away! This is absolutely gorgeous! I’d never want to leave this space! 🙂