
All Things Renovation
The final, final, FINAL!!!!! Mountain Fixer Floor Plan
If you want to give yourself an education in interior design start by doing a gut renovation of a house – ideally a stranger’s house or someone you don’t like …. because you will mess it up. If you want to learn even more, then … do it again. Want to get better at it? Don’t go to grad school – RENOVATE AGAIN, and again and again. It’s a job that is wildly benefited by a proper education in design (of which I don’t have) but you will never master until you actually participate in every aspect of some massive renovations. I’m sure it gets to a point when the intuition is stronger, the decisions are easier to make and the possible problems and costs to fix them become more second nature. But I’ve done 5 now and I’M STILL LEARNING SO MUCH. I have three new design assistants, recently out of school, and I tell them all the time – Just watch, listen and learn, because the best thing you can do for your career is to be as involved in these renovations as possible and watch me avoid or even better (for them) MAKE mistakes. It’s knowing the possibilities, processes and execution tactics, but also knowing what not to do and of course, having an idea of the ballpark cost of things.
What I say to myself, my brother (who is doing the project in Portland) and my team constantly is ‘I’ve renovated and designed houses before, but no one has ever done THIS house’. Every house is different – architecturally and every house has its own idiosyncrasies and problems. And design isn’t a formula nor should it be.
Luckily for them, I’m an ‘external processor’. That’s the pretentious way of saying I have to verbalize OR write down (thus the blogging) ALL OF THE THOUGHTS. It’s a literal stream of consciousness coming out of my mouth-hole whenever there is a question asked without a clear answer. I verbalize all the outcomes of each decision, weighing every pro and con, declaring every fear, and detailing worst case scenario. I tell stories of when I’ve done this before or when I haven’t, and wished I had. So there is a lot of verbal stuff coming out of my mouth hole and my lack of ego really lets them in on the WHOLE PROCESS.
The need to converse is the reason I started this blog and man have YOU GUYS HAVE HELPED ME SO MUCH – I learn SO much from you. I was trained as a stylist, not an interior designer and every single day I’m realizing there is a massive difference.
Today’s reason that I love you centers around the floor plan of the mountain house. THE FINAL FINAL PLAN.
Here is the original floor plan of the first floor, which is what it looked like when we bought it. See THIS post to read all about it.

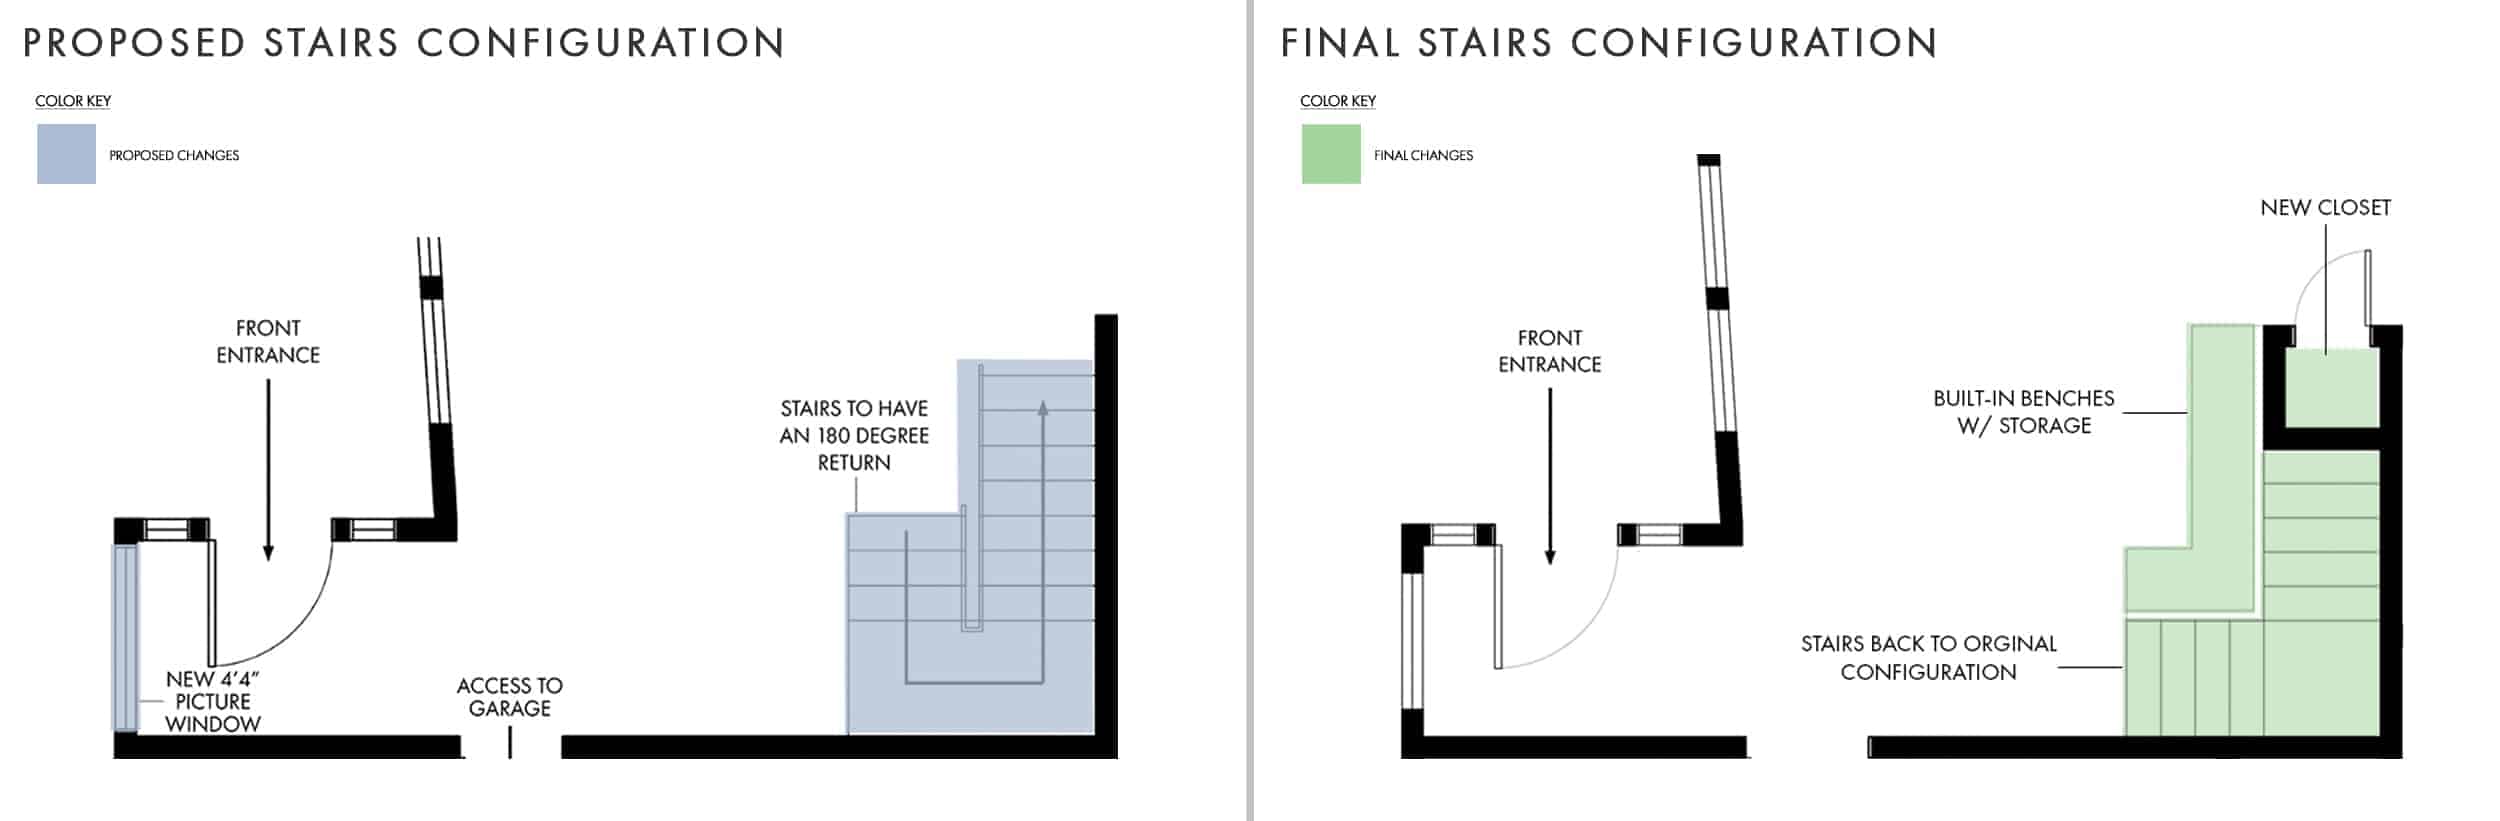
Below is how we originally planned on changing it. The light blue indicates the major changes that we were planning on making.

Then we changed it, and improved it even more.

But so many of you had such great suggestions to help the final plan after we posted THIS post. And we had some things that seriously bugged us still, too.
So here is the final floor plan. You know how I know it’s the final? Because it’s pretty much already framed and there is NO GOING BACK. The green indicates all the final changes that were made to the plan.

The biggest improvements from the last version to the final are as follows:
1. We moved the HVAC so we could put the fridge in the… kitchen. See below.

I’m not sure why this wasn’t considered before. When we asked we were told that moving the HVAC would be super expensive but then when I pressed – ‘like HOW much?’, the answer was about $4k. Now that’s not nothing but when you are considering how prominent and important it was in the space and the fact that our fridge felt like it was outside the kitchen (all the way at one end), well that’s worth a 4k move (especially when the cost of putting the fridge where it was going to be was $3k – because we had to move the exterior flu and furnace shed to inset it). So HVAC gets moved under the stairs (in living room) and we just gained a much-needed coat closet and of course a fridge in our actual kitchen. My family loves to eat food a few times a day so this proved to be very convenient to our food eating habits.

2. We switched the sink and the cooktop – AGAIN. I forget why we did this in the first place. You were super helpful. I think that functionally we wanted the sink to be on the island more than the cooktop and many of you had concerns about kids on the island so we flipped it back. GREAT.

3. We created a bar cabinet by the fridge, across from the ‘bar’ peninsula. This will be enclosed, but once opened will be a magical cabinet with a wine fridge, and shelves of pretty glasses, booze and accessories. Never miss an opportunity to put in a bar cabinet with wine fridge. Unless you are sober. In which case you might want to avoid that ‘opportunity’.
4. We eliminated the wall of cabinets in the playroom so we could make room for BRIAN’S PINBALL FANTASY. Fine, I get it. I guess you have to place it against the wall and we didn’t have one. He was also nervous about not having one normal wall in there (just windows, or cabinets or fireplace/TV wall). So we moved those cabinets to the other side of the room (except a lower version), opposite the kitchen and then added back in the fireplace.

Are we going to put a sofa in here? We don’t know. I’m on the hunt for something modular that can leave it more as a ‘game room’ and ‘play room’ but when needed can be a backup TV room if the grownups want to hang out in the living room (where our projector will be) so the kids can watch a movie here. It will look like a piece of art the rest of the time (because it’s The Frame and it’s the world’s most beautiful TV).
5. We reoriented the guest room deck so that we didn’t have to move the exterior stairs up to the master. Our architect thinks those stairs are hideous. I don’t love them, but of all things to spend $5k redoing, that’s not it. So this way we can have the deck without hitting the stairs.

6. We moved the interior stairs back to the original configuration because there were too many structural and cost issues with the first plan. Essentially we would need a wall to house the stairs (and help hold up the second floor) because we would need to remove a support beam in order to not hit your head on the current beam when you do that turn. Boring stuff. Underneath the stairs, we’ll have storage as well as the new HVAC. This means that we can’t really do a stone entry because I don’t want the stairs to end in stone. So again, our ‘entry’ is compromised, but the only way we were able to move the stairs would be if we added a wall to support the stairs which would cut off the room so much. We like the visual of seeing the stairs go up to the second level and it really matches the house.
7. We added closets back into the guest bedrooms. Brian didn’t want them. I vetoed him here. He doesn’t think we’ll have a lot of ‘stuff’ here and while I agree right now, future Emily knows that not having enough storage, but having huge bedrooms is a total mistake. The one on the first floor didn’t have a closet but ultimately that room was huge and it just seemed crazy not to have a closet. Sure we wouldn’t live here full time, but what if we wanted to stay for a month? Or at least for resale? Closets are back in the final changes version. (We were going to put wardrobes in there, by the way).
We reoriented both bedrooms to accommodate the change. On the first floor our king bed won’t fit as easily, so one nightstand might be in front of a window, which is not ideal, but maybe we can come up with an interesting solution.

On the second floor, we got rid of the Juliet balcony so that we could put the bed on that wall.
8. We moved the toilet in the guest bath to be in a less noticeable spot. When designing bathrooms you want to see the toilet LAST. We realized there was no reason it couldn’t be tucked to the side, thus just being prettier and less visible.

Now, for the second floor.

For you floor plan junkies (of which I am now) above is the original and below was our first proposed.

Remember when we thought we were going to keep the stairs to the master bedroom? HA. That was all you guys. THANK YOU. A good question to ask yourself all the time when designing or renovating is ‘do you need that? Could it be simpler and better without it?’ That’s the case of the stairs. We didn’t need them and both rooms (master and playroom below) benefitted in a huge way.
THANK YOU.
This was how we changed it.

But since the last revision, the following things have changed to the second floor.

1. We realized that we were going to have this amazing master suite with only a reach-in closet. So we added a walk-in which let us reorient the room to look out to the backyard. Which led us to…

2. THE FIREPLACE. HOLD THE PHONE/CALL THE FIRE DEPARTMENT. OBVIOUSLY we should have an indoor/outdoor fireplace. We could sit on the deck in winter, drinking hot toddies, or in the on-deck hot tub. HELL, YES. The bedroom gets smaller, but you can still fit a king and a chair/ottoman in the corner (not shown). We won’t have a dresser but we’ll have a walk-in closet.

The room was huge, it’s still really big – but now it’s big and hot and has more ‘masterful’ storage. Brian didn’t want it, but he’s coming around to the idea that a walk-in is better for our future. It also made the room smaller so we have way more wall to wall carpet options (when you get over 15′ in both directions you are very limited on the kind of plush carpet we were loving – more on that later, obviously). He gets his plush wall to wall carpet, and I get a walk-in closet and a better orientation of the room. When you are in bed you now look outside, which is also where the fireplace is.
3. We listened to you guys and switched out the guest room closet for a shower. Thus making it a full bath. And as I said above we decided to add a closet which meant that we kinda needed to reorient the room.

4. We eliminated the balcony so we could use that wall as the headboard wall, flanking it with windows. This made the room more functional, although smaller. The balcony was a lovely idea, but I wasn’t convinced it was worth the sacrifice. Who would use it and how often? Plus obviously, a balcony isn’t free and would likely cost at least $3500. Sometimes I wish we had nixed the deck below, but I also think that is going to be a dope room and I don’t want them to be identical….
We made all these changes weeks ago so I feel pretty good about them not changing. Permits are pulled. Demo and reframing is very much underway. I really don’t think these will change.
Plus…. Brian and I are still married – and most of the time, even happily!! So this renovation so far is actually going well (… now the Portland project on the other hand…more on that later …. no one is going to die, but man, renovating a 5k square foot house out of state is “challenging” to say the least.)
Any and all suggestions are welcome although we likely can’t change much at this point. Any questions?
Thanks so much for your input, seriously. You guys came up with some amazing ideas. Now that I’m better at floor plans and I’m getting SUPER into interior architecture I’m excited to look at yours or others plans. Funny how that works. Once you have experience with a medium or something that had previously intimidated you, you feel empowered to do it even more 🙂
Seriously. Thanks for your help. xx
Update: Check out all of The Mountain House REVEALS here: The Kids’ Bedroom | The Kitchen | The Kitchen Organization | The Kitchen Appliances | The Powder Bath | The Living Room | The Downstairs Guest Suite | The Loft | The Hall Bath | The Upstairs Guest Bath | The Dining Room | The Family Room


I love this! Last paragraph especially is spot on. We’ve been working on an 1100 sqft addition, and I have learned so many things & feel totally empowered (even though there’s 99% of stuff I still do not know!). Also, I’ve always been a fan of skilled tradesmen (my dad is one!)…but boy watching them work on our project made me appreciate their skills a million times more. They know what they’re doing!
ps–the master fireplace is dreamy!
Hi Emily! Can you expound on the kitchen work triangle a little more? I am not understanding why the fridge is on the opposite side of the island. As an avid cook, that would drive me nuts. But I feel like you probably have a super good reason for it so I’d be interested in the thought process. Hope that wasn’t snarky- I’m genuinely interested and a big fan of yours 🙂
Same here. That’s the first thing I noticed. Where is the fridge? Why is the fridge there? I’m a little perplexed by the kitchen layout. The cooktop facing the picture window. The oven being so far from the cooktop. I’m assuming you’re going to put some chairs around the island but it will be in the way of all the kitchen activity.
I’m not Emily but I assume its because the fridge is tall and she doesn’t really have a place to put the tall fridge now that shes removing the wall to the left of the island. She must want to remove the wall to make the kitchen feel more open to the living room and that only leaves the area to the south of the island for the fridge.
Indeed Amy. We could have put the fridge where the window is certainly but that room lacked so much light and was the darkest, saddest room to be in so we really wanted a big pretty window. We wanted to open it up and so we sacrificed the typical rule of the triangle to create a more beautiful room that we wanted to be in. We are not avid cooks, although likely will cook more there…. The only other thing we considered was creating a wall between the kitchen and the dining room to house the fridge. We thought about flopping the sink and putting it on the other side of the island, with the stools on the other. There are too many ways to skin a cat (where did that come from??) and there are sacrifices made no matter what choice. I’ve personally never understood the annoyance of walking a few feet to get something out of the fridge, but maybe I will personally experience that myself in 4 months (although its going to be SO PRETTY).
Ok, makes sense. I definitely understand the layout was going to be tricky regardless. It is also hard to see the scale on a small little image. Just watched your instastory and it flows much better on there. I also think for you aesthetics are more important that someone like myself where the function of the kitchen would be way more important. Not to say aesthetics aren’t important to me or that you don’t care about your kitchen working properly- just that you have to choose your priorities and unless you’re building from scratch it’s hard to get everything you want!
As someone who ended up placing the fridge on the other side of an open doorway (which results in 5 “extra” steps to the fridge, and I’m 8 months post-reno and this is my full-time kitchen), I will tell you for me, it does bug me a little bit. I definitely load up my arms with fridge stuff to cut down on the trips to/from the fridge. On a scale of 1 to 10 annoying, it’s maybe a 6, so very mild. It was worth it for the design though, that’s for sure!
KITCHEN. I agree. I worked in a church kitchen which had the range and sink on one side of the island and the fridge and pantry on the other. We were constantly crashing into one another as we circled the table to get needed ingredients. Do try to get the main fridge on the same side as your sink and range. At the very least, consider switching the fridge and stacked oven locations. Looks like you have “entertainment” traffic AND “food prep” traffic congestion designed into the aisle between the island and peninsula with ice maker and fridge drawers. Consider having two work zones — one for entertaining and one for food prep. Both functions often occur simultaneously when entertaining. The clean up zone is usually okay overlapping one of these as this occurs later in the evening (or in my case, often the following morning so I can enjoy my guests). BATH. Couldn’t agree more about wanting the toilet out of sight when entering the guest bath. Yet that’s also true if two people will be using the bath at the same time — expected since you’ve included double sinks. I preferred the original location of your guest room… Read more »
Our kitchen is similar to the final – we have the fridge and pantry on the opposite side of the island with the sink. It was the best place for it, and we also wanted a light and airy kitchen. We don’t mind the extra walk around and it helps traffic flow when the kids want to get a drink/water for the fridge while I’m cooking. I wouldn’t change it.
YAY DEBORAH. I appreciate all your feedback seriously. I’ve never been so glad to have brian say just now ‘screw the triangle this is what we want’. I mean, yes, we already plumbed and we’d have to change the size or location of the window so that was stressful, but ultimately we’ll walk a couple feet so we can keep the kitchen more open and the window and light more dreamy. PHEW. I had a serious panic moment over here (check my insta-stories) as we printed out four new kitchen design options where we indeed did considere the triangle. thanks everyone!
xx
E
Here’s how I envision the current kitchen floorplan working out: unload all the things you need from the fridge onto the island right behind you, walk around island, BAM all your stuff is right there in front of you, just behind the sink in your reach. I think it will work out great.
And because it is a weekend/holiday house, when working in the kitchen is usually more relaxed and there are likely to be at least a couple of people in there together, I think the placement of the fridge will be just fine and you will enjoy the big window!
All this looks amazing and I Iove seeing the process that goes into your design and the changes. I just acted as the general contractor for our kitchen remodel and it was mentally exhausting but now that it’s done so worth it! I understand the move of the guest room toilet so you’ll see the toilet last but in the floor plan it doesn’t look centered under the window – and that would bother me more then seeing the toilet from the doorway! Of course you would have to be in the bathroom to notice that.
Yeah, that stuck out for me also. I’m thinking put the toilet back next to the vanity and add a pony wall between toilet and vanity. You get visual separation of toilet from doorway w/o having toilet in a spot where it really doesn’t work as well. Having it under the window creates a strange empty spot in the corner that will be difficult to use and clean. Plus having a pony wall gives you a place to run electrical up to outlets that you need for hair dryers, toothbrushes, waterpiks, recharging, etc.
I completely agree! I love everything but that guest bedroom toilet. It’s off centered and I’d rather see a toilet when I walk into the bathroom than have it awkwardly placed under a window to “hide” it
interesting … that is a great point. let me see if we can move the vanity down and center the toilet. I honestly missed that. if it were centered it would be too close to the vanity but it seems like we have room to move it down. thanks, guys
Yes I was wondering how plumbers would position the vent stack, usually centred on the toilet. Though I like the toilet position away fro m door entrance view.
I agree. I liked all of the other changes, but a toilet half in front of the wall and half in front of the window with a blocked-off corner of wasted space would drive me crazy. I already detest the huge amount of wasted space between the vanity and toilet in our second bathroom, and it’s not blocked off and hard to clean. I think with the toilet in the original placement it will feel like there is more room to move around in the bathroom. I really don’t see any problem with the original placement. With the pocket door coming from the toilet side, it will be the last thing you see anyway, you won’t have to worry about knocking knees, and unless you’ve already done so, you won’t have to pay for moving plumbing or vent stacks.
I wonder about the master bath, mostly about the shower door opening against the bathroom door. It seems that the bathroom would have a better flow if the toilet and shower were switched. The shower could be a focal point along the back wall and the toilet could be hidden in a closet with a pocket door where the shower currently is.
We’re in the process of designing our forever home and I have become a floor plan junkie as well. It’s so fun to follow along on these projects! Thanks for sharing as much as you do!
good suggestion on the toilet/shower swap. that door interference kind of bothered me as well.
Hi there. I’m guessing Emily is creating a nice alignment between the vanity, tub and bay window which I think will look the most natural with the architecture and be really pretty. If anything she could have the door to the bathroom open into the master bedroom. It’s not the standard/ ideal thing to do but I think would work fine in this instance.
You are exactly right, Alexandra. We thought about switching this but we want a big shower and then the room wouldn’t be centered on the window. There probably was another way to configure it, but I think its going to be fine. Typically the shower door and the door into the master wouldn’t be open at the same time, right?
Hello!
I think all the changes are great. I wonder if you might want the master bath door to swing the other way, not into the bedroom, rather, into the fixed portion of the shower. Or perhaps remove the shower door altogether, as well as shower bench so that plumbing fixtures are in that location. Either way, I am beyond excited to see this transformation. Thank you for sharing all the ins and outs!
What about not having a door on the shower? It looks big enough to accommodate just a glass wall like so many are doing now. We just finished a master shower and the option we used was having the shower door swing into the shower. Also keeps the door from dripping water on the bathroom floor.
Yeah, I think it’ll be fine, like 95% of the time. That’s one of the few downsides of floor plans; they suggest that all doors will be open ALL the way ALL the time. It’s not often that I want my shower door just THROWN OPEN like some kind of Parisian balcony situation 🙂
Or you could change the direction the door of the bathroom opens, to have it open into the bedroom instead of into the bathroom
The toilet and shower swap doesn’t look like it would fit in the available space. Having a sliding door on the shower, swinging the bathroom door into the master, or going with half-width double doors or no door (if that doesn’t bother you) could also work. I’m normally against a doorless bath, but the configuration of this space still allows for quite a bit of privacy in the bath except, perhaps, when getting out of the shower.
I think a door on the bathroom is good for containing steam and smells.
Fantastic changes and the plan flows far better now.
Only thing I spotted (and it could be that you will have a sliding door) but when you walk into the master bathroom it seems to hit the shower door.
Really loving the final final FINAL version. I like almost everything. The only thing I would change if this were my house is the bottom bunk size in the bunk room. Let me expound. My kids currently have twin bunk beds and it’s challenging but doable to change the sheets, or retrieve things from the top bunk. The bottom bed being a twin is pretty easy to change, and the top bed is easy enough if I stand on the edge of the bottom bunk. But, if the bottom were a double size, changing the sheets on the bottom would be pretty difficult. Likewise, I’d constantly be standing on the actual sheets of the bottom one in order to retrieve things from the top bunk (books, pillows, sippy cups, whatevs – currently, if I can’t reach, I can pull a step-ladder right up to the edge, which wouldn’t be possible with a double there). Further, at the age that my kids are, they routinely throw things down from the top bunk (sometimes on purpose, sometimes accidentally), so if someone was sleeping on a double below, they’d get hit in the face with flying objects on the regular. Just some logistical… Read more »
Yah, built-in bunks are a fortune and we are still figuring that out. We LOVE having a full bed for Charlie so we can read with both kids in there at night. There will be a ladder or stairs in between both … but that is interesting. It might come down to budget, although i’ve ALWAYS wanted that built-in bunk bed of my dreams and this house is such a multiple family house that this way it could sleep so many kids …. Will consider though and yes, assuming things will get thrown 🙂
We can still read to our children while sitting on the bottom (twin) bed – we just sit on it like it’s a couch (backs against the wall, not the headboard). But it is a bit dark under there to read. Honestly, given that our kids both prefer to be on the top bunk, I usually just read a story to them with me standing on the floor, or all of us cuddled up on a sofa. Speaking of bunk beds, my kids went to a sleepover recently and there was a twin top, double bottom configuration and all three kids chose to sleep together on the top bunk – I guess the top bunk is where it’s at if you’re age six and under. About the ladder option, I didn’t explain that well. With the bunks we have, the ladder is on the foot side of the bed, so there’s no way for me to climb up the ladder and reach stuff that is on the head side, or crammed all the way against the wall, without getting all the way up there on the top bunk on all fours (given that we don’t have high ceilings, I find… Read more »
We were given hand-me-down bunk beds 10 years ago when my oldest was 5 and they can be stacked (like bunks) or separated (into two twins) and, my lord, the number of times we’ve reconfigured and had bunks stacked, separated in the same room, separated in two different rooms (I now have three boys) …. just a thought that the flexibility of non-built-ins was really useful for us.
Great adaptions, it’s really coming together. Master suite is going to be a stunner!
Things I see:
1. I know it was a big discussion on earlier posts, but I still think you should swap the sink and the cooktop. You want to see out the window when you are at the sink, and a cooktop under a window is just not a great idea. Downdrafts are always a last resort.
2. Placement and size of closet means bunk room is potentially going to get really messy. I’m picturing 4 little piles of clothes and stuff on the floor in there. The closet area should come out a bit more into the room – maybe should be almost a mudroom style, like a bench with divided backpack storage and hooks. And deep enough for kid size suitcase, winter coats.
Or at least put the sink on the other side of the island, so you can pull stuff out of the fridge and start prepping it without having to walk around the island?
You know what… if it were my kitchen, I would consider simplifying the entire layout. Get rid of the little ice maker peninsula and the cooktop cabinetry area in front of the window. Just make the back wall the beverage center, fridge and pantry wall. Then make the island bigger to accommodate sink and cooktop with seating for everyone on the opposite side. Window seat under the window (where cooktop is now) for kids to stay out of the way but in full view.
Even with the range in front of a window, a downdraft isn’t your only option (although I have one and love it). Assuming there aren’t vaulted ceilings over this space, you can install a commercial hood which lies almost flush with the ceiling — view retained, cooking odors eliminated. Here’s a link to just one example:
It isn’t as though the sink placement is against the wall. With the sink opposite the kitchen stools, and with a diagonal view to the playroom, she’ll probably be looking at her children while washing up. Also, she can open the window when cooking something smokey.
Floor plan junkie here, thanks sooo much for sharing each version!
I also really appreciated your point re: being told it would be “really expensive” to move th HVAC, then it ended up an expense you were willing to pay! We have had that many times in our renovation: “ oh, it would be really expensive to take out that wall,” but it turned out to be a few thousand dollars that brought me more joy than any other decision we made. I know cost estimates are hard sometimes, but it would be so much better just to give everyone a clear understanding of what each option costs so the homeowner can make their own priorities.
P.s. speaking of happy marriages, last night my partner and I both almost ended up in tears of the placement of a pendant light ???. And I don’t think we were actually disagreeing, we were just saying the same thing in 2 really different ways. But yes, still happy together 99% of the time! Especially now that we both like the exact same option for finishing our hardwood floors!
I am a little confused by the kitchen layout. When you come back from the grocery story with 4 bags of groceries, how do you perform the task of putting things away? Where do you unload the bags? There doesn’t appear to be any counter space next to the fridge. If the plan is to use the island to unload groceries, etc, wouldn’t that requite the island stools to be the kind with no backs so that you wouldn’t have to reach over them?
How about unloading the dishwasher? Where do the dishes and silverware live? It looks like there might be a lower cabinet next to the DW so the dishes could go there, but where do the glasses live?
Could you share a side view of the walls/cabinets?
Thank you.
Plans look amazing, but as a few others have noted, your kitchen work triangle is super awkward. Maybe you just don’t cook much, but the flow of having stove, sink, and fridge all within a reasonable uninterrupted triangular space makes sense on so many levels. Just one home cooks two cents.
I like most of the changes that you guys did, the only things I do not like are the new toilet locations.
I get you want the toilet to be less visible but I find the dead corners it creates in Bath2 & 4 really strange.
What will go in the ‘awkward to access’ corners? I find it makes the bathrooms look smaller than they are and will seems like a huge waste of space (unless you have something planned for those areas?)
I’m with Brooke. Those awkward corners can be way more offensive than actually seeing the toilet everyone knows is there anyway. 🙂 My main problem with the “toilet under the window” scenario is just that , with the toilet configured that way, the toilet and the closest sink are sharing the same floor space. The spot you stand in to use that sink is the same spot you stand in to use the toilet. Now, I know most people aren’t going to have one partner at the sink while the other is at the toilet, BUT, it seems like it would be awkward standing at that sink and being in the same “space” as the toilet.
I’m with Brooke on the toilet locations in baths 2 and 4, Emily. Trying to ‘hide’ the toilets is creating really awkward/illogical dead space in the corners. If you put the toilets in the more logical locations, you have a perfect spot for a nice built-in cabinet of some sort across from the toilet for linens, etc. In a smaller bathroom, hiding a toilet is pretty much impossible anyway so just make sure they’re nice looking and people keep the lids closed. That’s the rule in my house! 🙂
I agree with Brooke as well. A friend of mine’s main floor bath has that same layout and every time I’m in there I think to myself how awkward it is with that dead space corner and toilet partially jutting into the standing area for the sink.
I love that you added closests and can’t wait to see your plans and ideas come to fruition!
HMM…… YOU GUYS I HAVE SO MANY TOWEL LADDERS!!?? JK. UGH. i think you are probably right. We’ve already moved it and I’m cool with it. A plant, a towel ladder. or hell, maybe i’ll change it. UGH.. #toomanywaystoskinacat.
Even if you have many awesome towel ladders…A: you’ll have to reach over the toilet super awkwardly to get a towel and B. Eww.. 6ft toilet splash radius. Not sure I’d want all my towel at that location (OK if you always close the lid but no guarantee guests will do so)
🙂
Agree about the guest toilet locations. I actually think the toilet’s will be more ‘hidden’ if they are tucked behind the vanity, rather than under the window. It will eliminate the dead corner, and I think the bathroom will feel bigger because there will be more visible (and useable) floor space in one stretch. Also agree about the toilet and sink using the same standing space.
Yeeesssss. Toilet locations are so awkward. Next to the vanity makes so much sense.
done. I’m paying to have the relocate. you are right. THANK YOU. XX
Love the changes. I’m definitely in the pro sink in the island camp. I spend way more active time in front of the sink than the cooktop and Is much rather be able to see people than outside. Plus I’ve never felt comfortable using island cooktop with kids around.
In the previous layouts I hadn’t gotten a good feel for bed room size, but now that I have I definitely agree with you on closets.
SO SO happy that you moved the HVAC and that awful floating wall!!! Your new living room/kitchen layout is so much more functional and will be something that you love every day, whereas I think you would have looked at that floating wall with SO much regret. Yay!! Also love the changes to the master. The indoor/outdoor fireplace is amazing (we have one) and you will love it.
On the HVAC expense, when we were renovating our home, we wanted to raise the ceilings in the hallway (I could TOUCH THEM!!!). I hated those things. Our contractor kept saying it would be too expensive and after I pressed him on the cost, it was 10K. Not too expensive!! Although he kept protesting, I finally told him, “I do not care how much it costs, DO IT!!!” And he did, and they are amazing. Added a gorgeous skylight into it which brought amazing light into what had been a dark, cramped hallway. After it was done, the contractor admitted he was wrong and wistfully said, “I wish we had done this to our house when we renovated!!” HA. You gotta do what you need to do, ’causes if you don’t, it will BUG you forever.
Hi Emily,
I love what you are doing in this house and it’s fascinating to read how you have worked through the design process and what has influenced your changes.
I’m working on a project at the moment and I’m wondering what software you use to create the floor plans?
Thank you,
Kathryn
We use autocad, which isn’t that easy to learn and sketchup *(which has a lot of bugs) but hopefully that helps!
You will never regret more closets! We have a seasonal cottage in Wisconsin and while we don’t aim to have a lot of stuff there, the seasonal stuff seems to have a life of its own (fishing gear, i’m looking at you). Plus even when you go up there for more than a day or two it’s nice to be able to put stuff away. Plus one year you will go up there for Christmas and you will accumulate Christmas decorations and the next year it will be Thanksgiving and before you know it you have 2 of everything in your life but somehow whatever you want is always in the other location… I have a similar kitchen layout (though without the ice maker penisula, just open at each end). My fridge and ovens are on the other side of my island from sink & cooktop. I don’t love it – I basically do laps around my island getting food out to make meals – but it’s a weird space and there weren’t a lot of options. Funny that you took the door off your potty area in master bath…my dream is a to have a separate door on toilet… Read more »
Love it all!!! It seems so well thought out! Cant wait to see it all come together.
I just watched your instastory, and I say go with the final kitchen floorplan you showed here! I’ll preface it by saying that I am not a huge fan of cooking, but we have a similar setup in our current home and I love it. I think you will spend more cumulative time looking at your kitchen than you spend actually cooking in it so go with what is more visually appealing. Especially since your job is to create beautiful content. I don’t think anyone ever regretted having more windows and letting in more light! Either way, it will be lovely and I can’t wait to see how you finish it out.
I second this–I actually cook all the time and have a similar layout. The extra steps NEVER bother me because the aesthetic layout of the kitchen is so worth it. Plus I tell myself I’m getting more exercise 🙂
Sarah and Elizabeth – THANK YOU. I agree. Many times function over form but every now again I will choose a pretty kitchen over a slightly more annoying layout. xx
Thank you so much for sharing your floor plan details, I have loved every step of this renovation. I saw your story on Instagram and had to weigh in. We do not have the perfect triangle in our kitchen and truly, we don’t notice. Our sink and stove/oven are placed just as you have in your proposed floor plan and our refrigerator is placed where your ice maker will be. I love being able to plop my groceries on the island with easy access to the fridge because let’s be honest, toddlers require a LOT of groceries and would require ALL of your countertops. And practically, this isn’t the house where you will spend every single day and the focus is relaxation and to enjoy nature and family. Keep your gorgeous windows girl!
Totally agree! Windows forever!
yay!!! agree. thank you for weighing in. xx
I cook on the daily in an annoyingly-laid-out-and-tiny kitchen and think the work triangle is just fine. A little annoying if you’re at the cooker and forgot to grab something and there’s a whole island in your way? Sure, but such a minute annoyance. It’s not like it’s a huuuuuuuuge kitchen involving ginormous circumnavigation of a humungous island! So you’ll scoot round and grab, the end. As for resting bags of groceries to put them away, what’s wrong with the island and the peninsula-full-of-wine-thing? Stools aren’t that tall.
I dunno, I just think all the alternatives you showed on Instagram are so yuck – losing the window! Walking in the door to be confronted by Giant Side O’ Fridge! Shoving things to the side instead of a central window! Eurgh. Keep the final, final, final!!! as is. Oh, except for put the sink in front of the window and the oven on the island. (I mean, do what you want, obviously, it’s your house!)
I’d just be more gutted by renovating a house to make a kitchen darker and pokier and placing a fridge right by a door than a reno with a giant window and loveliness.
Hello,
I cook professionally so I’m in a lot of lux kitchens, few are perfect. I dont think the triangle is the problem as much as why is the stove top by the window and not the sink that would bother me .
Yes. I’d lose all the superfluous stuff on the kitchen wall to the left and put the stove there, then the sink under the window.
wait, why? I want to do dishes while watching my kids. but i’m totally open and had it the other way til a lot of people said it was dangerous to have the cooktop on the island because of kids.
I am absolutely ga-ga about the indoor/outdoor fireplace in the master – I now need one immediately! I cannot wait to see this dream home come to life. As a floor plan junkie, I could look at these plans all day. Thanks for taking us on your adventure.
Huge floor plan junkie here; thanks!!! Work triangles are overrated; Lauren Liess had a fridge far off her kitchen workspace in a previous house, it totally worked and it totally LOOKED AMAZING (and that’s worth a lot). My kitchen isn’t the most convenient maybe but I appreciate the symmetry, I don’t mind walking around an island to get to the fridge, and I cook almost every night.
As a kitchen designer I would not have put the cook top at the window. cleaning, grease, etc. I’m sad to not have the sink at the window, I know that is what’s considered the “norm” but for a good reason. The view while cleaning up, ( a much less social occupation than cooking). For that matter I usually try to not have a cook top on island, probably for all the reasons others may have told you. I might have configured it on the side peninsula and left the main island where they will be seating clean. However it is so big that the kids would be pretty safe unless they crawled across the counter top, which , of course is always a possibility. :)) I wish I could have been involved. I would have drawn up a plan for free! Your frig is still far from you cooking and sink. I love you but your kitchen plan is not the most functional in my eyes. Though maybe you did work with a kitchen designer. You could have all your wants but I think a better plan. I think you are so great, Emily so I hate to say… Read more »
I generally like the changes in the final floorplan, but wanted to join in to add that you will not be happy with the placement of the cooktop underneath the window. Down drafts are challenging and won’t keep you from the endless grease and sauce splatters that will inevitably cover your windows.
It is getting exciting! Keep the kitchen as it is in the final plan. I just watched your instastories and if you place the refrigerator on the window wall you lose so much counter space next to your cooktop. (Also a beautiful focal point with that window) With both locations of the refrigerator it looks like you would place items on the island when you took them out of the fridge. I would consider having more room to chop and prep near my cooktop a higher priority than when putting my groceries away.
I agree with keeping the stove off of the island. Unless you keep you stovetop clean 100% of the time, it will be a pain to be consistently keeping it spotless. I guess you can say the same for dishes in the sink on the island, but that’s an easier clean up than having dirty pots and pans and spaghetti sauce splatters all over your island.
It is truly so fun to watch this process, and if I am ever renovating or building a new home I know I will go back to this post to be reminded of the hundreds of factors to consider. I LOVE what you have come up with, and I feel certain you won’t regret making such careful decisions. For what it’s worth, I am in agreement on putting the sink in the island. I spend way more time at the sink than at the stove, and I’d want to be looking at my people more than the outdoors. As for the bathrooms, I think keeping the toilets next to the vanities is better than creating a useless corner space in order to put them out of view. Just another non-designer’s opinion!
Loving your changes (that master suite ?)! Can’t wait to see it all come together, and the design stuff. Really looking forward to seeing what you do with the pebble tile.
Now you’re a floorplan expert – do you wanna figure mine out? Ha ha ? We are reconfiguring our hall to make our family bathroom bigger, and so the 4th bedroom comes off the hall, not the family room. But it means losing precious storage space. My hubby also doesnt think its an issue (but he never puts the towels away, so….)
Trying to figure it all out is making my head explode! It would be so much easier if we could get solid numbers of ‘doing this will cost this, doing that will cost that’, then we could make an informed decision based on OUR priorities, not someone else’s.
Love all the changes guys! I think having the fridge on the opposite wall from the window where you have it seems to make the most sense for your lifestyle (and Brian seems quite passionate about it!! hehe) The wall with the window will be gorgeous if there’s nothing tall on it and you can keep the window centered and as large as possible. I think the fridge being close to the window/door could also block a bit of the light flowing into the kitchen. The only thing that seems kind of funky to me is having a cooktop under the window. I think the sink and cooktop would be nice be swapped, and put the dishwasher to the left of the sink. My kitchen has that type of layout with a large open peninsula with bar seating across from the cooktop, sink directly behind the cooktop under a window. My friends and family (no kids yet, I understand some people are saying its a hazard to have the cooktop so close to kids on the island, though I’m not sure I agree?) sit there when I’m entertaining and I really like the layout. I spend more time cooking/stirring than… Read more »
Just watched your insta story! And chiming in for the 2nd time today. I already noted that my kitchen layout is a lot like your final above. And it’s live-able. But ours ended up like that in pursuit of symmetry in a weird kitchen space. it is lovably symmetrical now! But if i could go back in time i would FOR SURE sacrifice symmetry to have the damn fridge on the same side of the island as the sink and cooktop. I will paint you a picture, if your kids are anything like mine: someone wants an apple, so you walk to fridge to get one, then to sink to wash it. Then someone wants string cheese, so you walk to fridge to get it, then back to sink side to throw out wrapper (assuming your garbage will be over there too). Then someone #1 has spilled their milk, so you walk back to fridge to get milk, to island to pour milk, back to sink side to get paper towels, back to island to wipe up milk, back to sink side to throw out towels, back to fridge to put away milk…doing laps ALL.DAY.LONG. on the plus side: getting… Read more »
oh no!!!!! oh man. nooooooooo
Definitely not a “cooks kitchen” but I’m sure it will be beautiful. You have said many times you and your husband don’t really cook much so this lack of flow situation will likely not be any big deal. If you were planning this for the flip house in Portland I would definitely reconfigure. 🙂
Designing is not my forte so you can take this with a grain of salt, but I have been cooking for over 40 years and I believe this kitchen floor plan would make it very difficult to efficiently prepare meals. Especially if you do not like to cook. Most activities involving cooking and clean up will involve the stove and the sink, and almost everything needed to do these are stored on the other side of the kitchen. I think the stove, sink, fridge, and cupboards all need to be within a few steps of each other. I recommend: 1) slide the counter with the ice maker and fridge drawers down so it will connect to the wall with the main kitchen storage; 2) remove the cooktop from its location under the window and move the ice maker, fridge drawers, bar cabinet, and wine cooler to this location. This will create a beverage and snack area that is separate from the main food prep area; 3) flip the sink to the other side of the island and reconfigure the wall opposite (and relocated counter) to house the cooktop and ovens (or free standing range), fridge, pantry, and any other cupboard… Read more »
oh man. i’m going to have to draw that up but i’m tempted and believe you. my contractor is going to hate us! but i want to explore every option. thank you!
Thank you, Emily! I love your work and that you take the time to share all the details with your readers. I have another idea – perhaps you could separate the sink and dishwasher from the food prep area with the stove and fridge. Maybe keep them on the side of the island in the current location, or reconfigure the island so the sink and dishwasher are adjacent to the dining area (but there may not be enough space for this.) If the sink and dishwasher are across from the window (or rotated 90 degrees) someone could be loading/unloading the dishwasher would not be bumping into the meal prep person. (And have the fridge closer to the dining area.) Or if you could do without island seating, maybe keep the sink and dishwasher across from the window, and put the stovetop in the island on the other side. Then the cook and dishwasher could talk to each other, and also have a great view of the entire first floor of your fantastic mountain home! Whatever you decide to do, it will be great because of the all the people visiting with you. I am reminiscing of the wonderful vacation times… Read more »
What a great idea, Karen. Sometimes it’s so hard to see those options where the main traffic patterns are totally reconfigured. It’s probably too late to be worth it for Emily, but putting the bar area against the windows and making the big wall with the fridge and ovens also the spot for the stove, with the sink in the island opposite would create a much more functional cooking zone, keeping other traffic out of the area. On the other hand, if Emily and Brian tend to cook together, it might be too compact, and they might be on top of each other.
wow! this is so impressive! There’s so much behind every detail and I’m humbled! I bought a house three years ago and slowly but surely remodeling kitchen, bath, bath…etc, and growl every time I begin because, when does anyone have the time? job, kids, life, etc! I know this is also your profession, but wow!!
We bought a nondescript home in a beach community. We scraped it & had a builder do exactly what we asked for. We thought for years what we wanted in an ‘aging in place’ home. We picked out every surface treatment,
floor plan, sq. footage, landscape, etc. The company’s design team ended up just ordering what we chose & the
house ended up in the local home & garden magazine, plus won a 2nd place design award which went to the
builder. That was OK as we got just what we wanted & they love to use our home in their advertising.
Love seeing the progression. I think it will be beautiful.
I too am designing a kitchen right now so have OPINIONS! I would not want a stovetop under a window–hello greasy window! That’s where you want to space out staring outside doing your dishes. And I really don’t like a stovetop in an island–stand back kids doing their homework mama’s cooking! Also, as Diane Keaton says in her latest book–a sink in the middle of the room in an island with dirty dishes is not great. I know there are always reasons to compromise and we pick what matters most to us. It’s your house and only you know how you live. For me, I am choosing the kitchen island to be a work station and hang out station only–chopping and chatting. No dirty dishes or greasy fire situation there in the middle of the room. But whatever you do I know it will be beautiful– and you have given me tons of inspiration so thank you so much! I just wanted to mention these things as food for thought–I know there are so many details to ponder!!
The plan looks great! I see why you struggled with the kitchen plan but I think the final is the best plan. We recently moved into a house that has a sink/dishwasher in the island and the fridge on the opposite side of island. I thought i would be annoyed with the disrupted triangle but it has not been an issue at all. You will be more interactive when guests are over while you do food prep or dishes since you will be facing out. And can I just say that I am most excited to see how that tricky corner fireplace turns out!
Just not sure about picture window as backsplash? You might be cleaning that A LOT. You could still do two windows flanking a backsplash/cooktop. Guess it’s too late to consider one of those gigantic (like as large as the island) recessed skylights? Also door to kitchen kitchen could be glass to let more light in. I’m sure it will be gorgeous whatever you do. I did a build from ground up and yes there are things I would change but you just have to live with your decisions and move on!! Love you and your mouthhole!
Oh the work triangle. I have done some research on it, as we currently HAVE a triangle but in a skinny galley kitchen it’s awful cuz the fridge, oven and dishwasher all block the walkway when open. Since our kitchen will always be a skinny galley due to its position in the house, I plan to have all the appliances AND sink on one side, with a narrower counter on the other side. Fridge will be at far end of appliance side. It will still be within the NKBA guidelines for steps to fridge, but I know some people would freak out about the no triangle thing and having to walk down to the fridge. We cook every day, and I say the other problems with our kitchen far outweigh any benefit of the triangle.
ha. ok. #notriangleifitdoesn’twork
Everything seems to be good except for the master bathroom. The door to the master bathroom seems confusing.
Oh Emily – congratulations on making it through the tough part. It will be great! I am so pleased you talk about how hard it is to renovate from distance. I have done three renos from Abu Dhabi, all taking place in the Czech Republic. One small apartment, one large country property including an extension and one large Prague-based apartment. We just had no other option but to do it from distance, we completed but it did make my hair go more grey in the process. Glad to hear that this is normal and that challenges don’t go away even if you are a successful designer.
thank you Darcy. Yes. My hair is all but gone. ITS SO HARD RENOVATING ESPECIALLY FROM A DISTANCE!!
I love the kitchen layout; I think the work triangle is highly overrated. When I’m cooking (and I love to cook), I don’t spend a huge amount of time at the fridge. You take out your ingredients once or twice, and the rest of the time is between the real work triangle — prep counter, sink, stove.
I do have a thought on the toilet placement in the guest bathrooms, however. As others have mentioned, it creates a weird dead space in the corner, but in addition, if you’re lying in bed in either bedroom with the bathroom door open, you’re staring straight at the can. If the goal is to hide the toilet from view, I’d just make it blend in more in the standard run of bathroom accoutrements (sink/toilet on the same wall). For example, a tankless, wall-hung toilet jumps out at you as “I’m the place you poop” less than a standard toilet.
Overall I love these floor plans — I’m very excited to see the transformation come to life!
The work triangle isn’t all that important to me. It’s a few extra steps. You’ve said you’re not really a cook so it’s not a big deal. Now the sink in the island with the cook top by the window is odd to me. To me, dishes take more time to do so we positioned our sink under the window so we can see outside while we’re doing that awful chore. Then the dishwasher is to the left side of it. I get that you’re going for aesthetics and the cook top WILL undoubtedly look super amazing under a huge window. So that’s cool too.
I have only ever done small renovations, not involving structural changes. But it’s fascinating to see a part of your process for an entire house. I think we have all been poorly influenced by the magic of television, making it look so fast and easy. I appreciate you showing us the reality of it with the stress of so many options and considerations included. I like how it’s developed and overall the final plans look really beautiful. Of course I am looking forward to seeing more about the next phase of”pretty stuff” too!
THANK YOU. This comment actually made my day. xx
I love the kitchen changes. I have had a cooktop in an island and would never do it again and I purposely shifted my fridge out of the way so that people could access it and not interfere with me cooking or cleaning. I open it and get everything I need out on my island without any issues.
I am surprised by the toilet shift in the guest bath. From bed, if the door is not closed, you are looking at a toilet and it hardly makes it less visible and gives you the oddest unused corner in that bath. Just my 2cents.
yah. we changed the back today thanks to you guys. xx
Hi Emily … I saw your Instgram post about the “perfect triangle.” I commented there, but I’ll post it here as well. I’m glad you stuck with your plan in keeping the fridge on the other side of the island. I don’t have a perfect triangle in my kitchen, with the fridge a little out of the triangle, and we are fine with it. In fact, it has worked well for us. When someone is cooking, or washing dishes, and someone gets something out of the fridge, they aren’t bumping into each other. Another really good idea we did was to add a second, smaller sink on the island. I initially thought it was a waste of space, but my husband insisted. I’m glad he did. It has worked out beautifully for us, since we both love to cook together.
Emily, I’m totally with you right now because I’m designing a kitchen and the contractor keeps not wanting to give me what I want because it’s breaking “the rules” I don’t understand why I can’t put my fridge where I want it instead of closer to the table. It literally means I will have to walk 5 more steps to get the layout that I want. You being happy in your space is more important than the rules. Also, currently my table is about 20 steps away from my fridge. Gasp, and we never even noticed we had to walk so many steps!!!
After you decide where you want the window inside the kitchen,
don’t forget to look at it from the exterior of the house too.
An indoor/outdoor fireplace + hot tub? AHHHHH!!!!!! That sounds amazing!!!!!
Stacked W/D upstairs and downstairs?