
Ban.do Custom Pieces
You know that scene in The Notebook where Ryan and Rachel’s characters are on the dock, rain pouring over their drenched bodies, as she yells through her tears ‘It wasn’t over for me!!’, then he passionately responds almost angrily ‘It wasn’t over for me. Its still not over!!’, and then a lot of REALLY good things happen to all of Earth’s women because what comes next is one of the best scenes in all of film history? Well, the Ban.do project is kinda like that.
You thought we were done posting about it. You thought you toured the whole space and got all the info possible, and yet on my blog calendar I have 2 more posts.
It wasn’t over for me. It’s still not over.
The problem is that when you do a weird project like this, but then aren’t really allowed to blog about it much until it’s published you just have WEEKS of really good content that you have to sum up in a few days. In fact if we weren’t waiting for it to be published there would be honestly probably 10 – 12 Ban.do posts over this last year, with updates or how-to’s or details really documenting every aspect of the project. But instead we just have to post ALL AT ONCE and then it becomes Ban.do overkill. If that’s even possible.
We joked that everything in this project was custom – that nothing was just bought at a store or easily figured out (HA HA HILARIOUS JOKE). Because of that fact, there is just way too much good info that I refuse to keep all to myself. So, this post is all about a lot of those details or smaller projects that were missed in the other posts that I know at least some of you are interested in – the reupholstering of chairs, plexiglass projects, window gels, wallpaper, disco ball and nude murals of both Jen and I on the walls.

We recovered A LOT of vintage chairs for this project. In case you are wondering if this is a cheap, time efficient process the answer is NO. But it sure is fun and satisfying. First you have to find the awesome chairs (and enough of them) then you have to choose the fabric which is exciting but can be absolutely daunting, then you have to arrange pickup, yardage delivery and wait a few weeks. It’s kinda what we do so we are used to it, but yes, ordering office chairs online and just assembling them might be cheaper and OBVIOUSLY takes less time. Which is probably why I just ordered my office chairs online after doing this project. I couldn’t do it again. 
Those chairs above were 5 for $400 (I think) and while the ‘before’ fabric looks good, it was pretty gross. I wonder now if we should have just had them cleaned but at the time we found this BEAUTIFUL blush velvet that we were dying over and we pulled the trigger on making that happen. That blush velvet didn’t photograph as well as I thought, but in person it is wonderful. I don’t remember exact costs but I think that each one were around $120 to reupholster (they are fairly detailed what with the seams, piping and the arms), and they each needed 1 1/2 yards of fabric. 
Then I found these lucite bad boys on Craigslist – I think 4 for $400 (again, the details are foggy but I rarely spend more than that). I happen to have had 2 others that I was hoarding that I threw in (although one broke AFTER we reupholstered it, ugh) – so they have five now. That blue crushed velvet is exactly that – crushing. 
We struggled with Jen’s chair – unable to find one that was big enough for her desk, commanded the presence that she needed (to lord over her minions), and was comfortable (without being a fortune). I bought four of those teal chairs years ago (see them here) and they were pretty big – too big for four of them in our office. So I sold three of them on Chairish. I had one lonely chair left and while it truly didn’t need new upholstery it was an easy answer to an annoying problem. So one day I brought it to her office in a desperate attempt to check something off the list, and she sat on it and felt the power that she should feel in such a throne in her office (that has GLITTER wallpaper). I was delusionally hopeful that the color would somehow work for her, but it didn’t and she demanded (from her throne) for it to be recovered in a silvery white linen that is EXTREMELY gorgeous in person. I was VERY jealous when it came back from our upholsterer. I think that it was $250 or so to recover, and the original chair was $150 from the flea market. 
Next up – those plexi glass desk dividers. 
Making the desk situation stylish was tricky because we didn’t have a huge budget to buy seven $800 desks, but those standard white ikea desks are rather boring and simple. Totally fine for many offices (we use them as is) but it just felt like not enough for these ladies. So I did some research (by watching the movie ‘Her’) and came up with the idea of this modern cubicle idea, using plexiglass to divide up the desks. 
Here was the process – we sampled a bunch of plexi colors, and mapped them out in a drawing (not shown). Then once we had decided on the colors we ordered them (with the holes) and drilled them in (see picture above). They were between $30 – $40 each – with the neon or the mirrored ones being on the more expensive side. Here’s a quick note though: if/when these guys get snagged they break off. So if you are interested in doing this just be aware of that. I think the only way to possibly avoid it would be to get thicker plexi (like 1/4″ instead of 1/8″). It’s just the ones on the side that snag, the ones in the middle don’t. But its a good thing to know if you are trying to recreate it – especially if you have a severe spacial awareness issue like I do.

Because our love of plexi couldn’t just stop there, we had them made into mood boards – 2 for Jen’s office and 1 for Ally who is designer. Basically the goal was just a sleek beautiful surface for them to washi tape up all their current inspiration/color palettes, etc.

Jen chose this opalescent plexi which I liked a lot, but honestly I think that against the glitter wallpaper a white opaque plexi would have popped more. We disagreed – she was the lady holding the money (in a confetti cannon mind you) so she won. I still LOVE it and it definitely has more texture than a simple white board (and it could have looked like a white board, and actually would have functioned as a white board, too, by the way). For the edges we decided to embrace our inner 80’s and on one side we did a hot pink mirror and the other a neon. You can see a hint of the neon from the front, too.

Then for the other one we chose a melon-y pink plexi and just did clear on the sides. If I had to do it over again, I would have done a different color on those sides, too. It did cost more, and its a low-impact detail but a pretty fun one. They stuck out of the wall 2 1/2″ I believe (as you can see below). For Ally’s in the front office we did a different opalescent one. In a perfect world it would have been a color but she couldn’t put pantone chips on a color. 
We had the fronts and the sides custom welded together by a plexi welder dude (?). He gave us cleats for us to hang them on which we did. Jen wanted to lean hers although I wanted to hang it. She told me I could hang it for the shoot, but I lacked the motivation to do that so I didn’t.

The problem with Ally’s is that the opalescent (and probably plexi in general) sucks up and reflects color so the pink ceiling made it look pink, which is a problem for her visually when she is trying to match or select colors. So they have now repainted that pink wall/ceiling back to white. Wah Wah. Hey, it’s just paint, people. It takes like 2 hours to paint a room. Deal.
Oh and I believe those plexi sheets are 4×8 and 1/4″ thick. 
The real question when they leased the space was like most companies first thought: ‘Where would the disco ball wall room thing go?’

Obviously it goes right there. This custom project needs less explanation because I really have no idea who is going to recreate this – so this is more just me making sure you guys saw my disco ball room. Basically we gave the idea and drawing to a dude and he fabricated and installed it. We wanted clear plexi on both sides, and enough room at the top to put more in and get some out. I think he created a rail with quarter round wood to keep the plexi in place.

I think between the plexi and the labor and the disco balls this might have been one of the more splurge-y pieces, but yes, I think its wonderful as you can plainly see in this below photo:


I can’t believe i’m lumping the curtains into this post. We literally spent probably 50 hours on these panels – from conceptualizing the idea, to swatching the fabric, to figuring out the hardware to coordinating a seamstress, to hanging the panels. There were many challenges along the road. First off – they wanted privacy from Hollywood looky-loos but still wanted to let a lot of light in. So they couldn’t be typical thicker curtains nor could they just be sheers. 
We came up with this panel concept which allows for double layering (color in front of a white) which does provide privacy so that people couldn’t see in, but was sheer enough that it let a lot of light through. Plus those colored panels gave us a lot of well, color and impact.

We used those ikea hospital tracks (that we of course had to paint from the silver metal to white which virtually we didn’t even notice after Brady and Ginny spent the entire afternoon doing it). They typically come with simple store bought panels, so we replaced them with these colored guys. Figuring how many of each color, what height and where they would go, on which track was insane and makes my brain hurt to recap. Ginny killed it.

Once hung you simply slide those bad boys around (well, they have to stay on their particular track) as Jen is modeling for us below.
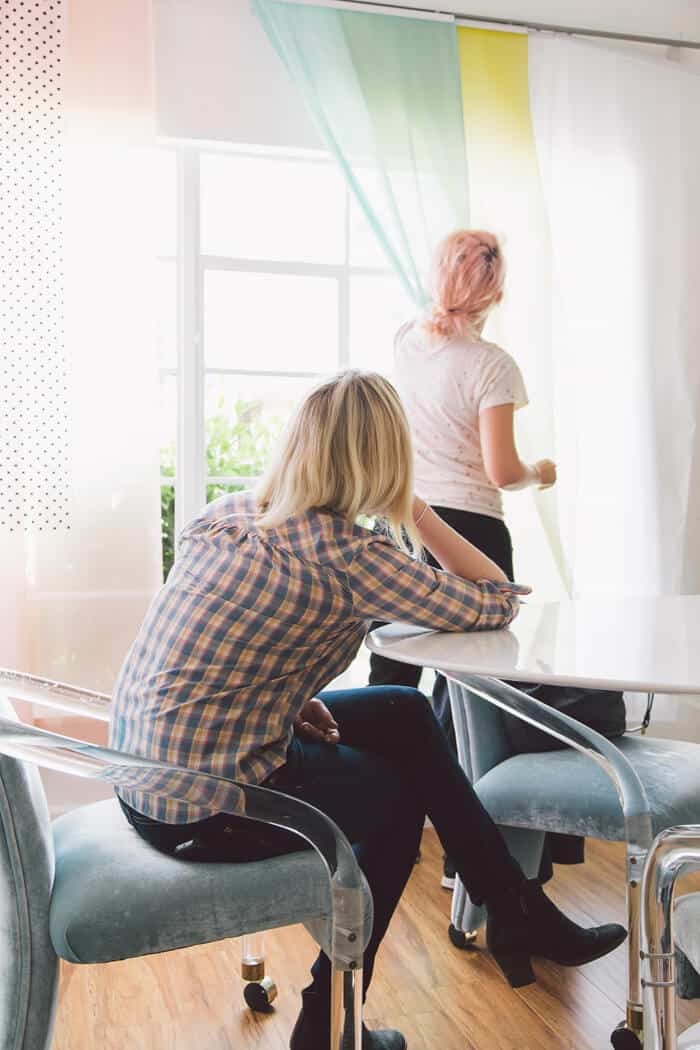

We used this rack for the curtains: Ikea Triple Curtain Rail.

We did a few things in the hallway that you may or may not have noticed. First off the there is light green fabric wallpaper. This is pretty when you are in the hallway, but since there is little natural light you can barely see the color let alone the texture. Next time we would have just painted.

Jen painted this graffiti style pink and gold leaf paint situation on the cabinets at the end, because she is a famous 80’s tagger.


We apparently couldn’t stop from painting the rest of the doors, too, trimming them out with neon and then with gold brass tape. Now THIS has impact. It’s just one of those simple little special details that you might not have noticed, but makes you really happy when you see it. 
Paint in Cheery, Hot Lips , and Pacific Ocean
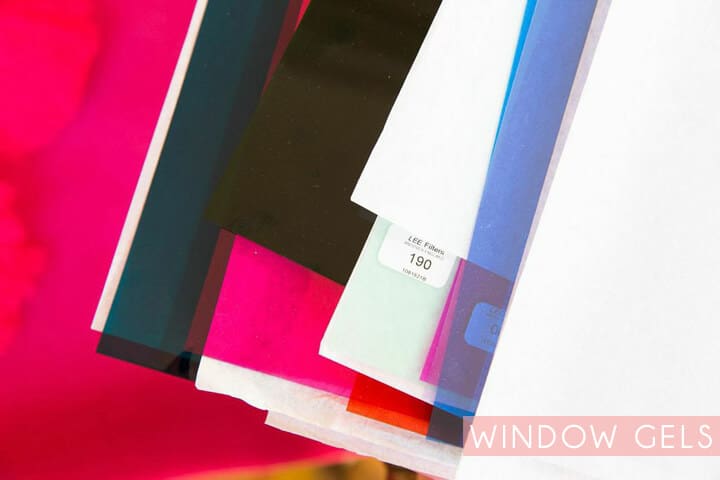
Some of you noticed that there were what looked to be stained glass panels in the windows. Nay, those are just gels that we cut in the shape of the windows. Probably the easiest and cheapest way to do something incredibly fun. 
They range from $7 – $15 each (I think we cut two window ‘panels’ per piece). I believe they came in like 18×24 sheets or something close to that size. We simply used a tiny bit of double sided tape to tape those suckers up and the BOOOOOOM, shit got real. 

We got them at Sammy’s Camera in LA. I’m sure you can get them at any camera supply place near you, or just google ‘colored gels’ and a lot of options will come up. So fun for a kids room or play room, or like this, the office of a Creative Director of a fashion brand. 
If you noticed the amazing nude toned glitter wallpaper then nice job. It’s incredibly beautiful. We didn’t use it very many places mostly because it was expensive and is super distracting. We put it on the underneath and sides of the corridors – if that’s what you call it. I wouldn’t know because I’m brain dead from writing this – THE LONGEST POST EVER. Man, somebody still better be reading. I should start slipping nude photos of myself in in these long posts just to see if you notice. 
This photo below shows how beautiful and reflective that wallpaper is. It is pretty magical. 
There you have it. Just a few simple generic details to totally EXPLODE your mind on this Thursday afternoon. In case you are new to this project check all the posts, below:
*The first round of ‘after photos’ and all the progress/installation photos by Kelsey Tucker. Refinery 29 ‘after’ photos (and portraits) by Tessa Neustadt. Check out the whole Refinery29 tour here. Want more info on the whole process? Check out these posts: The Beginning | Floor Plan & Progress | Ban.do Update | The Ban.do Studio Design Reveal – The Front Room | The Ban.do Studio Design Reveal – Jens Office | The Ban.do Champagne Room | 1 Day DIY Striped Walls
A huge thanks again to Ginny for being the lead designer and project manager on this project. All those custom details above were ‘fun challenges’ to work on I’m sure, but it totally paid off in the end and makes a huge difference in the space, so THANK YOU.
I love this place, it makes me so happy. Thanks for sharing all of the fun, creative details!
Me too!
i’m bawling over how much it costs to get chairs reupholstered in the states. so much more expensive in london ugh why why why do i live here.
If it’s any consolation, here in Costa Rica the upholstery work is dirt cheap… but I cannot get any of those lovely fabrics unless I pay a million dollars in shipping! #whygodwhyyy
So go buy the lovely fabric and take an upholstery course! 😉
In Los Angeles, upholstery is a lot cheaper–there are so many wonderful craftsmen that they have to keep prices lower to compete-now I live in the Midwest and the prices on this post would be double here. Le sigh!!!
They’d be 3-4x in the Boston area!
Yes, at least $400 to reupholster a simple chair, not including the fabric. It’s not even worth bothering unless the furniture is of exceptional quality.
The disco balls are just decorative? Or they’re on display for sale?
I read it all! Amazing! Incredible! *mind blown*
Lova ya lady. You da best.
What a serious color explosion. The plexi glass on the work stations is a pretty sweet idea. And who doesn’t LOVE to reupholster chairs :D. All these Ban.do posts have been amazing.
Read all the way to the end and loved the post, as usual!
I read all of it.
Thank you for this post.
This space is pure joy!!!! Great work as always!!
The disco ball wall is tons of fun and all, but seriously.. those plexi dividers?! SO genius. I. Love. Them.
Josh | The Kentucky Gent
Bravo… thanks for sharing all of your secrets and not bringing them to the grave!
The detail that you put into this place is amazing! Toward the end of the post I thought you were going to say how you painted the walls with unicorn tears. It is just THAT special! I love the plexi desk divider idea. Well, I love everything actually. What a wonderful, creative environment to work in!
where in la is the plexiglass source? I want plexi!!
i made it to the end. still as funny as the beginning! thanks for sharing as always. i love the ban.do brand personality. you did a great job bringing it to life!
UGH IT’S JUST SO GOOD.
I love how you and your team paid such attention to detail. All of these little unexpected accents are freaking perfection.
Also: thanks for not slipping in the nude pics. I think I would have spit out my coffee at the surprise of Ban.do Ban.do Ban.do Ban.do NAKED EMILY Ban.do.
xox
These are fantastic details- I love it all!
I love it all, but man, that sparkle wallpaper… I love it so much my heart hurts. I need it in my life.
Thanks for the amazing post! It’s fun to read about all the details.
These are always my favourite posts of yours. I love getting a peek into your crazy yet brilliant mind! You are such an inspiration!
One of my favorite posts ever. Those colors, that plexiglass, those drapes the mini disco balls.,. the energy generated could power a small city. You are awesome!
I love those plexiglass dividers! They’re so fun and add an amazing pop of color!
Paige
Okay, I love love love reading your blog, but this new site is so hard to read on mobile. The font is tiny and the page takes FOREVER to load on wifi on my iPhone 5S. I end up reading in iOS’s Reader Mode, which helps with the font issues, but half the time the photos can’t load, and a design blog isn’t much fun without photos.
Again, love your blog! I’ve been reading it for years!
Amazing work! I´m from Argentina, I studied Interior Design and you are my favourite designer! LOVE YOUR POSTS
Cool ideas! I love the plexi desk dividers. The glitter wallpaper in the door openings is cute, but I’d be worried the edges might catch and peel over time. You could get a similar cool effect with just a pop of paint color.
Off topic, but I was reminded off it when you were talking about the curtains. Are you going to do a post about the pink curtains in your own studio? I would love to know what kind of fabric you chose for that.
I read it so closely and so thoroughly that I want to know why there’s no write-up detailing the transformation/reupholstering of the leather-to-hot-pink director’s chairs.
Me too! Also, where does one get amazing glitter wallpaper?
i need to know about the glitter wallpaper! where is it from?!?!
Haven’t decided if disappointed or relieved nude mural wasn’t in there, hehe. (See, read every word).
Thank you so much for the great tips Emily! I wish my office looked like this! Would do wonders for my productivity.
I live in LA and am interested in getting a chair reupholstered. Do you have a preferred place you use here? I’d love to support someone you recommend.
I can’t believe how many amazing chairs you managed to find for such awesome prices!! I love the upholstery choices, too – classic with a twist!
I would def notice if you slipped in nude photos, but I promise it’s not necessary. 🙂 I’ll keep reading all the way to the end of the posts if you keep putting in ah-MAZ-ing content like this! Thumbs up for the blog posting endurance.
Weird, but knowing about the details of the space make me love it SO much more. Actually, not weird. I am a details-oriented person, so I guess it makes sense. Mostly, when I look at this space, I think, “Cool, fashion-designer Barbie would totally approve!” Great job!
I purposely save your blog posts for last so I can ensure that I read every last drop of info. Thank you for the time its takes to review every detail and link old posts and sources. You’re fantastic and so is your team!
I’m glad you’re doing multiple posts about this space because the first time I saw it, there was too much to look at and I didn’t take it all in. Now, I’m noticing more things and I appreciate it even more. I think this project really shows how much of a design rock star you are!
Hi, Emily!! Thank you so much for the details. Can you remember what color pink the built-ins at the end of the hallway are painted, the one with the gold leaf treatment? I am looking for a mid-century pink and this one looks like a contender. Thanks! And congratulations on an amazing space!
I read it all and it was amazing! I love how you share what looks great now that it’s done and what doesn’t have the impact you imagined it would. It’s so good to know that happens to you too. But in the end, everything really does looks perfect. I was hoping there would be some info about the peg boards since they were so big. I thought they might be custom. Where can I find something like that without having to piece small pieces together?
Can you tell us where you got your fabrics and where you get your items reupholstered? Thanks!
LOVE the details and backstory as much as the finished product.
Amazing. I love it all. No nudes though? HA.
Yay for long posts! Read all of it, as usual. Loved this gorgeous fun project!
Thanks for reminding me about Ban.do! Their stuff is so cute. You’ve made their offices as cute as their products. I always love behind the scenes posts!
Saw this and thought of you!