
Dining Rooms
How to Style Your Dining Table for Everyday Living
Earlier this year, while working on my MOTO (Makeover Takeover), there was one area where I felt like I had a little bit of a blind spot. I had a pretty good sense of the style I wanted to achieve, the blue velvet sofa was dialed in, but when it came to figuring out what to do with the top of my dining table, I was stuck. In the grand scheme of the design, it felt like an afterthought…because it kind of was. On an everyday basis, it’s normally the spot where my piles of junk mail land (until they topple over and I have to deal with it) and where our Amazon boxes collect, well, the smaller ones. It’s a bit of a “life” wasteland, so I didn’t want to super fake it with anything too set. I wanted to do something that, post-shoot, could still work for how we live. So I dug through our archives for inspiration and it was super helpful. So helpful, that now, months later, I think it’s time to share with you guys in case you’re tabletop-challenge like I am.
Read on for six different approaches to the “everyday” dining table, though leaving it clear is also a very real option…so let’s call that style #1. Now, for style #2:
Centered Vase

I figured let’s start with where I ended with my dining table: the “centered vase” look. Yes, I also have a candelabra and some plates, but really that was more for styling the shot. In real life, you’ll mostly find just one thing sitting right there in the middle of my table (absolutely NOT surrounded by a bunch of other junk like my husband’s headphones or a random sweater and clutch I threw there one night after going out)…
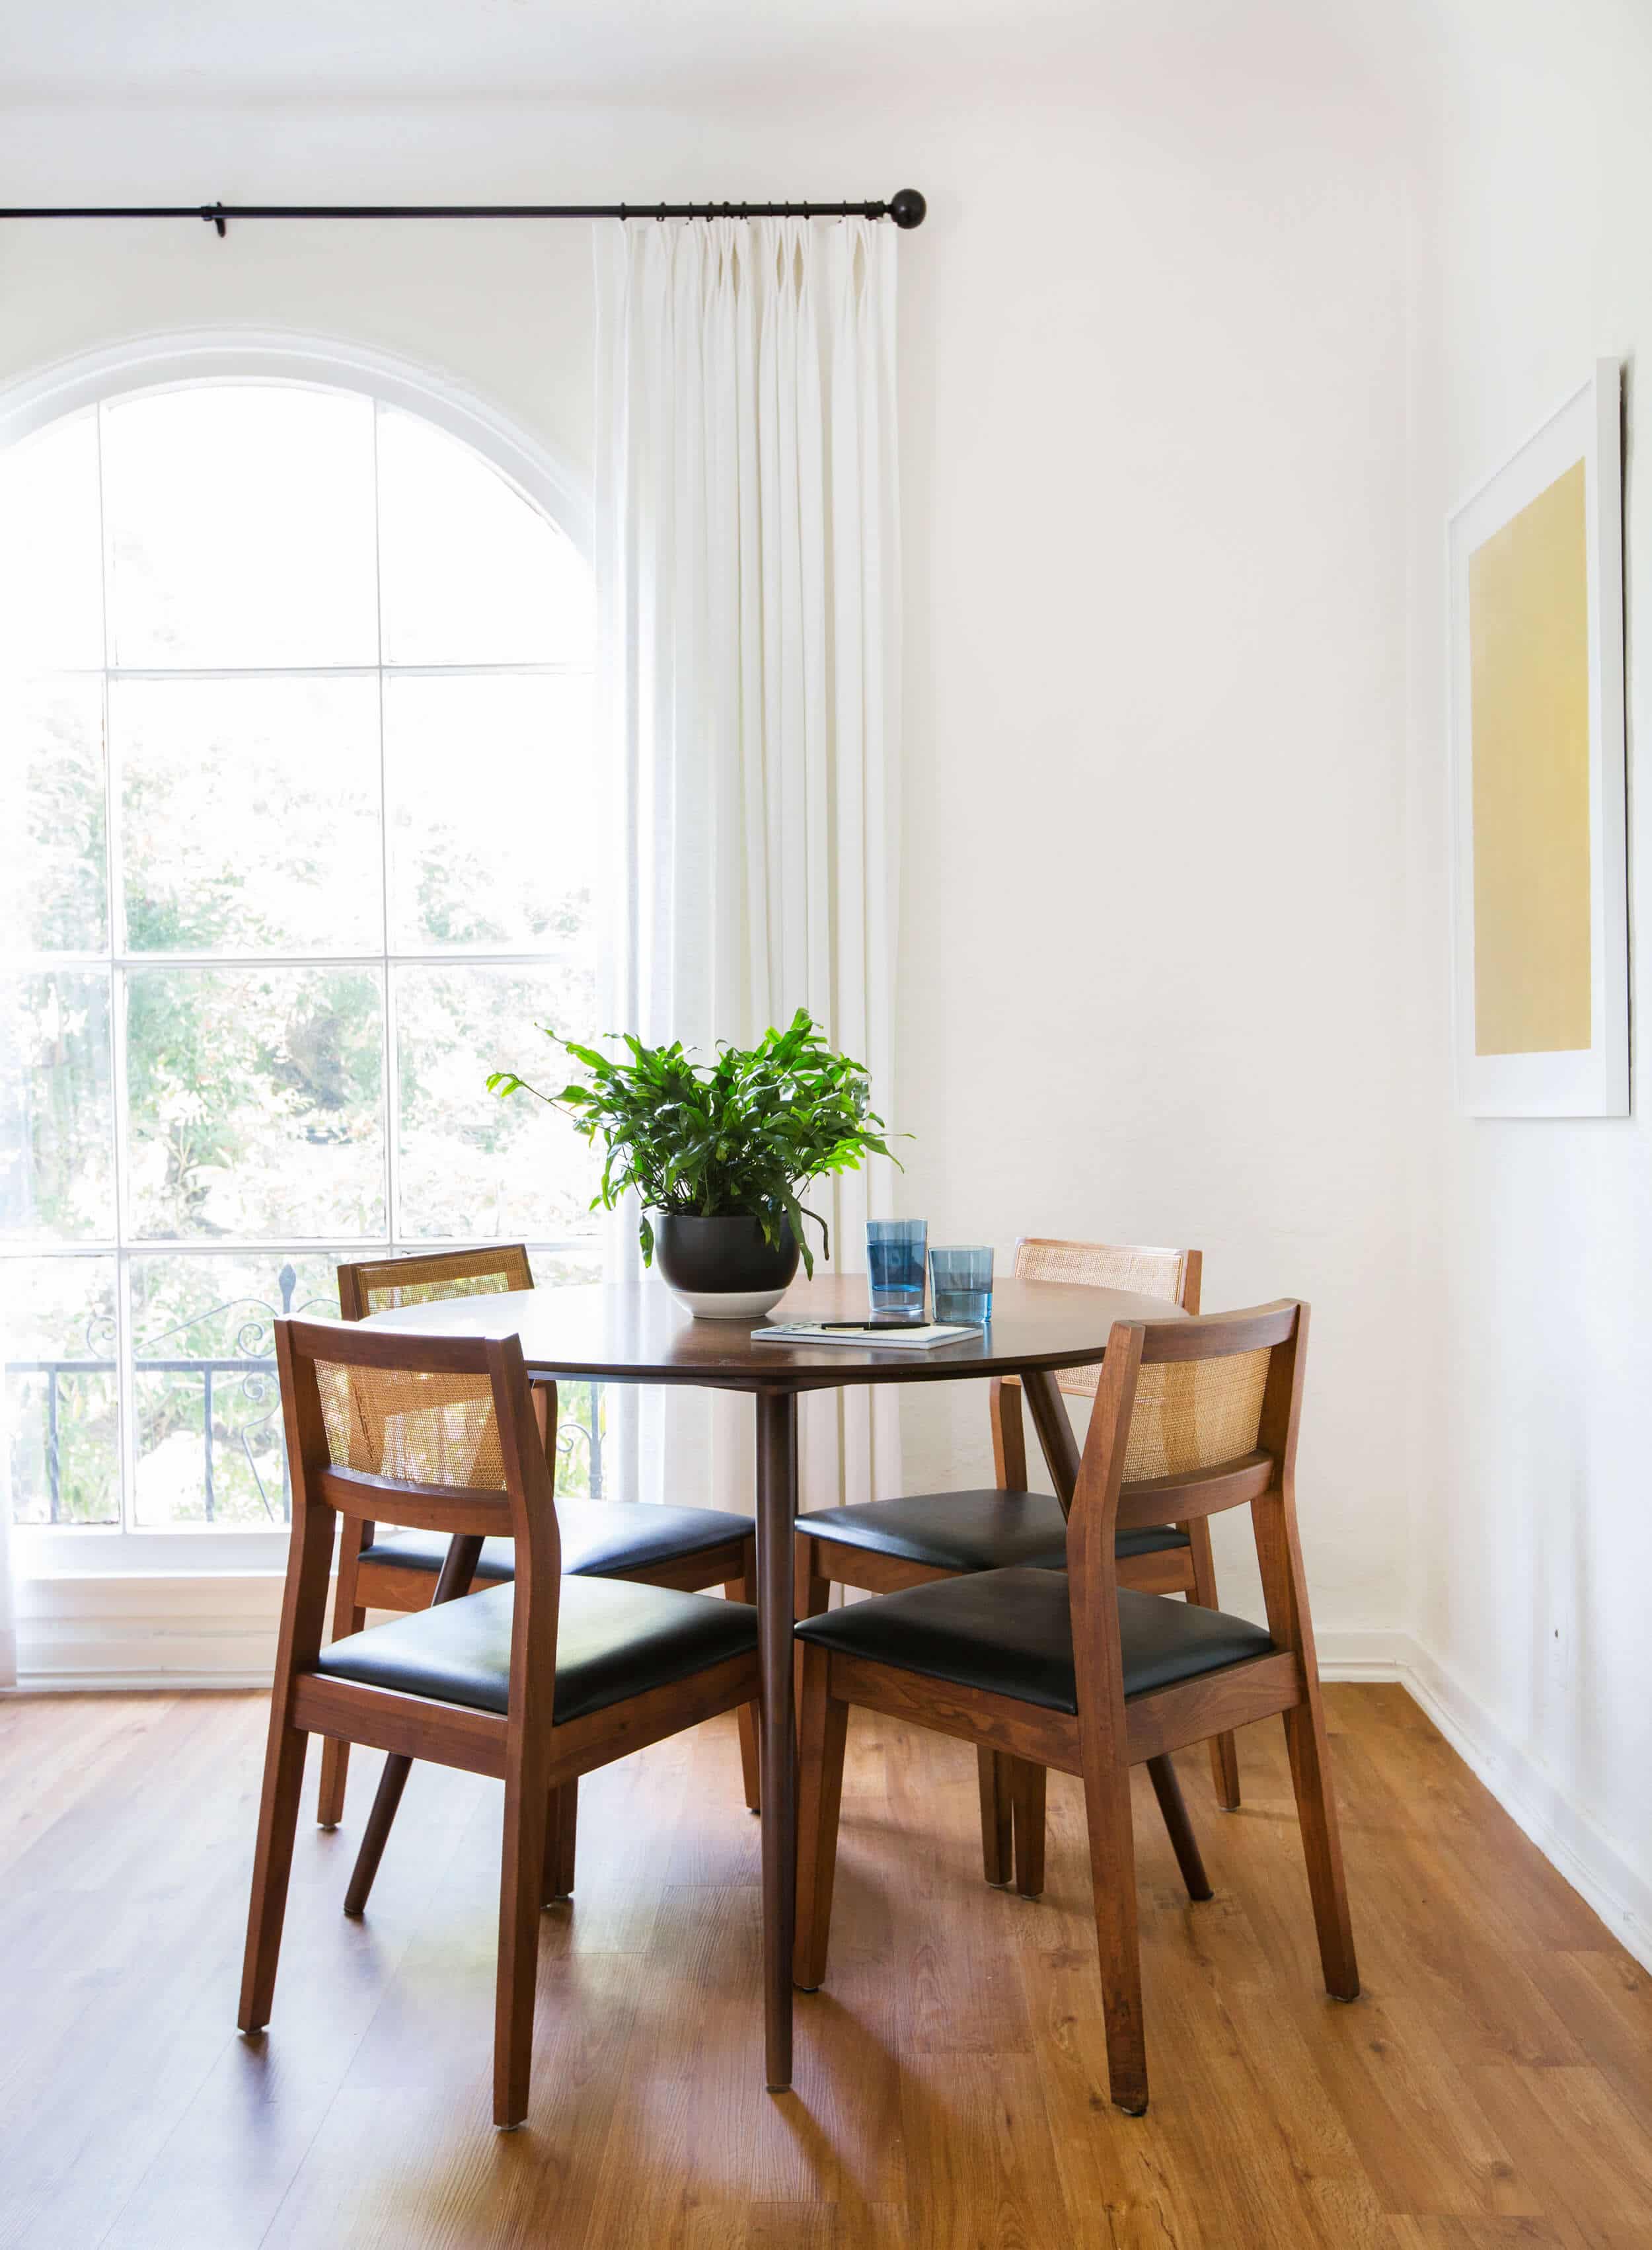
I went tall (it was a vase I had on hand from Target years ago), but you could also go much shorter, like Sara did here in her old apartment. You can go the fresh florals route, or, for something much lower maintenance, pick a potted plant (as long as your room gets the right light to keep that thing kickin’).

This is maybe my favorite dining space from our archives because BOY THAT WINDOW IS GOOD. But besides that, the one centered vase with organic, asymmetrical greens feels so liveable and laid back, and isn’t that exactly what you want in a breakfast nook like this?

When you have just a little surface to work with, like in the dining nook (which she DIYed people…incredible) of Jess’ rental apartment, I personally think simple is best, so all hail the subtlety of the “centered vase” for spaces like this.
Collection

For larger tables, I’m ALL about the “collection,” like Emily did in the Portland dining room. It’s an 8-seater, so there was a lot of table surface area to cover and empty, it might have felt a bit bare and unfinished.

Something to note with the “collection” of things is how it looks from all angles. You’ll want to make sure you’re spacing things out so that whether you’re seeing it head-on or from the side, it doesn’t end up looking like the bargain table at your local thrift store.

In Portland, they went with a set of same-colored sculptures, but in this “organic modern” dining room, it was a mix-and-match collection of vases and vassels. Note the tight color palette and variety of shapes and sizes to keep things interesting. Always remember, just because your “collection” has 10 things in it doesn’t mean they all have to be displayed together. If it works, great! But you can always split things up if you’re after something a little more curated and edited down.
Grouping of 3

The “grouping of 3” is a close cousin to both the collection and the centered vase. All the same ease as the centered vase, more of the visual interest of the collection (but without thinking too long and hard about the set up). Three candleholders in varying heights is a great option (and typically are sold in a set just like this).

If you don’t want to go the candlestick route, there’s always the three-vessel route, like they did in Sylvia’s dining room for that surprise reveal. I think the key here is the varying heights like I mentioned previously. That way, you can more casually cluster things in the middle of the table, though if you have three things of all the same size, I’d go with something a little tidier such as lining thing up across the long-way of the table.
High/Low

Here’s another option that I really love (I tend to like the more non-symmetrical stuff because it gives the eye a lot to play with). This one I’m calling the “high/low” because, well, there’s one high or tall thing (ideally with some greenery to exaggerate the height even more), and one low and wide thing (in this case, a footed bowl of produce…I think).

You can either go the way of putting your high/low goods in the center of the table, or off-setting them to one side if you are casually placing anything else on the table if you find yourself entertaining.
Tray + Gather
There might be a chance you found yourself thinking anything up there I showed you previously felt a little too “floaty” so you, my friend, are the “tray + gather” type. You’ll want to be sure your tray is on the larger side (about 1/3 the wide of your table is a good rule of thumb) or else you risk things looking a little dinky. Now, what exactly do you put ON that tray? Well, that’s up to you. Ginny did a high/low thing with florals which I think feels really nice and not overly stiff, a low bowl of nuts and a small carafe, but you can go with a candle, a small collection of things…there are no rules!

In Emily’s previous Glendale house, she went with the tray + gather, too, but in this case it was styled out more like a refreshments/snack tray with a drink pitcher, some glassware and, again, a bowl of nuts (never underestimate the power of a bowl of nuts for styling, ha).
Casually “Set”

And lastly, our final category here…the “casually set” table. This one is less for everyday, I think, and more for “company’s coming over and I have a few snacks but not a full sit-down dinner happening.” You can use all the same ideas for the main anchor pieces, but shift them a little to make room for a stack of appetizer plates, napkins, glassware and anything else you want to set out.

Hopefully that was helpful for you all. I know it can be easy for us to forget to talk about these little everyday styling questions and conundrums that come up for EVERYONE, design novices all the way to the pros, but the key is to tap into inspiration, see what you think would work best for your life (and you like, of course) and play with what you have to get there.
Please let me know in the comments what other “no-brainer” type styling ideas you guys might feel stuck on and we’ll round up that inspo to help you out. Thanks for stopping by and see you this afternoon.


I have a similar setting but it has never looked this nice, maybe i’m missing something important. I been scouring the web for tips and so far I’ve only been attracted to 2, your’s and casagear.
Hi all
On this topic I would be grateful for a post on great placemats that can stand up to kids. We now have teens and they are maybe just as challenging to keep things clean as when they were toddlers. And of course now they bring some attitude for fun. I’d also like some bold color options and possible mats made of vinyl or a surface you can wipe down that is fun. I have been hunting for months an no luck. So many neutrals but almost nothing in fun colors or of a sort resistant material.
Thanks for any and all ideas. Laura
Chilewich is more known for their neutrals but they have some bright colors as well. I’ve had some of mine for years and they clean up nicely. A good combination of wipeable and civilized. Keep an eye out for sales as they are not super cheap.
I don’t know if these are your style, but Modern Twist has silicone placemats that are super easy to clean. I’ve had the same set (in a neutral pattern) for over 10 years. Honestly, I’m ready for a change, but I can’t find anything else that holds up this well. When I went to grab the link, I see they have a lot of colorful options and patterns now, too.
I have the same type of placemats as Kelly. I love mine & they’ve held up really well. I have the ‘pebbles’ pattern.’ It feels neutral because the colors are not bright yet it still provides a touch of interest.
I would also love great wipable placemat recs! With a toddler, a baby, and surprisingly messy adults, I rely heavily on cork-back placemats. After much searching, I also bought some faux leather placemats from Amazon. It’s hard to get them perfectly clean because of the texture, but they catch spills, are easily wiped down, and protect from heat and scratches.
Maybe a ‘kid and teen friendly everyday place setting’ post is a good one for janauary. I’ve been wanting to show you guys the plates/glasses that I actually use (because of durability, lightweight, size, etc) but we don’t ‘placemat’ over here (I think just because I wasn’t raised with it). Maybe its time to start 🙂
yes pls! been in the market for a set of kids plates/bowls/cups and can’t find anything i like!
Seconding Chilewich, here! They have lots of new styles that can go casual or formal, traditional or modern. Worth the investment because they will last for years! Don’t get the knock offs, they’re crap.
I have French oilcloth tablecloths, but you can also get placemats. They aren’t the plastic or vinyl covered linens. Instead they are acrylic coated. They are more expensive, but they are beautiful, if you like that French country look, and they wipe clean so easily. I’d love something like them with a more modern look, too, but haven’t seen anything.
Fingers crossed that the afternoon snack today is some of these items for purchase! I have a large dining table (8 seater) and am struggling to find a tray that is big enough… might have to give up and move to the “collection” look.
You likely won’t find a tray big enough. But a tray and vessel with branches could work with that big? I went to the flower market last week and was reminded that the base of pots (that dish underneath that catches water) is usually sold separately and they are FAR more inexpensive than a large ceramic or pottery bowl (yet they are the same thing, just maybe not food safe). Some of them are certainly low enough to be a tray, just round. Anyway, there were some like 24″ wide and I was like ‘noted – next time I need a pottery tray that looks expensive, i’m coming here’. Not sure if that’s what you were looking for me, maybe i just wanted to play show and tell 🙂
Very interesting idea! Thank you!
No brainer category I’d like to see: workspace / office desk. Also, playroom toy storage area.
Interesting that there’s no table runners or textiles shown in any of these examples, especially since the Team is always reminding us that textiles add warmth and texture, which is (usually) always a good thing.
Good point!
you are right! ha. good point.
That doesn’t explain how you solved your main issue which is organization and functionality. I have a runner on my table. On it a vase and 2 small stackable trays for bills and important mail I’m working on. Ideally, I’d keep the table just decorated without any clutter, but I don’t have a sideboard or a bookshelf nearby to keep my mail. I think it would be ideal and very functional. Another option is to have a small desk for mail and packages in the living area, but it may not be an option in smaller homes. I like the idea of a working dining table. It’s nice to work in a beautiful room, and make sure this room is used more than once a year
These are beautiful ideas, and seem particularly suited for more casual dining settings. What if you have a formal dining room, especially one with a long table? That would be where I am more likely to maintain a table that is styled. A “collection” of items might work, but then where do you put 10 vases or a pile of ceramic pottery when you are actually using the table?
Pretty things are always good. Call me crazy but for everyday living, my dining room table tray has napkins and salt and pepper. Add a bowl of fruit to encourage healthy snacks and a mug of pencils for homework. Wallah
I have an adulting question…these are lovely setups but especially on the smaller round tables, do you move aside what you’ve styled in the middle at every meal? Or are these more for dining styles where everyone’s meal is already plated from the kitchen? We go between “the meal is just one thing so you just get your one bowl/plate” and a more communal style of having a variety of dishes to serve yourself from in the middle. I think our dining table is also probably on the smaller side…and it feels weird to have something in the middle in-between the other people you’d be sitting with. But moving decorative items on and off the table for every meal seems like it would get old pretty quickly too. Maybe everyone else is less lazy than I am? Ha!
I was thinking the same thing. I got annoyed having to move stuff off the middle of the table every night, so ours is just empty! Or since this is a design blog, maybe I can say it’s minimal! 😉
I agree. I keep things simple for everyday life. I have one simple bowl in the middle. Low profile and minimal. Doesn’t block sight line. Plus I purchased it at a flea market by a local artist. So it’s unique.
So, I live in a household where most of my everyday dining is not happening at my dining table, but I do entertain and yes, when it comes to using the table, I typically move that stuff over to my buffet or bar (which is why I personally like to keep it minimal with just the one vase). If I was “everyday styling” a breakfast table, I’d go the route of Sara’s table that I showed up there…something a little lower that’s small enough to sit at the center for most uses.
I try to keep our table free and clear with the high/low option but then again it is the dumping ground for all things that I need time to process to put away. Or that’s what I tell myself anyway.
THANK YOU!!!! I don’t like the look of a “set” dining table when it’s not in use, but our empty one always looks lacking. It’s impossible to find photos of “every day” dining table settings that are simple enough for my minimalist tastes. So thanks for finally giving me what I’ve been looking for!
I love these ideas! They’re simple enough to be implemented in any home!
Paige
These are great ideas! I’m looking to style my 108” dining table in a “library” style as it won’t be used often. Aside from piles of large books, what else could I add to get the look? Don’t want to just plop a bunch of tchotchkes down the length of the table! Thanks!
I think you could have also shown a more minimal dining set-up, especially for those of us that use our dining tables regularly. I have a very low and large vintage wooden dough bowl in the center of mine. Behind it, the sideboard has a pretty collection of vases with some greenery, and a lamp. Those decorative items give the room visual interest and texture, while the table remains simple and ready for use. If I need the center of the table for placing food, it’s easy to move one bowl. Otherwise because it is low, it can remain while we eat because everyone can easily see over it.
Just beautiful; thank.you. All are favorites!