Make Overs
The Tile Pattern Risk That REALLY Paid Off In This Kids’ Bathroom
First, I just want to say a huge thank you to everyone who read and commented on last week’s post about our primary bathroom! Your kind words really meant so much. I’m not a regular writer on the blog, as you know, so it’s still a little nerve-wracking for me to put myself and our home out there—but hearing from you sure makes it fun!
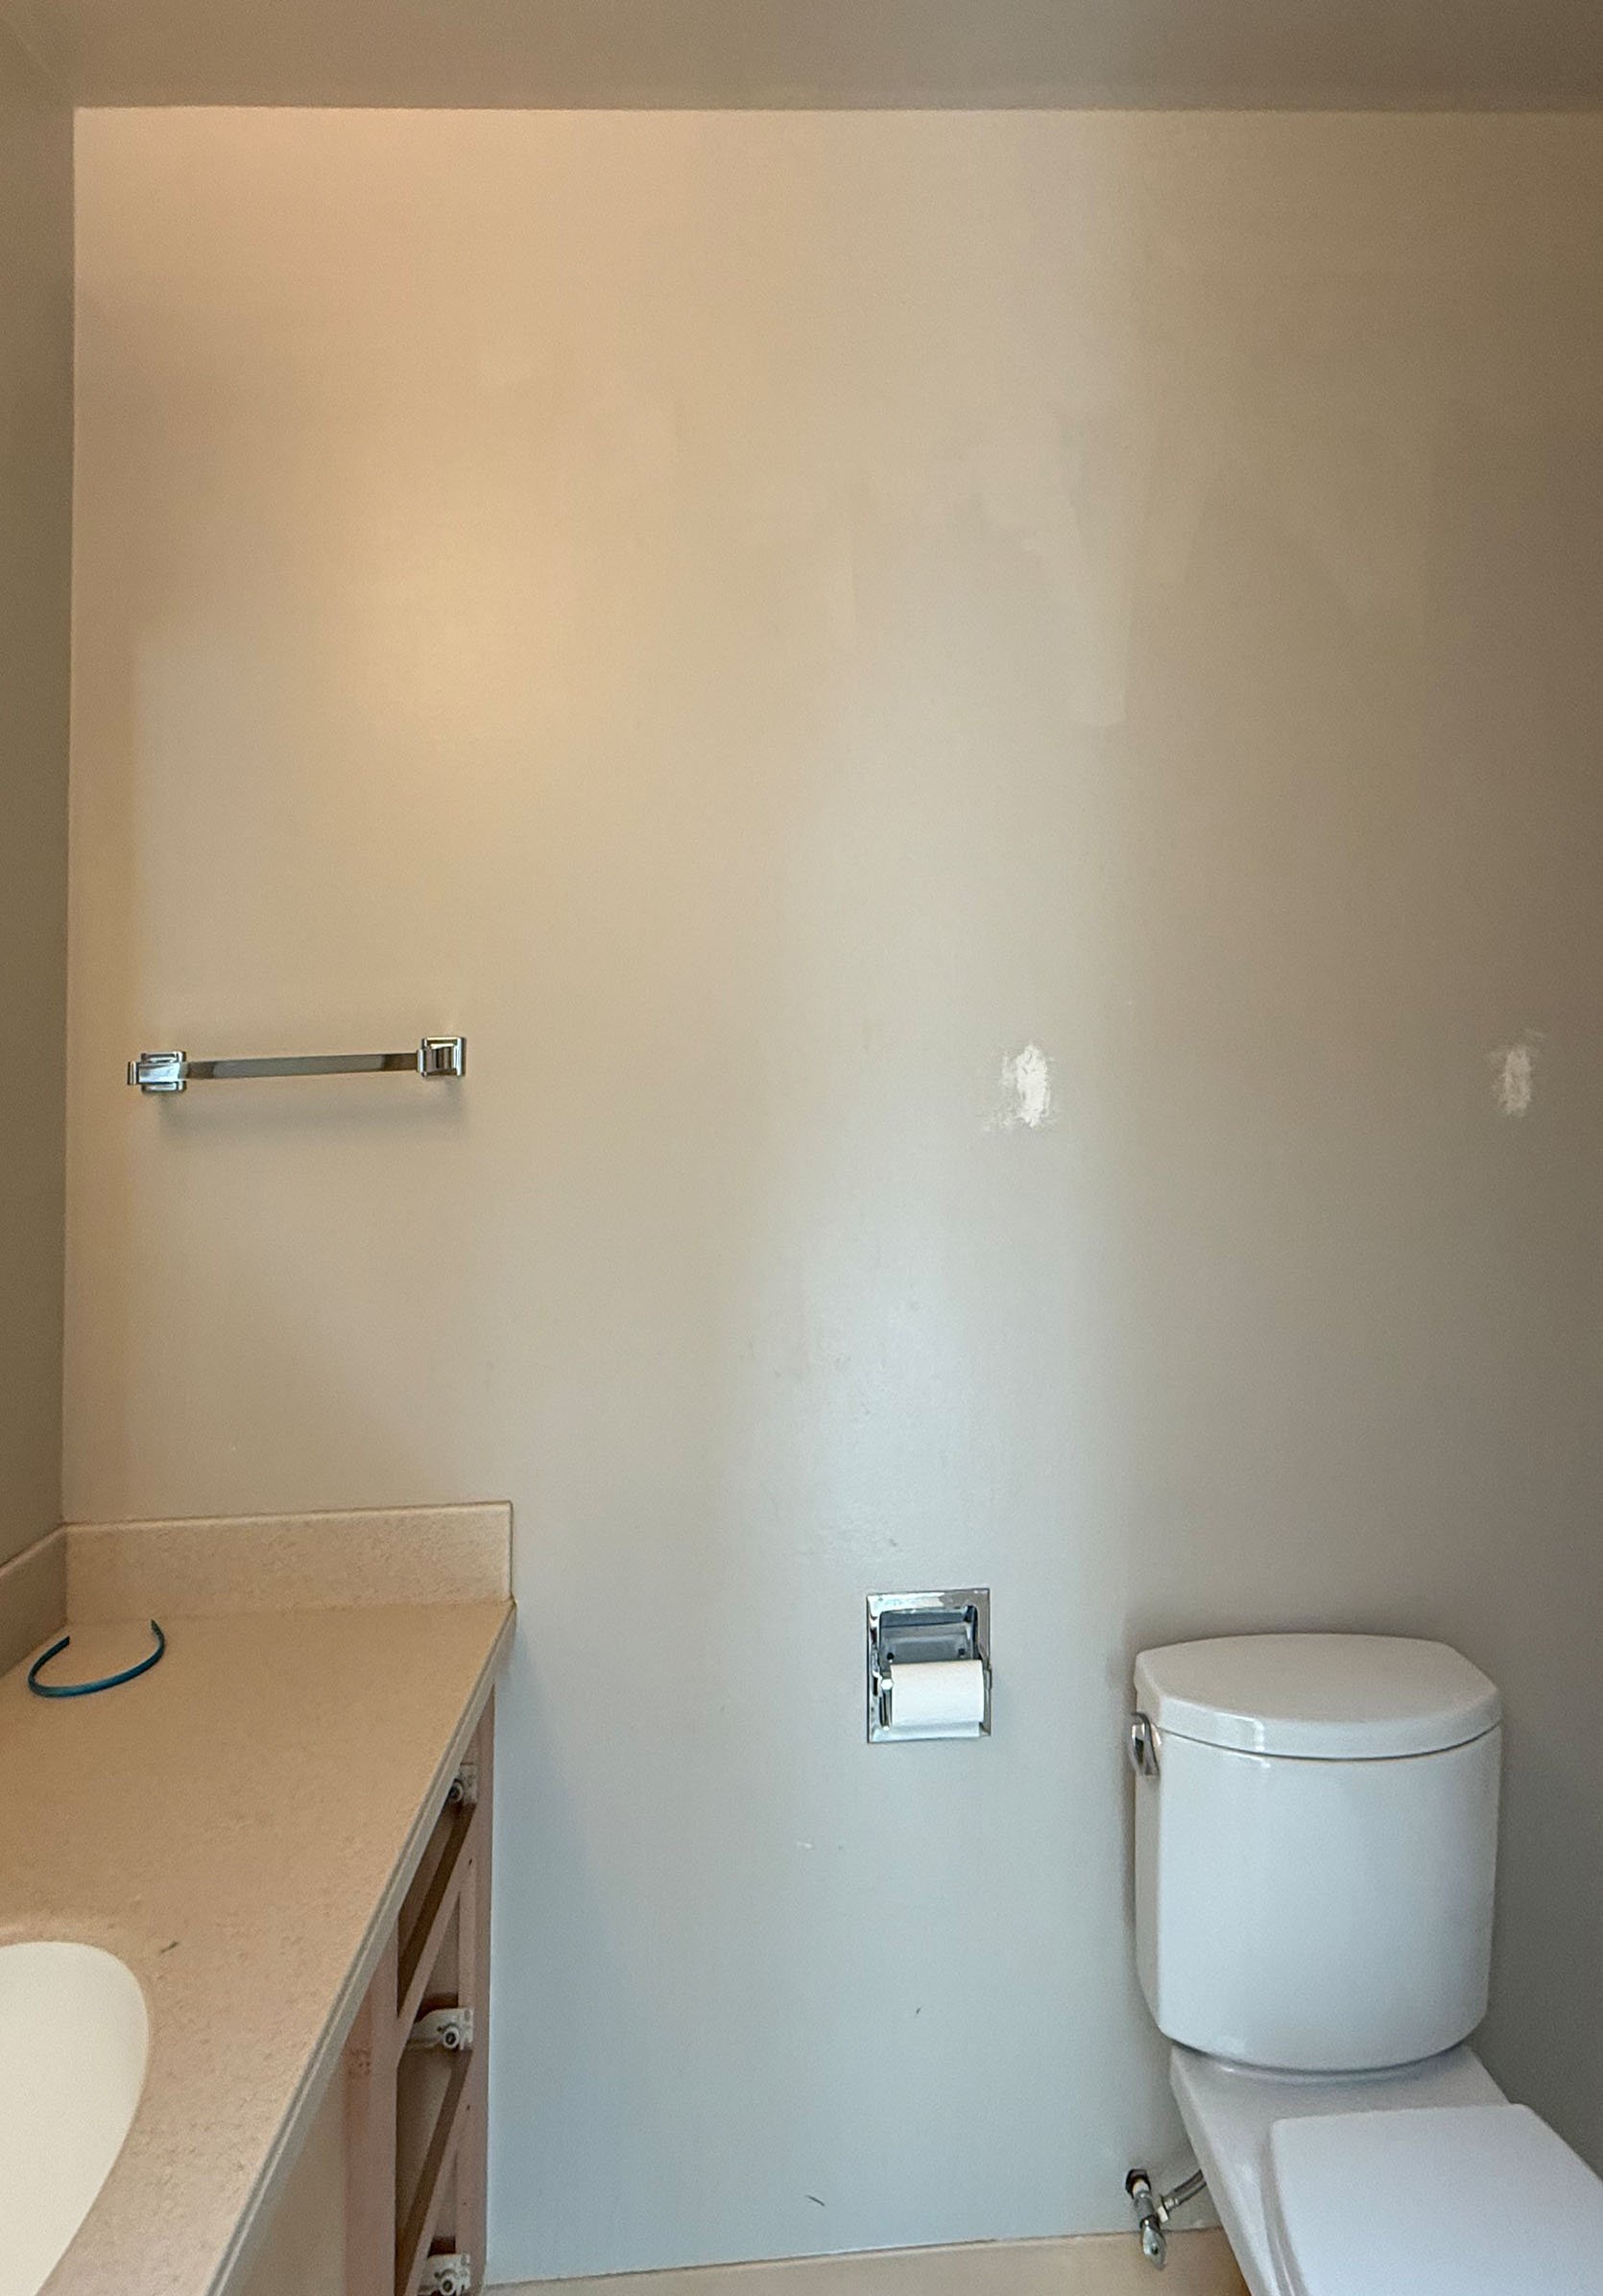
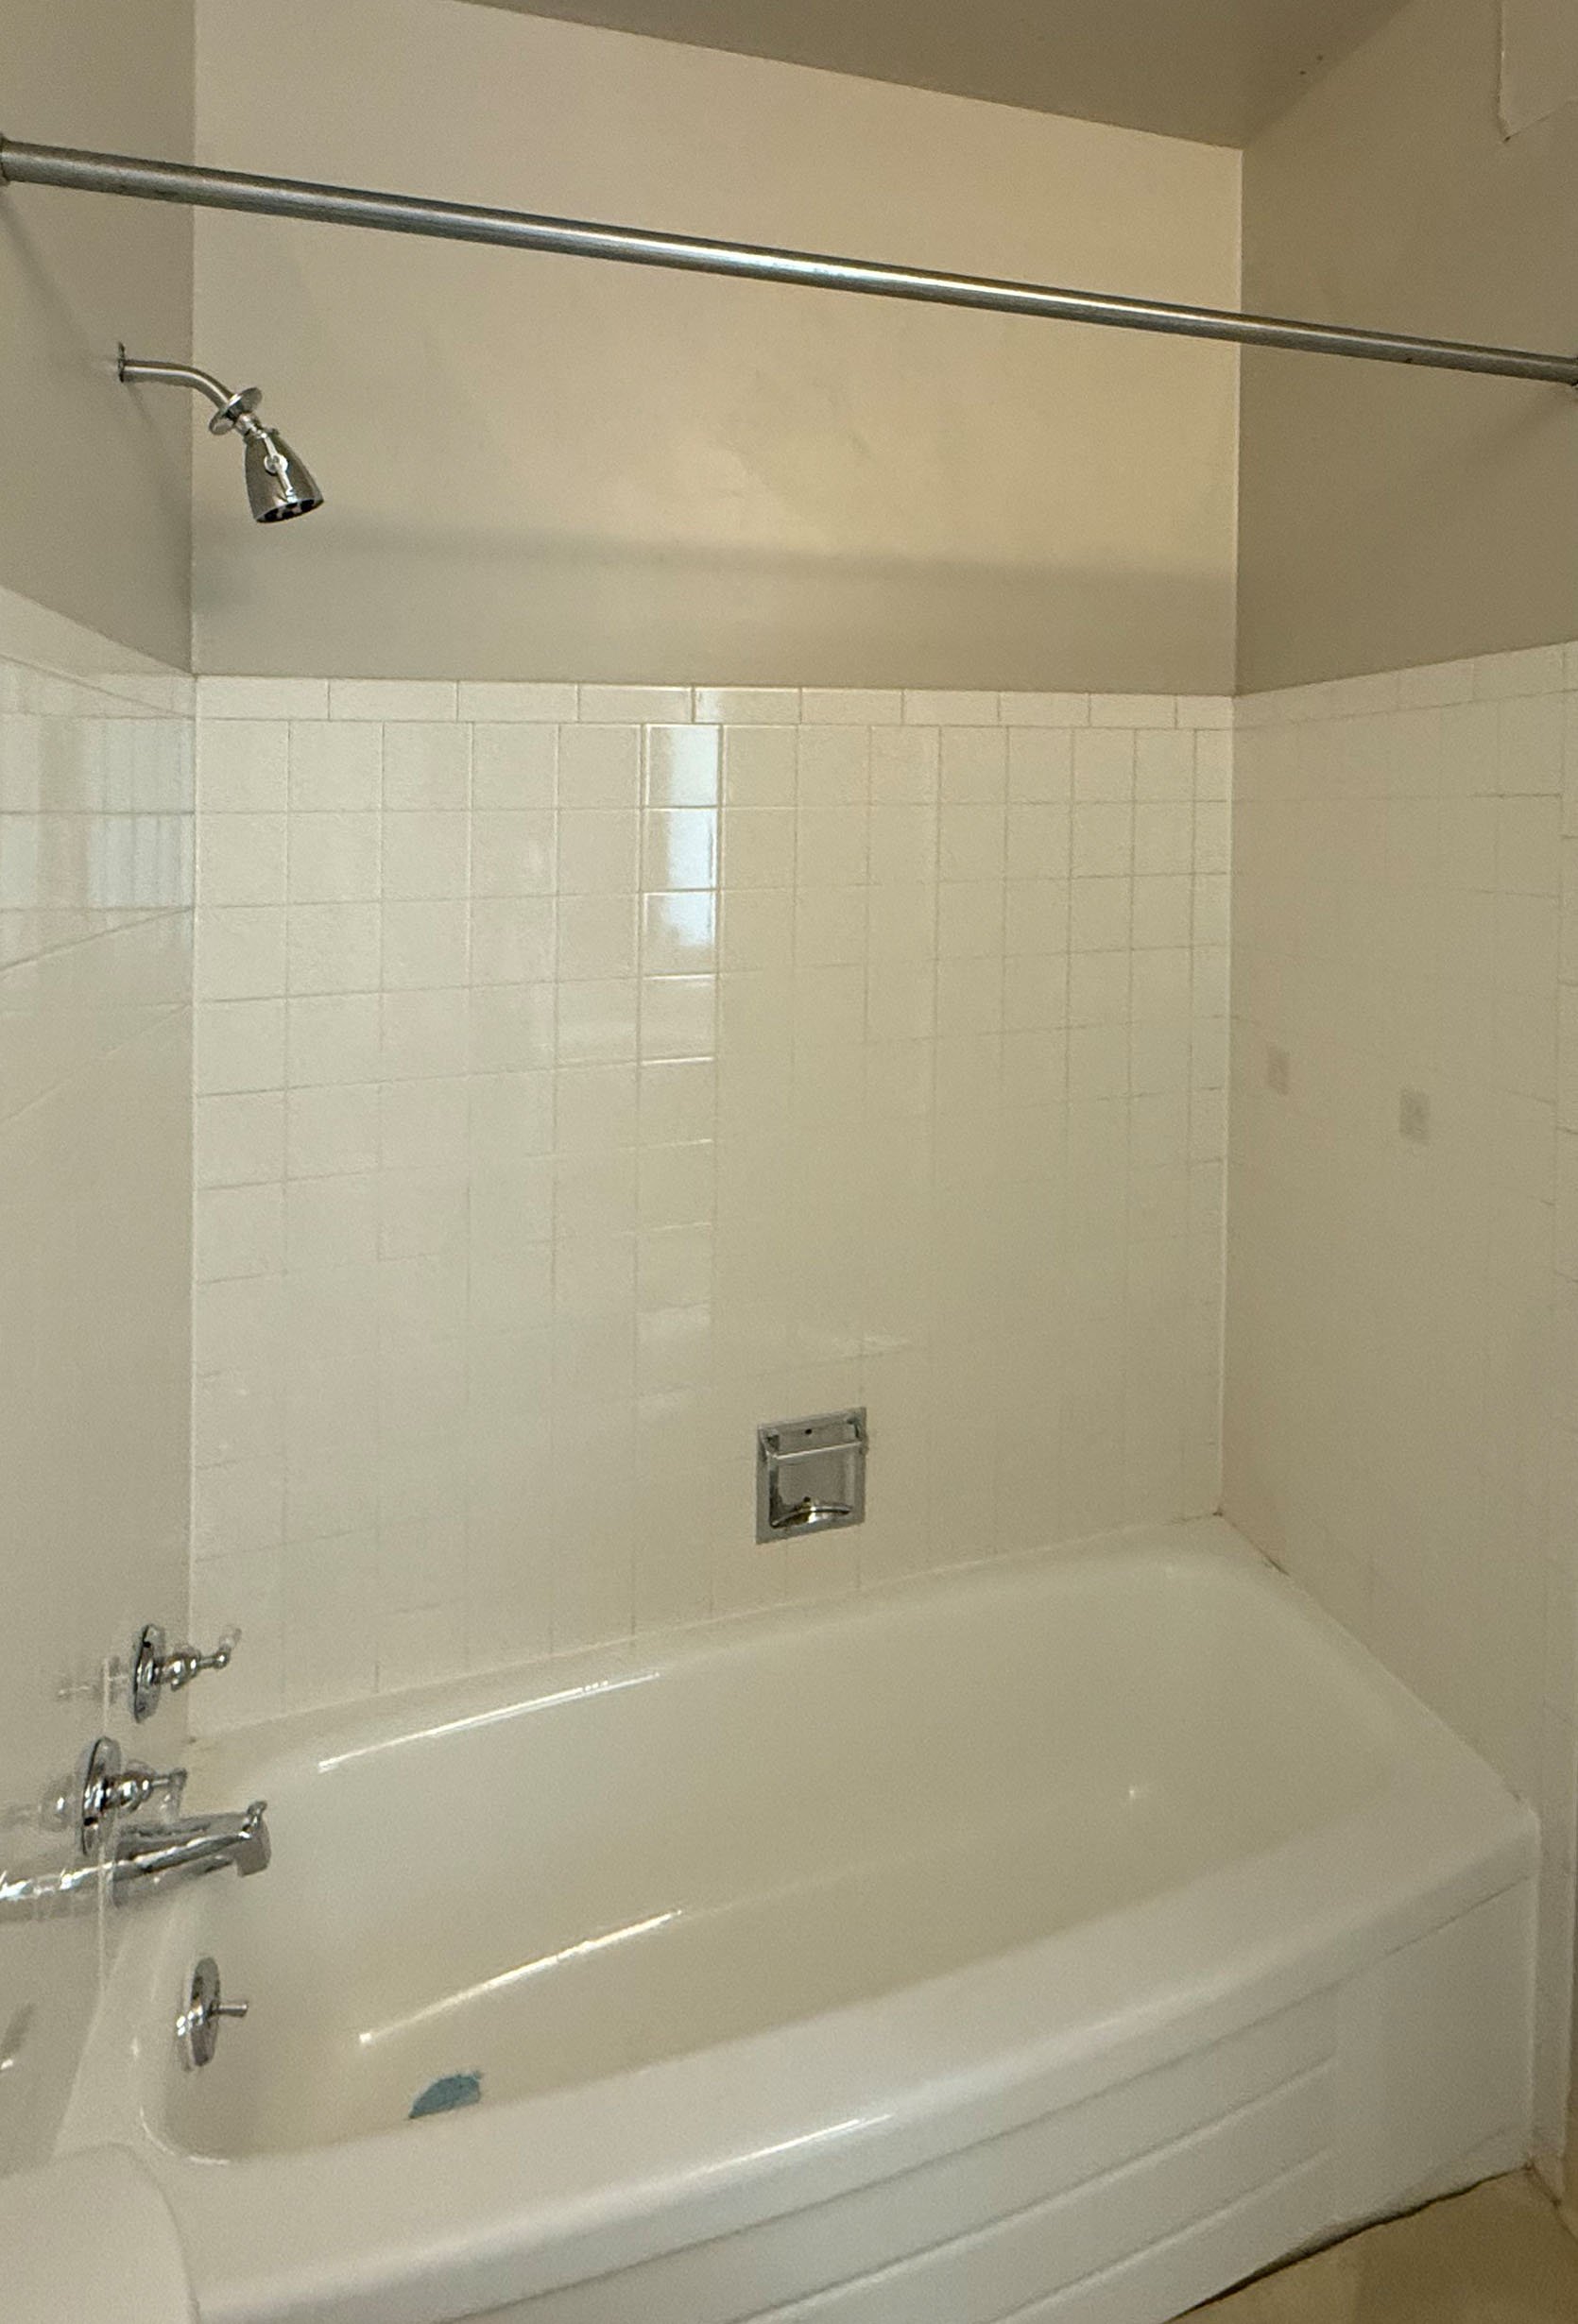
Today, I’m excited to share our daughters’ bathroom! When you last heard from me back in July, I gave a little peek at the space pre-demo, but here’s a quick refresher.
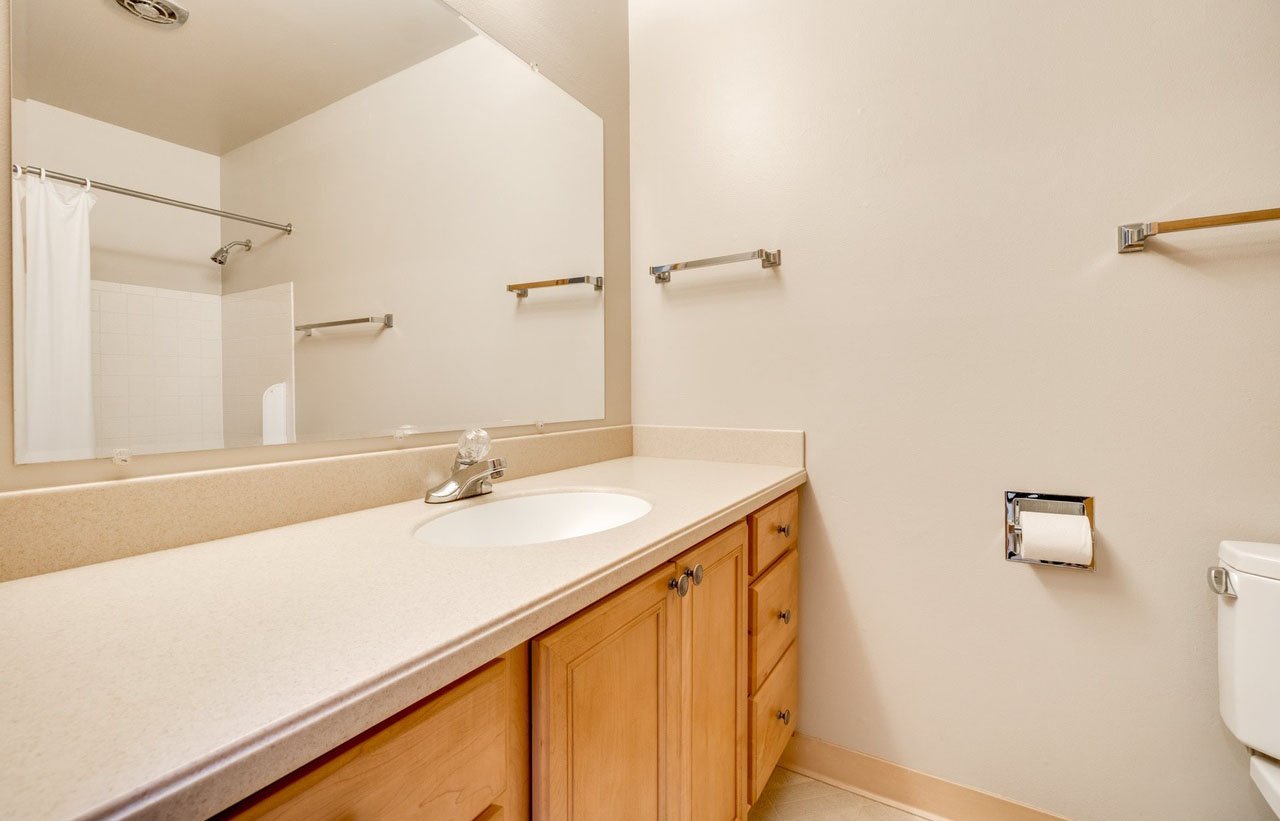
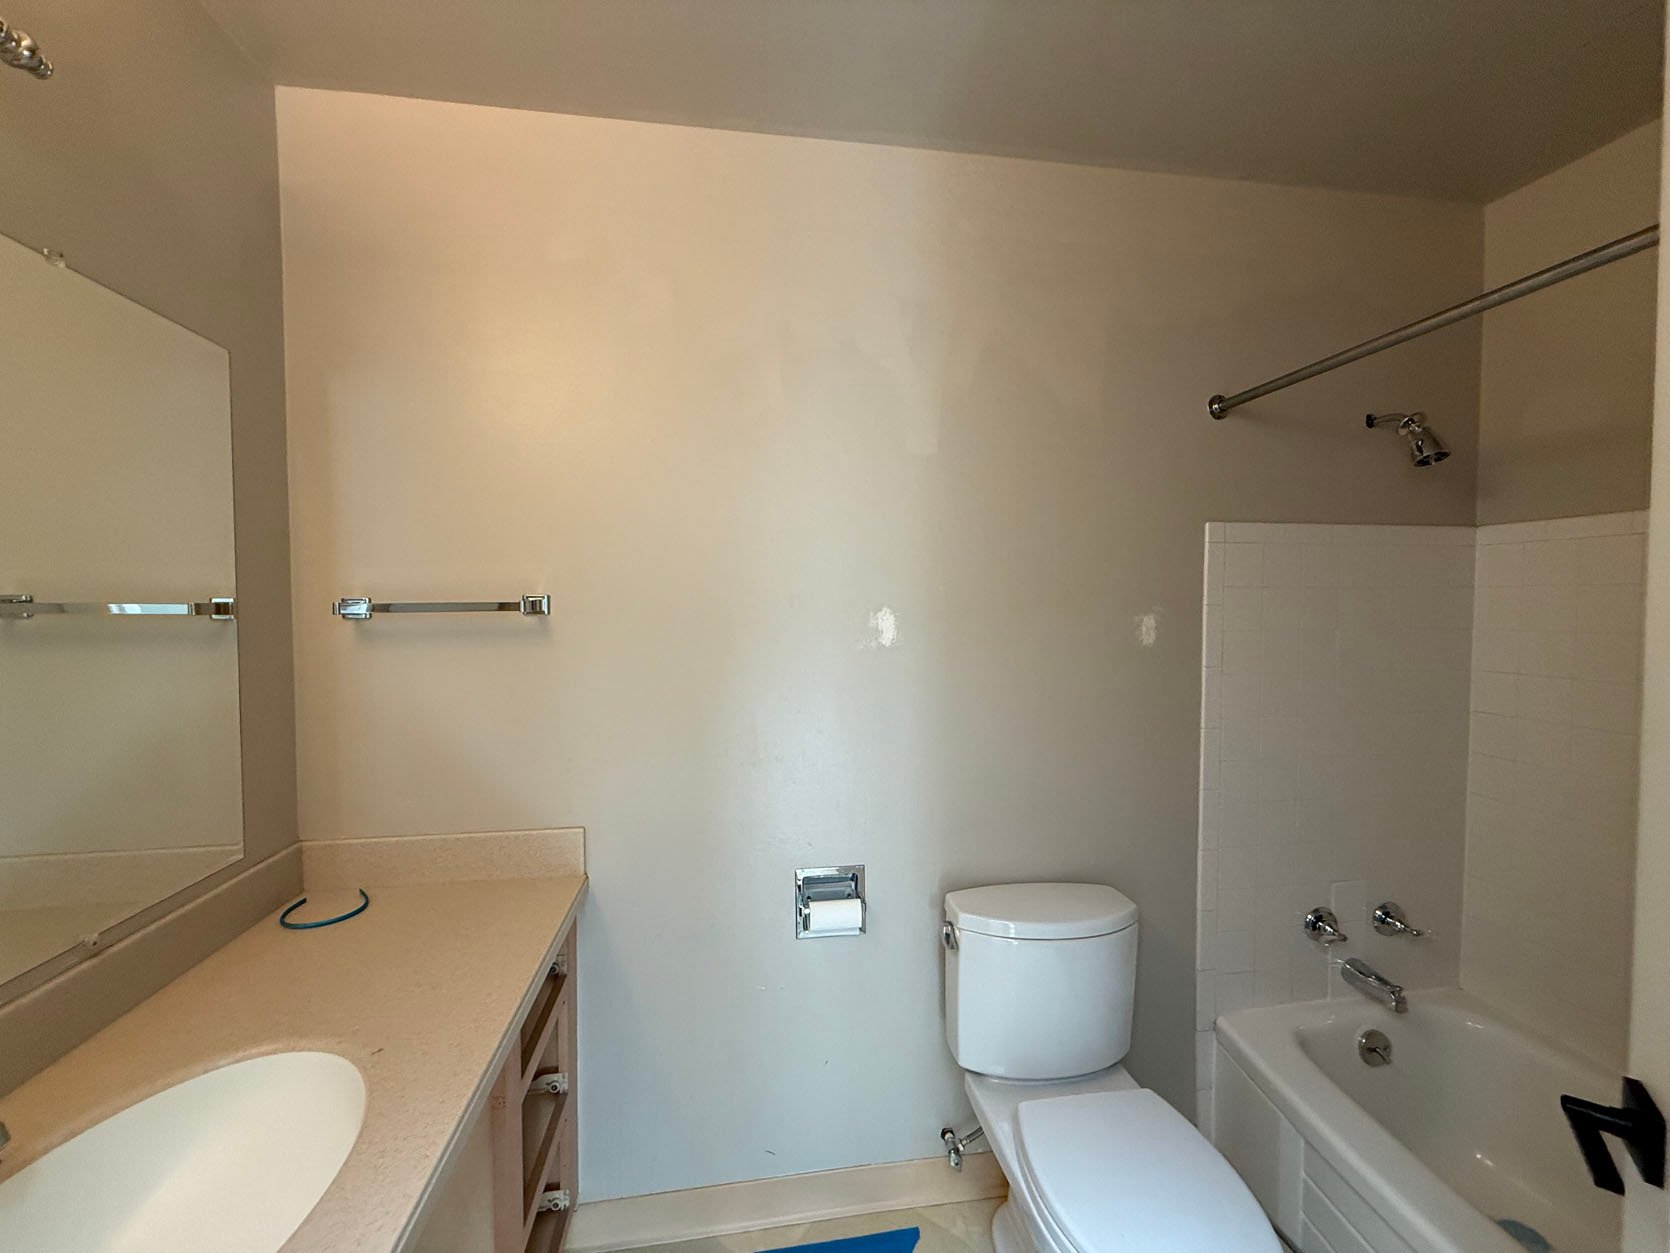

Honestly, compared to the primary bathroom, the girls’ wasn’t quite as bad. I mean, both were pretty bad, but the condition of the tile in this one wasn’t quite as tragic—and it’s a slightly larger space overall. Unlike the primary, where we had to take down a wall, this one was more straightforward: rip out the old, bring in the new, and make it feel fresh again.
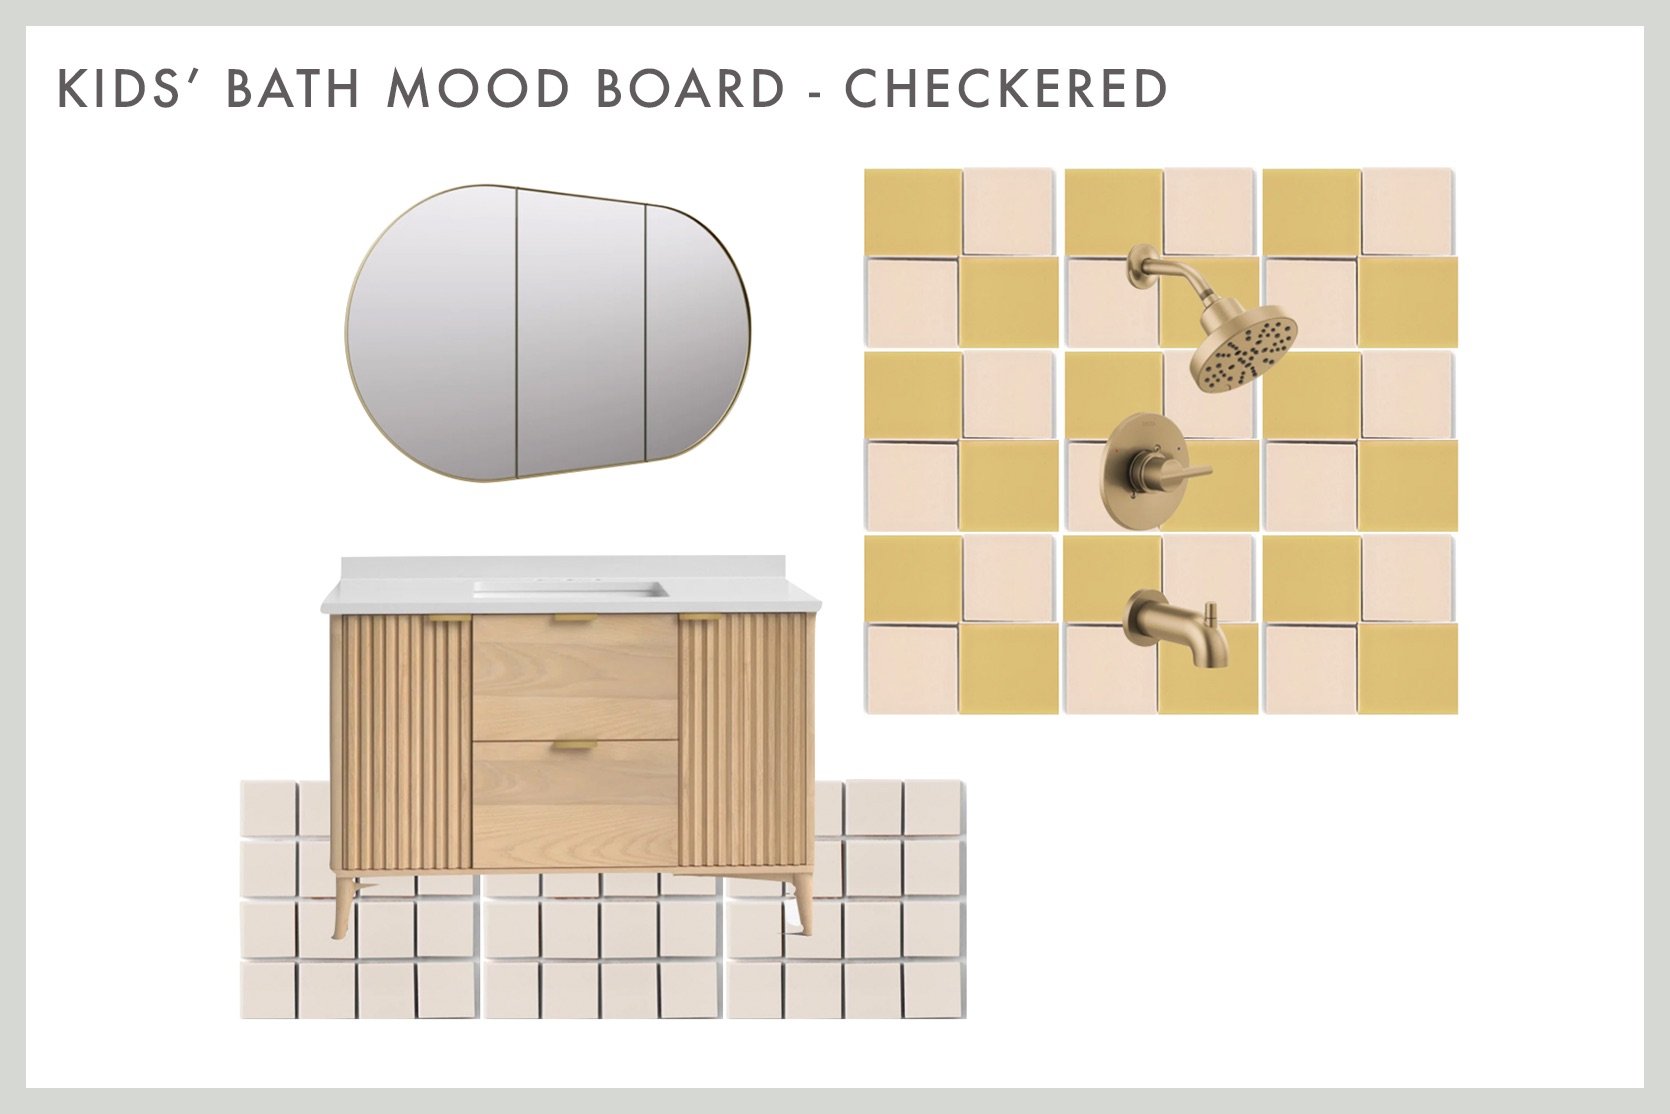
Here was our moodboard for the space…
If you remember, designing this bathroom felt way more challenging to me than working on our primary. I think there are a few reasons for that. First, when we have guests over, this is the bathroom they’re more likely to see. Some of our friends didn’t even realize we had a bathroom off our bedroom until our reveal last week! (Ha!)
We also have a half bath off the kitchen that we quickly updated during our big main floor remodel—we carried the hardwood floors in, painted it white, added an inexpensive vanity, and called it good. It’s teeny-tiny, but it definitely has potential. I’m kind of hoping to give it a little refresh in the New Year—maybe some fun wallpaper? Stay tuned.
Anyway, since more people are likely to see the girls’ bathroom than the primary, designing it carried a little extra pressure. I wanted it to feel fun and playful for them now, but as I mentioned in my previous post, also a space that won’t feel too “little girl” as they get older. If I’m being honest, I’m not totally sure I’ve nailed that balance—but for now, it’s pretty cute 🙂
The Tile Saga
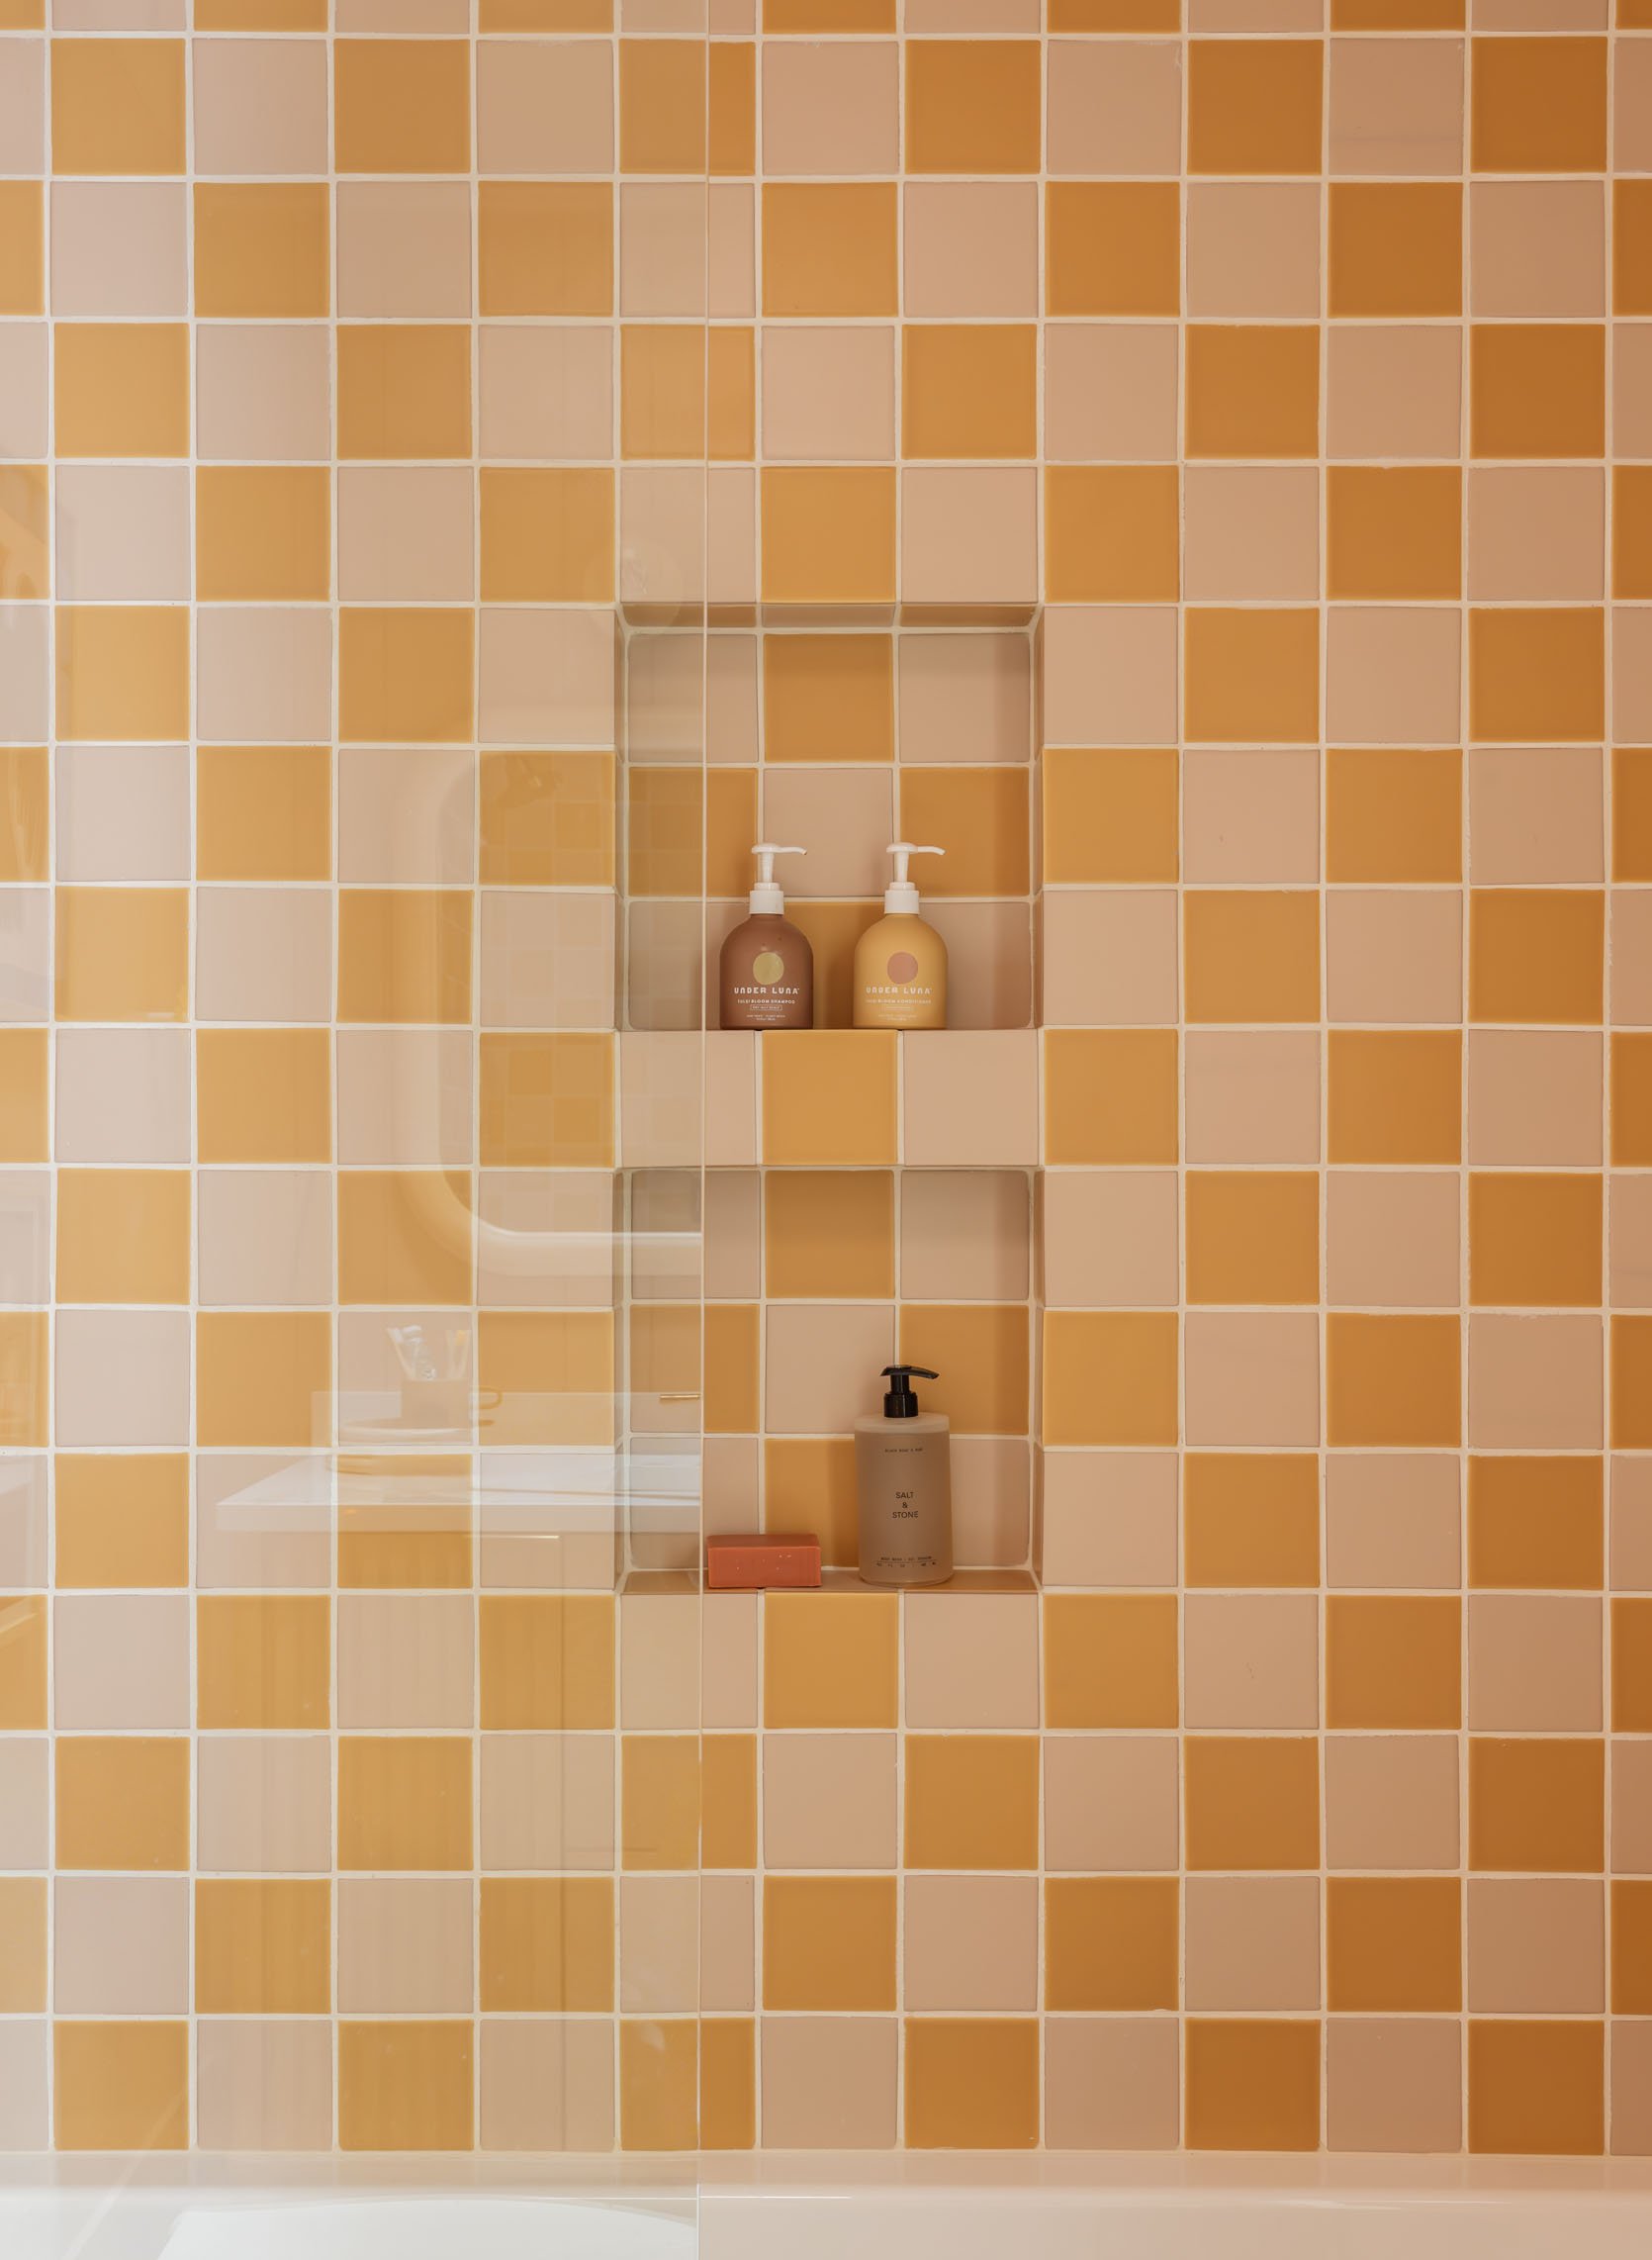
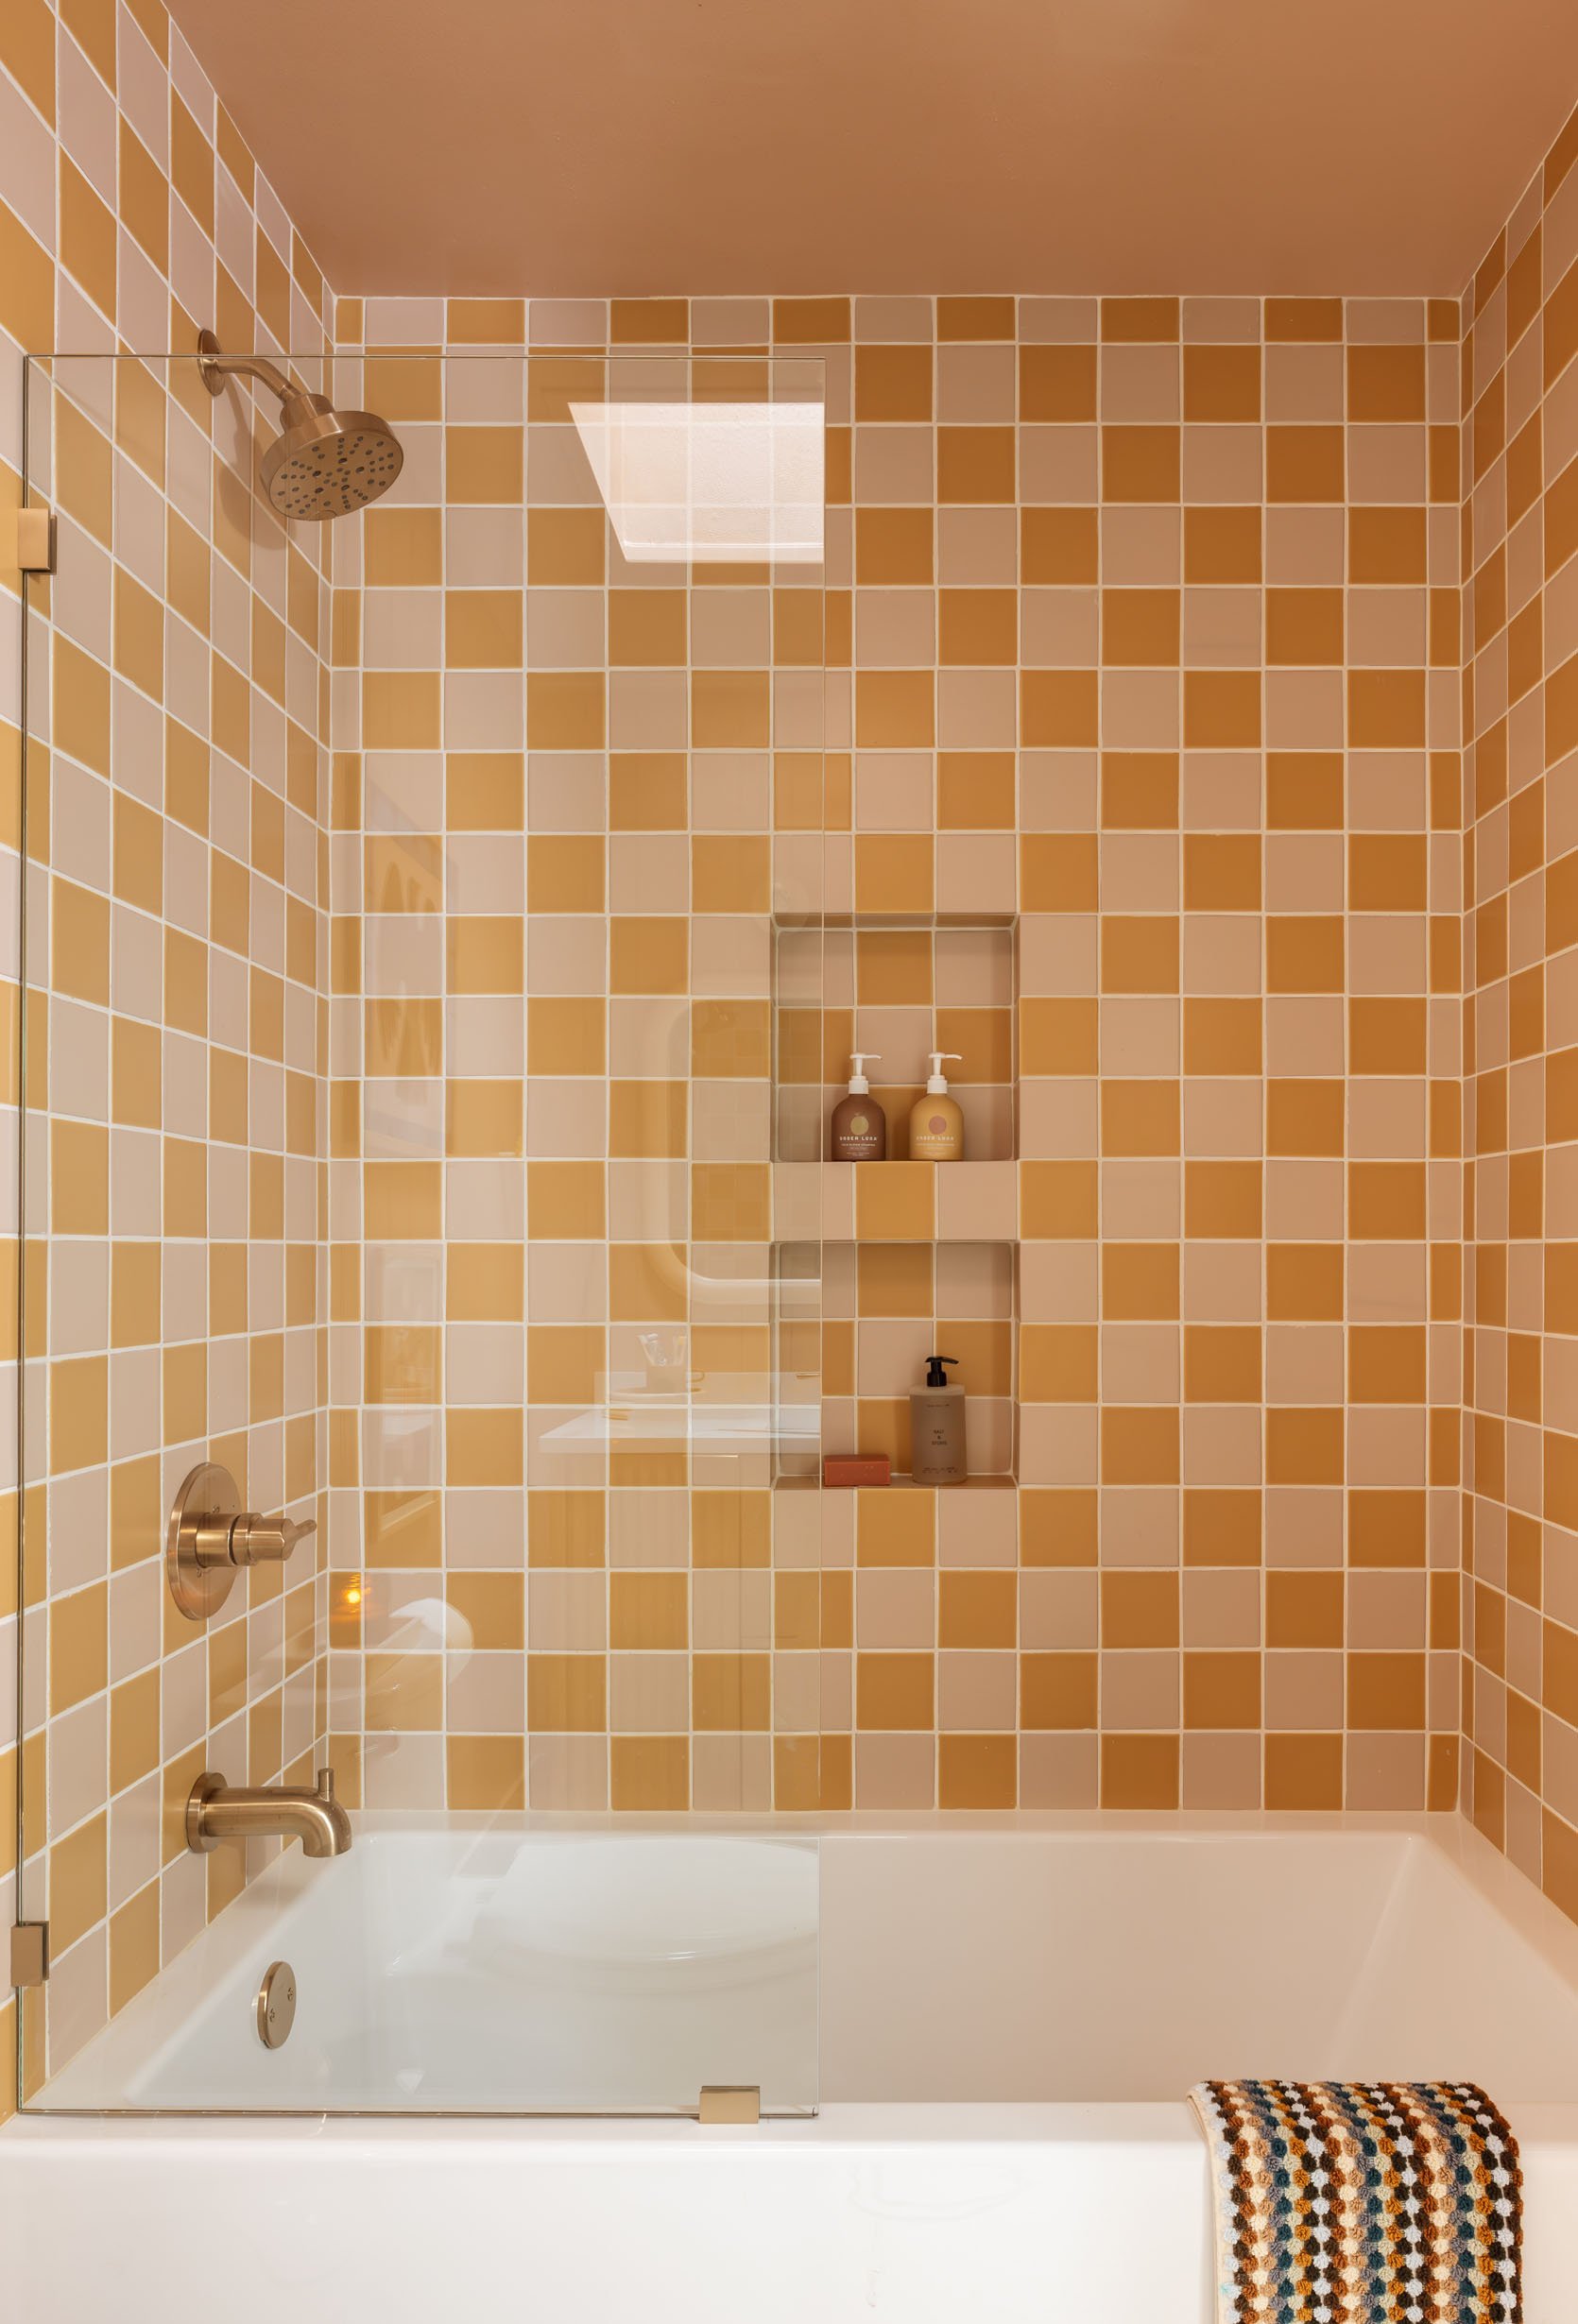
The morning our tile installers arrived, my husband and I both had a brief moment of panic. I was about to head out for a shoot when he came rushing in, asking, “Are you completely sure you want to do the patterned tile in the girls’ bathroom and not just a solid?” Truthfully, I’d been second-guessing it myself—should we go checkered, vertical stripe, horizontal stripe? I had just shared our bathroom plans here on the blog a couple of weeks earlier, and all the feedback about the tile pattern had me questioning things. Should we just play it safe and go with a solid?
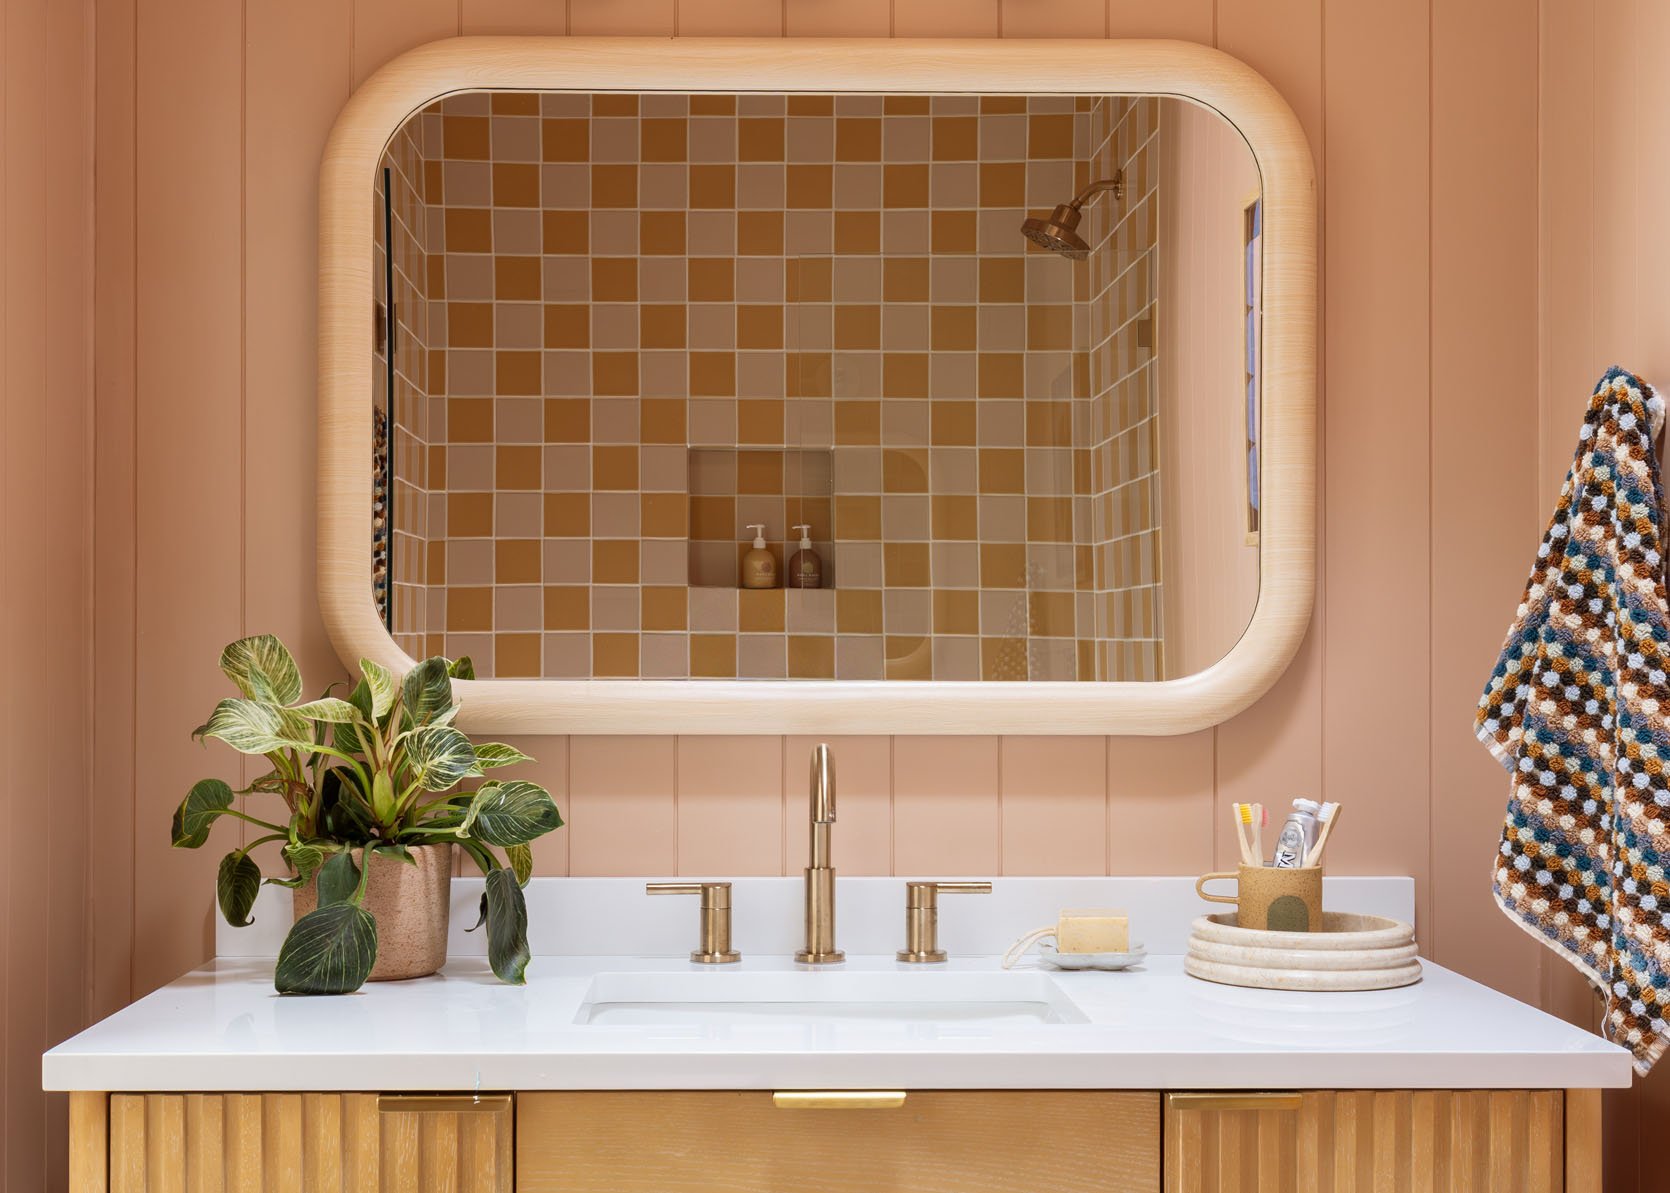
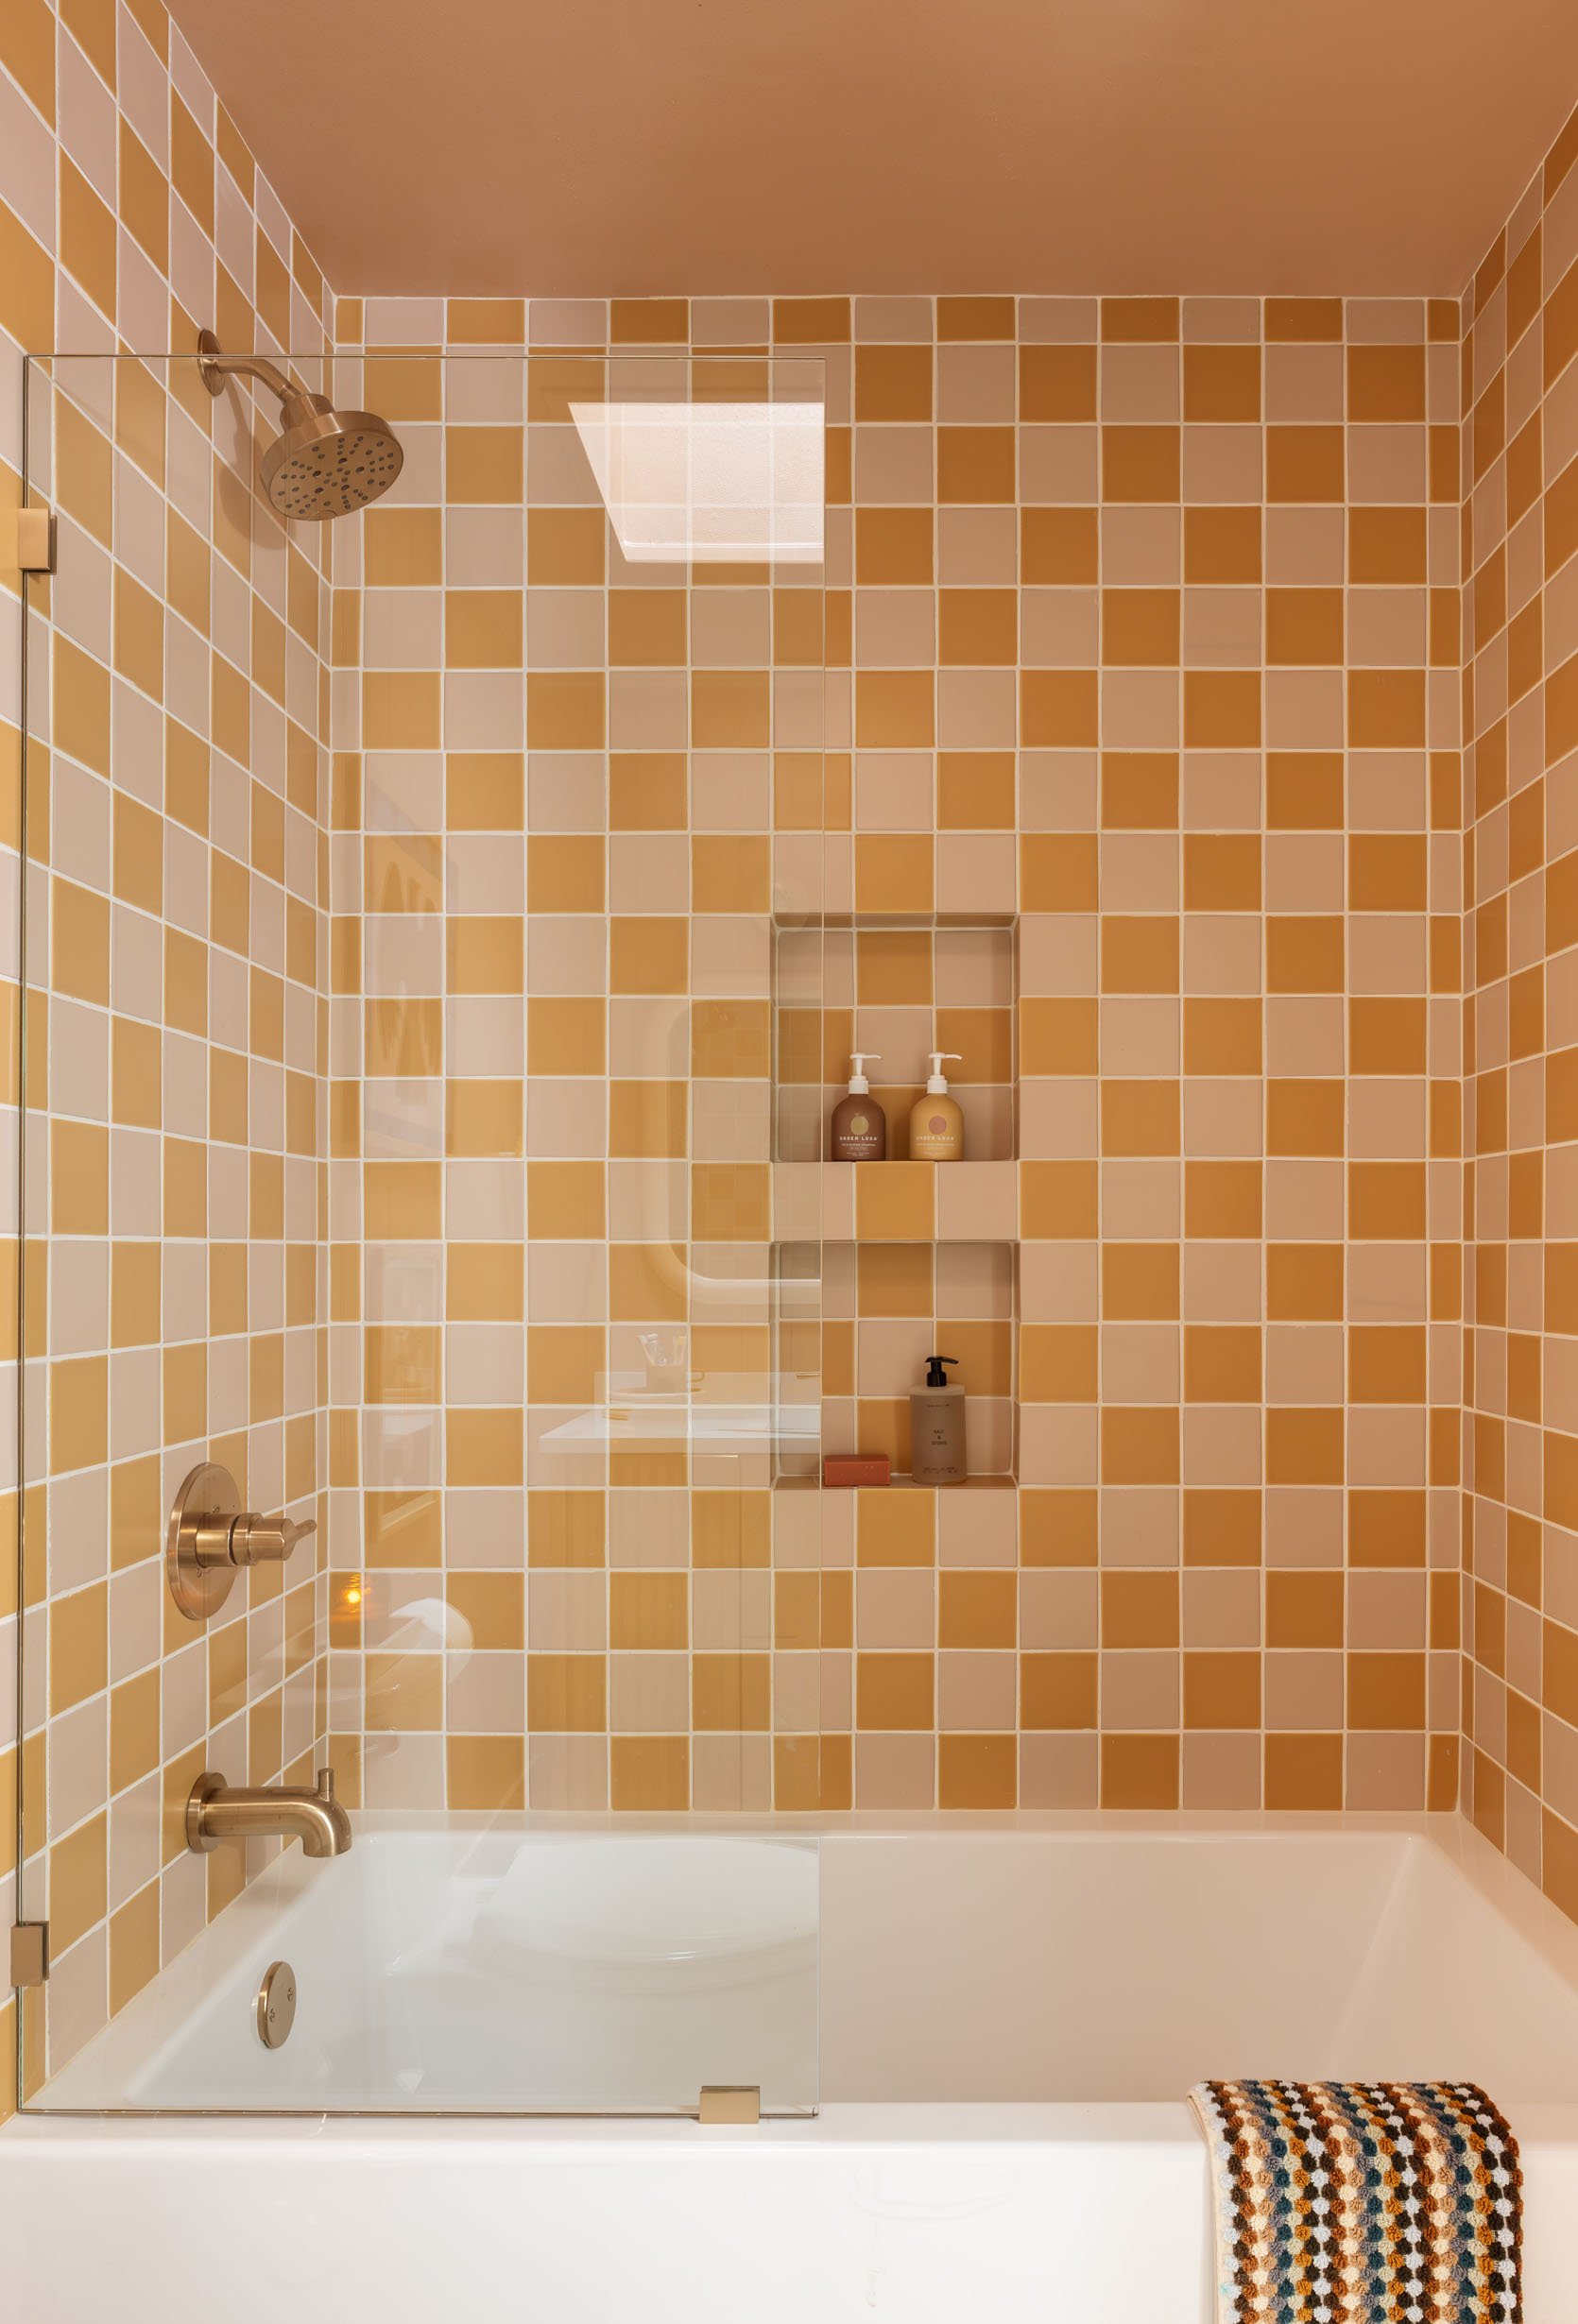
When my husband admitted he wasn’t sure if he was sold on the checkered layout either, I started to worry we’d be making a mistake. We ran out to the garage to count how much of the yellow tile we had, and realized we were just a couple of boxes short of being able to pivot and go all solid yellow. Thankfully, we didn’t have enough to change course—because in the end, the pattern completely transformed the space (as you can see in these process shots, we went with checkered). It brings such a playful vibe to the space, and now I can’t imagine it any other way. My husband and I are both so happy with the result.
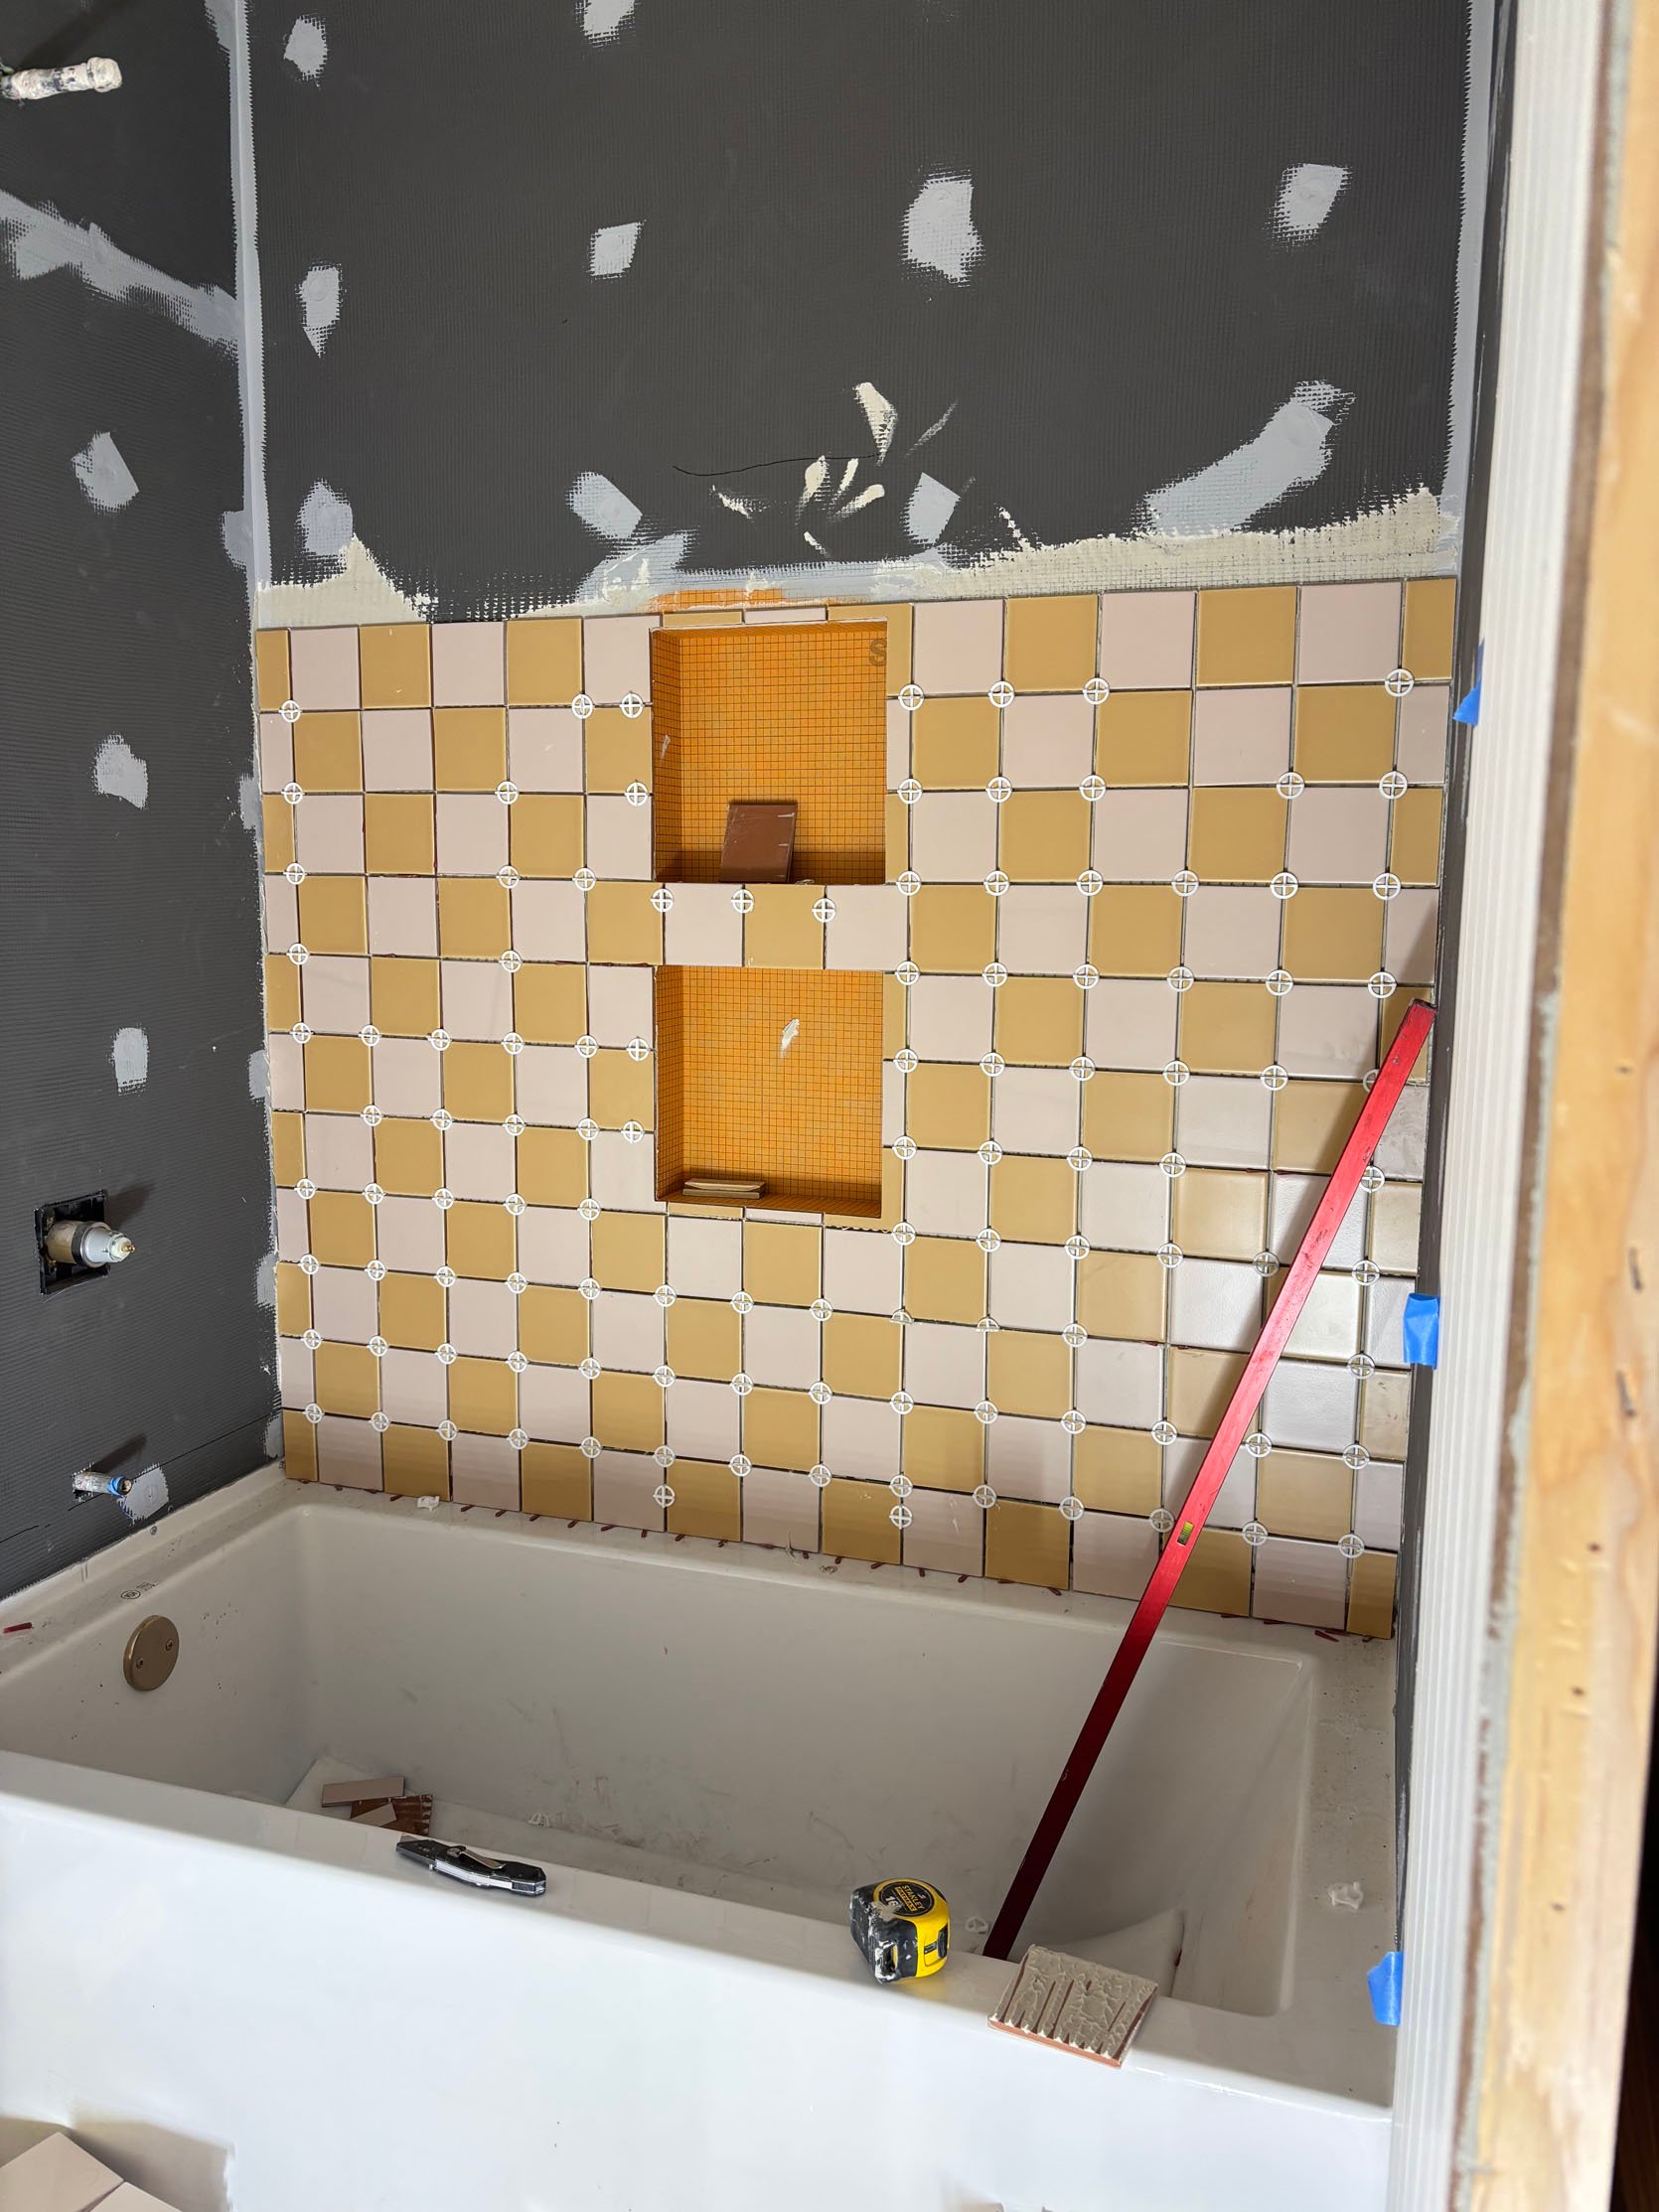
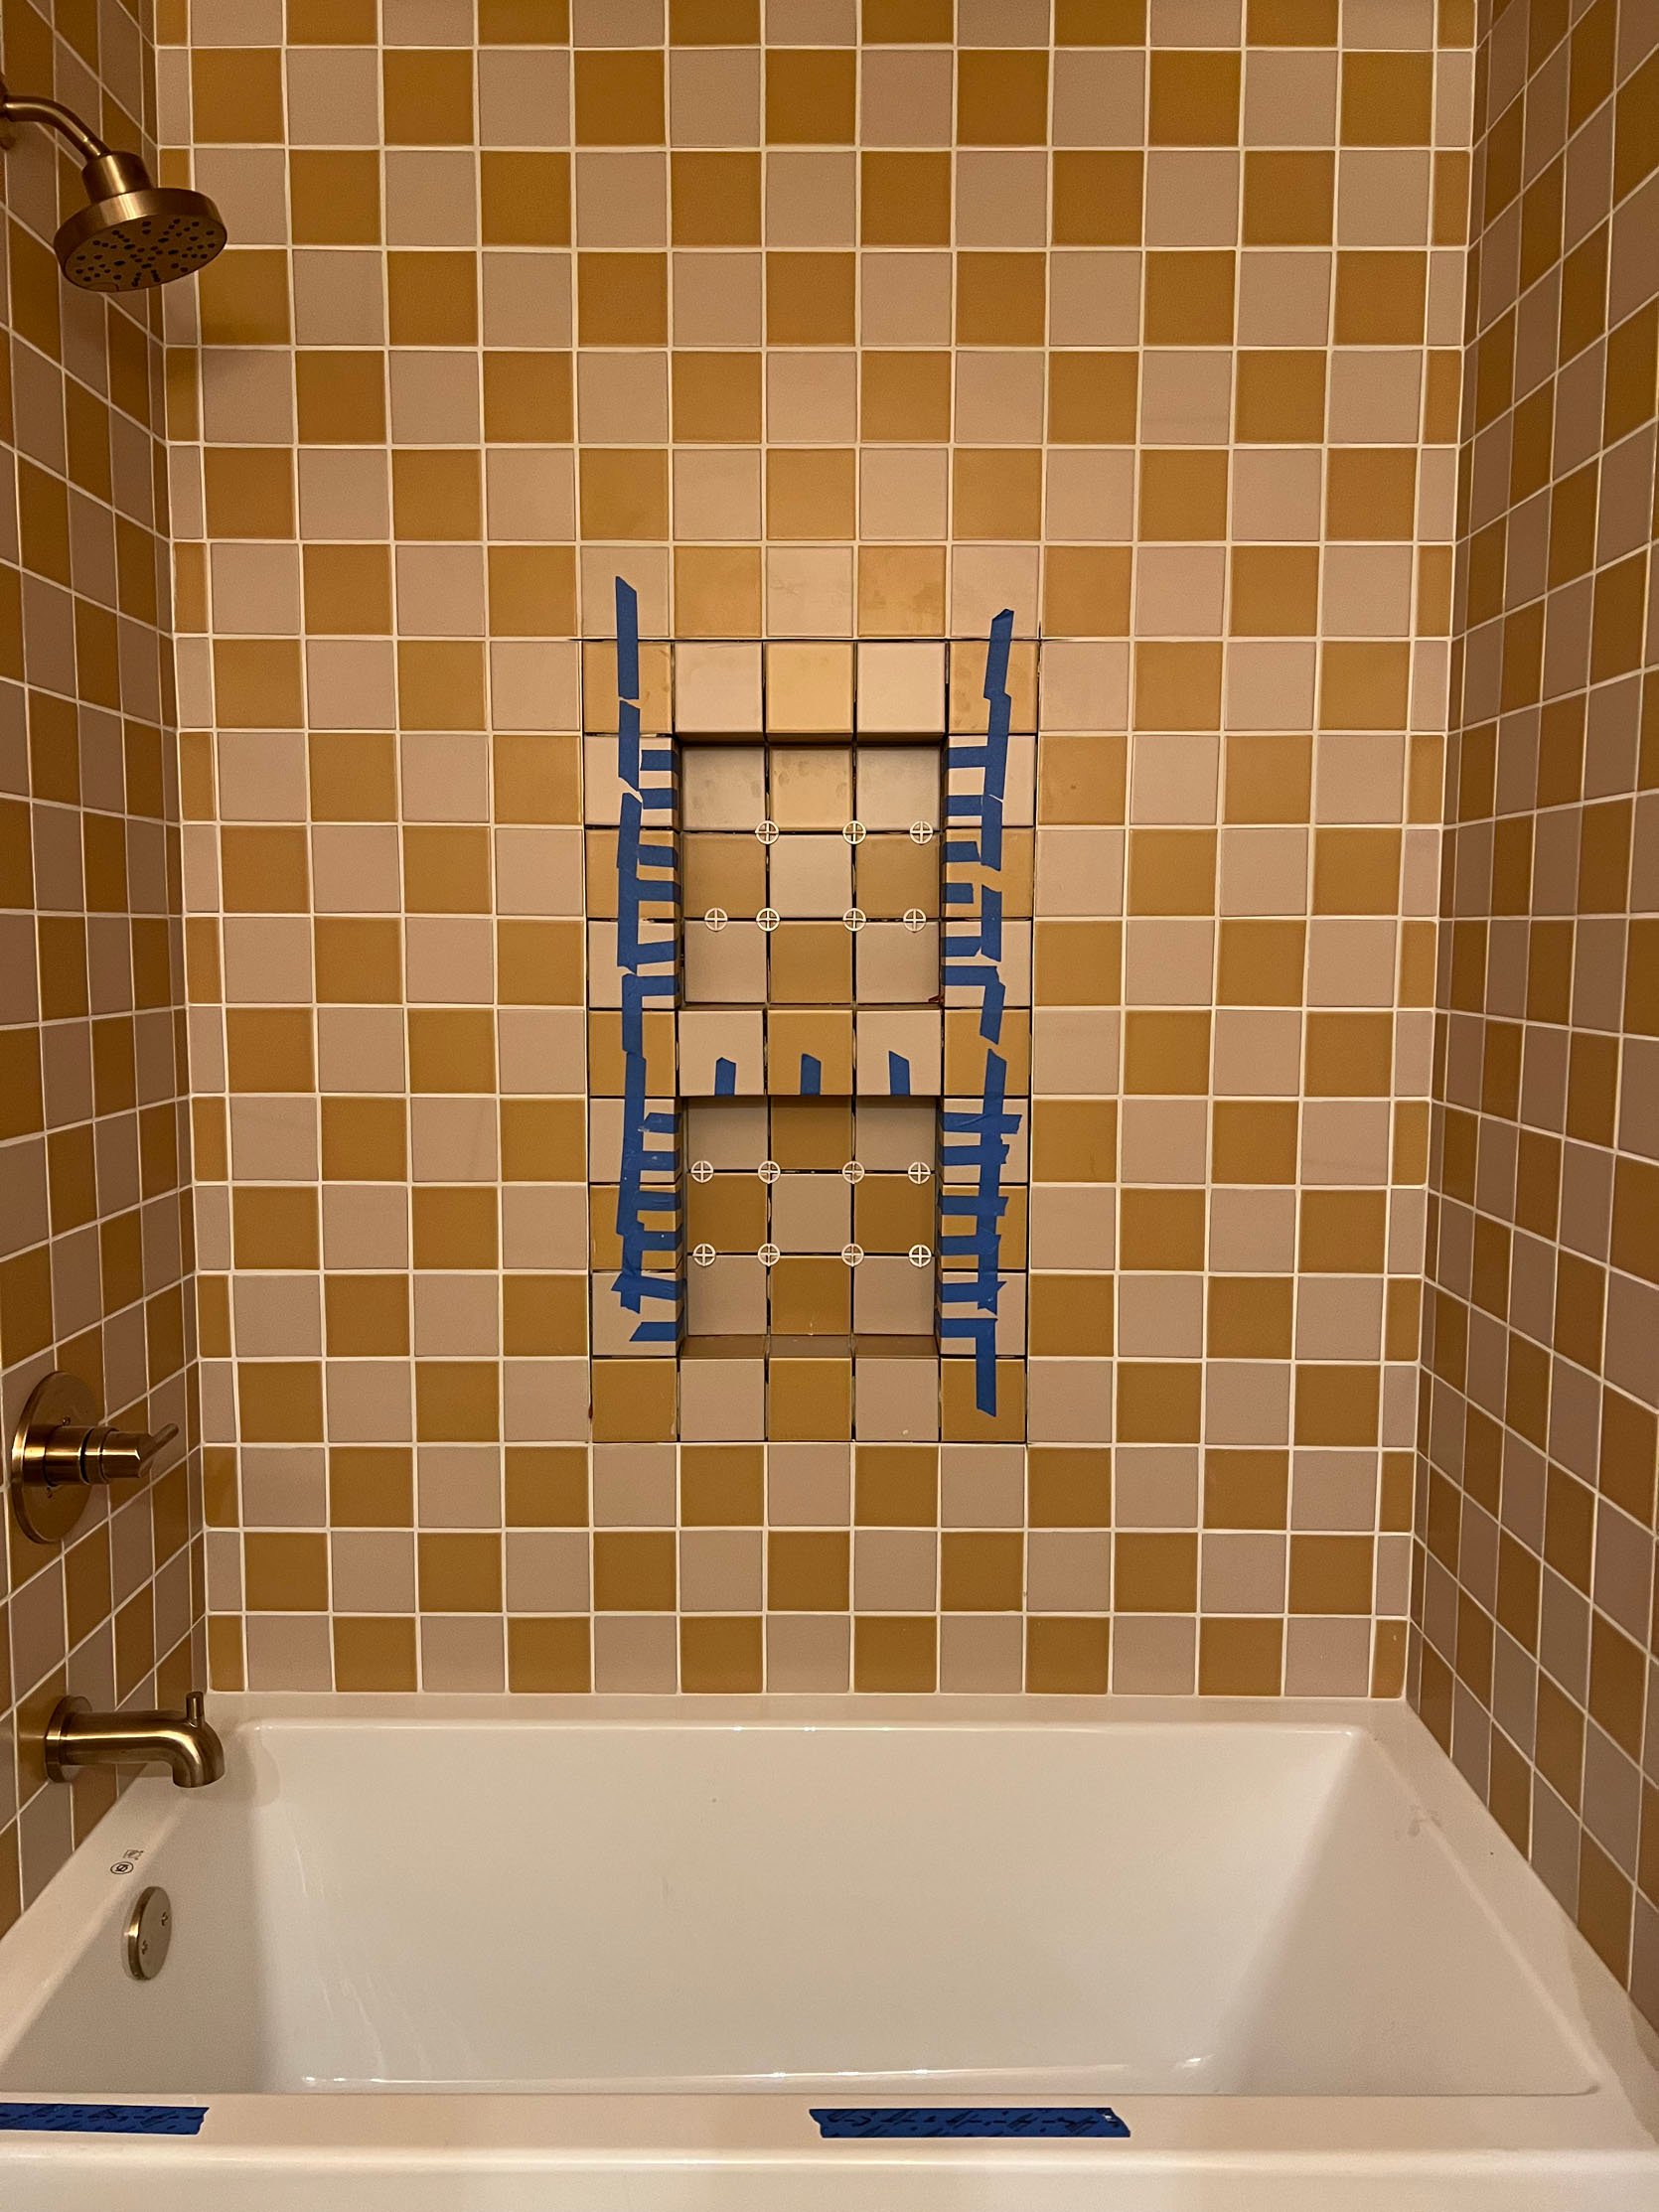
Alright, here’s where things got a little tricky for me. It might have been because I’ve never designed a bathroom before and wasn’t totally clear in my communication with our subcontractors—or maybe because I have a hard time speaking up in situations like this—but when I got home from work the day the tile install began, something around the niches immediately felt off. I loved how the tile itself was looking, so I tried to convince myself it would all come together once the grout was in. (I know, I know—I should’ve said something right then.) But once they finished grouting, it was clear the niche situation wasn’t improving.
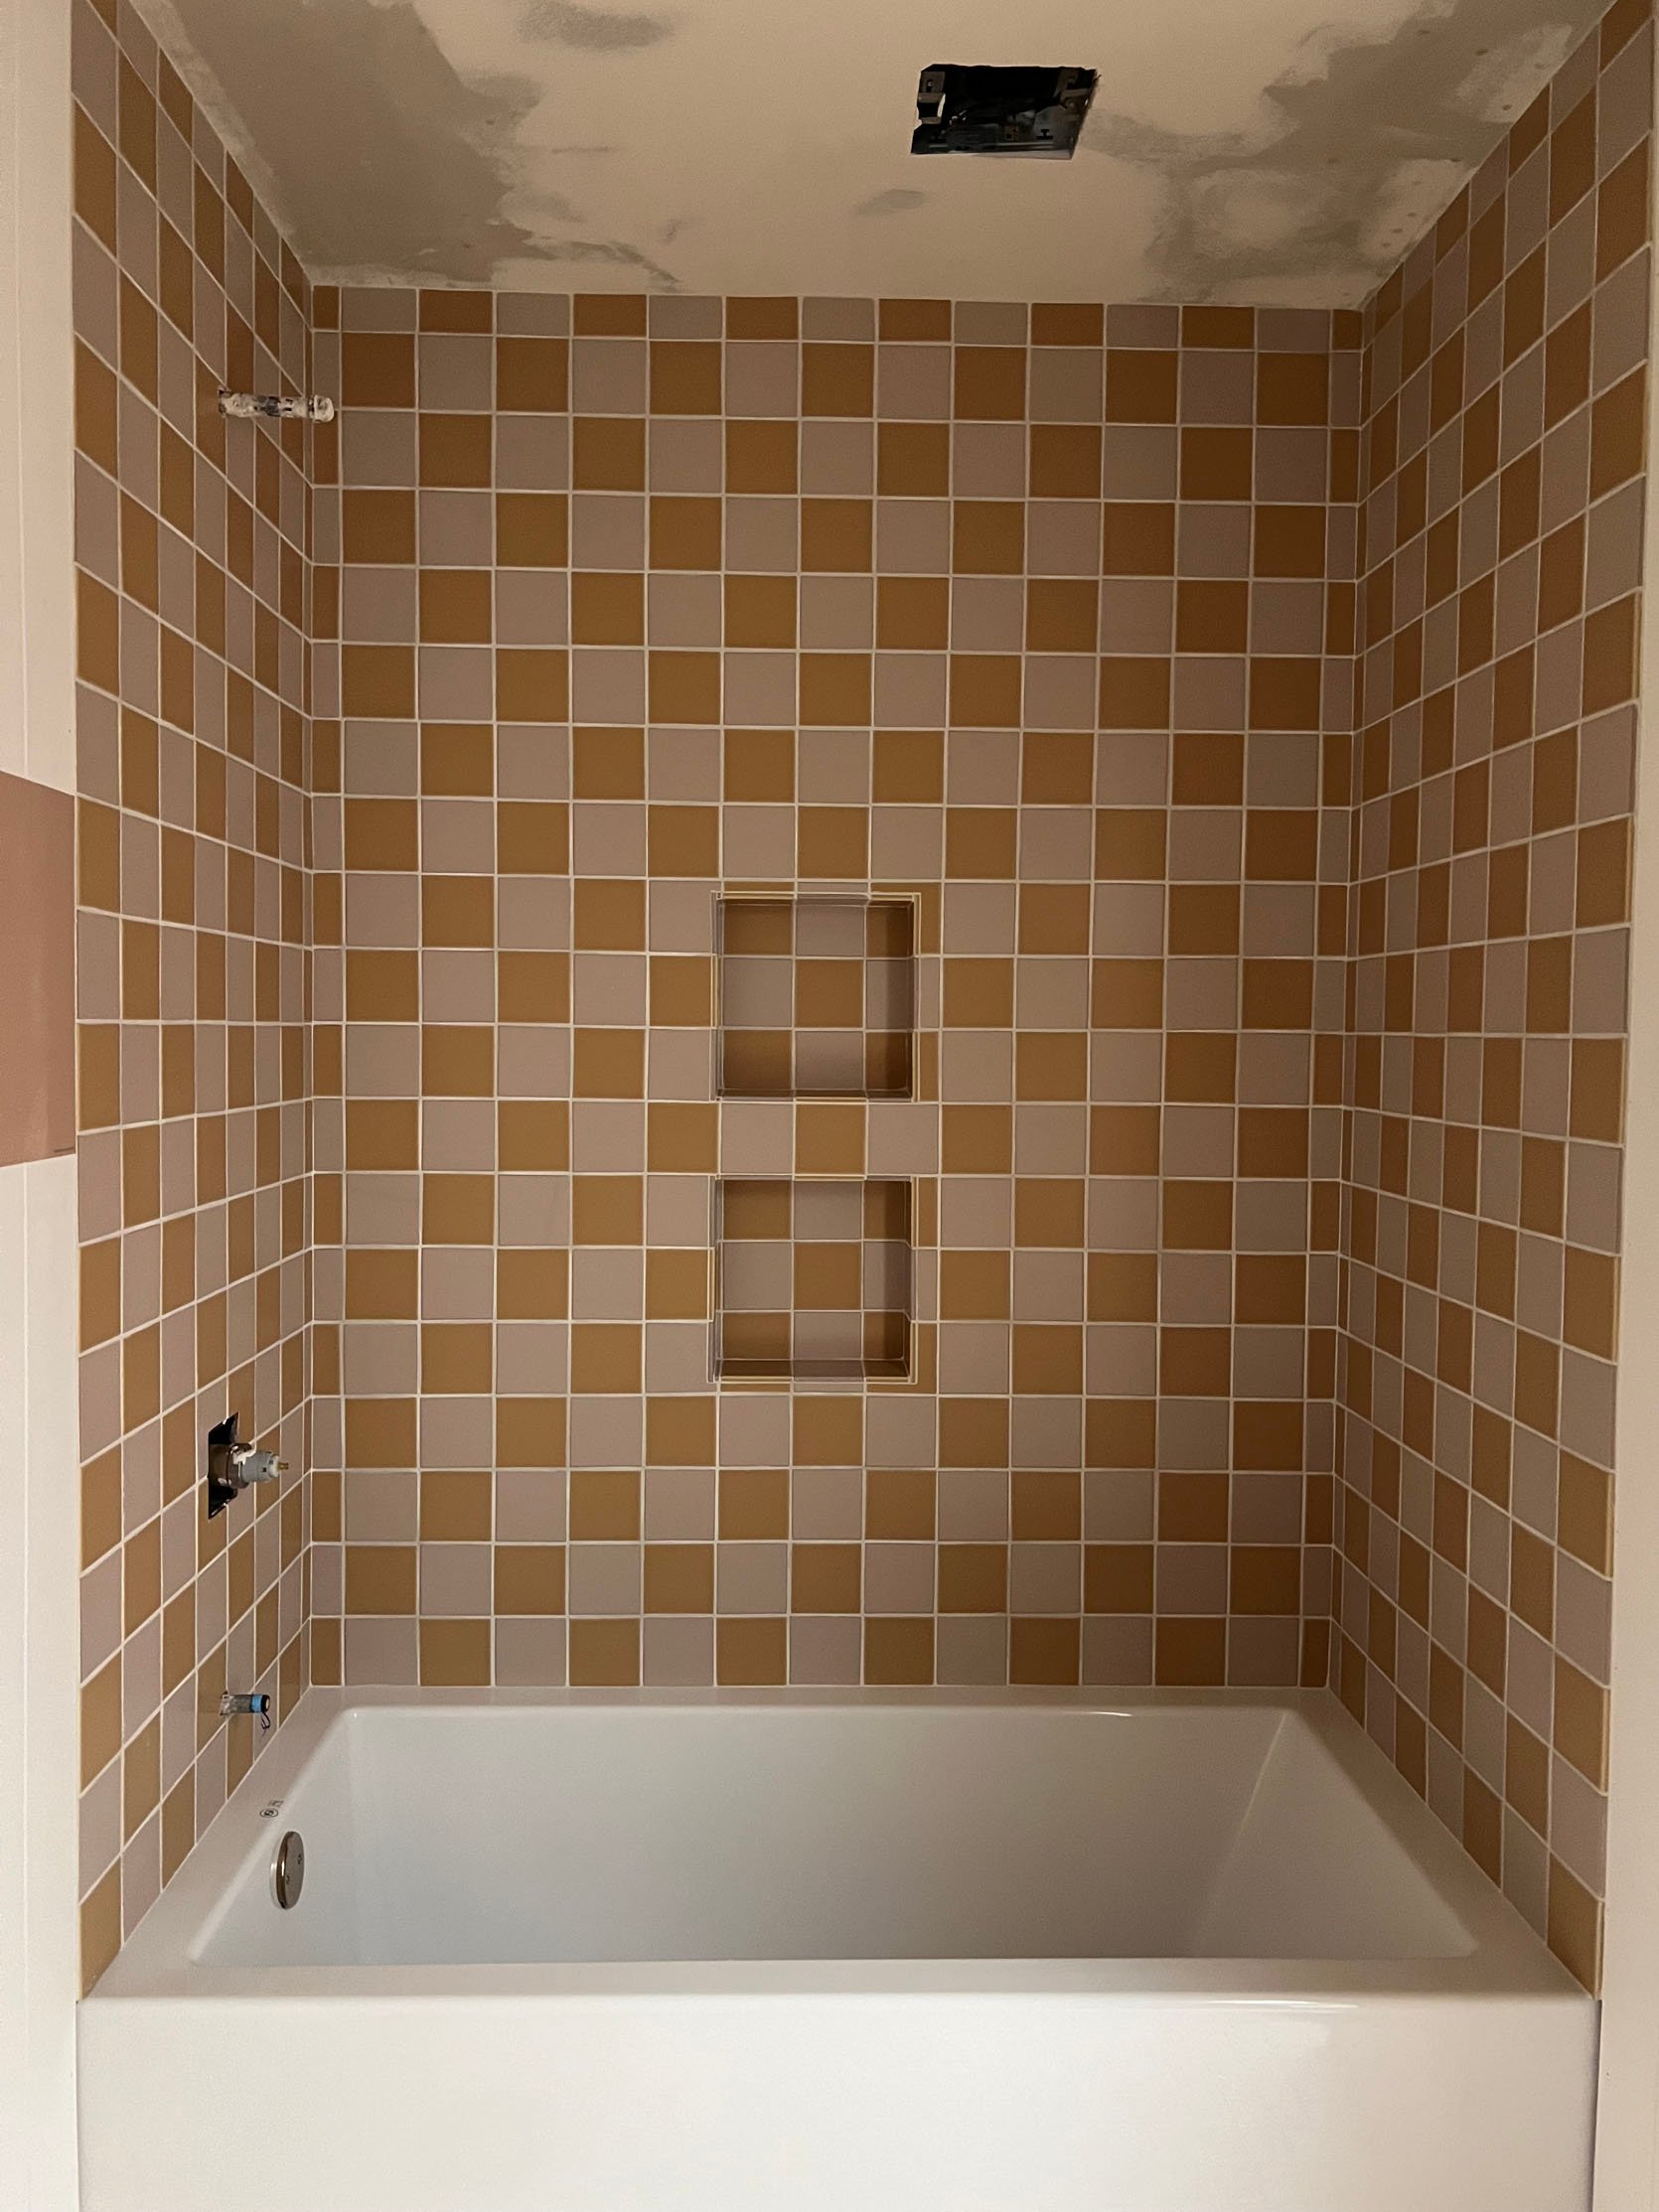
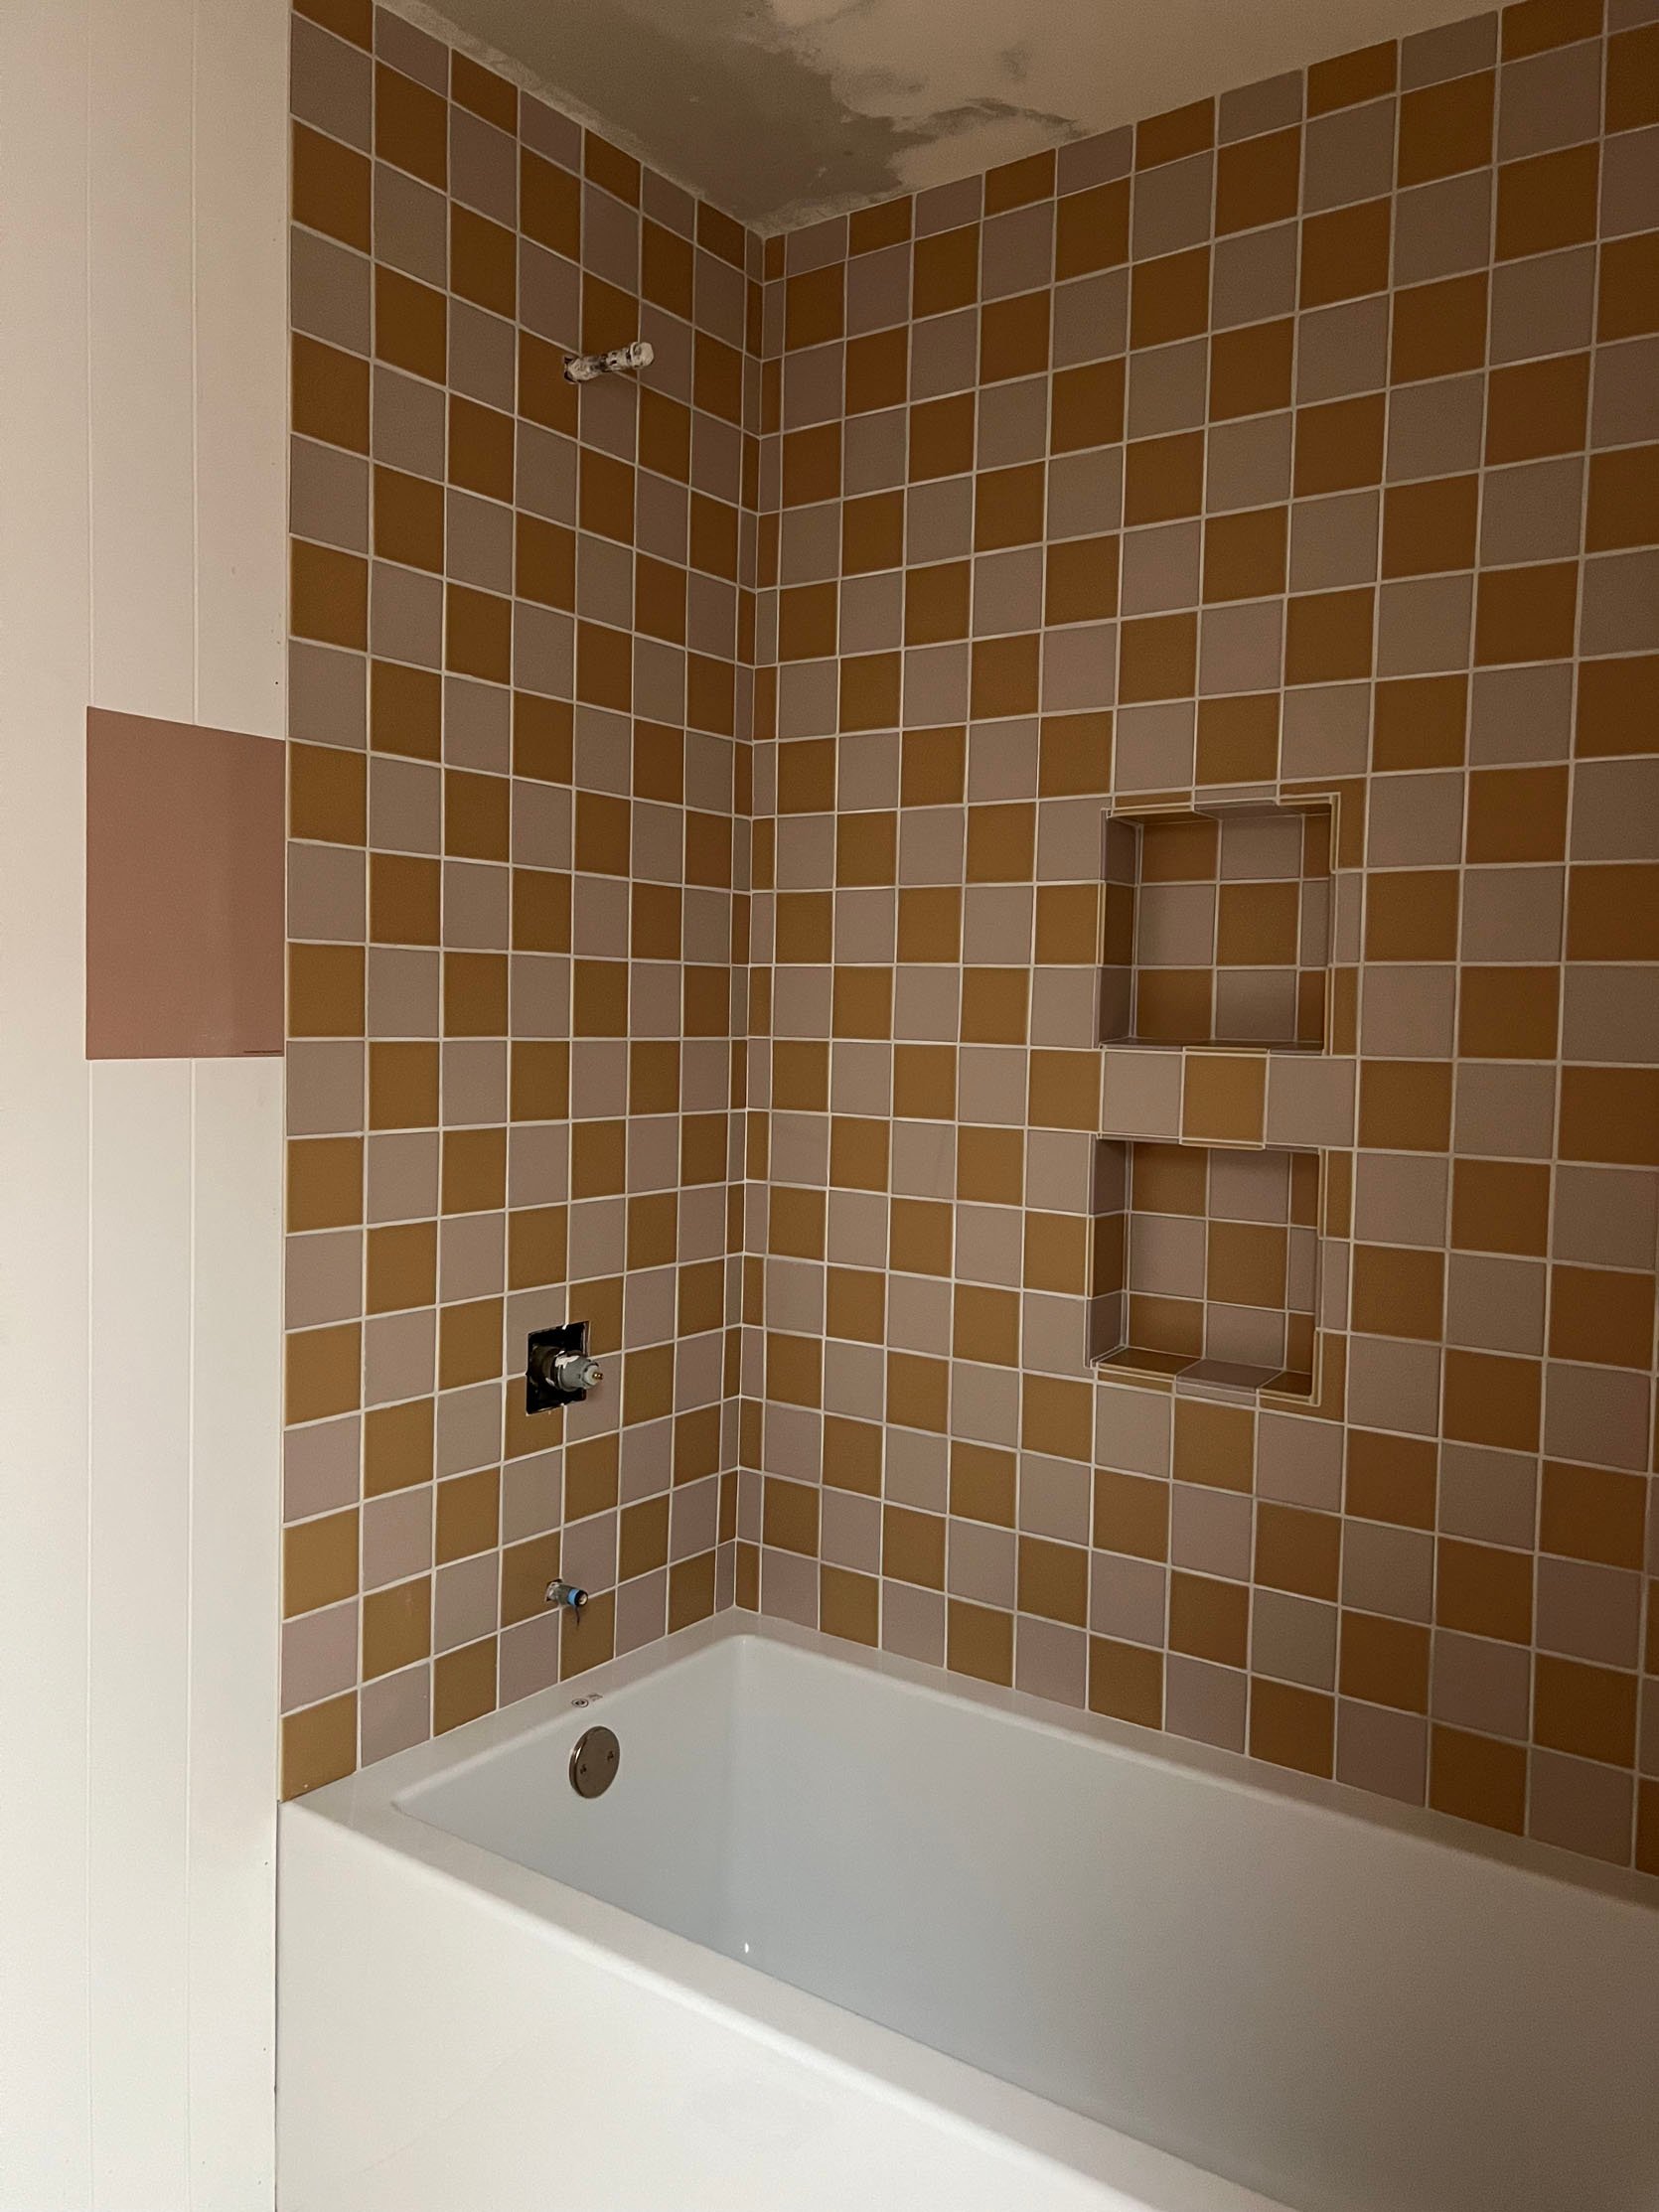
Maybe this sounds dramatic, but I was so bummed. We loved the tile, the color, everything—except that one detail. It felt like I’d completely failed the project (renovation emotions are so, so real). In my mind, it was done, set in grout, and we’d just have to live with it. I texted Emily a flood of photos over the weekend while she patiently talked me off the ledge (I’m fully aware this is a very privileged problem), and she simply said, “Why don’t you just call your tile guy and see if he can fix it?” It honestly hadn’t even occurred to me that it was an option. Again, I sometimes have a hard time speaking up in these types of situations. But sure enough, he came back the next day, fixed it, and was so kind about the whole thing.
Alright, that’s all for reno drama. I think it’s time for the final reveal…
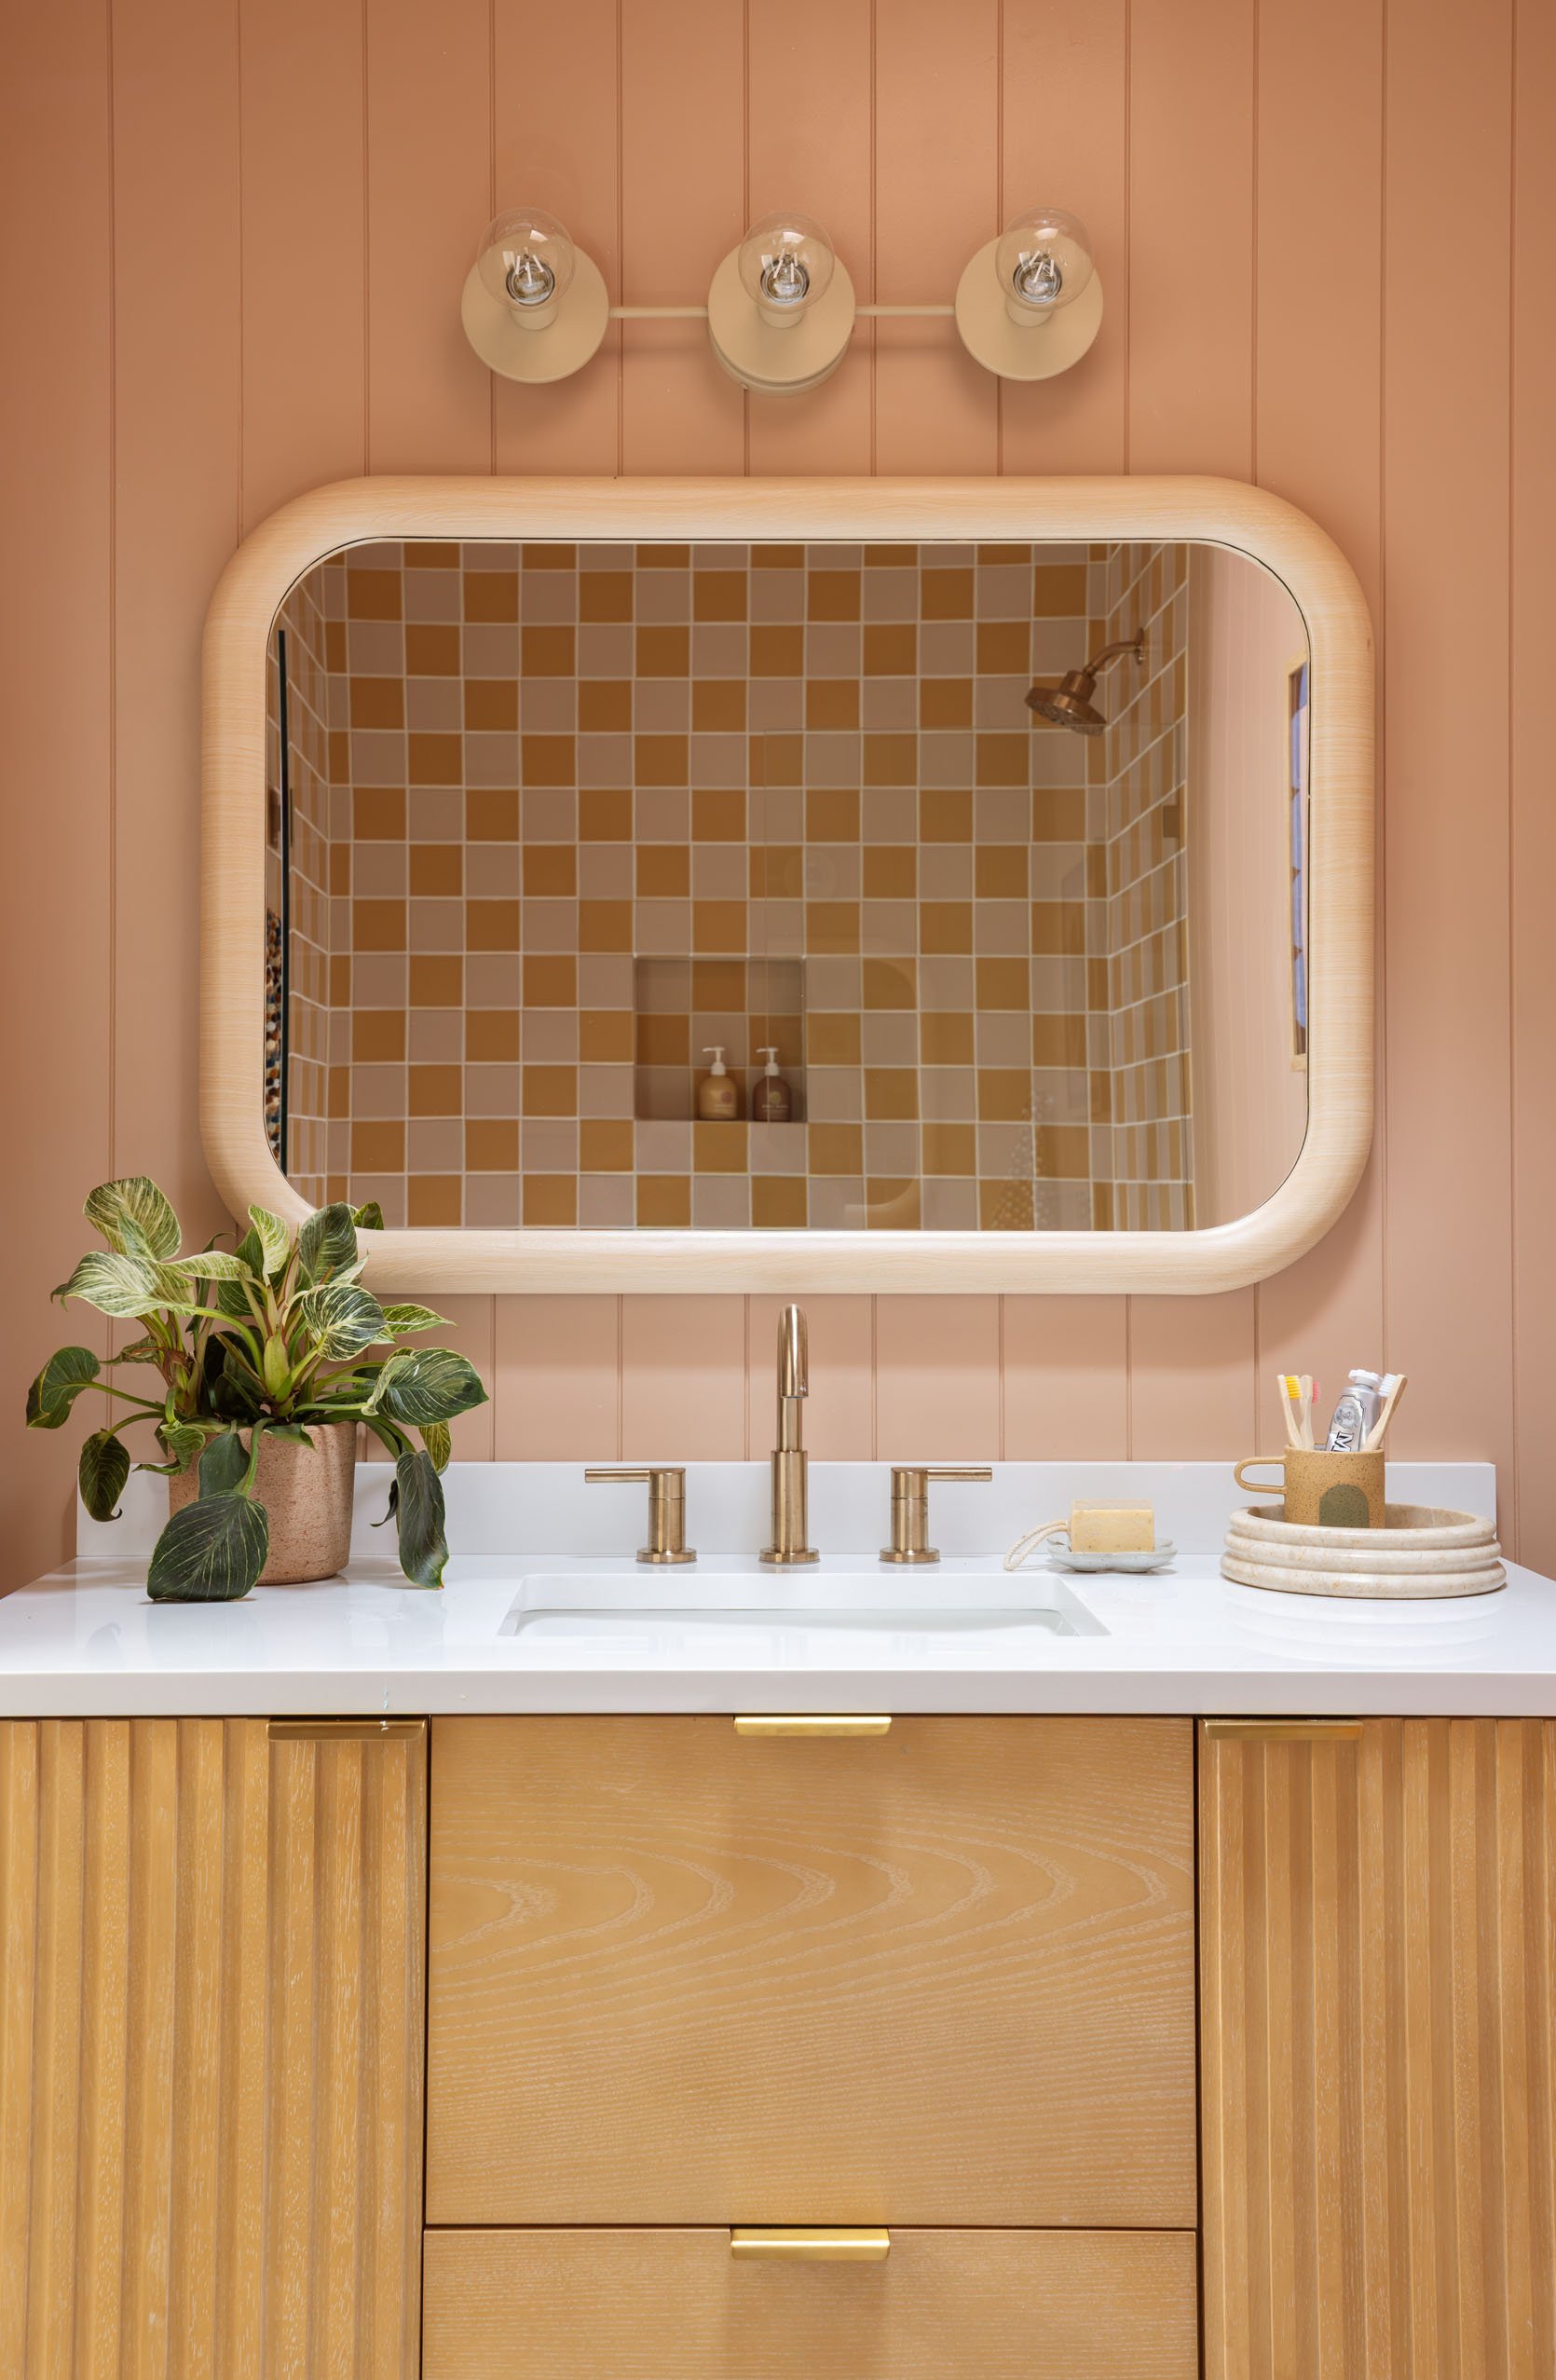
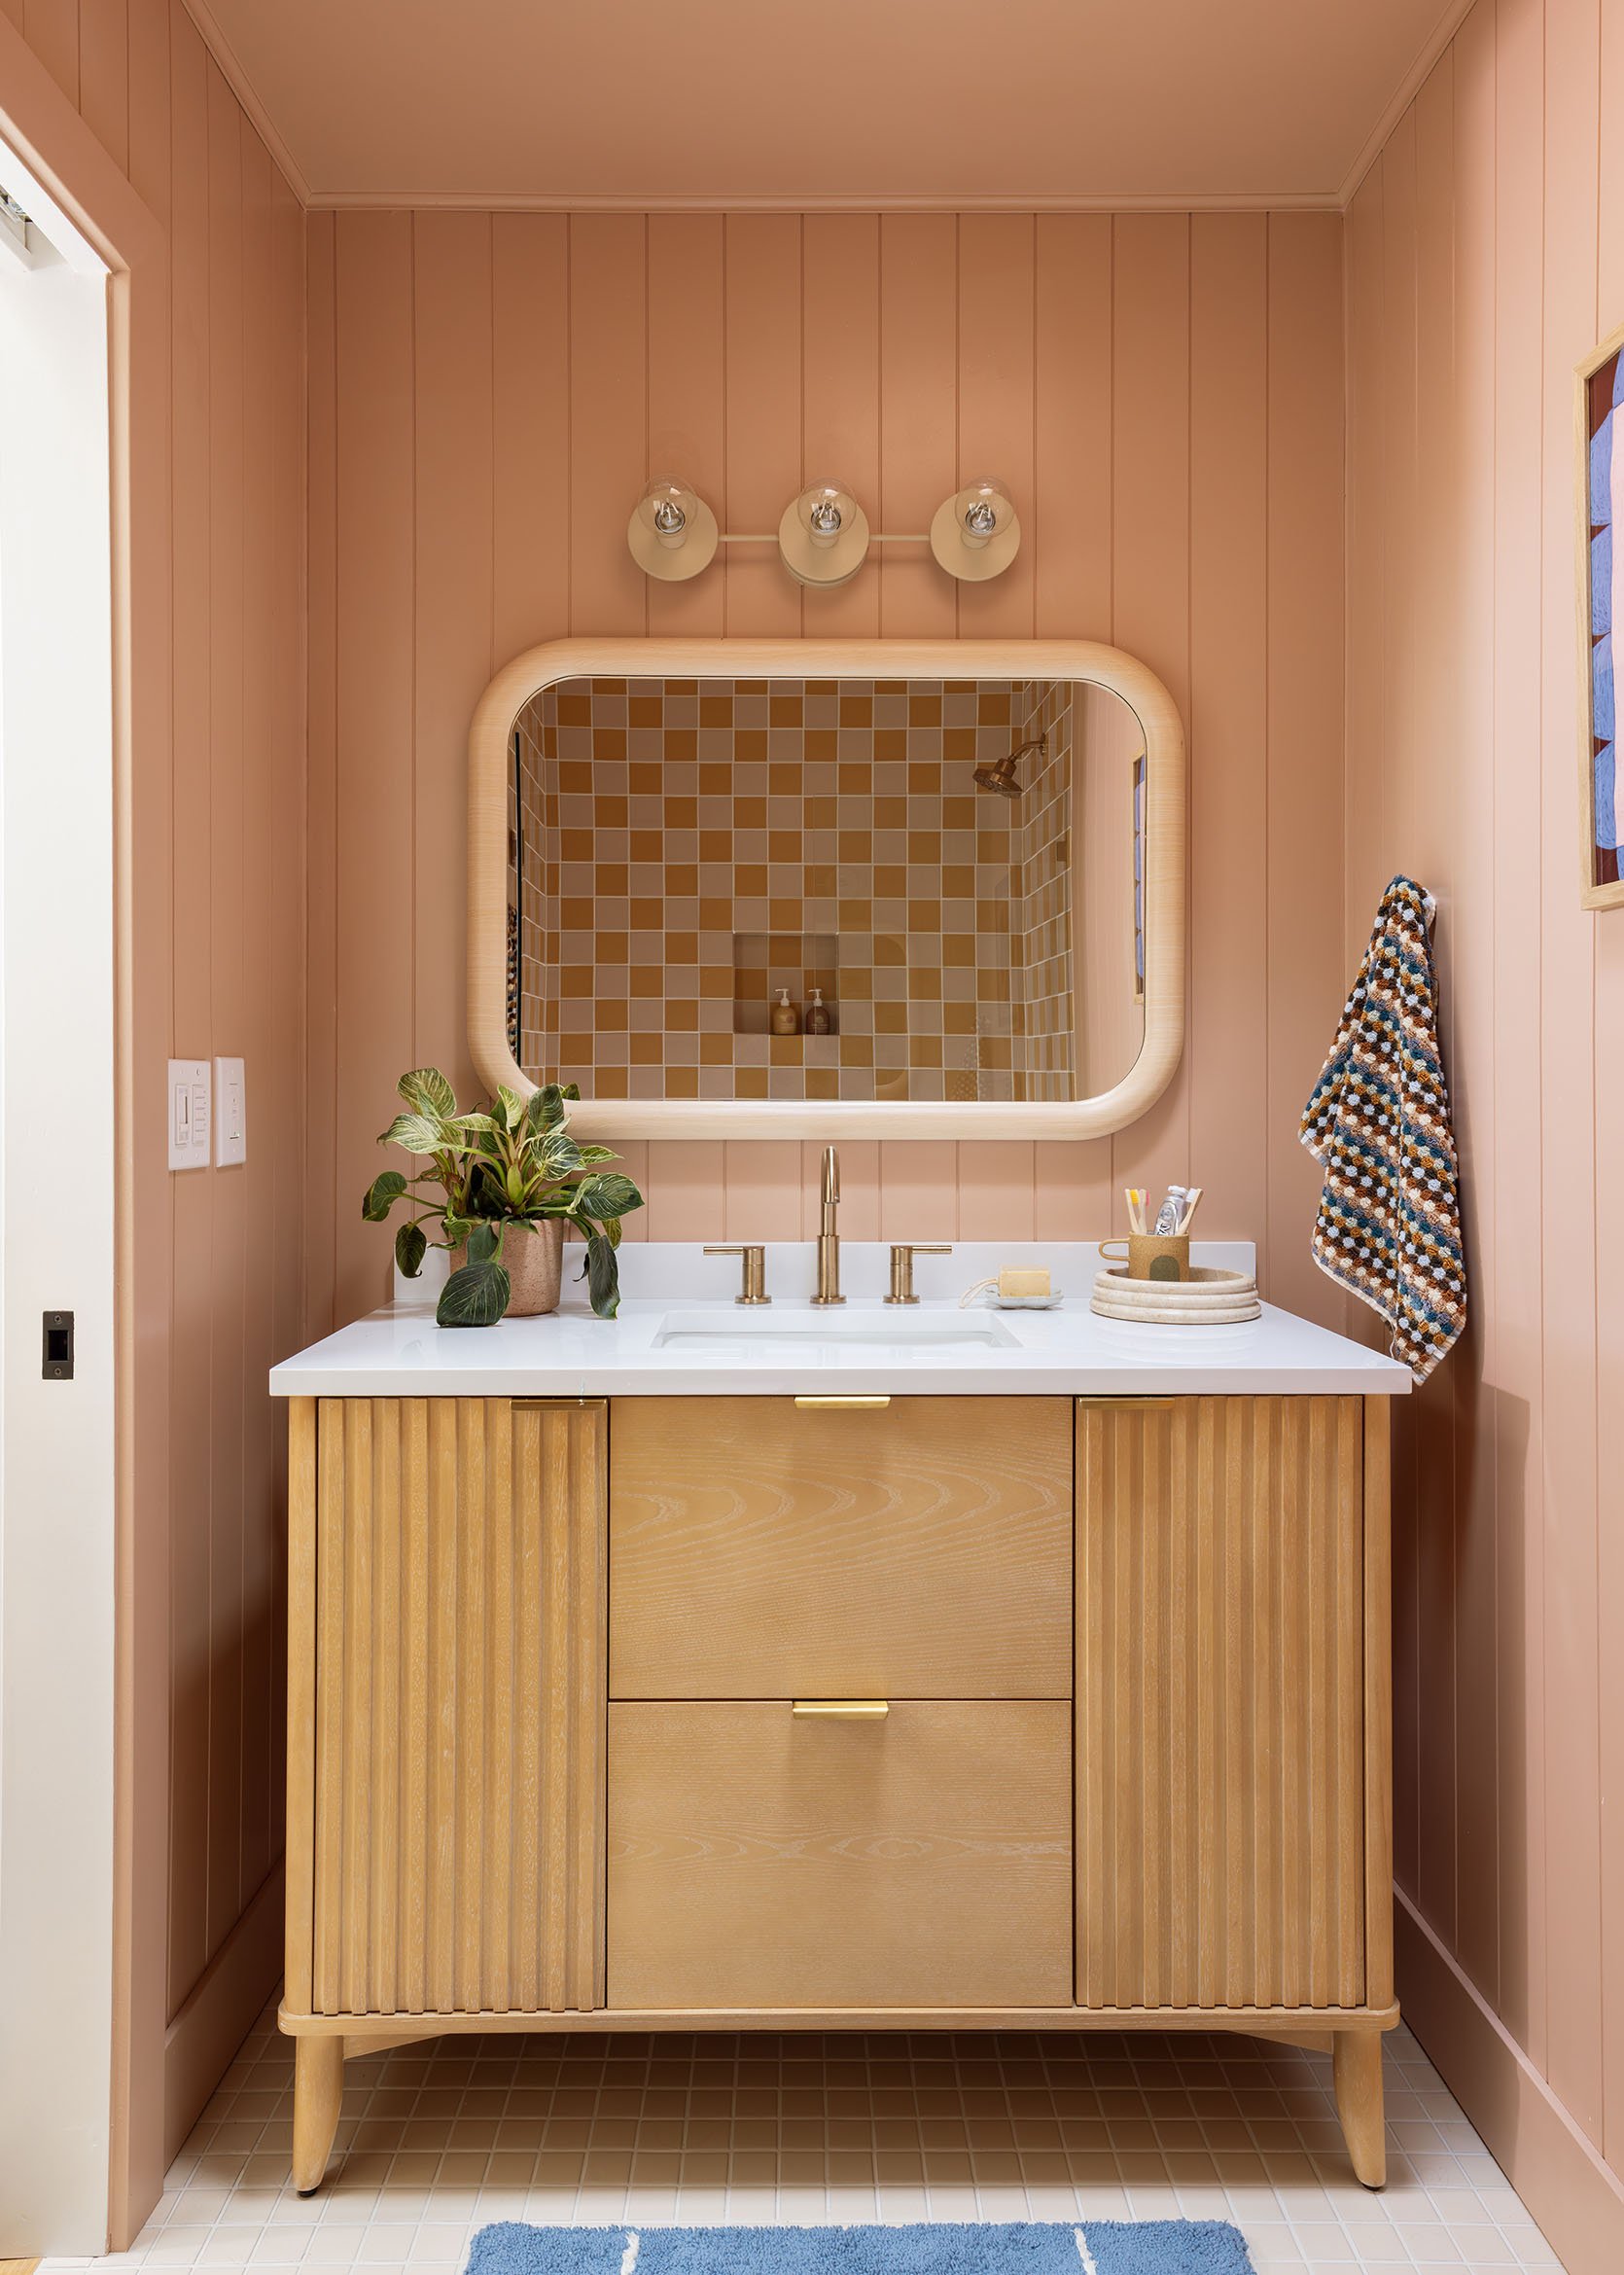
Vanity | Faucet | Mirror | Light Fixture | Planter (unavailable) | Soap Dish (unavailable) | Tray | Cup (unavailable) | Pink Tile | Yellow Tile | Shower Set
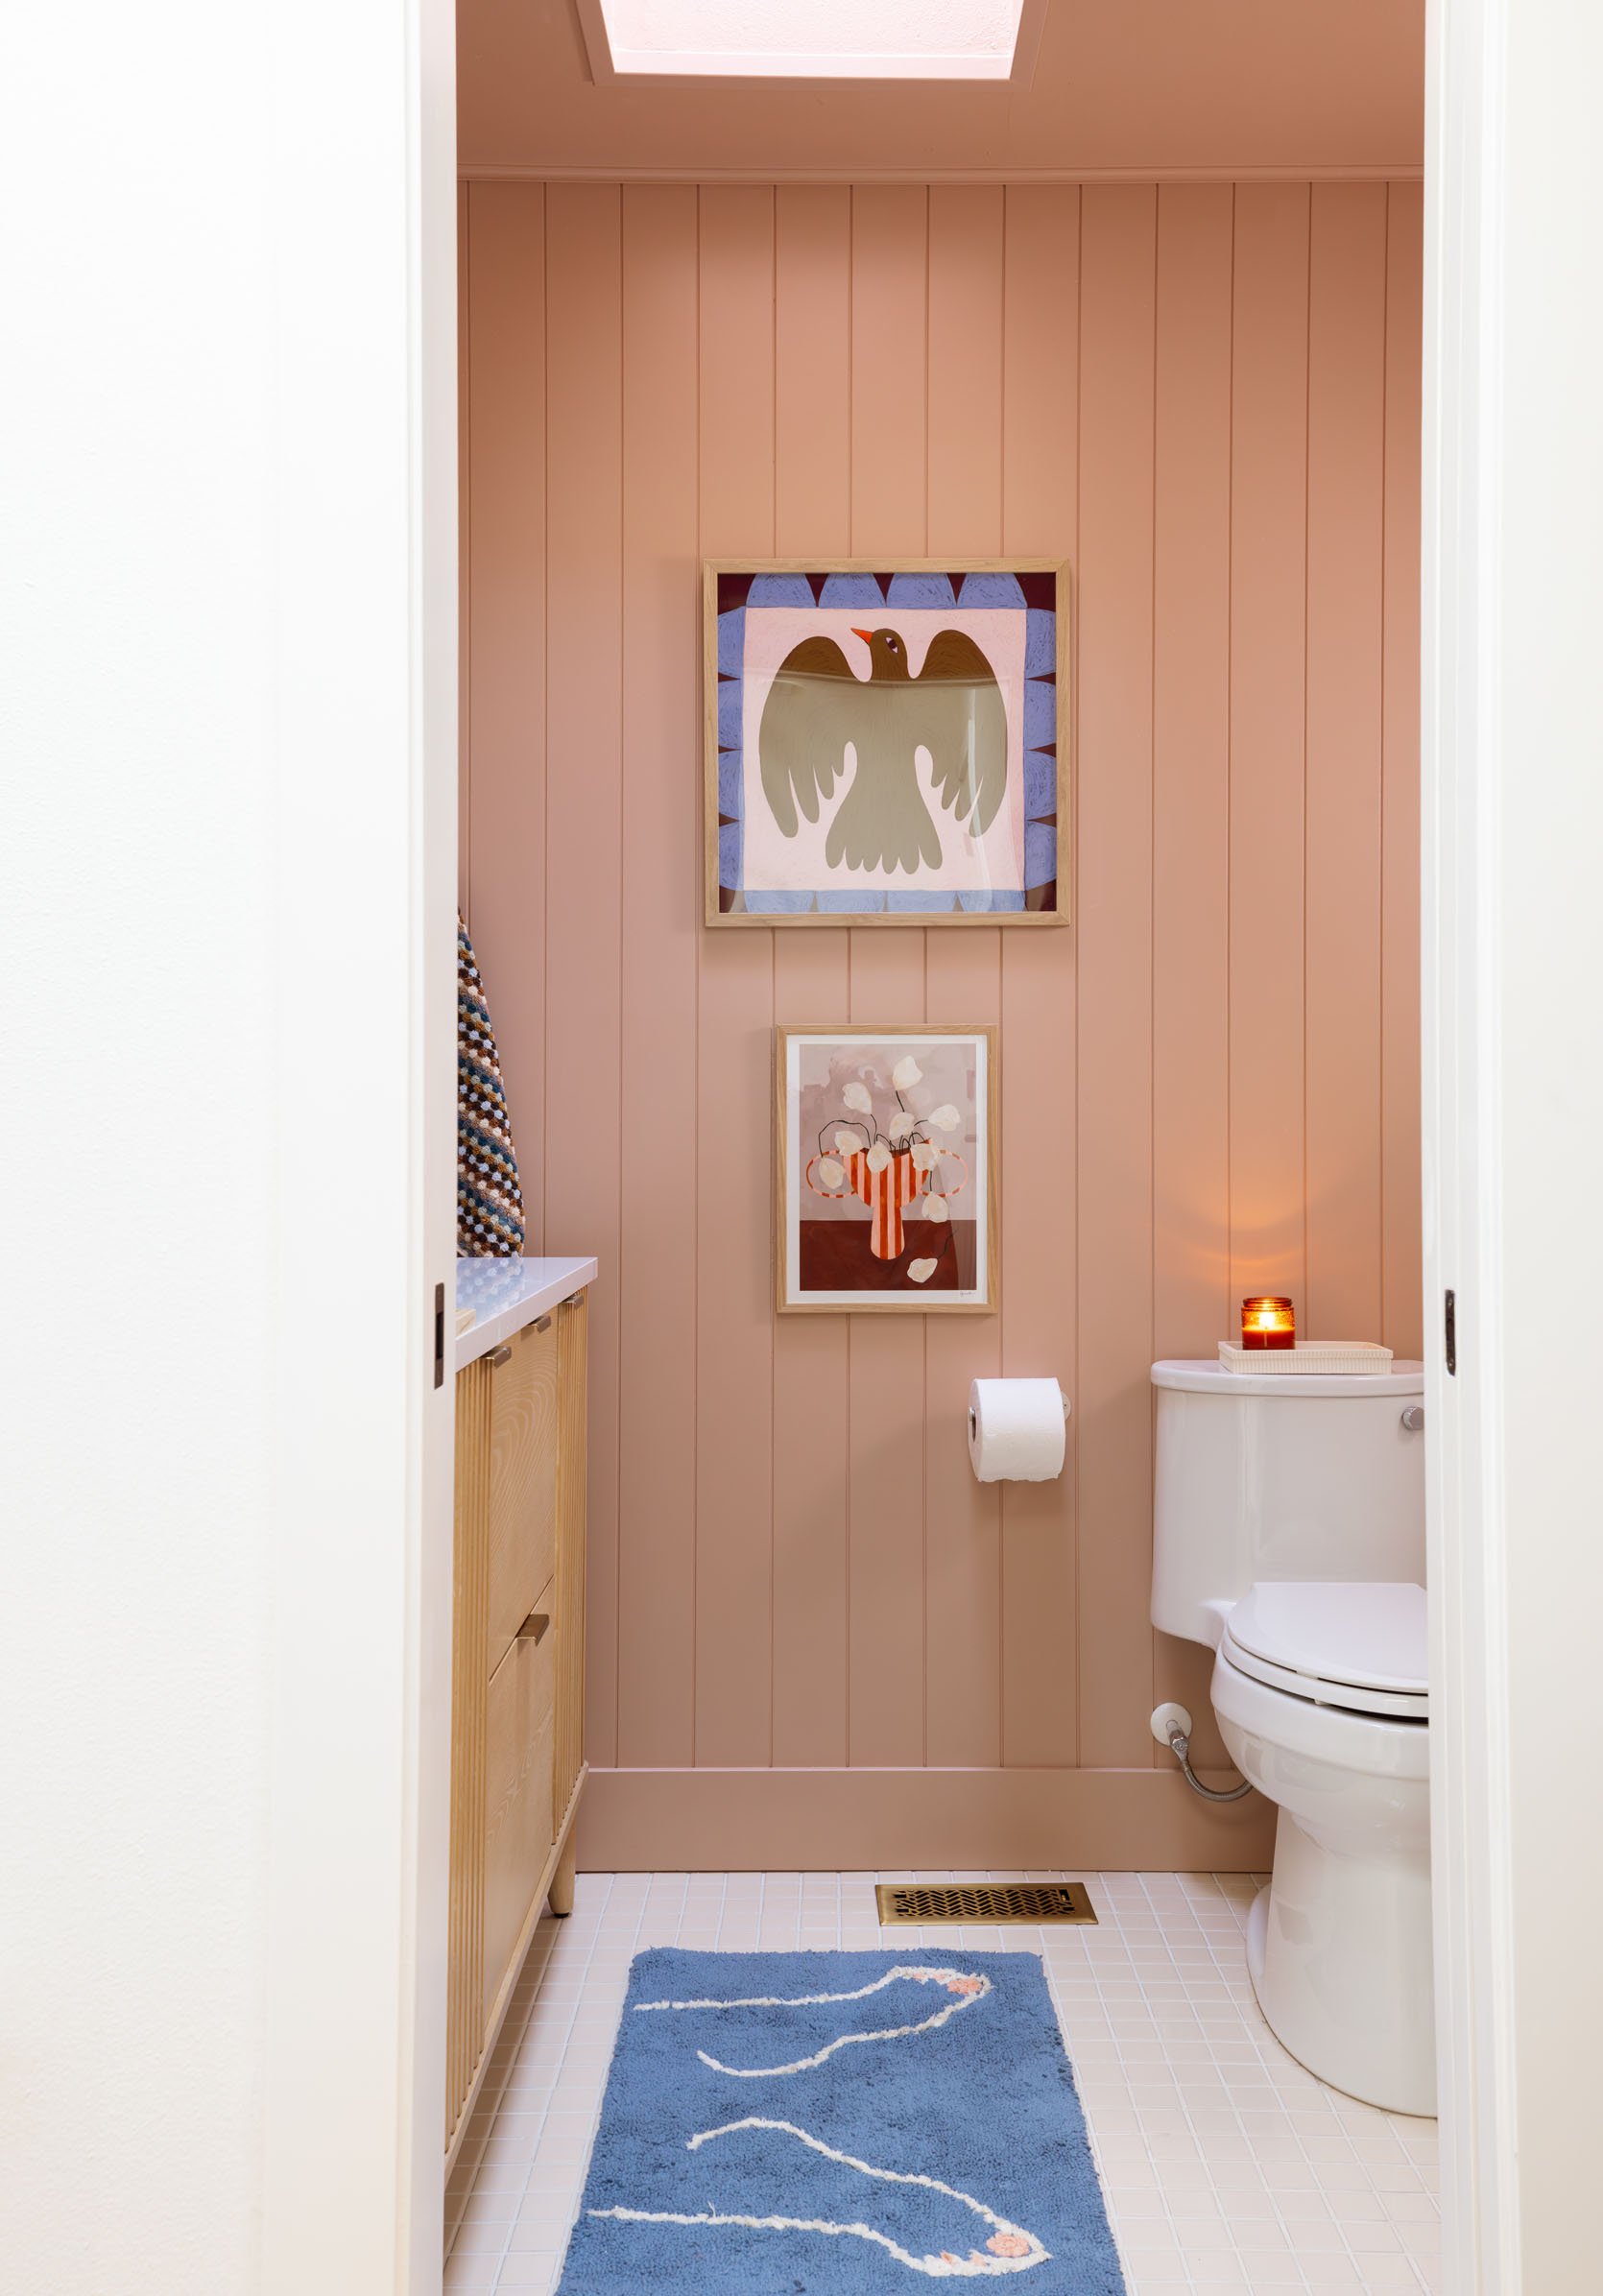
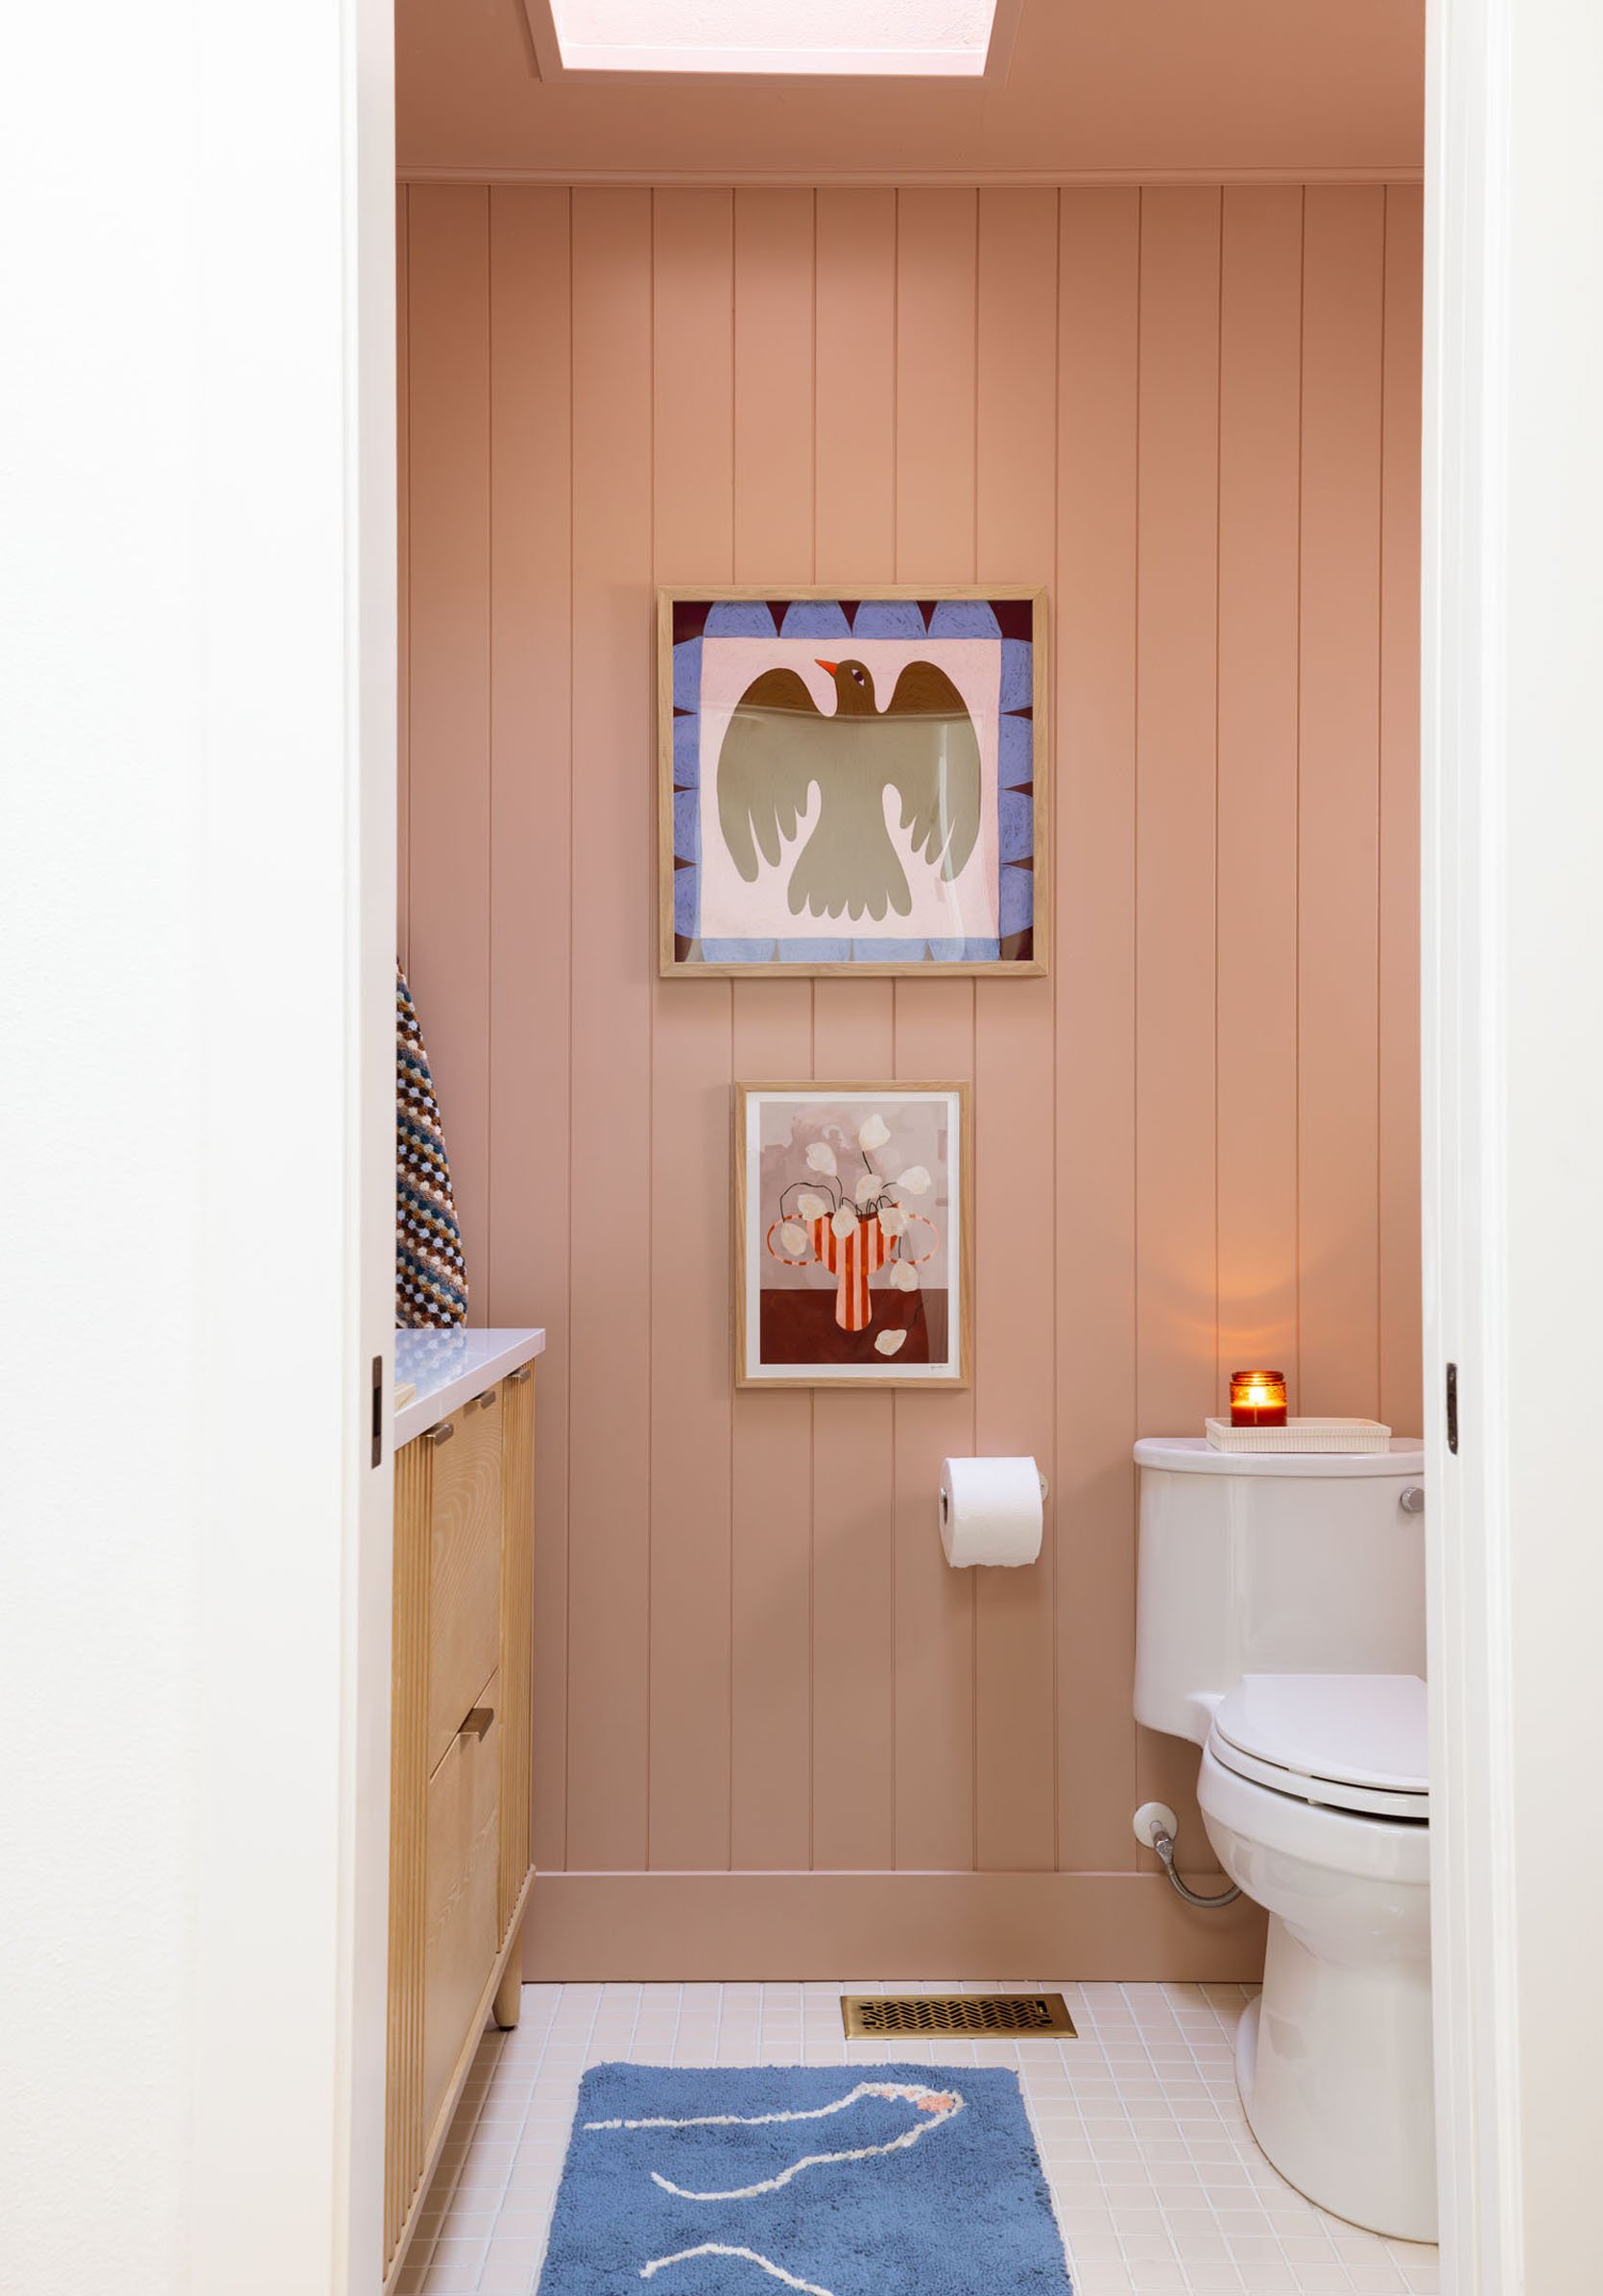
Paneling Color | Bird Art | Vase Art | Toilet Paper Holder | Toilet | White Tray | Bath Mat | Floor Tile
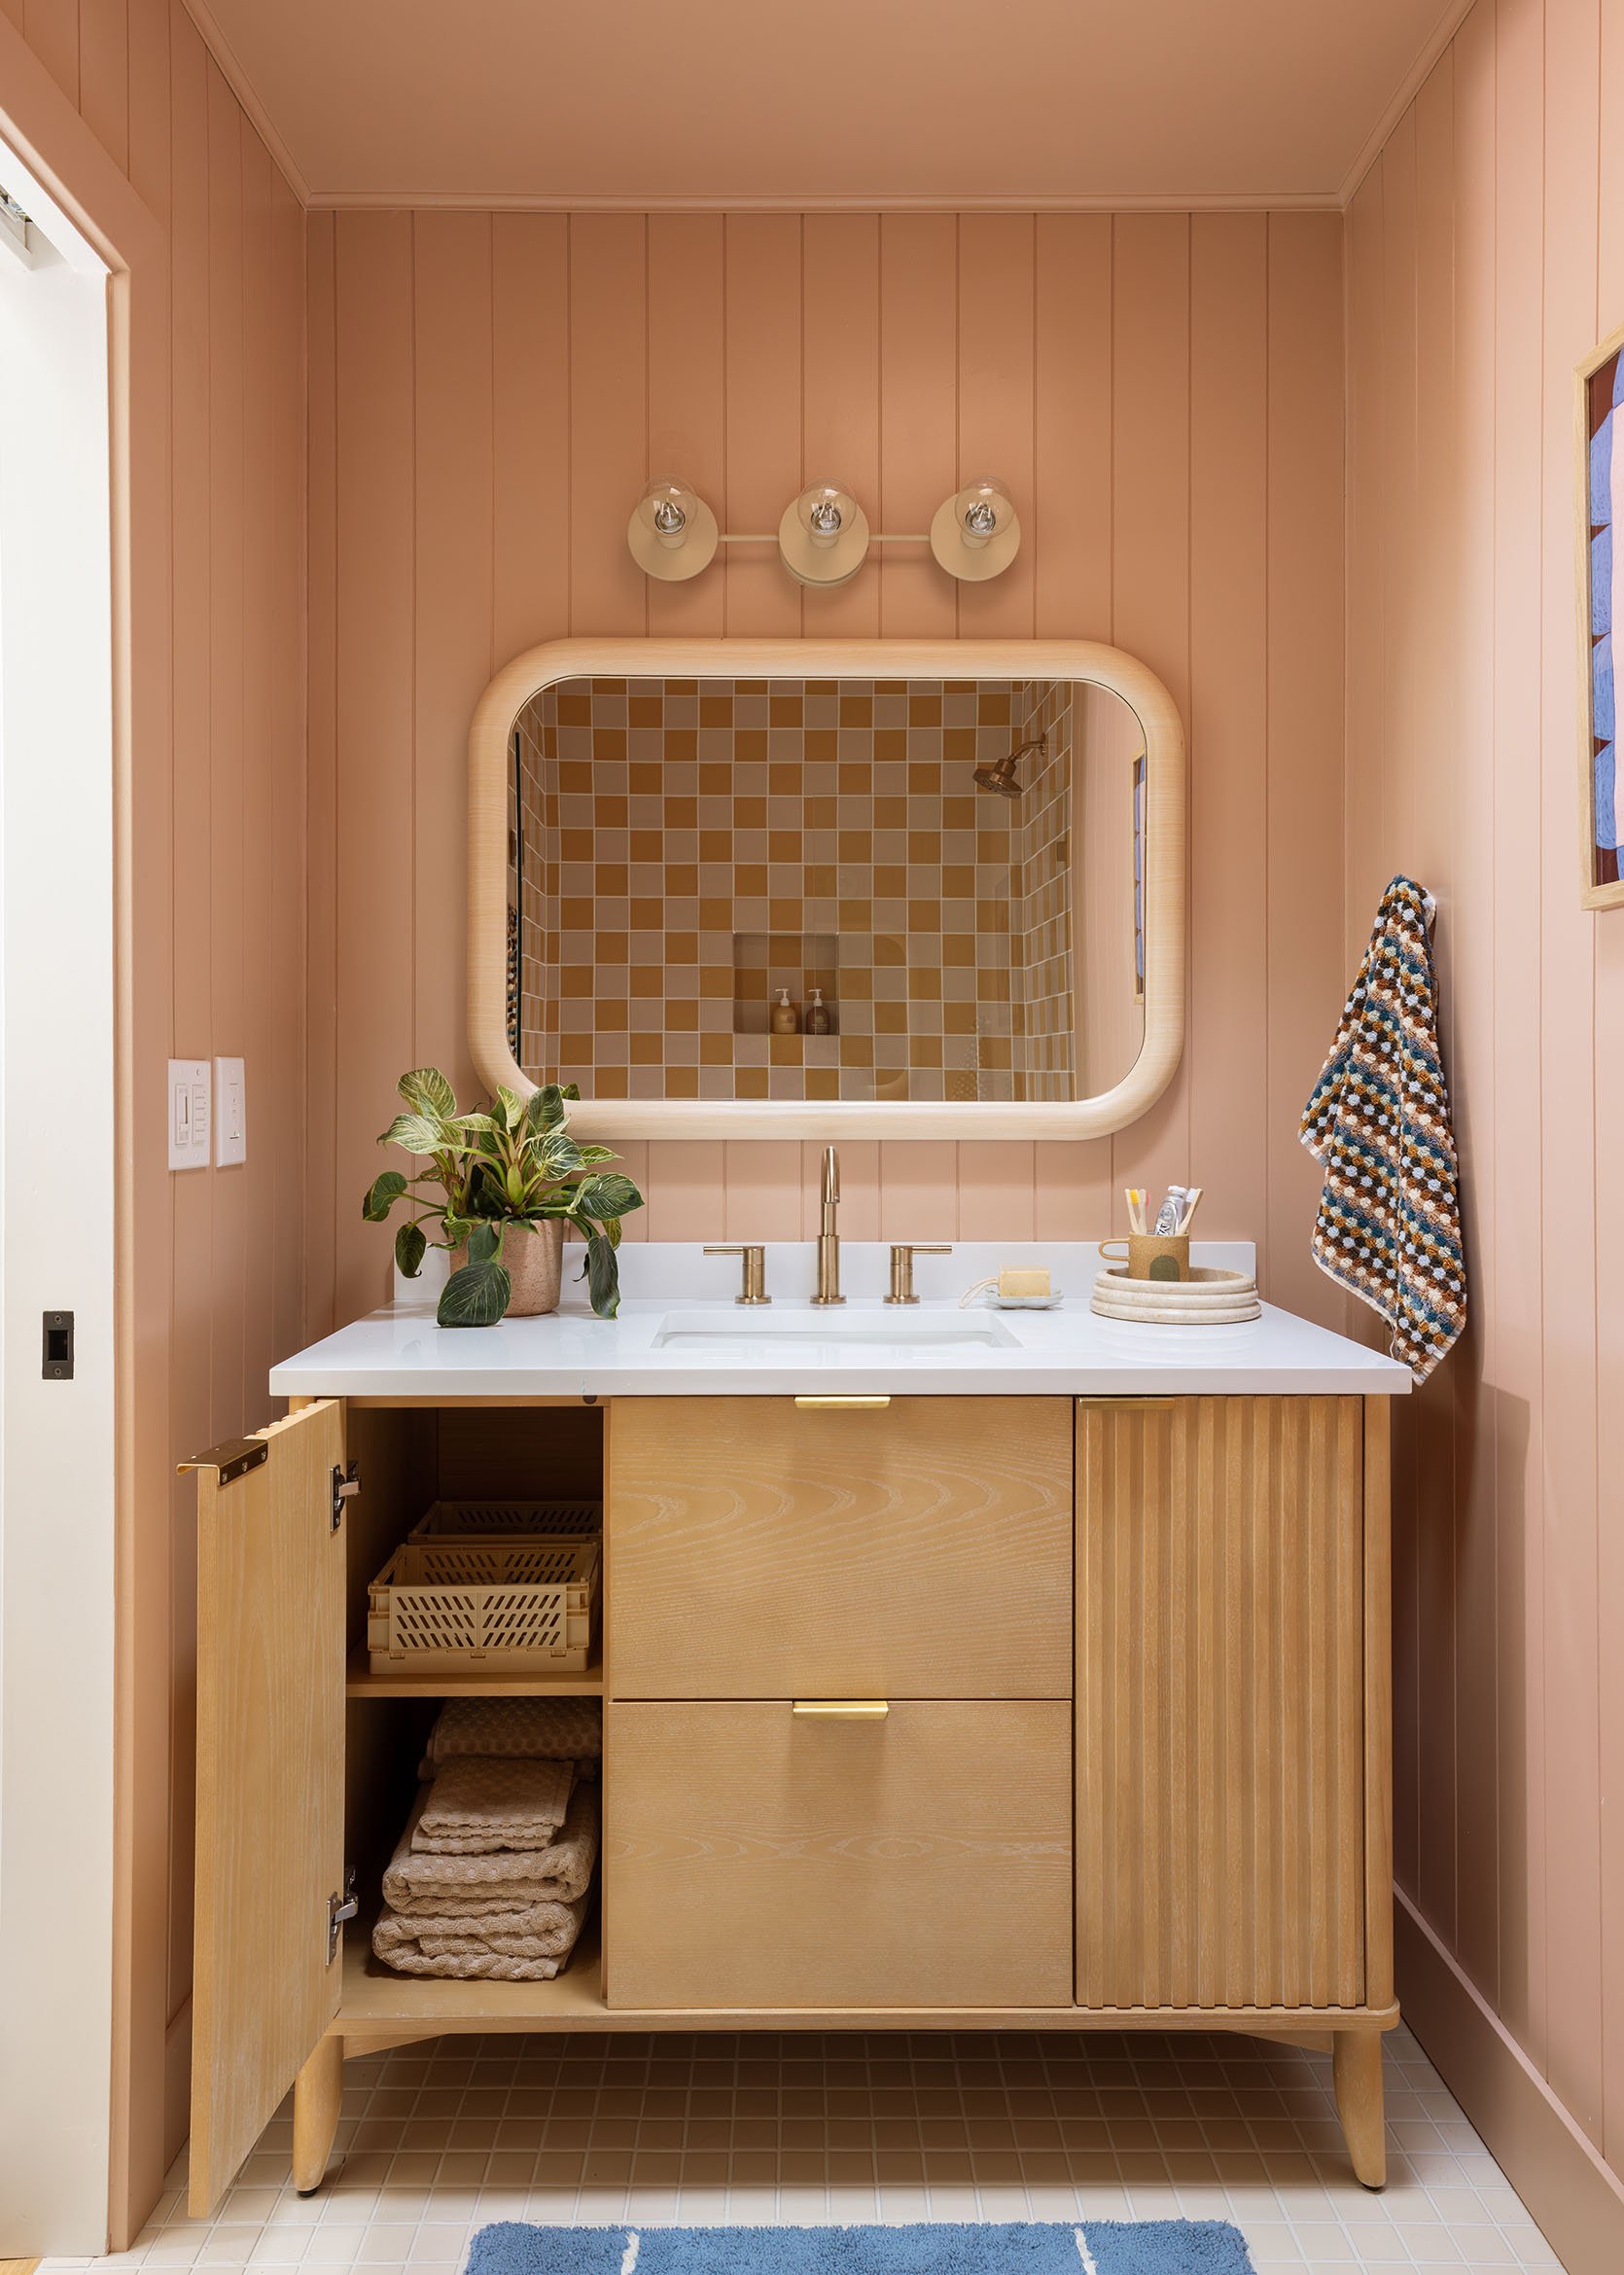
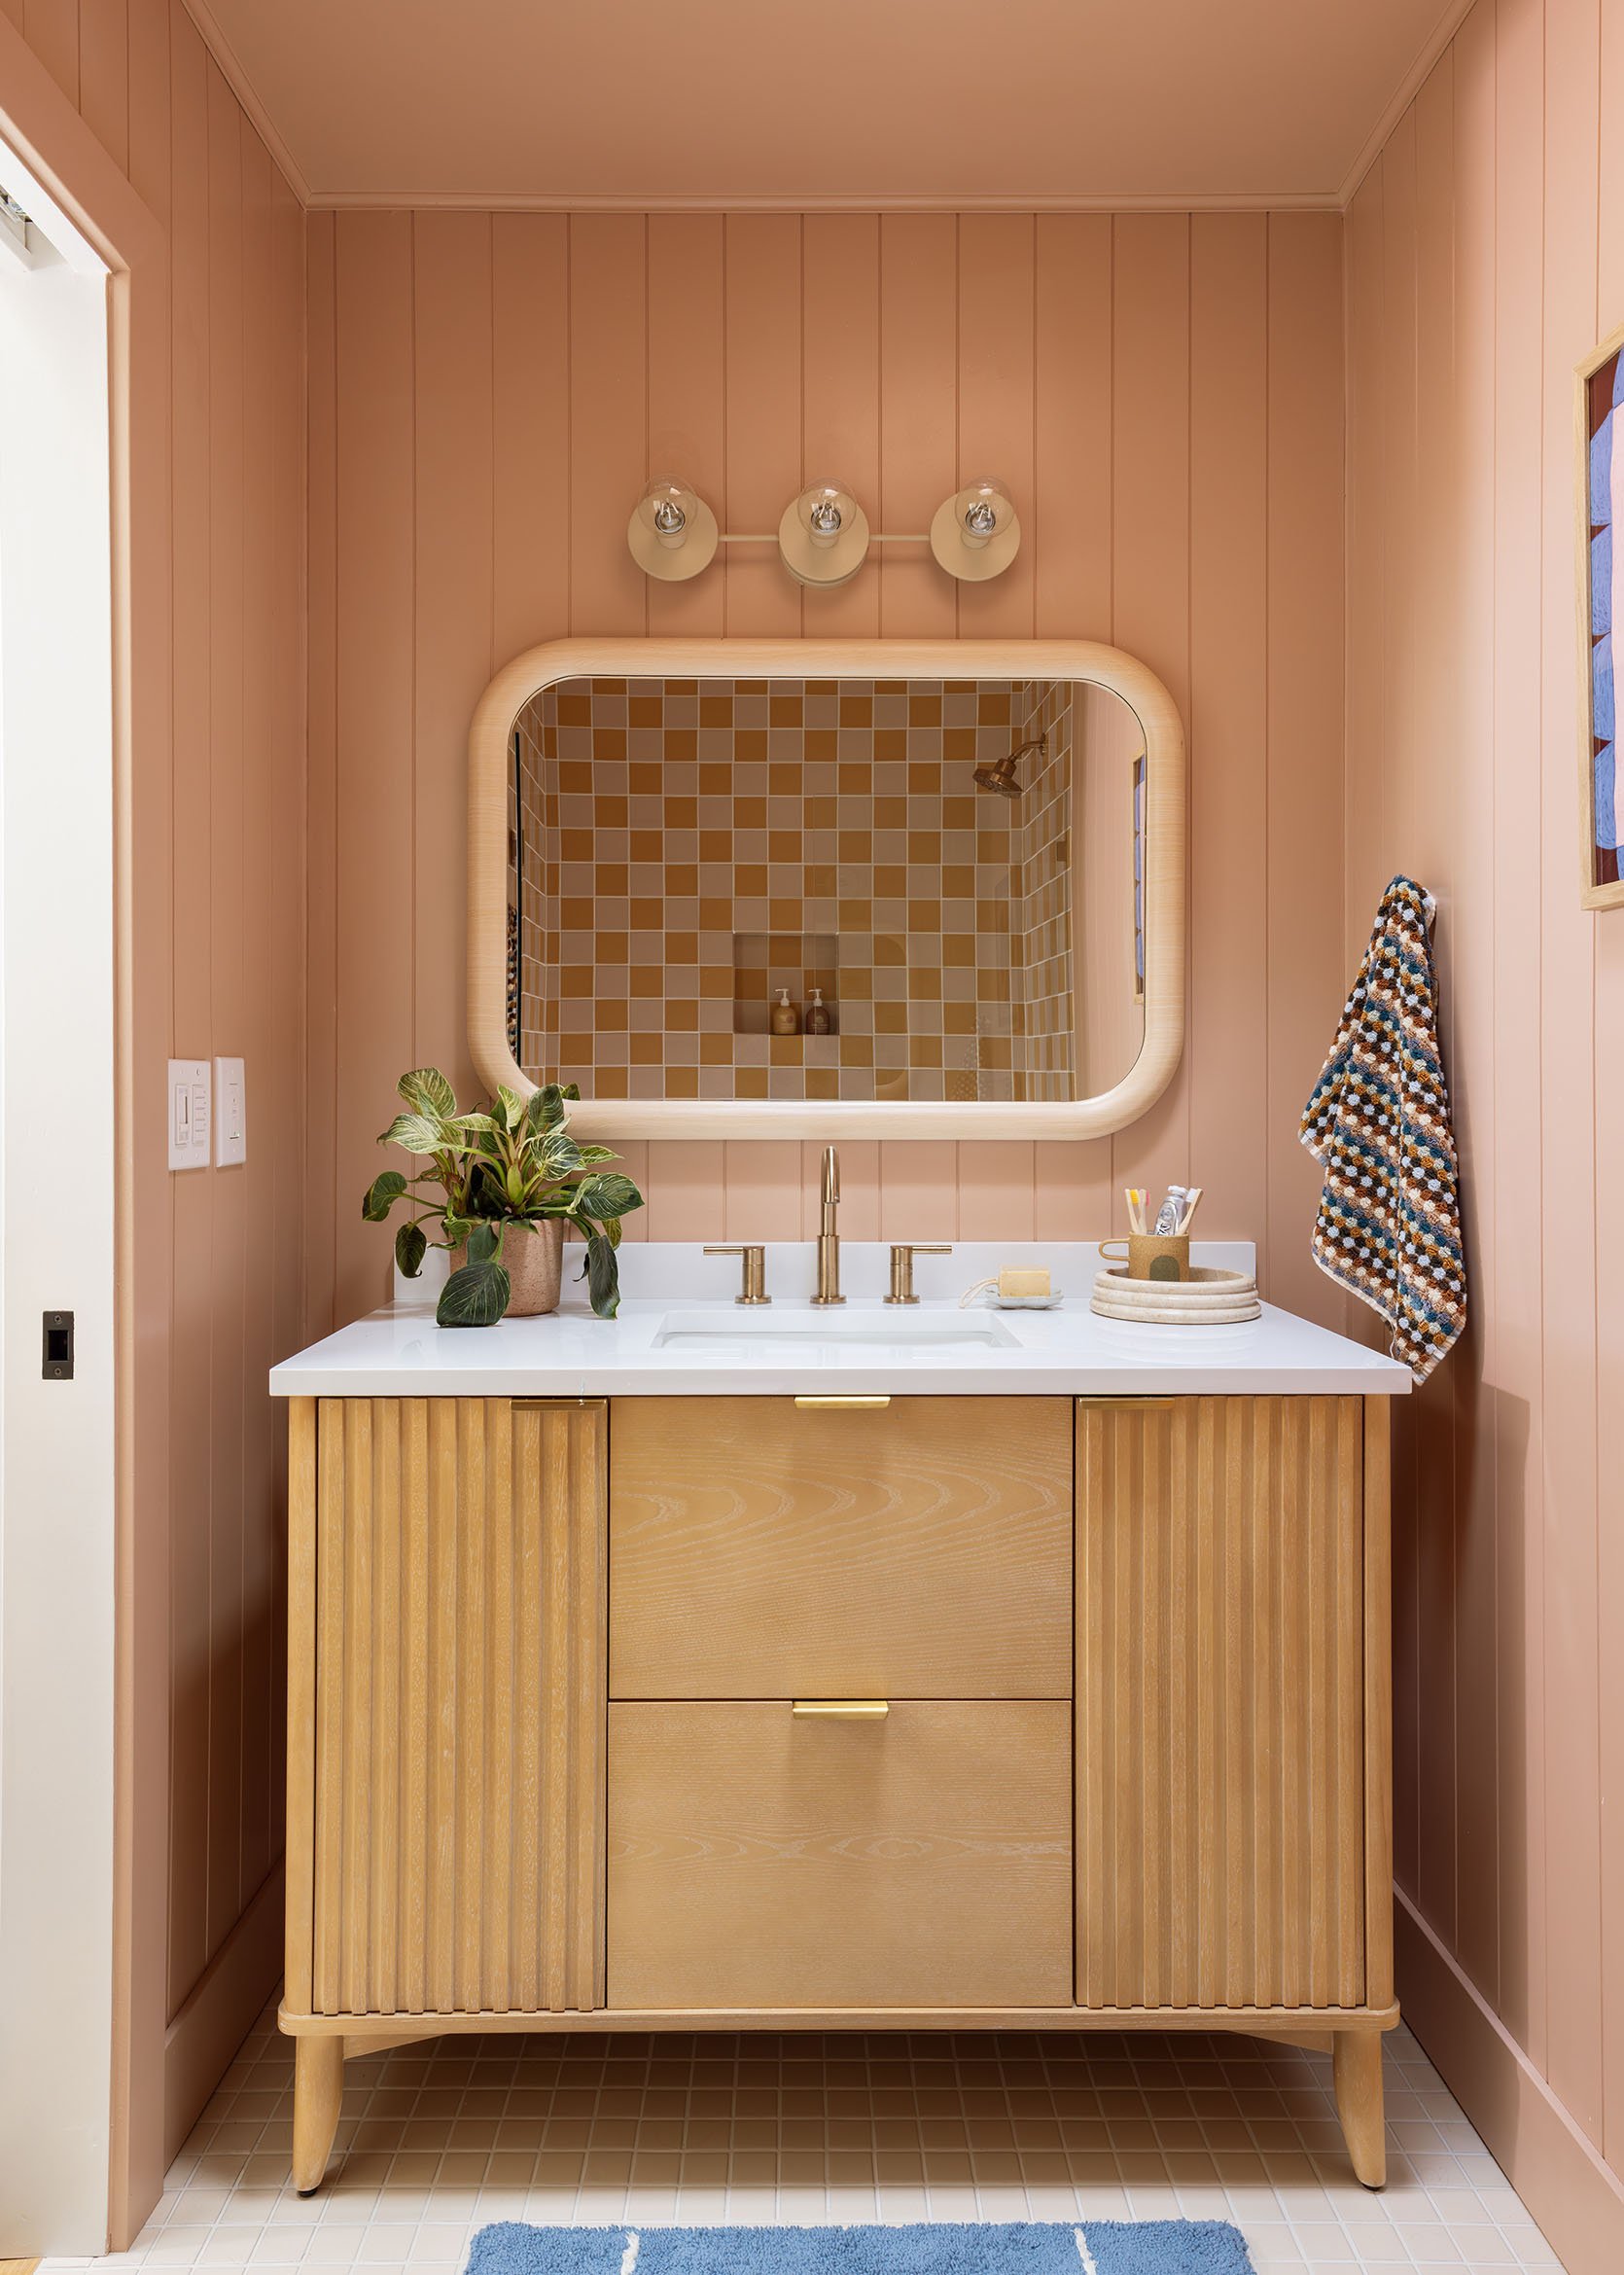
We’re so grateful to AllModern for gifting us so many beautiful fixtures for this space. We love how simple and playful this vanity is. The sides are doors, and the middle section is drawers, giving us plenty of storage for all the knick-knacks, jewelry, headbands, and hair ties that my 8- and 5-year-old girls collect.
Vanity | Faucet | Mirror | Light Fixture | Planter (unavailable) | Soap Dish (unavailable) | Tray | Cup (unavailable) | Wall Hook
You may notice a small change from our original mood board—I swapped out the large pill-shaped medicine cabinet for this smaller mirror. I wasn’t sure the original shape would work with the other elements in the bathroom. Maybe down the line I’ll be bummed on not having a medicine cabinet in here, but for now, this mirror feels just right.
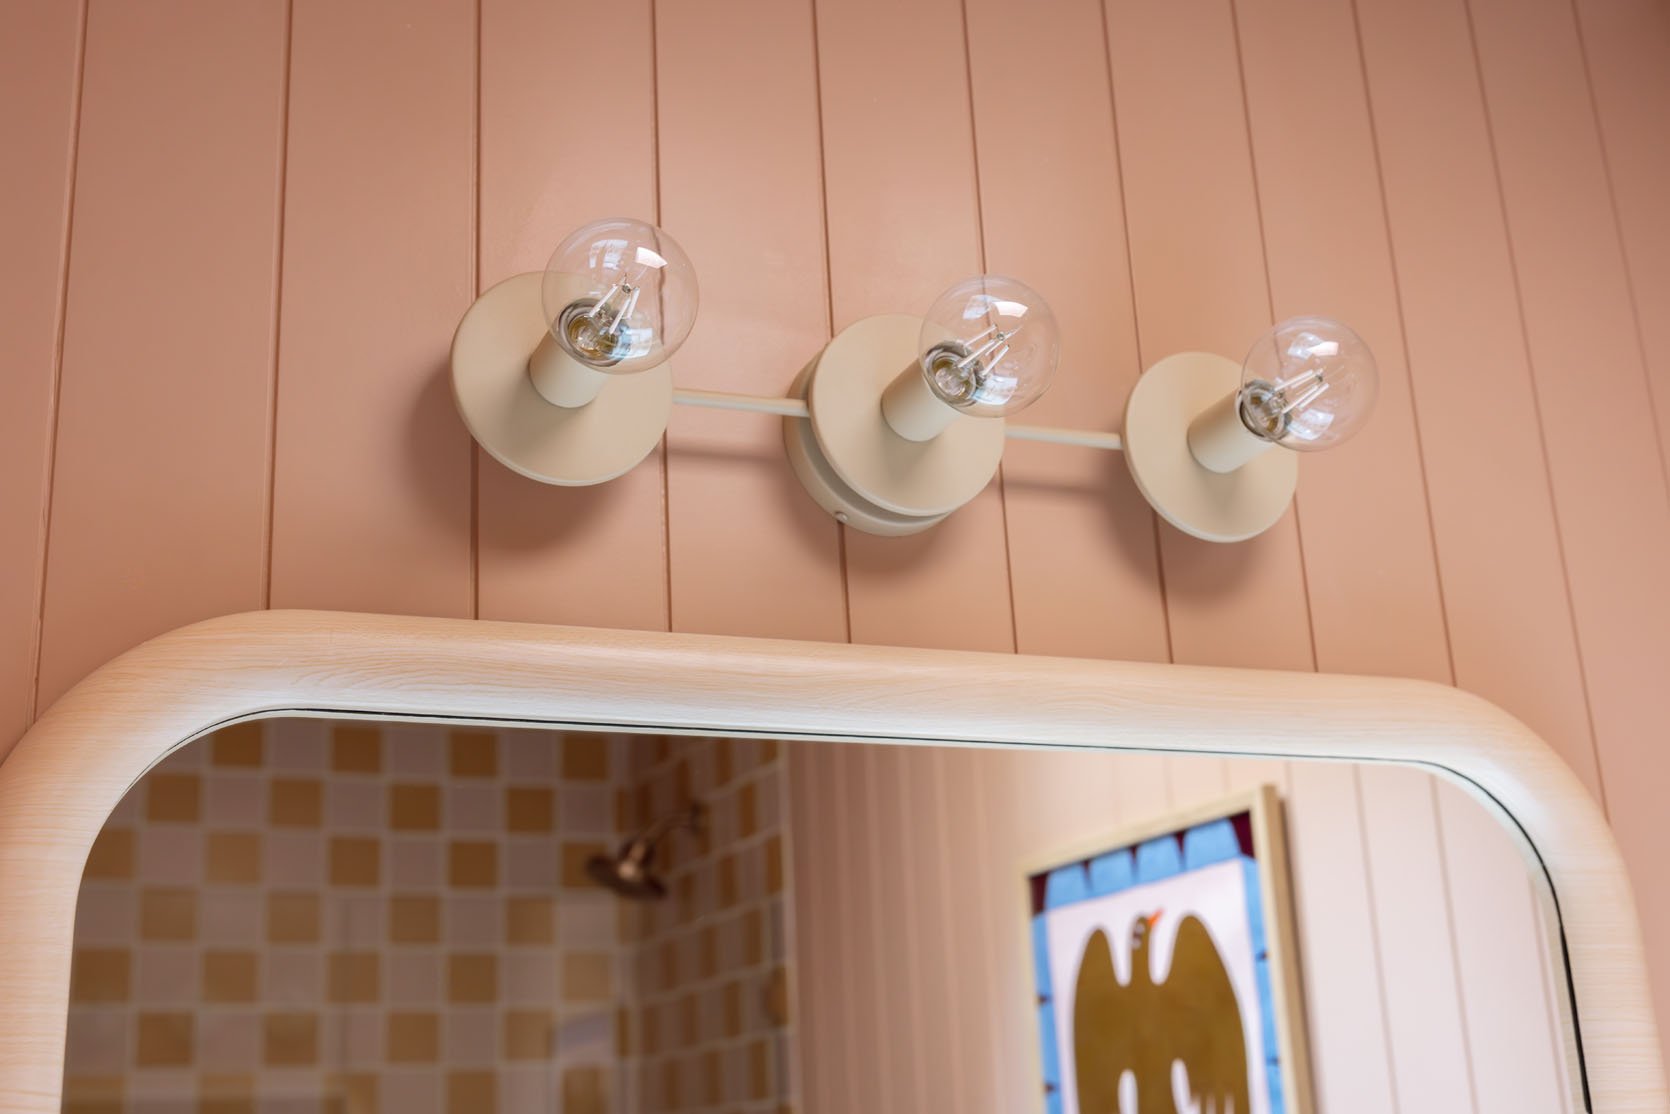
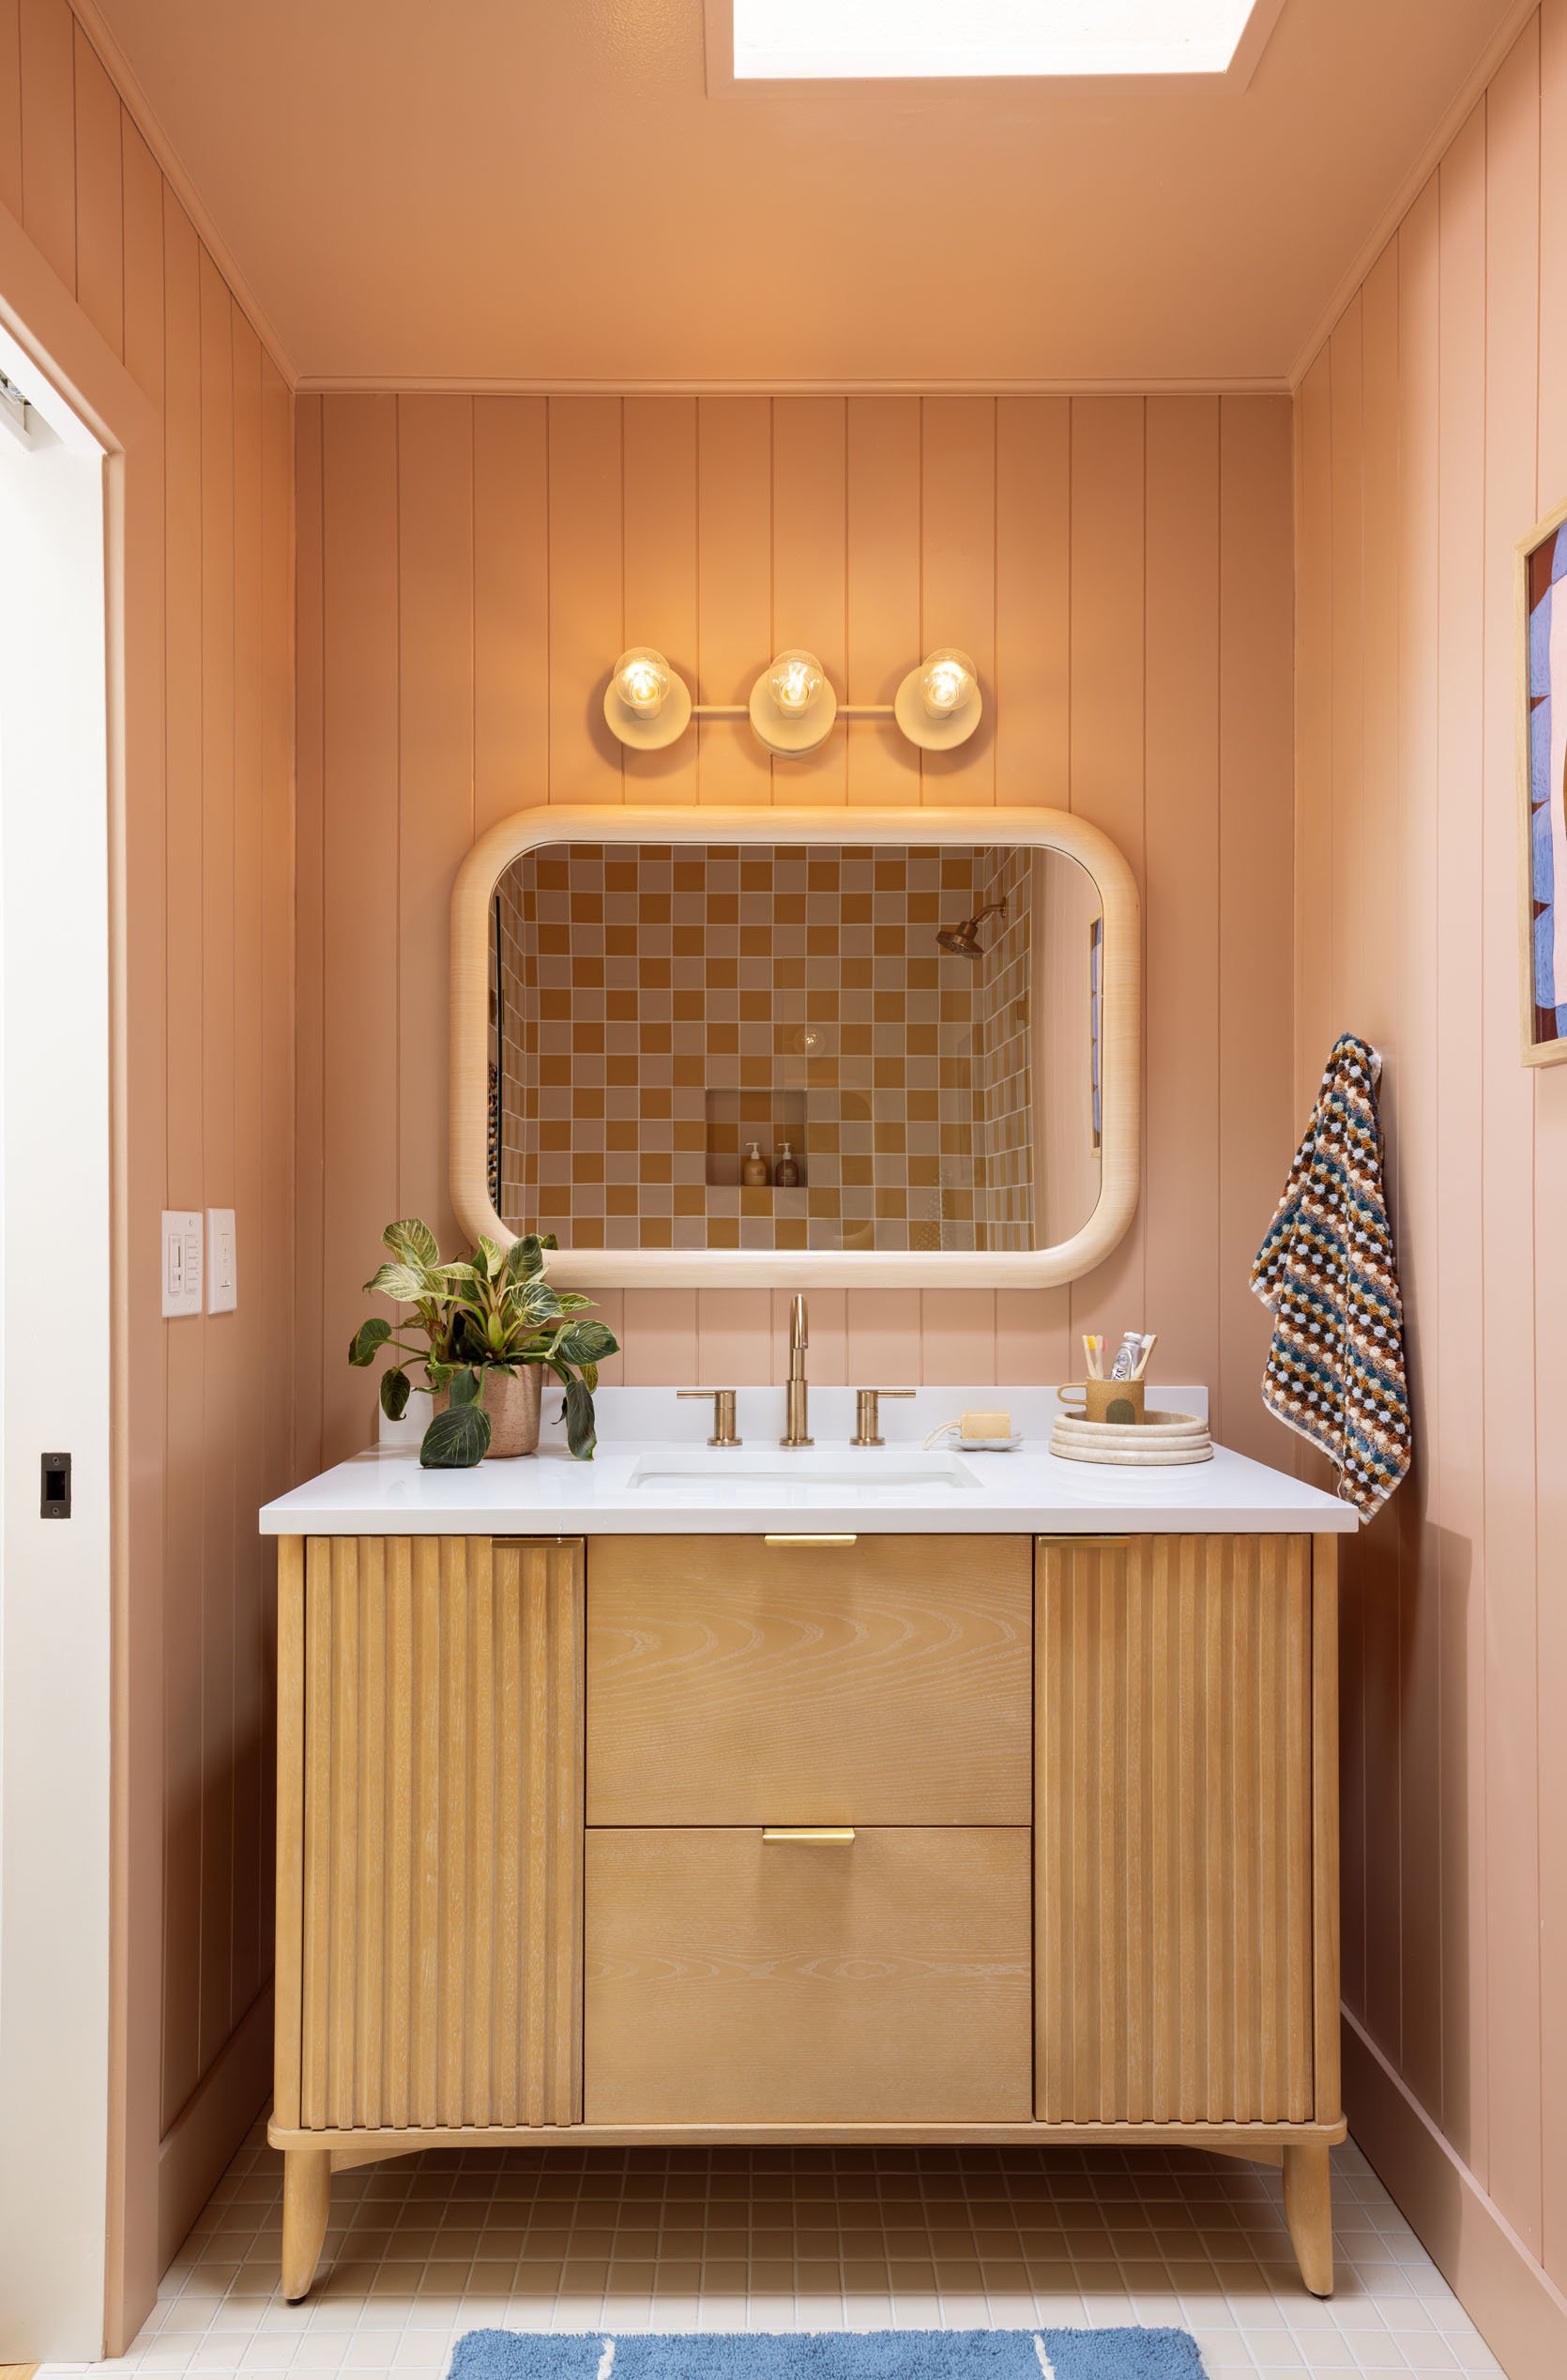
I found this cute little light fixture on Etsy. Again, on a dimmer, of course 🙂
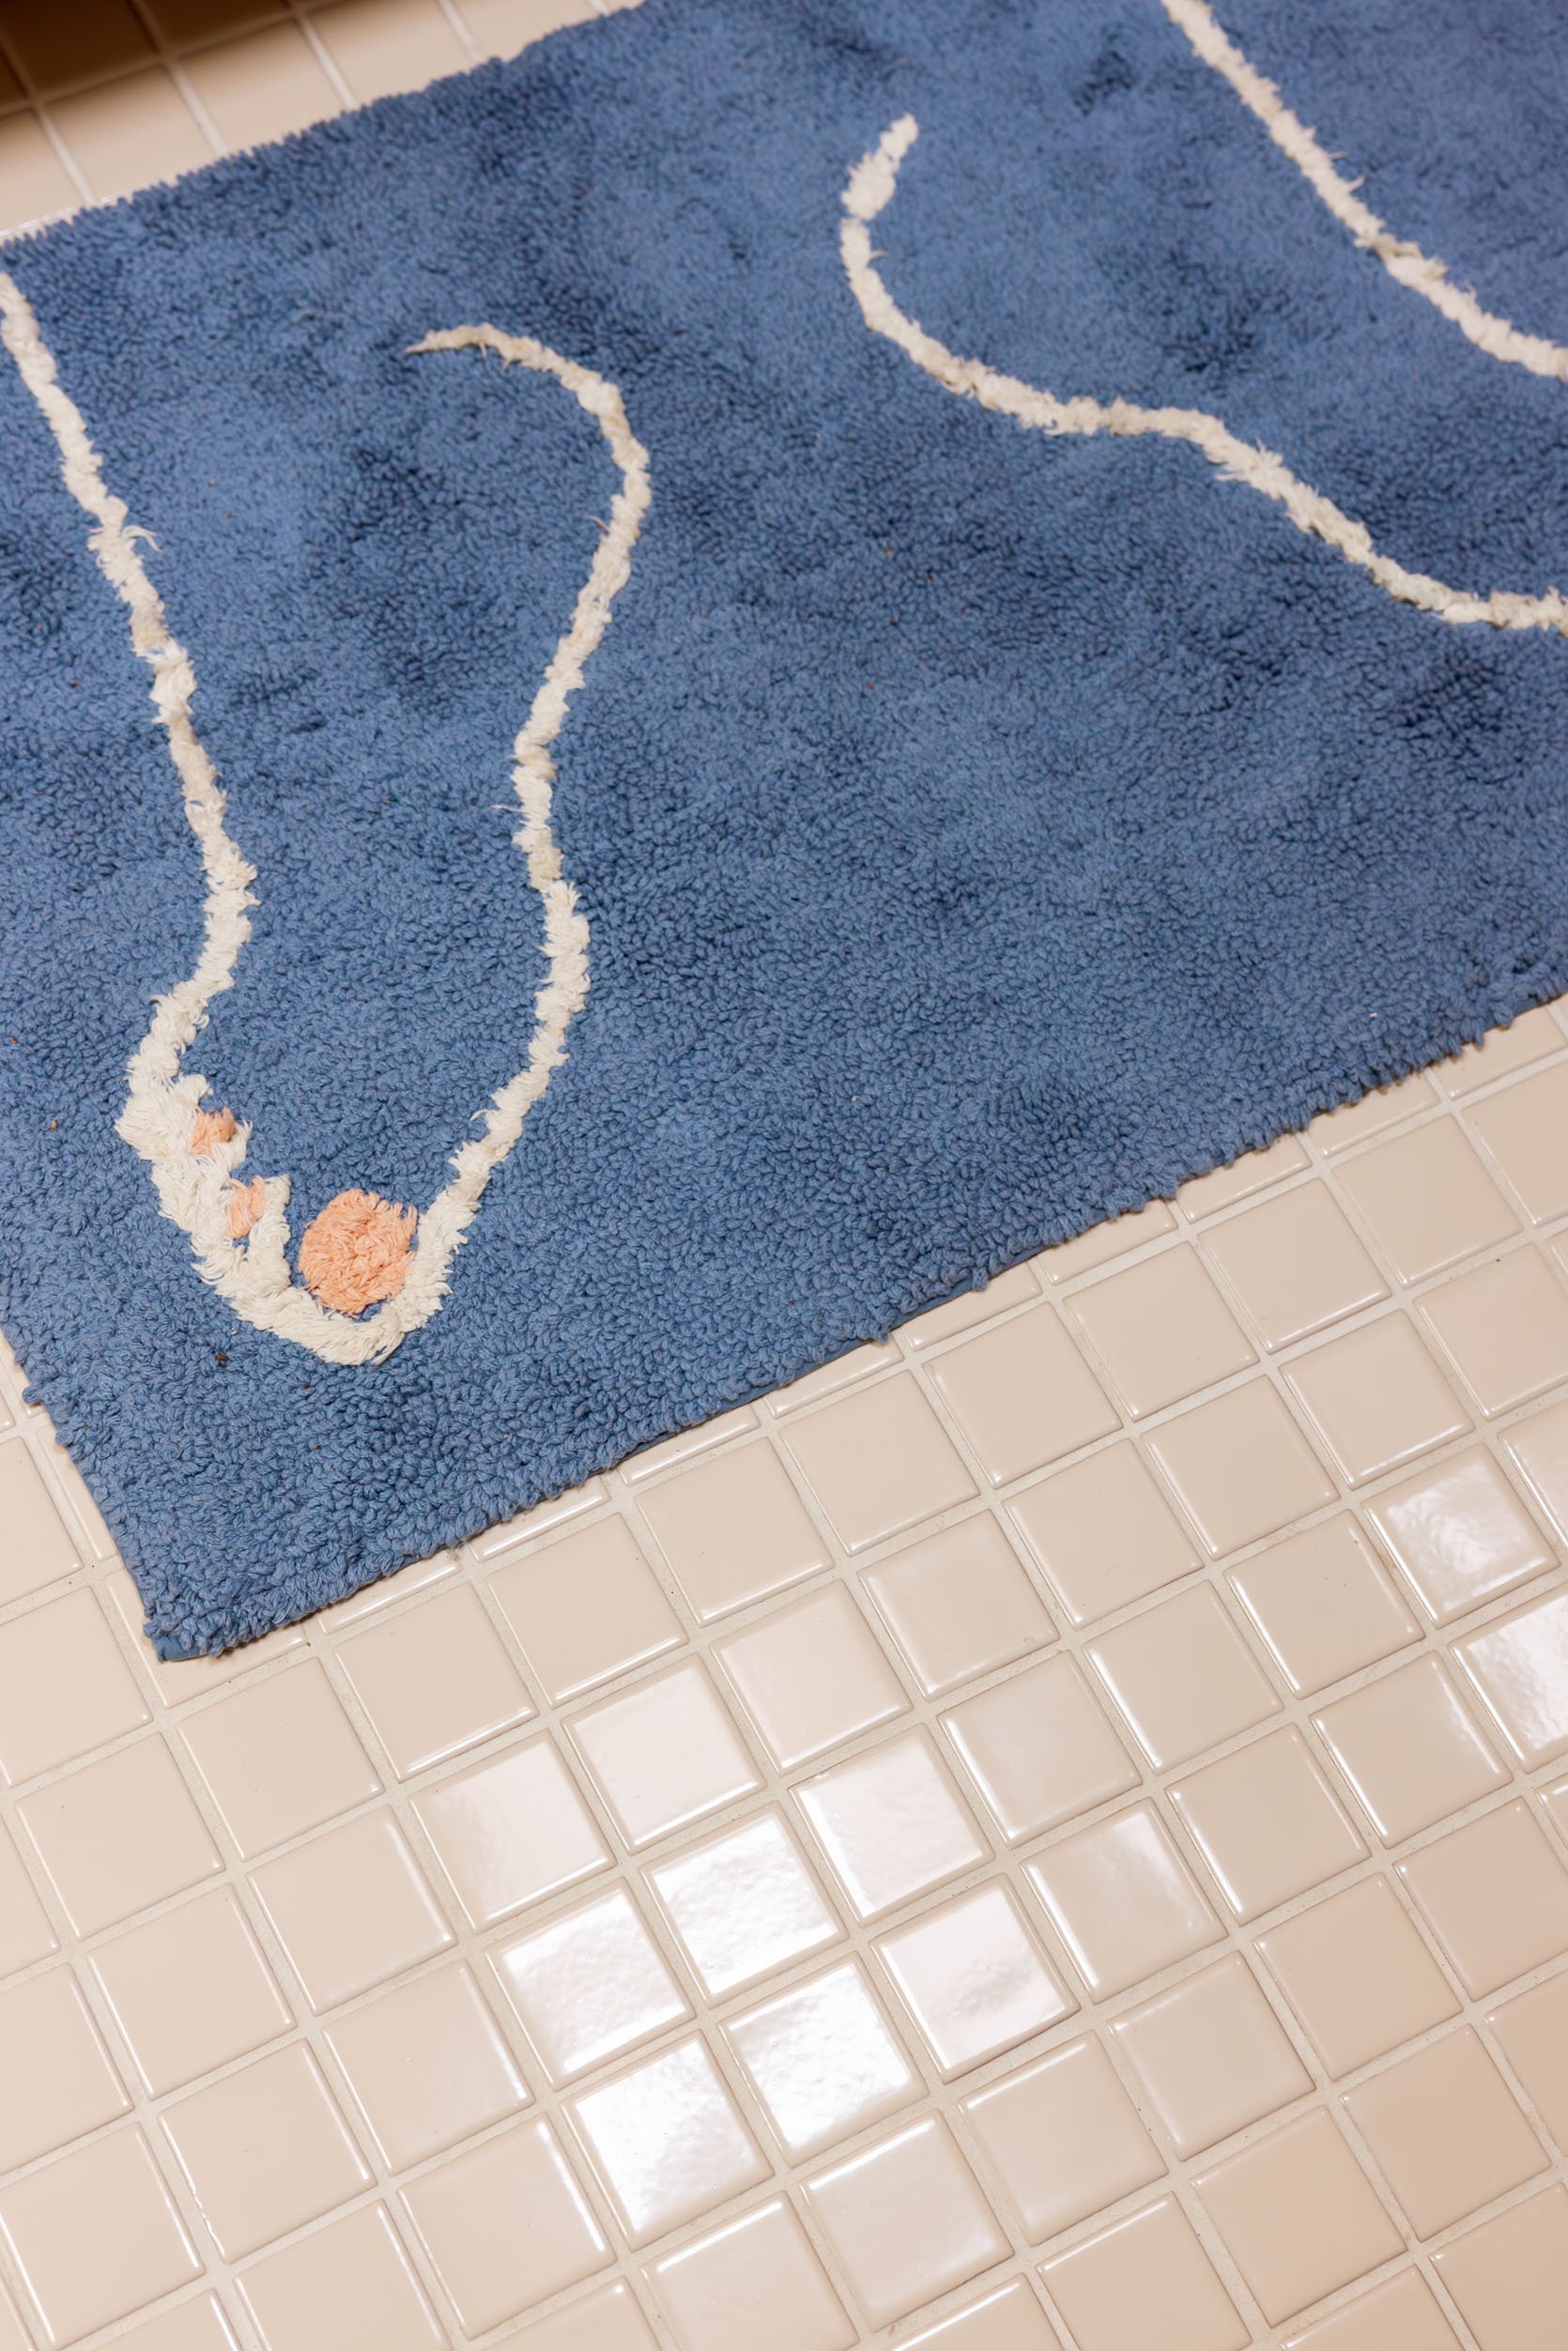
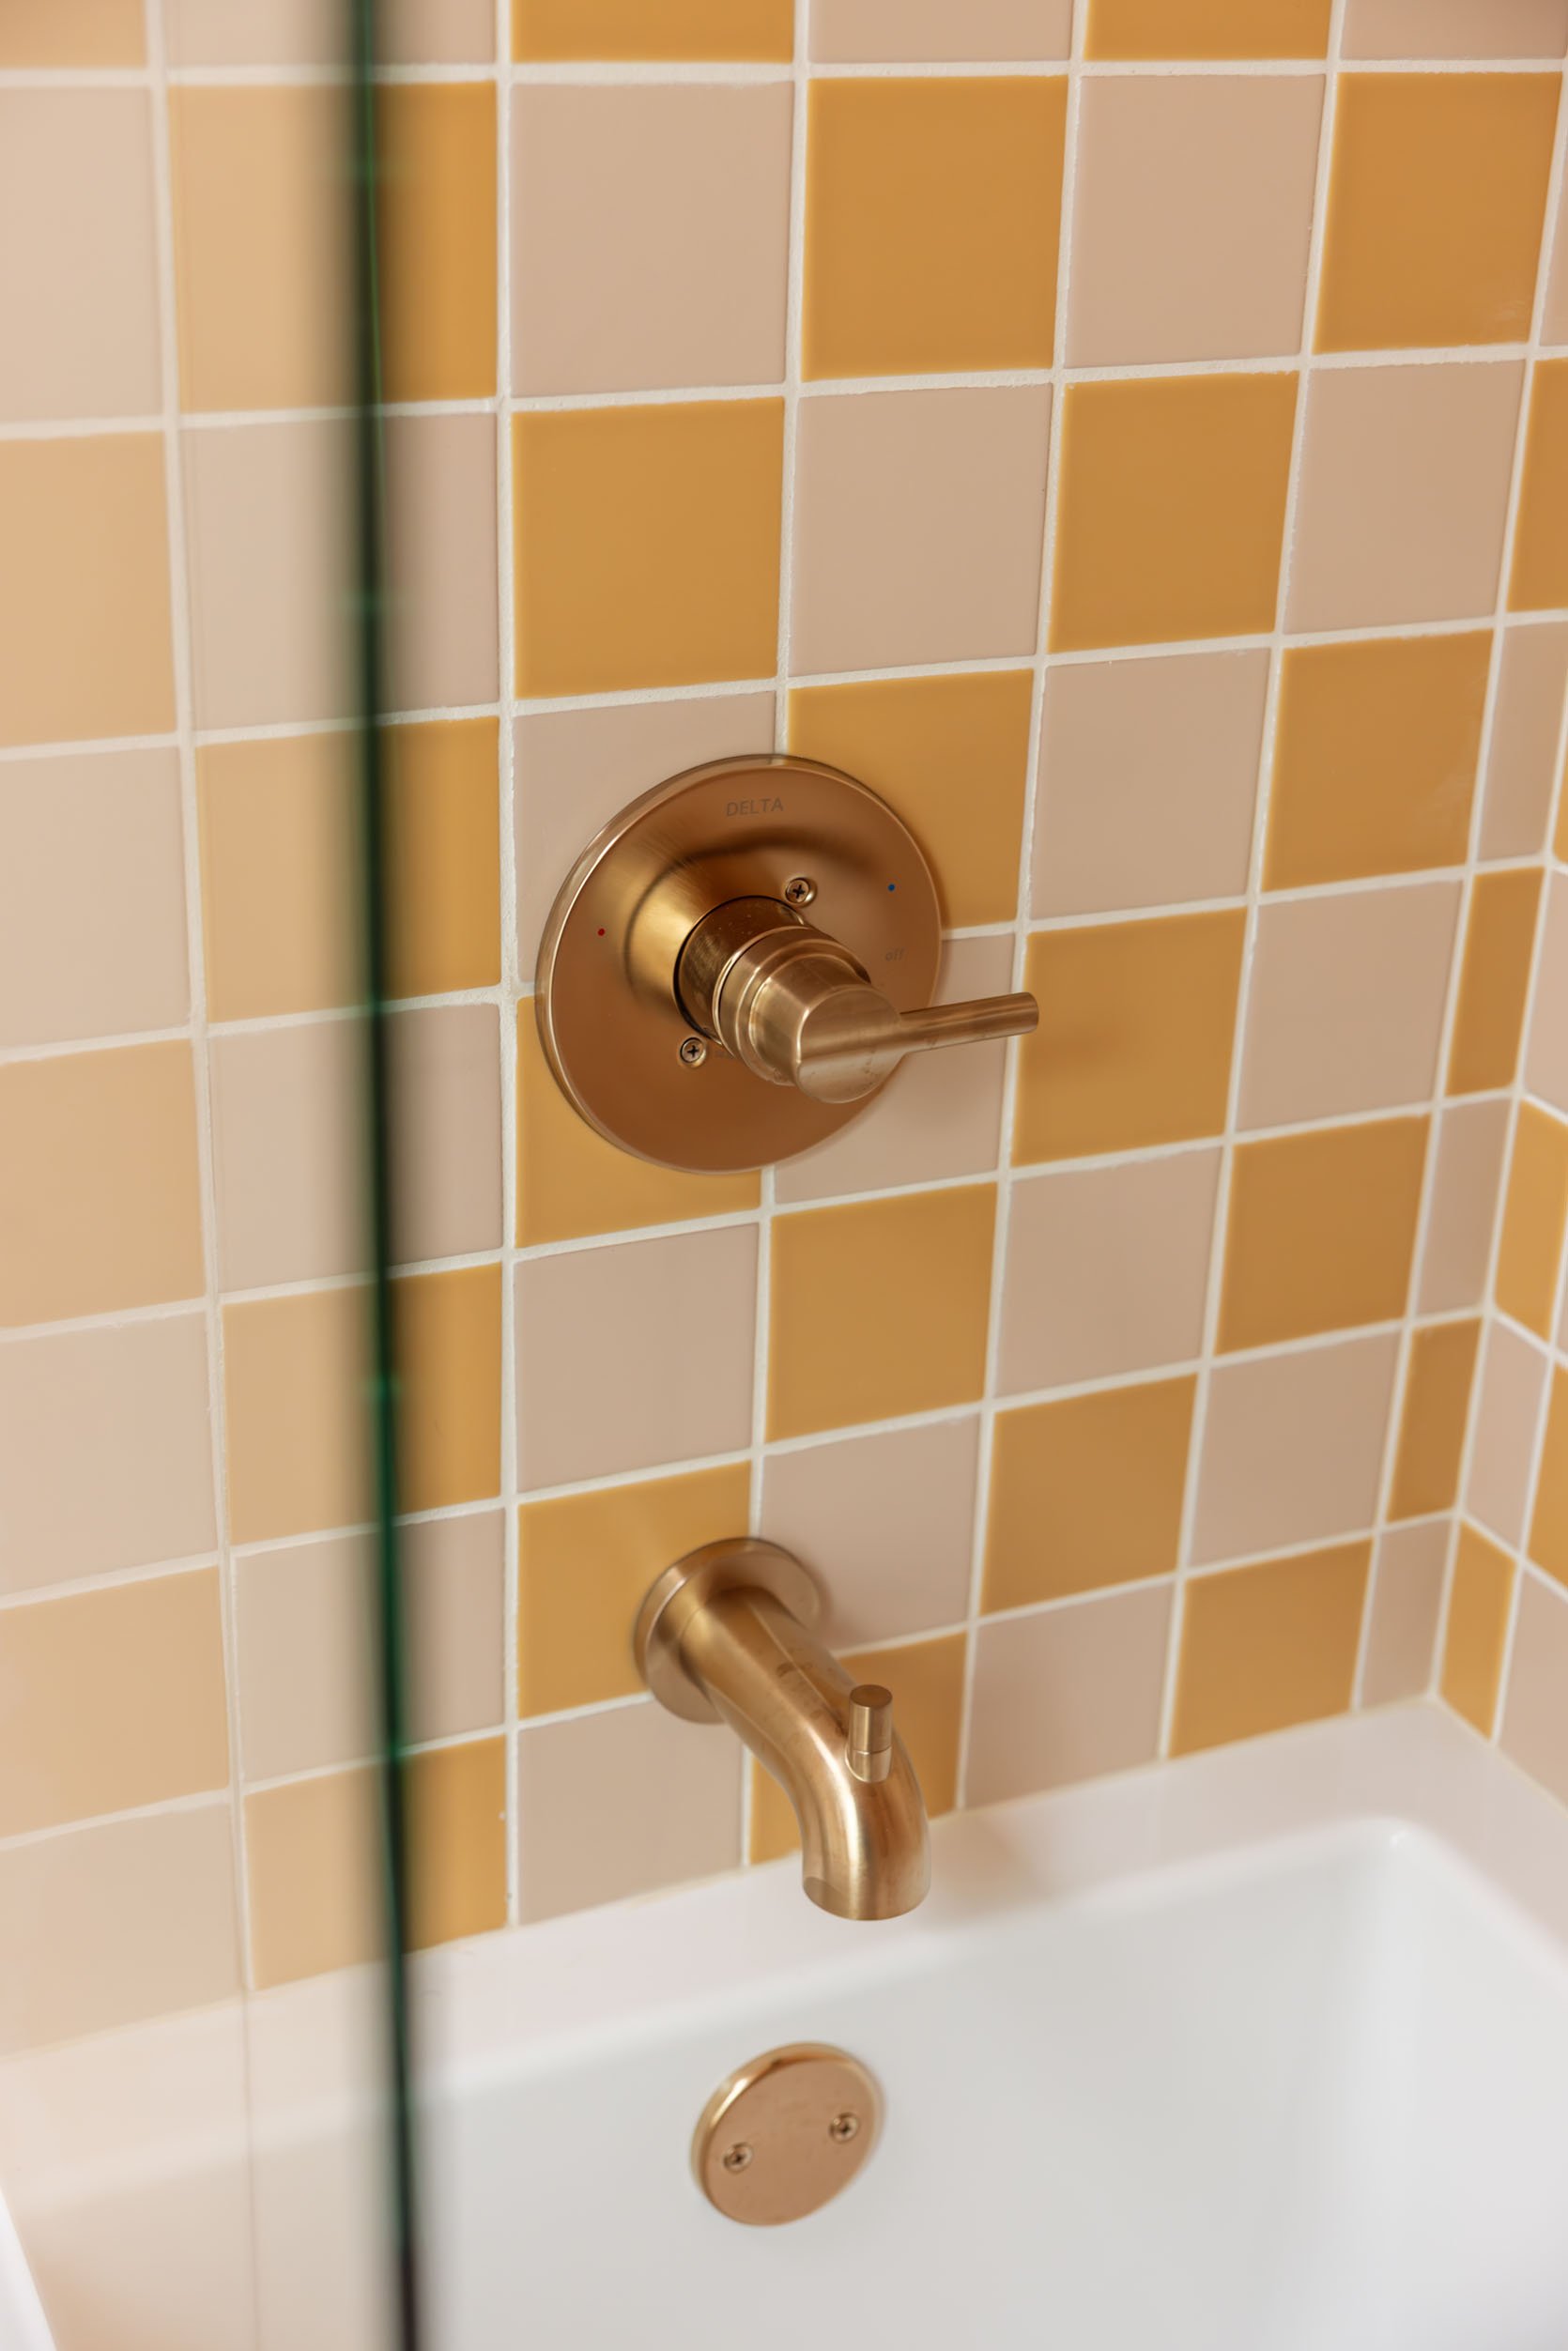
For the floor, we went with a sweet 2×2 tile in Ivory Gloss, and on the shower walls, we mixed 4×4 tiles in Tumbleweed and Haystack. Just like in the primary bathroom, we stuck with Alabaster grout throughout, which brightens the whole space and makes the pattern pop. Honestly, now comes the real test—keeping it clean. I’m already doing daily wipe-downs, but truly, it’s worth it for how fresh and happy this bathroom feels.

Pink Tile | Yellow Tile | Shower Set
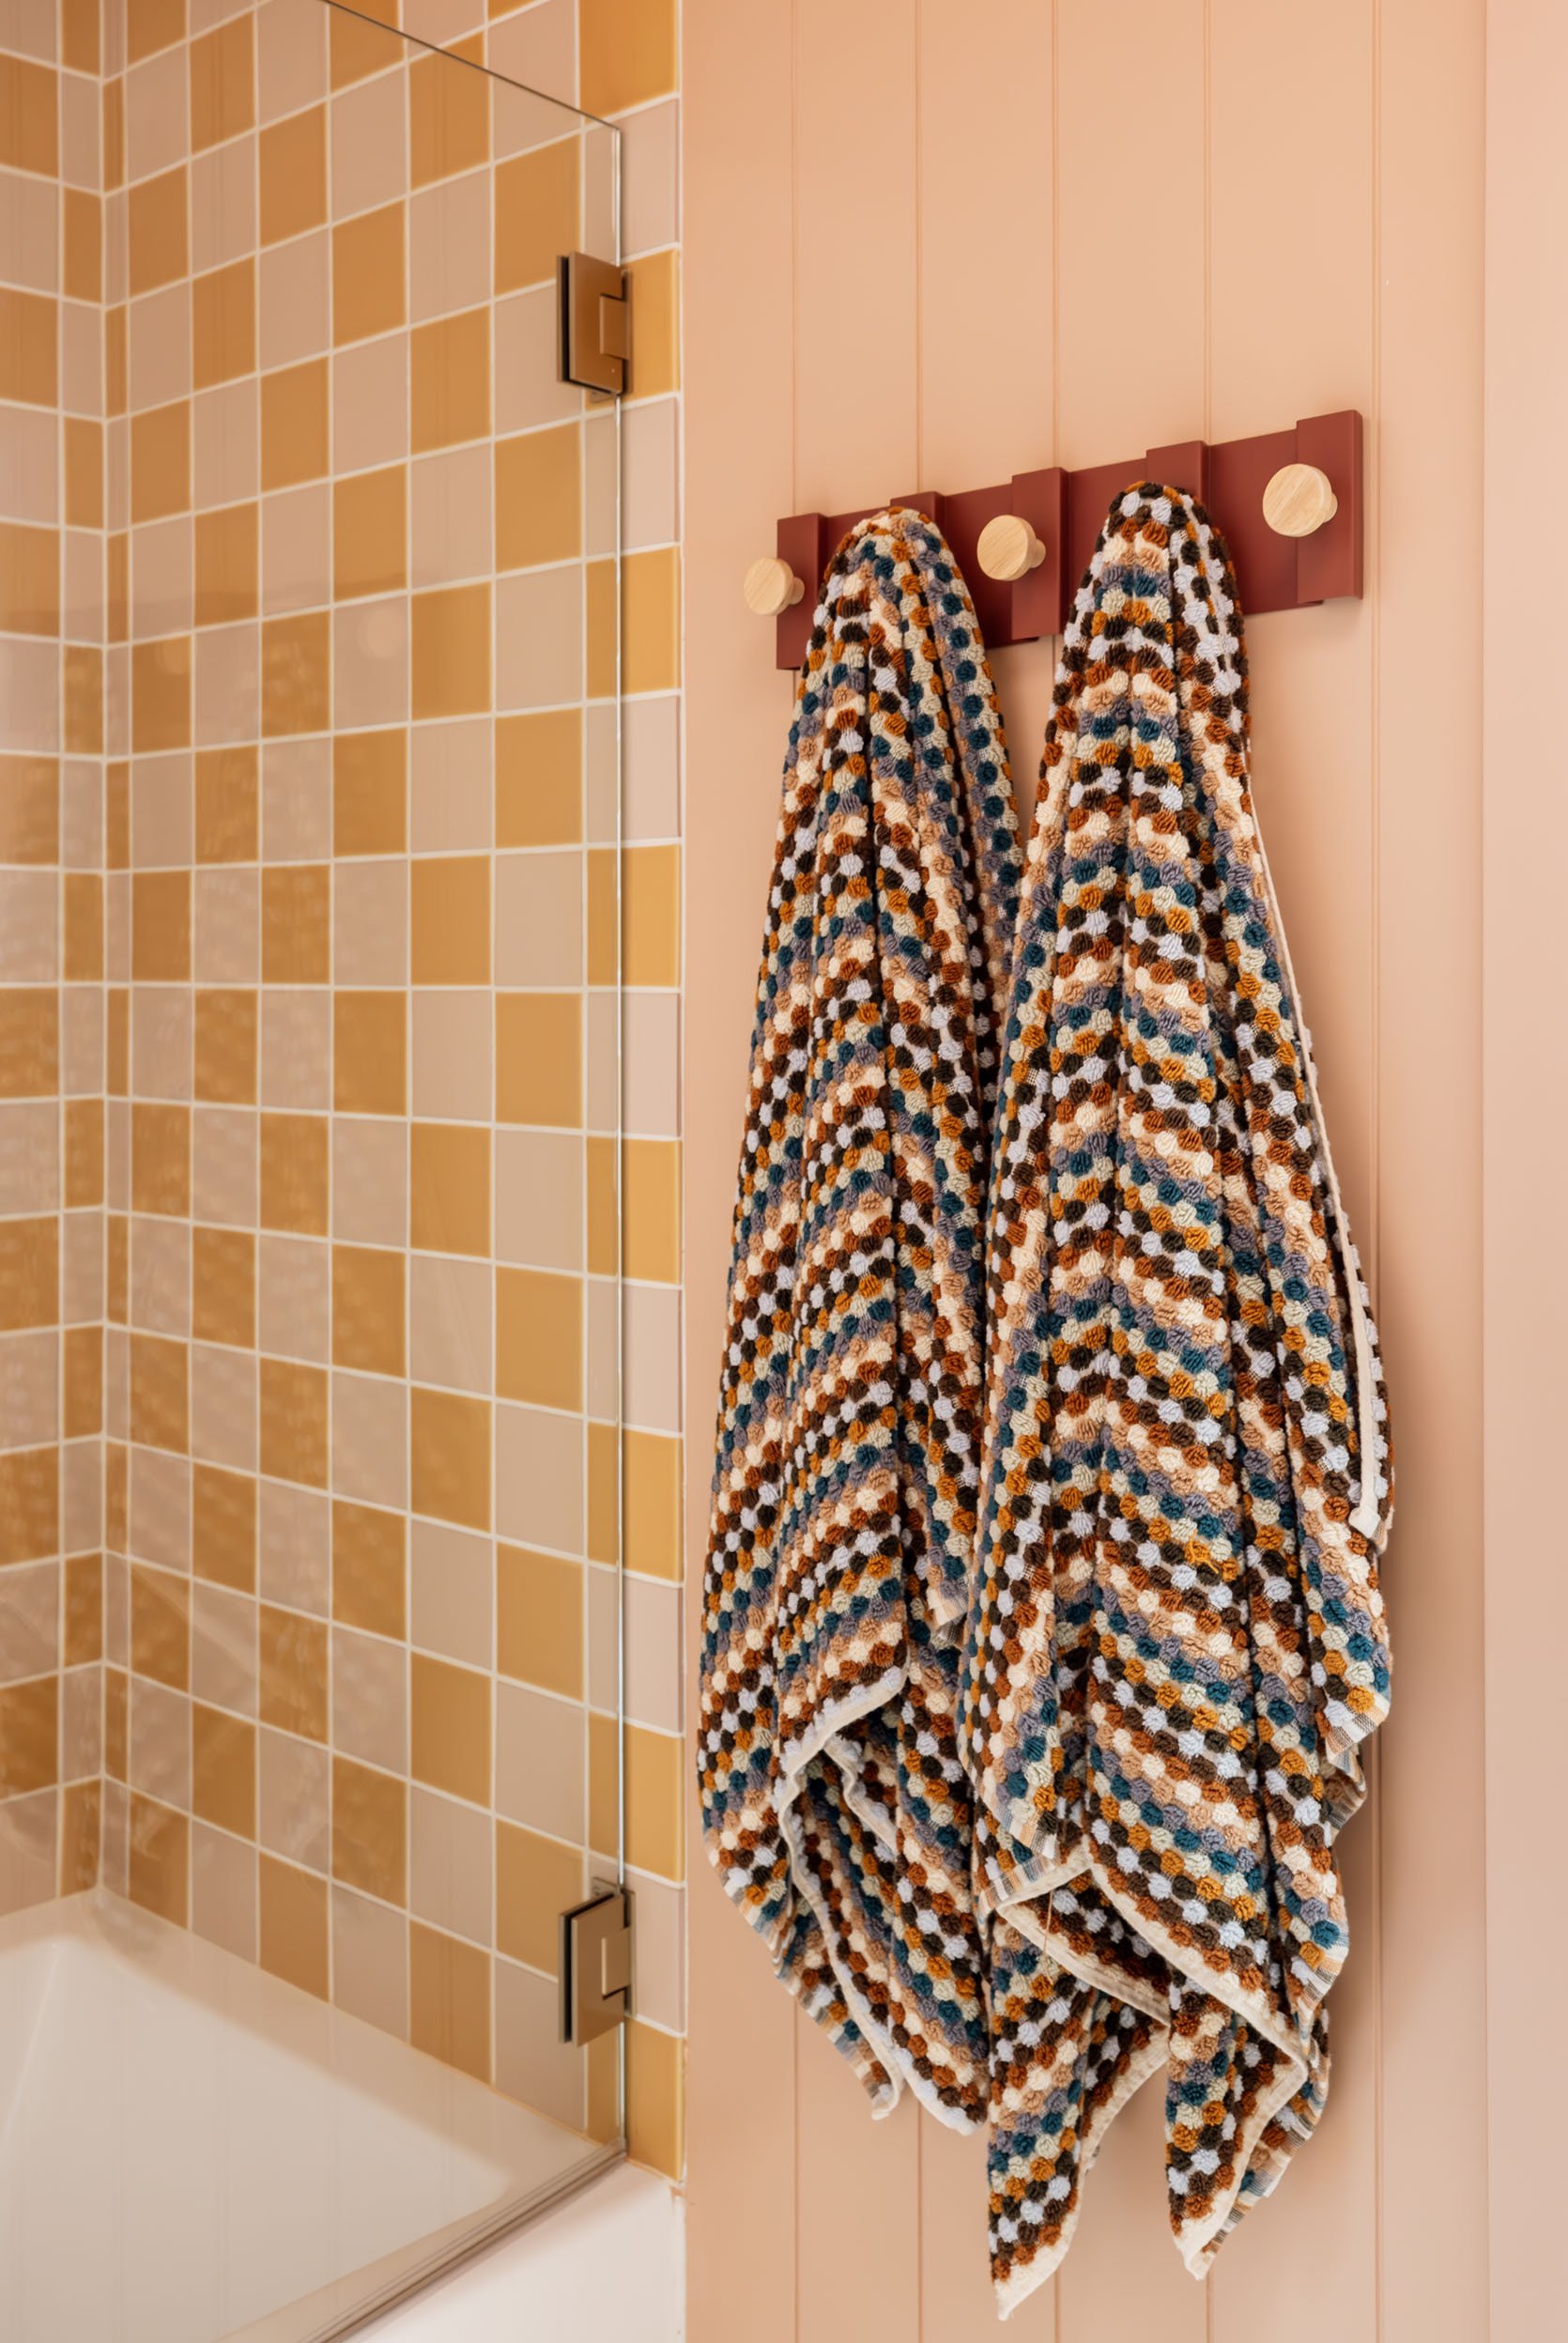
As I mentioned before, I’d planned to stay away from anything too pink—but clearly, that kind of went out the window. Once we started looking at paint colors, we decided to just lean in. We tested a bunch of shades, from pale blushes to darker pinks, but Pinky Beige by Sherwin-Williams ended up being the perfect in-between. It’s warm and cozy without feeling heavy, and just different enough from the floor so it doesn’t feel too matchy-matchy.
And just like in the primary bathroom, we decided to panel the walls here too. It adds so much warmth and texture—honestly, it gives the space way more character than plain painted drywall ever could.
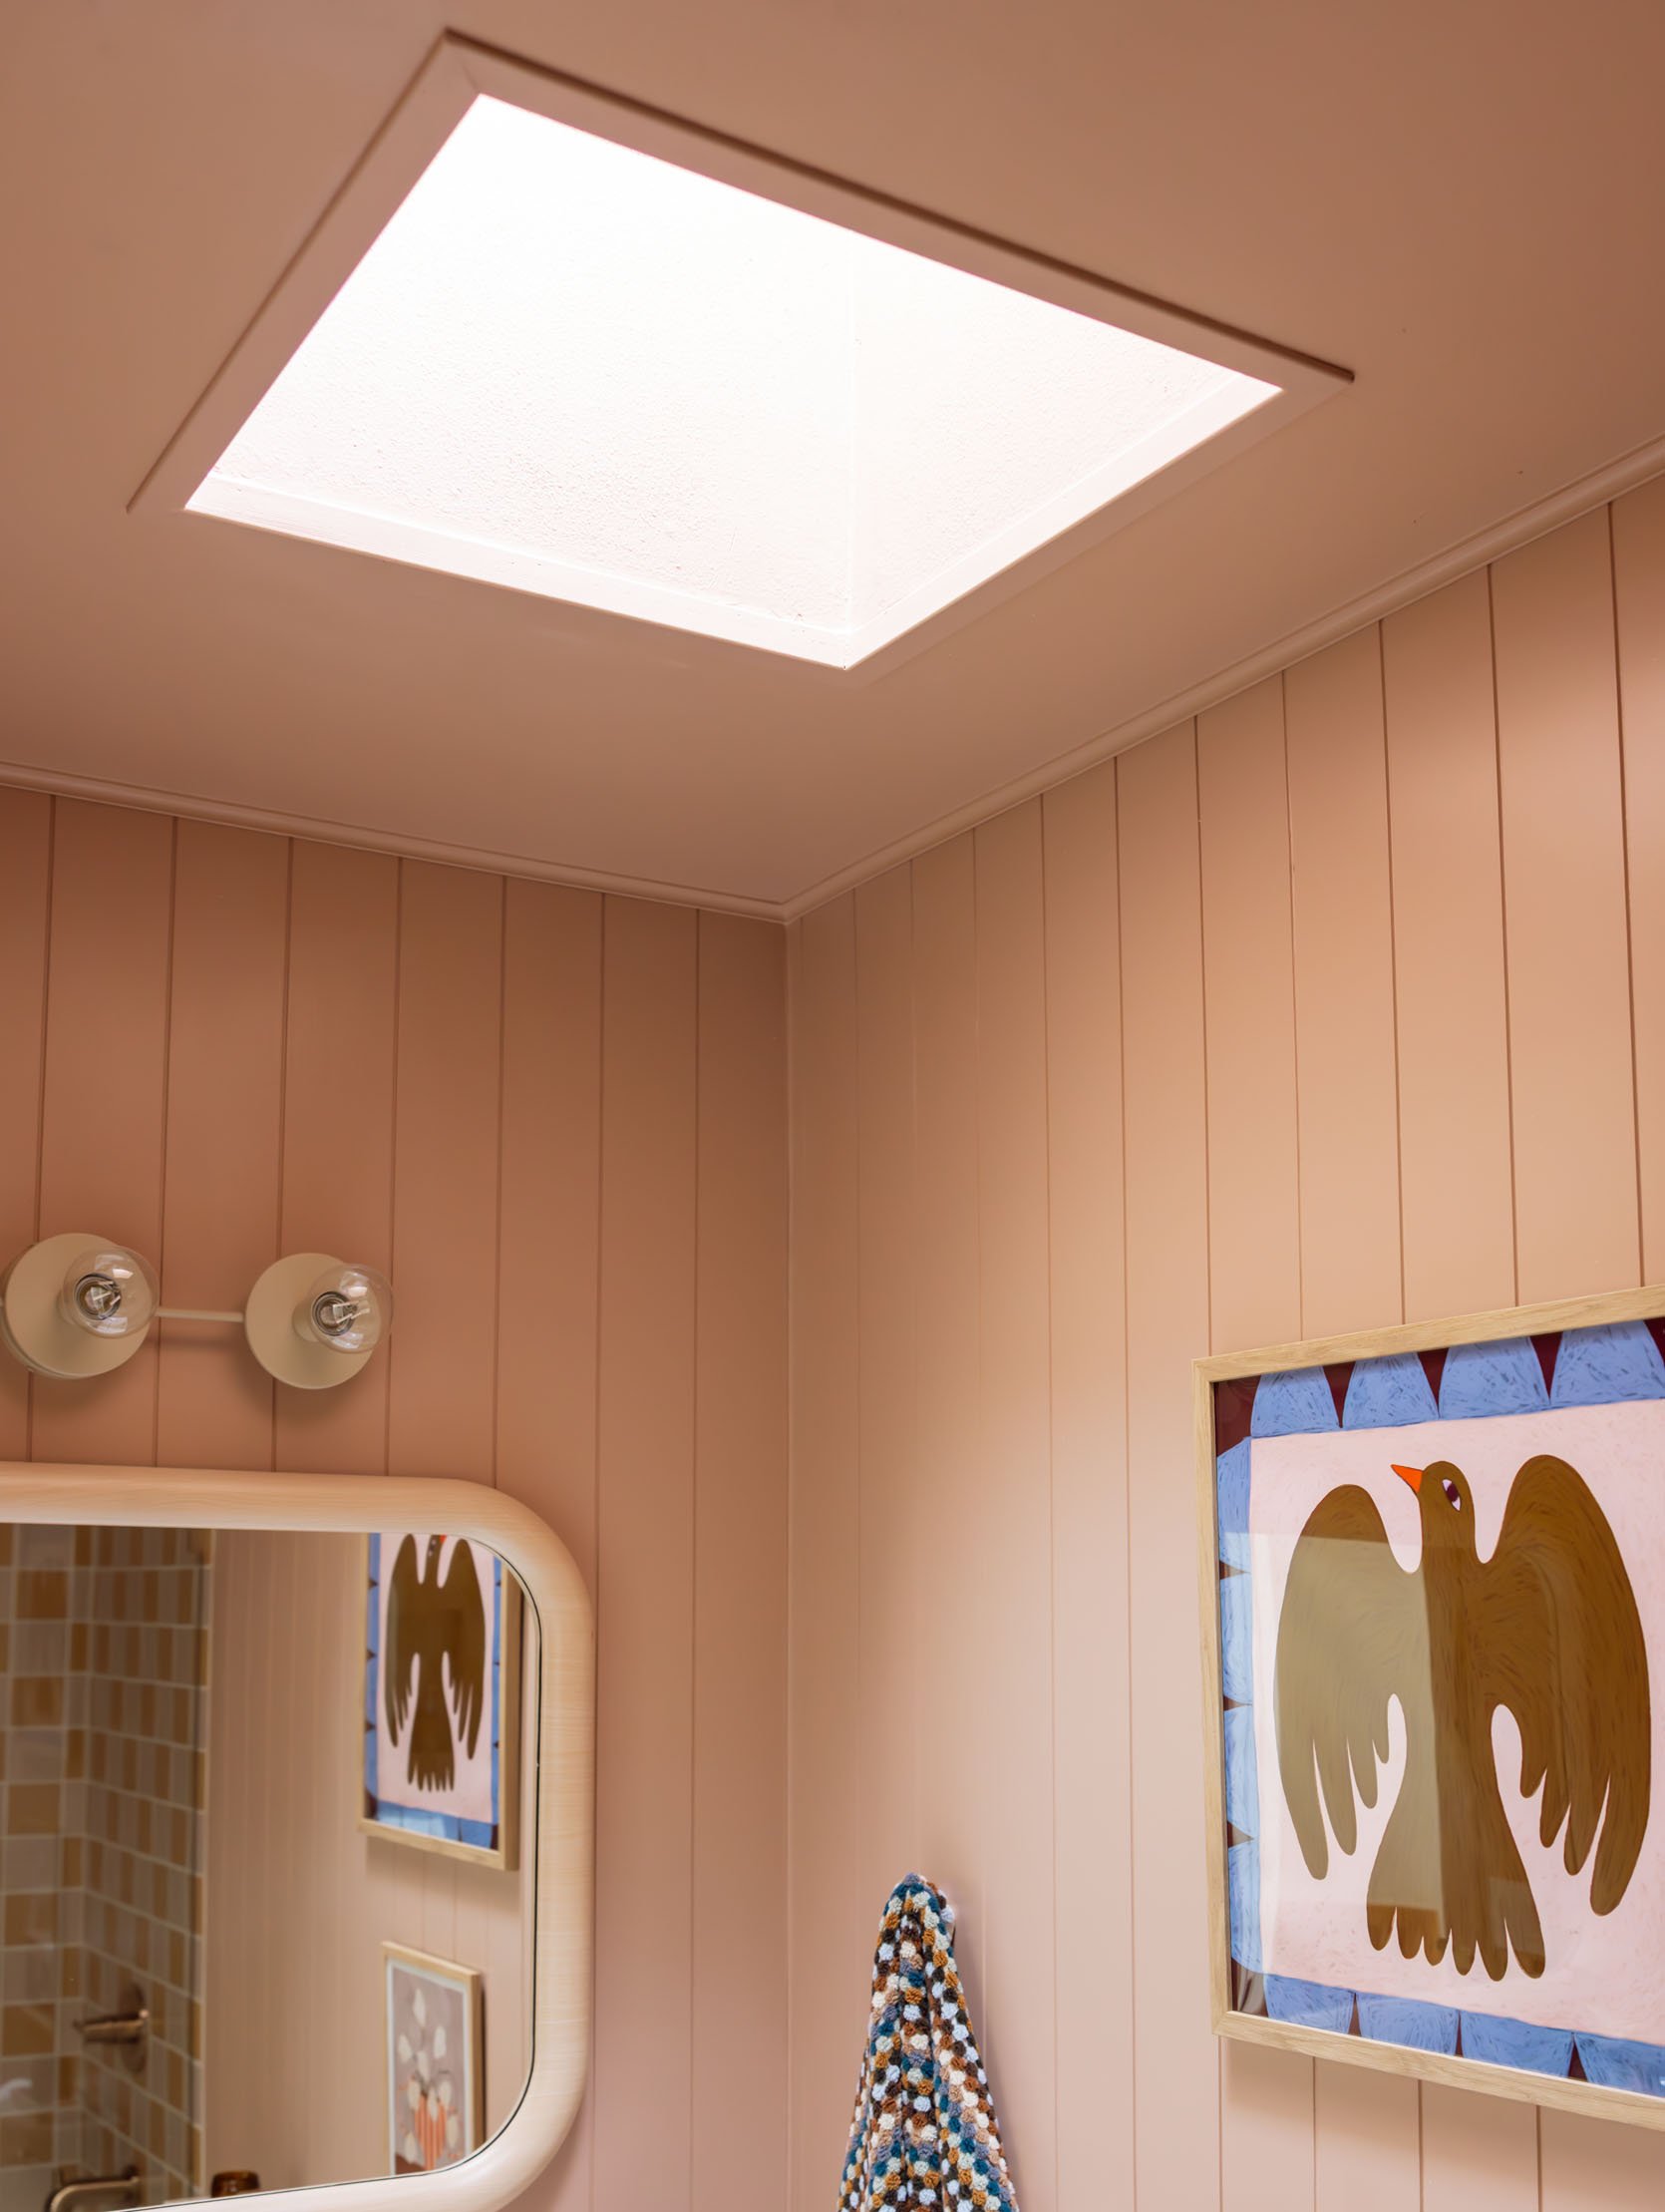
This bathroom had zero natural light and felt very sad, especially pre-remodel. But the moment that the Velux skylight went in, it was a total game-changer. Instantly, the space felt brighter and so much happier. Who knew a little window in the ceiling could make such a big difference? Thank you again, Velux!
And that’s a wrap! I said it last week, but thank you, Em, for this opportunity—for your trust, your partnerships, and for letting me share a little glimpse of my little design journey without totally messing it up. And of course, a huge thanks again to Afore, AllModern, and Fireclay for making this space feel so special!
*Design and Photos by Kaitlin Green


OMG .. WOW!
This is a good case study for the benefits of taking a little risk rather than playing it safe in a small room. That checkered tile is fab!
It’s a magical transformation, full of warmth and whimsy.
In terms of grout protection, I’ve used this product on white and coloured grout and it works really well without changing the colour of the grout.
Purchasing now! Thanks, Elaine!
Well done! Speaking up during a Reno is huge-I get it. When I had the primary Reno’s, I was inspired by a Roman and Williams hotel bathroom with all bisque colored tiles. But a junior tiler was on the job (I later learned) and the niche alignment looked off. I feel like a badass in my profession, but speaking up to the General Contractor about this felt overwhelming. But I did- twice. The initial fix was still off, so I kindly but firmly brought up my persisting concerns- and it was fully handled by the 3rd time.
The process was a blessing: The reno still makes my heart sing, and speaking up about what wasn’t landing right visually was a huge growth moment for me. 🌸
Ahh good on you for speaking up as well! I’m sure your bathroom is stunning!
It’s really a gift to the tiler who is learning. In the case above a more experienced tiler would have seen that it was off and done it right the first time but all contractors need clients to improve (in my humble opinion). Sometimes an architect or designer gives them that feedback but I think they act majority learn from clients. So speaking up is helping not just you but the installer too – even if some don’t handle it as well as they should.
I didn’t see a source for the tub and glass doors, did I miss it?
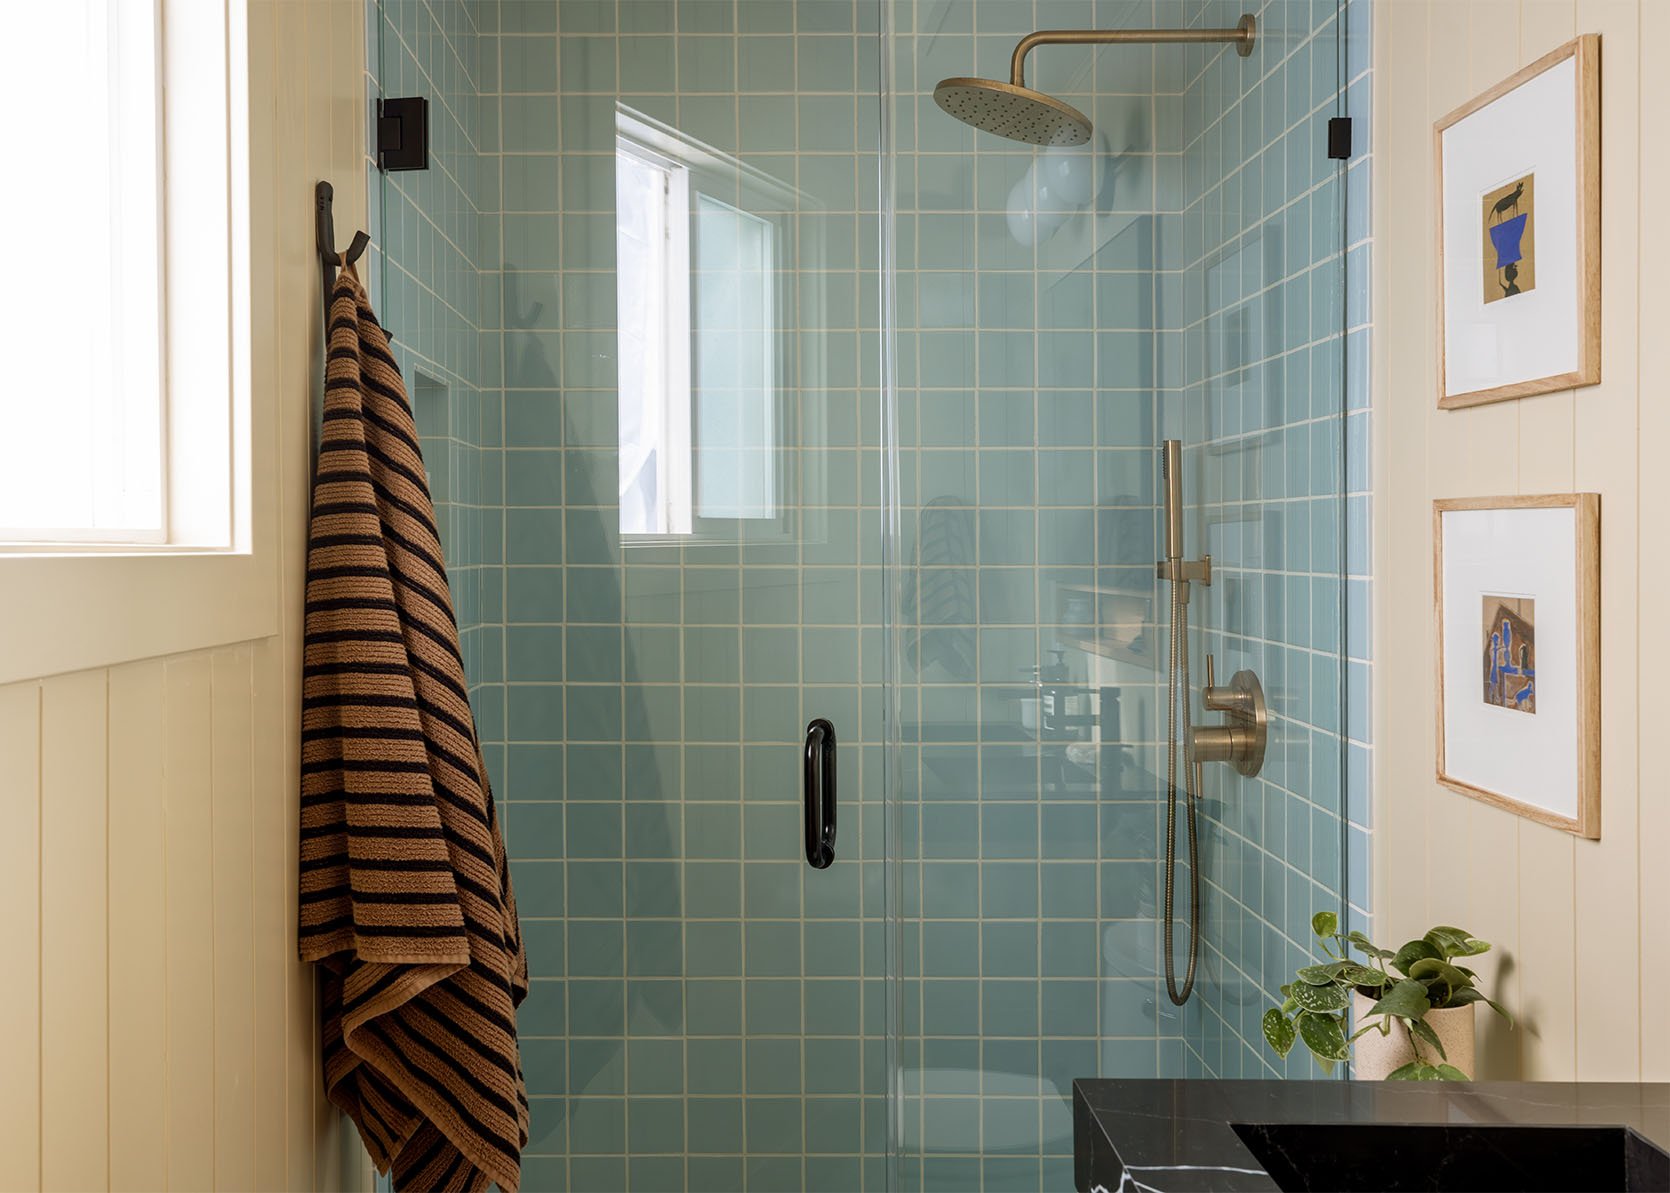
The tub is from Signature Hardware. And the shower doors are Glass Warehouse on Wayfair, though they don’t seem to be available anymore? Which is a bummer because we love them! They’re the same brand as the ones in our primary and both look custom!
Kaitlin, the bathroom looks amazing. Well done. Could you elaborate on the tile issue and solution? It looks as though you had small pieces of tile around the edges but was the fix making the niches larger? I can’t figure it out.
Good question. Since the tiles were 4×4, we really wanted to see full squares in the niche, not partial cuts/squares. If you look closely at the images before they corrected it, it looks like the niche needs to be shifted to the right. The change didn’t make the niche any larger, just more linear.
Thanks so much for the explanation, Kaitlin. I totally see it now. A huge difference. Kudos to you for speaking up so that every time you look a your shower you feel joyful rather than a vague sense of dissatisfaction. Job well done.
I went back and forth too but as soon as you follow the stripe down from the ceiling you see it. And once seen = never unsee. Absolutely a redo. I’d bet money the tiler never makes that mistake again.
To me, it looks like they made the niche a little bigger to accommodate full size tile so it didn’t look weird with the little pieces.
It’s perfect. I LOVE it.
I think this bathroom is a home run! A very bright, fun and modern bath update. Love the art and bath mat but the tile is definitely my favorite!!! Well done!
Thank you! Cold Picnic makes so many fun bath mats. Definitely a bit on the spendier side for a bathmat, but we love how much it adds. Kind of like a piece of art on the floor 🙂
I love the ’70s style with the colours and yellow tile. I think this will definitely be timeless as your girls get older. Having a medicine cabinet isn’t a huge deal (at least for me) as long as there is plenty of storage.
A really beautiful bathroom. Fun but still a little bit sophisticated. Good on you for sticking with your first instincts and not going down the ‘safe’ route. Love the whole vibe and the contrast in colours from your bathroom.
Thank you!!
Love this! As well as your primary bath! Do you have a source for the paneling you used? I’m considering something similar.
I believe we went with the 7/32 in. x 48 in. x 96 in. White Nickel Gap Shiplap Panel from Home Depot.
Love it. I just want to chime in about tiling issue. It’s great that you caught it and that your crew was able to fix it before it became a huge deal to undo the sloppy layout. My take on dealing with contractors of any type is to make sure to confirm anything that seems like it might be a judgment call for them. I discuss and draw every detail I can think of, so we can go over what I want and expect, as well as anything that might be tricky or even impossible. I also ask a lot of questions and try to start each day knowing exactly what will happen and how, to get ahead of any questions. I also remain on site and check in regularly. I’m sure some people find it annoying, and it’s certainly a hassle for me to be tied down like that, but I’m always amazed at how many little things don’t provoke a question from the contractors. I think they just default to whatever is easiest for them, or how they did something last time. And those are the little things that might drive you up the wall for the rest… Read more »
This is so true (re: contractors not thinking to check) and excellent advice re: making a list of exactly what you want, even if you think it’s completely self-evident. Better to be considered a pain than to have something drive you completely up the wall!
Thank you for sharing these bathrooms. I love seeing the premium bathrooms but my realty is exactly like these. I’ve got two bathrooms that will need updating in the next 5-7 years and I love seeing inspiration that I feel like I could actually afford. I’m a huge fan of the paneling trend for making a space feel more bespoke. And AllModern is rocking. Only wish I had a place to lay hands on them to see what they feel like in person. But mostly came here to say thank you thank you thank you. And good work!
Thanks, Michelle! Appreciate your kind words 🙂 Agreed about not being able to see AllModern in person; however, I will say, they do have a pretty decent return policy if something you order isn’t as expected!
Love it! It dances the line between pretty and modern and characterful so well! Love the warm colours, the panelling and the artwork too.
I also love that there are ideas here that can be added to an existing bathroom piecemeal too, which makes it more accessible and and a source of inspiration for those of us not doing a reno.
Great job on both bathrooms. Did you ever have a chance to share the dimensions of each of your bathrooms? It would be so helpful for those of us with small/regular size bathrooms.
The kids’ bath is ~5×9 and the primary is ~4.5×9, including the tub/shower area.
Those are some lucky girls!!! Absolutely gorgeous!
Just great, we are in the middle of a bathroom reno and now I have this to stress about. At least we have not completely closed up the walls to the point that I can’t move the niche a bit to fit the tile pattern…..
Mark
Hillsboro, OR
You did a great job on this – super cute!
I’ve got to ask about the tile redo for some insight – I was gifted some free tile that our tile guy installed in our kids’ bathroom. I did the same thing you did once I went to see it, thinking “something isn’t quite right but it will be fine.” Instead, after it was grouted, I realized there was one square of penny tiles that was a shade darker than the rest of floor. It’s driving me crazy! Was it hard for your tile guy to undo his work? Or was this before the grout went in? Any insights would be appreciated.
It sounds like your tiling job is entirely done, and fixing the one problem would mean a lot of redoing and undoing, unlike this niche issue, which I think was caught before grouting. A important point to keep in mind is that contractors are instructed to just do the thing they’re hired to do. They don’t necessarily notice a detail like this or, if they do, they may think you’re fine with it or you would have said something. They should notice a technical issue, but you can’t expect them to be interior designers, scrutinizing the finishes that you had picked out and signed off on.
In your case, maybe coloring the grout a darker color would minimize the difference in tone in your tile?
Wow, so cool. Restrained and warm with elevated details. And, it feels like a real family’s bathroom, if that makes sense. Well done!
I know not everyone uses Insta but here’s a link to a video snippet of both of Kaitlin’s bathrooms (if it works for you):
instagram.com/p/DQ4inTUj_OQ/
Just a note to say, when viewing the website on a PC, it’s impossible to see the entirety of the photos or before/afters that are oriented in the “portrait” direction. You end up having to scroll to see the whole image, which is a bummer.
what about the bathtub? can you share the model?
SOOOO CUTE! Love it.
I’m amazed that they can fix that! Impressive! Well done on such a fun still easy on the eyes bathroom.
Lovely! Trust yourself!
I second the comment about your daughters being the lucky users of the space… filled with doses of charm, chic, whimsy and function. It is lovely and looks like a space that will suit young ladies as they grow up.
love this bathroom. The checkered tile is just the right amount of different. I’m glad you kept the pattern, it’s so much fun.
WOW
AMAZING!! LOVE your style!!!!
Love it! And I can confirm the choice to stay in the checkered lane is a good one. My house still has its vintage 1935 hall bath with checkered pink and peach tiles and we LOVE it. We’ve gone to great lengths not to disturb the tilework in our renos and yours gives me a similar vibe. It’s a classic!
This little bathroom has SO much personality and it feels achievable thanks to your honesty about the process and down-to-earth choice of materials. Thank you for sharing this pretty space with us!!
I truly love this so, so much. You did a wonderful job and it feels timeless in a MCM way.