Design
How Mallory Created A Renter-Friendly Built-In Bookcase For Only $600
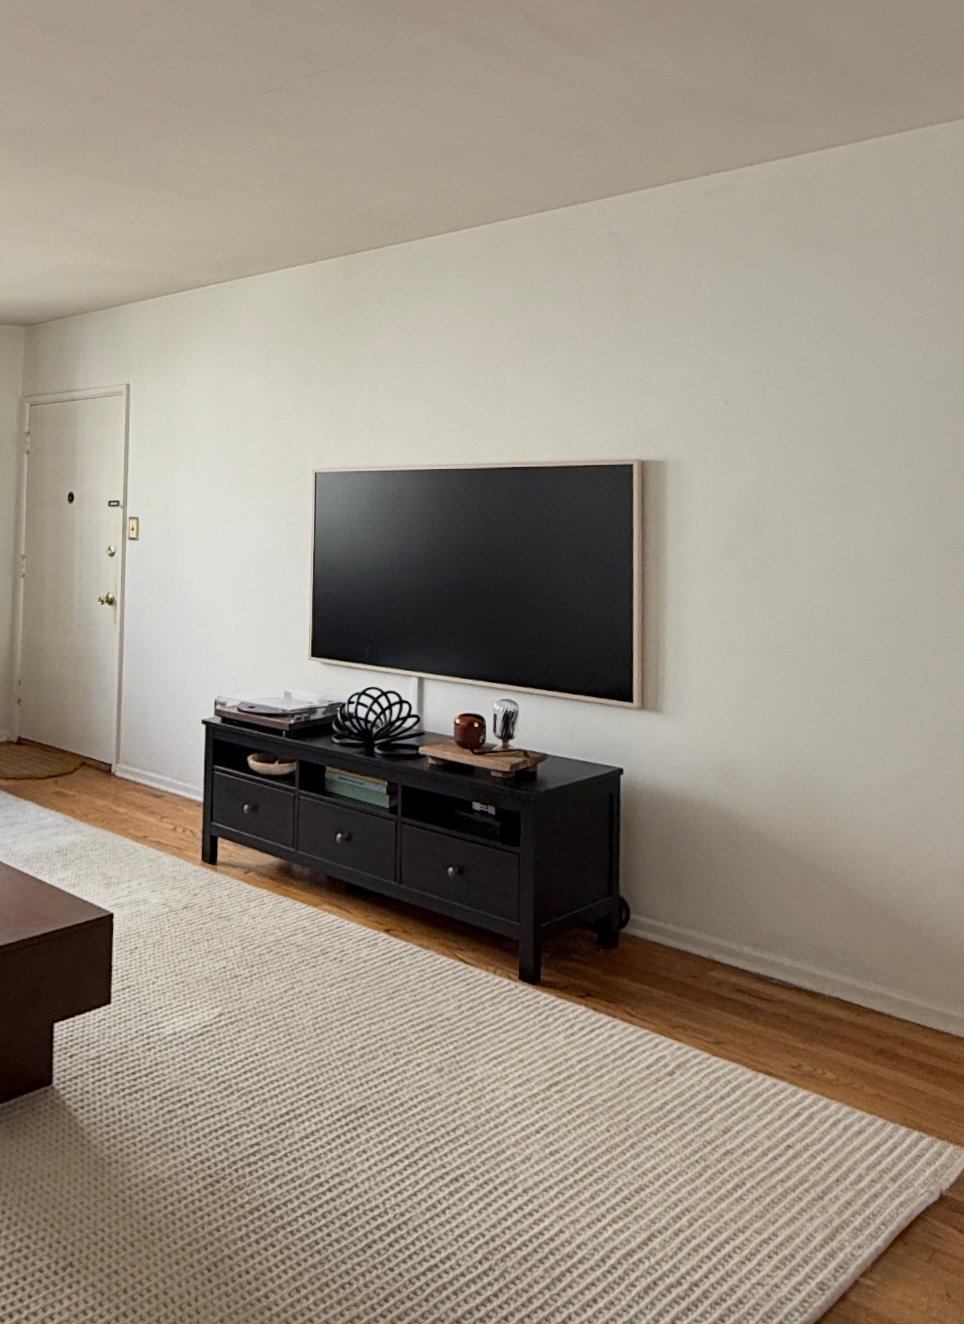
My main goal in life has always been to have a custom built-in bookcase in my living room. You know the ones – they’re all over Pinterest and Instagram. They instantly make a space look super elevated and cozy. Bookcases and built-ins are among the most high-impact design elements, and they can take a boring blank white box and instantly transform it into a cozy home. My dream, however, felt so far away because my god, they are EXPENSIVE, time-consuming, and invasive. It’s why so many people do IKEA bookcase hacks to try to achieve that luxe built-in look (which those hacks, FYI, also typically cost $3k or more depending on the size). The other issue, beyond the cost, is the fact that I live in a rental – so I can recognize that it would be unwise of me to hire a contractor and install a whole shelving/storage system that I can’t take with me to my next place. But once I get an idea in my head, I make it happen one way or another, so I started doing some research on how I could get a similar look for much, much less. But first, let me show you where I wanted to put said bookcase:
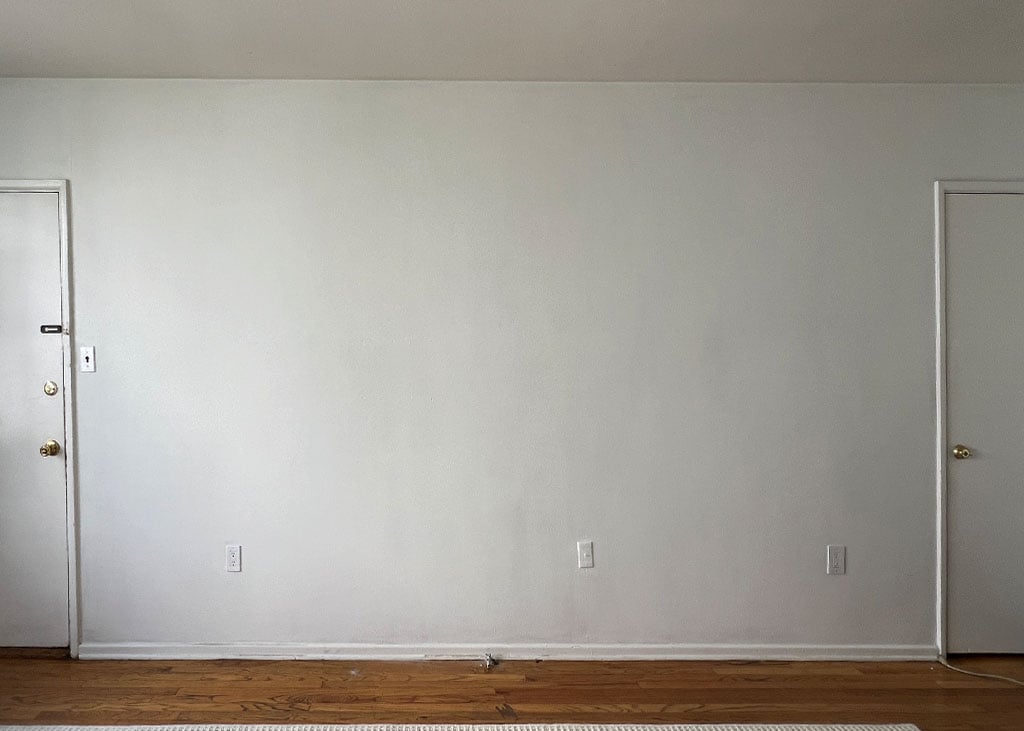
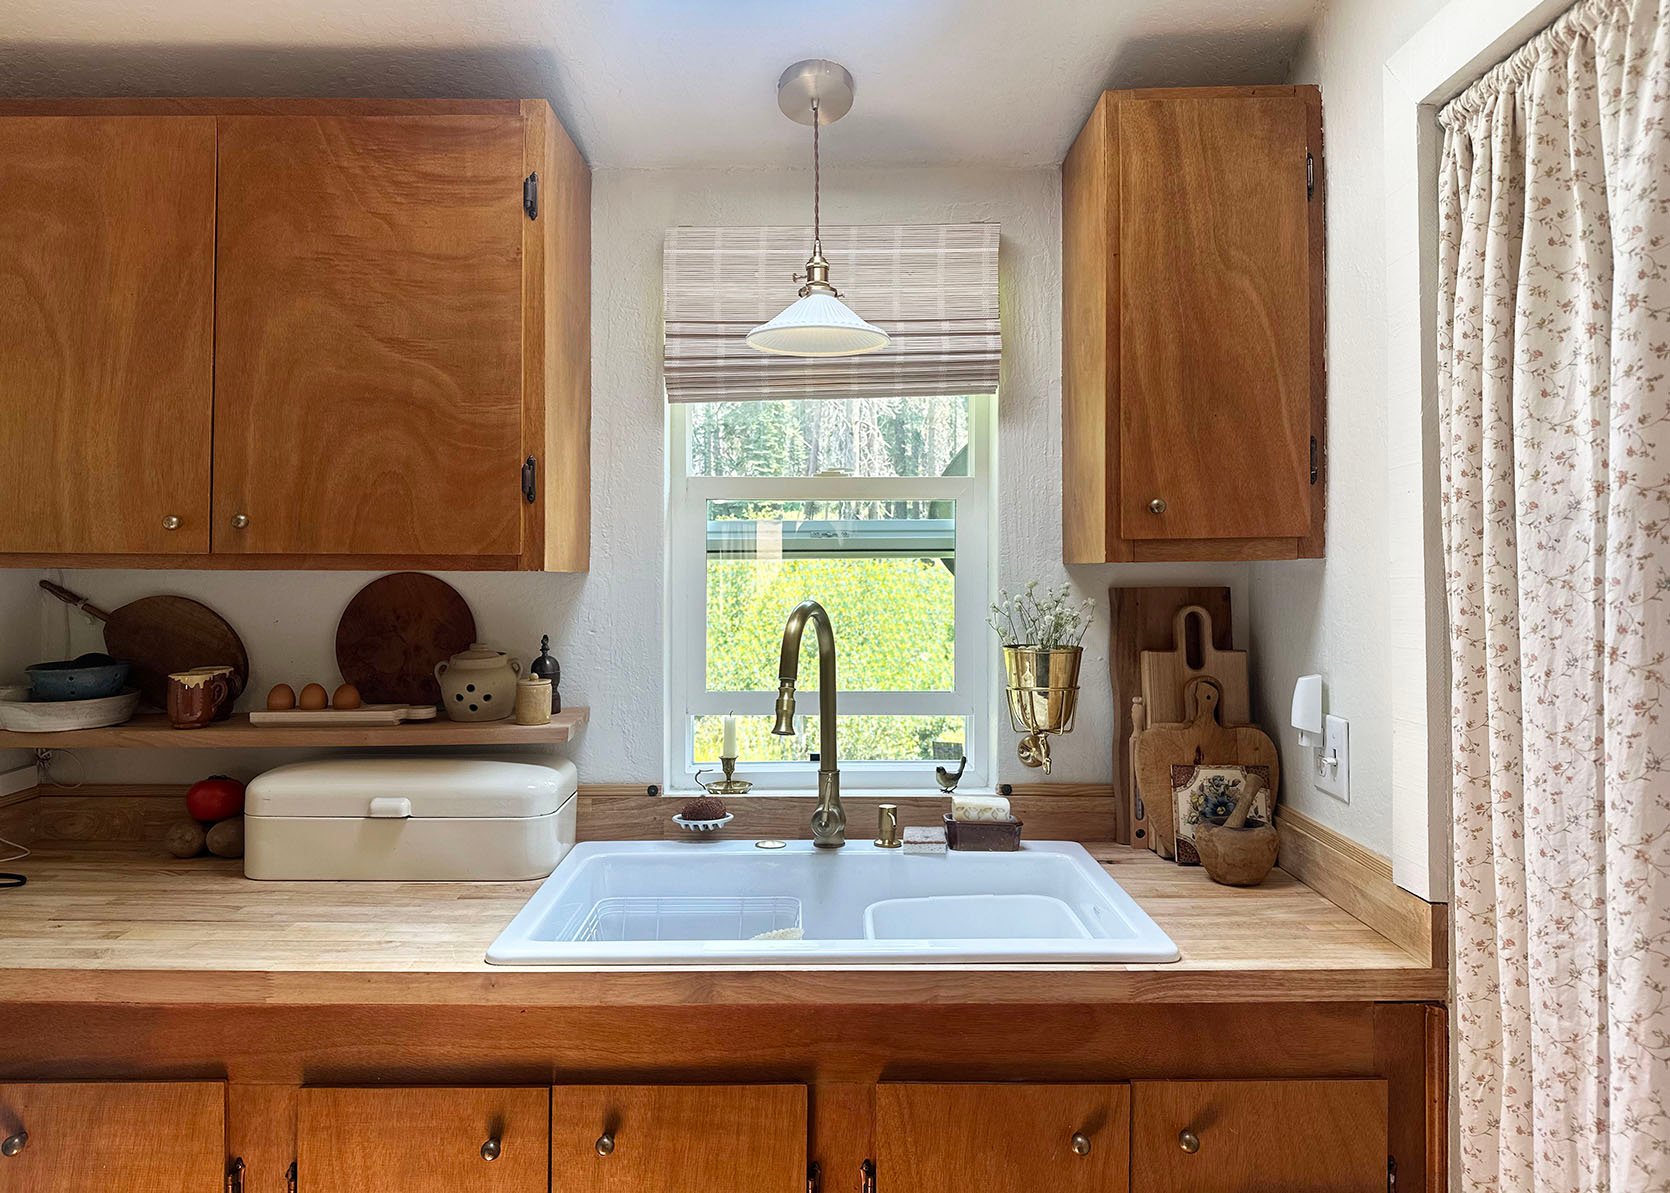
This is what my living room looked like when I moved in a year ago. My boyfriend, Austin, and I gave the entire apartment a fresh coat of white paint since the walls were originally a weird light brown color (and we did it all on a weekend where it was like 90 degrees and I didn’t realize the AC unit in here was broken – so bless this man). Also, shoutout to Alabaster by Sherwin-Williams – it’s such a good white paint color. The apartment I moved into is a month-to-month, rent-controlled place in my perfect location in Los Feliz, and it’s been in my friend group for a while, so I know deals on apartments like these don’t always come easy. While the place was such a good find and checked so many boxes, the condition of my new apartment certainly wasn’t what my last new-build, studio apartment was, and it desperately needed a clean, blank slate. Here’s what it looked like a year ago after we painted it:
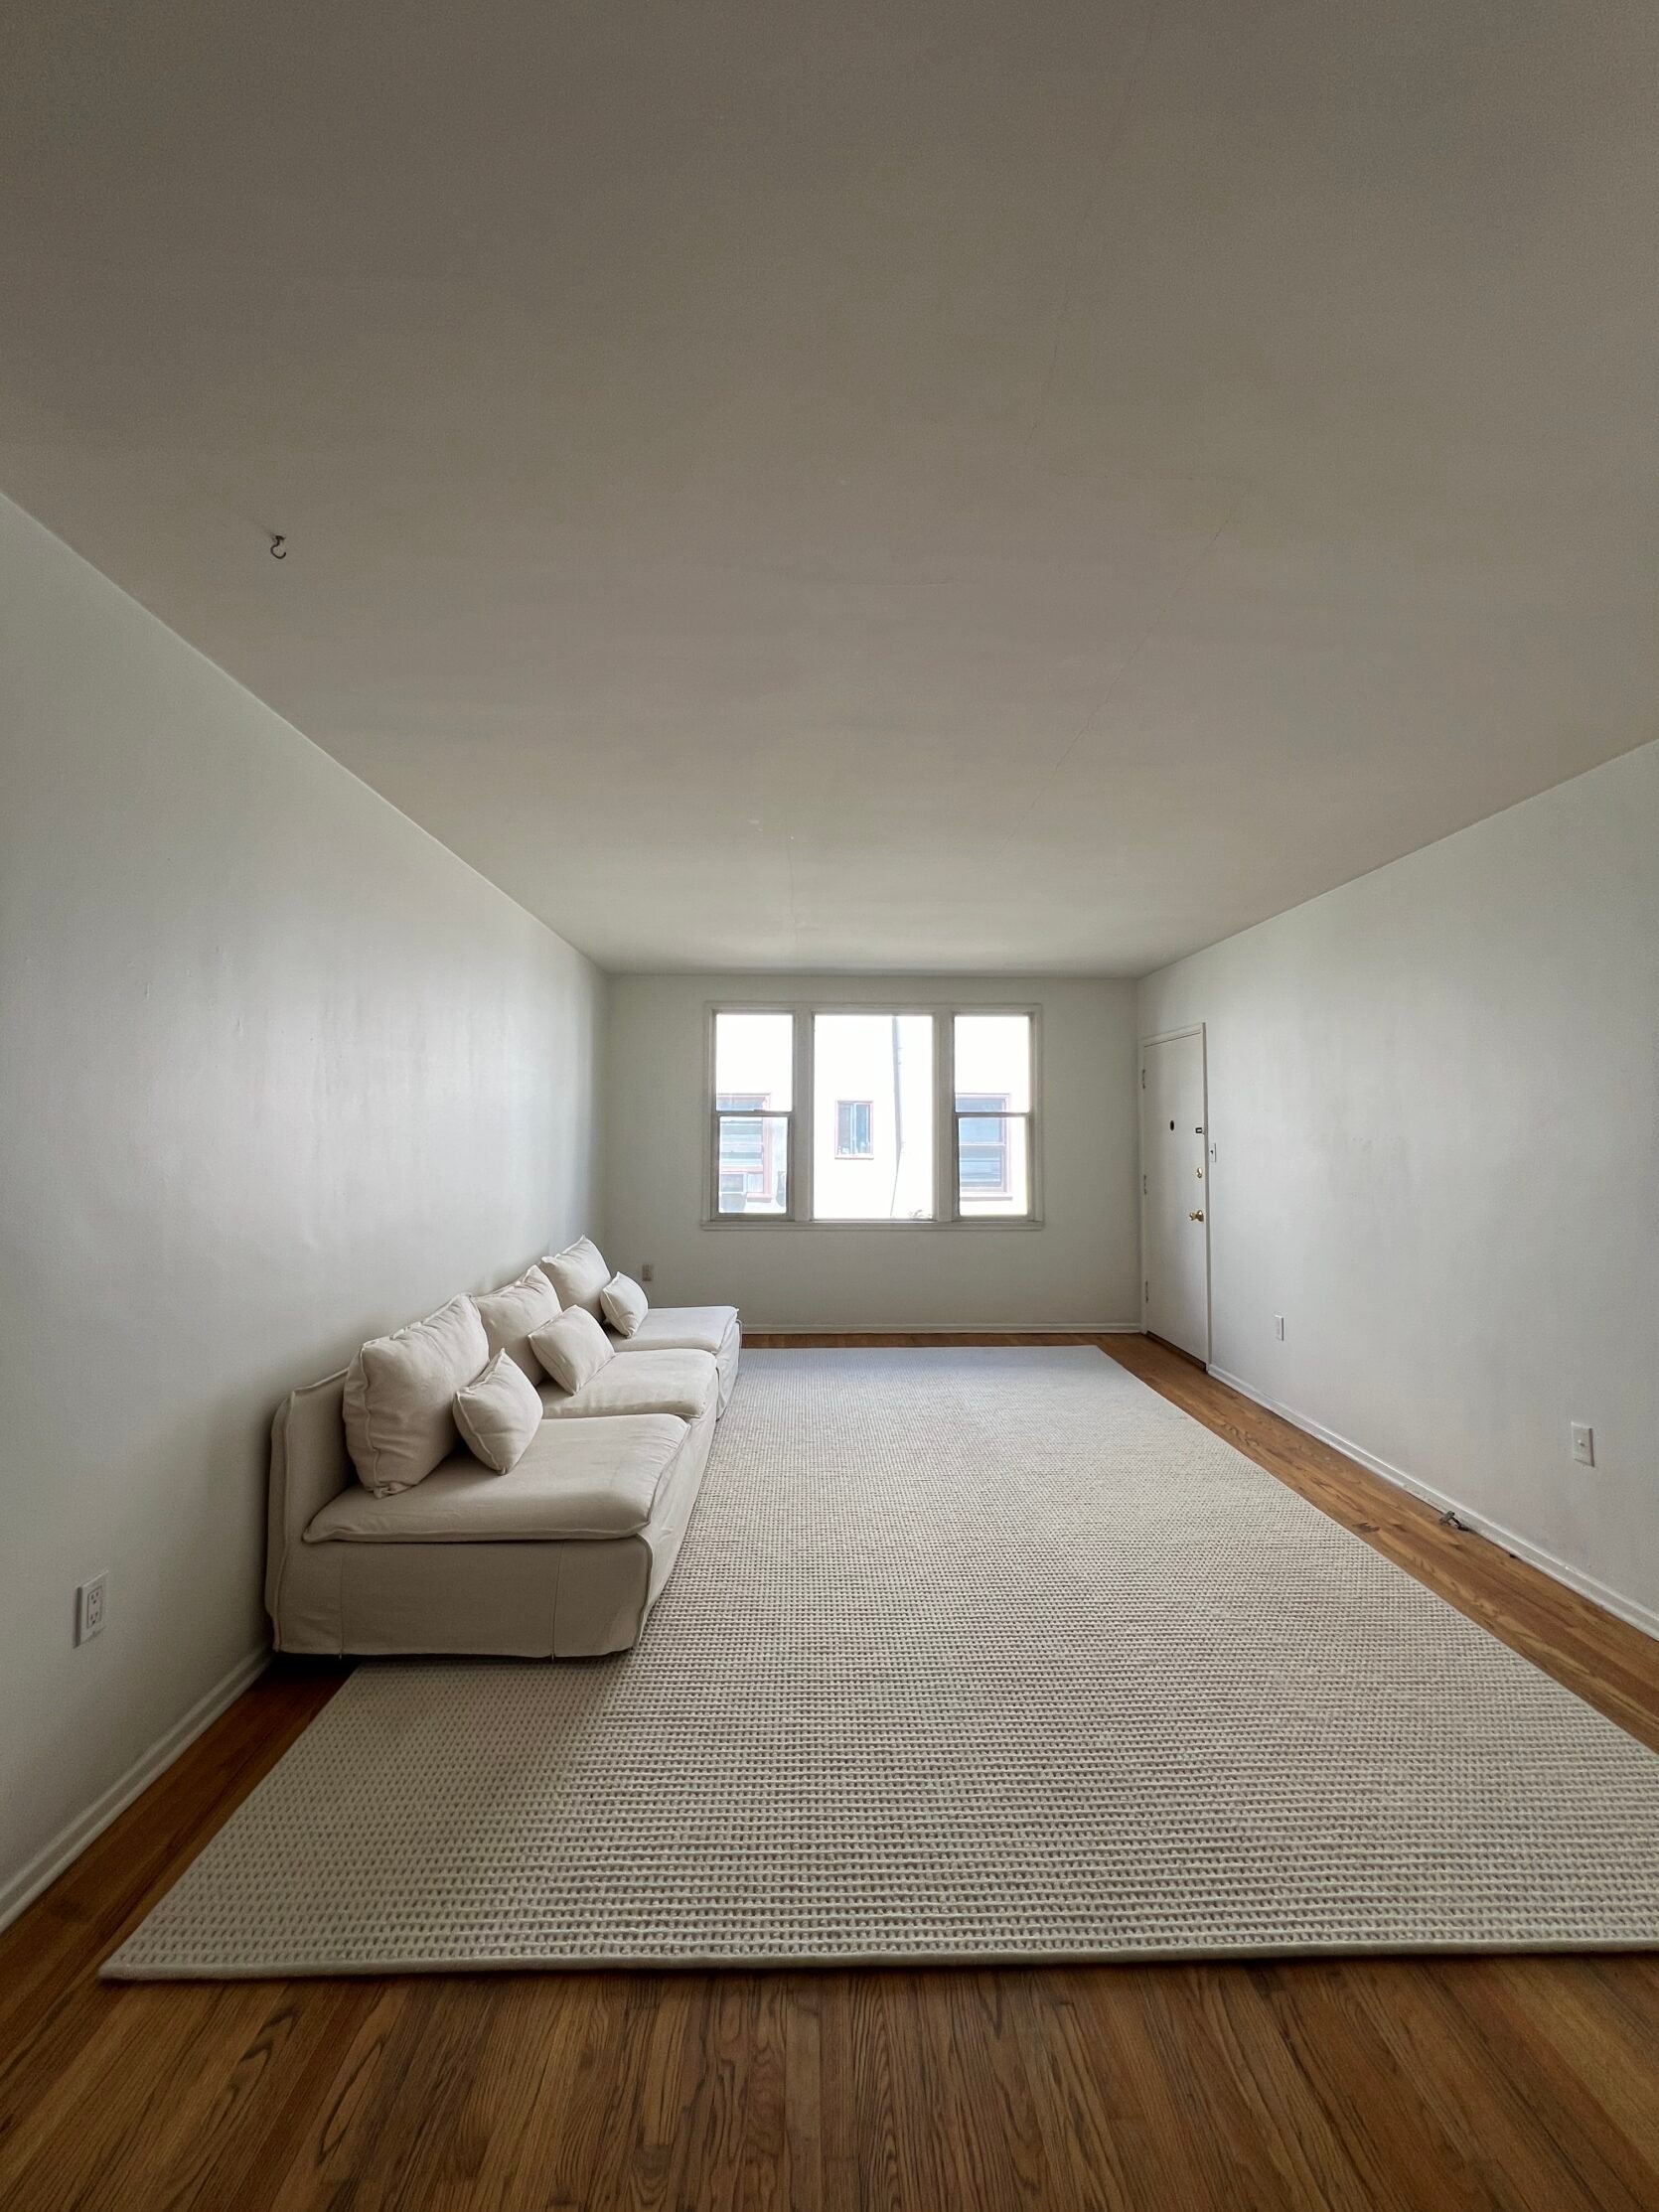
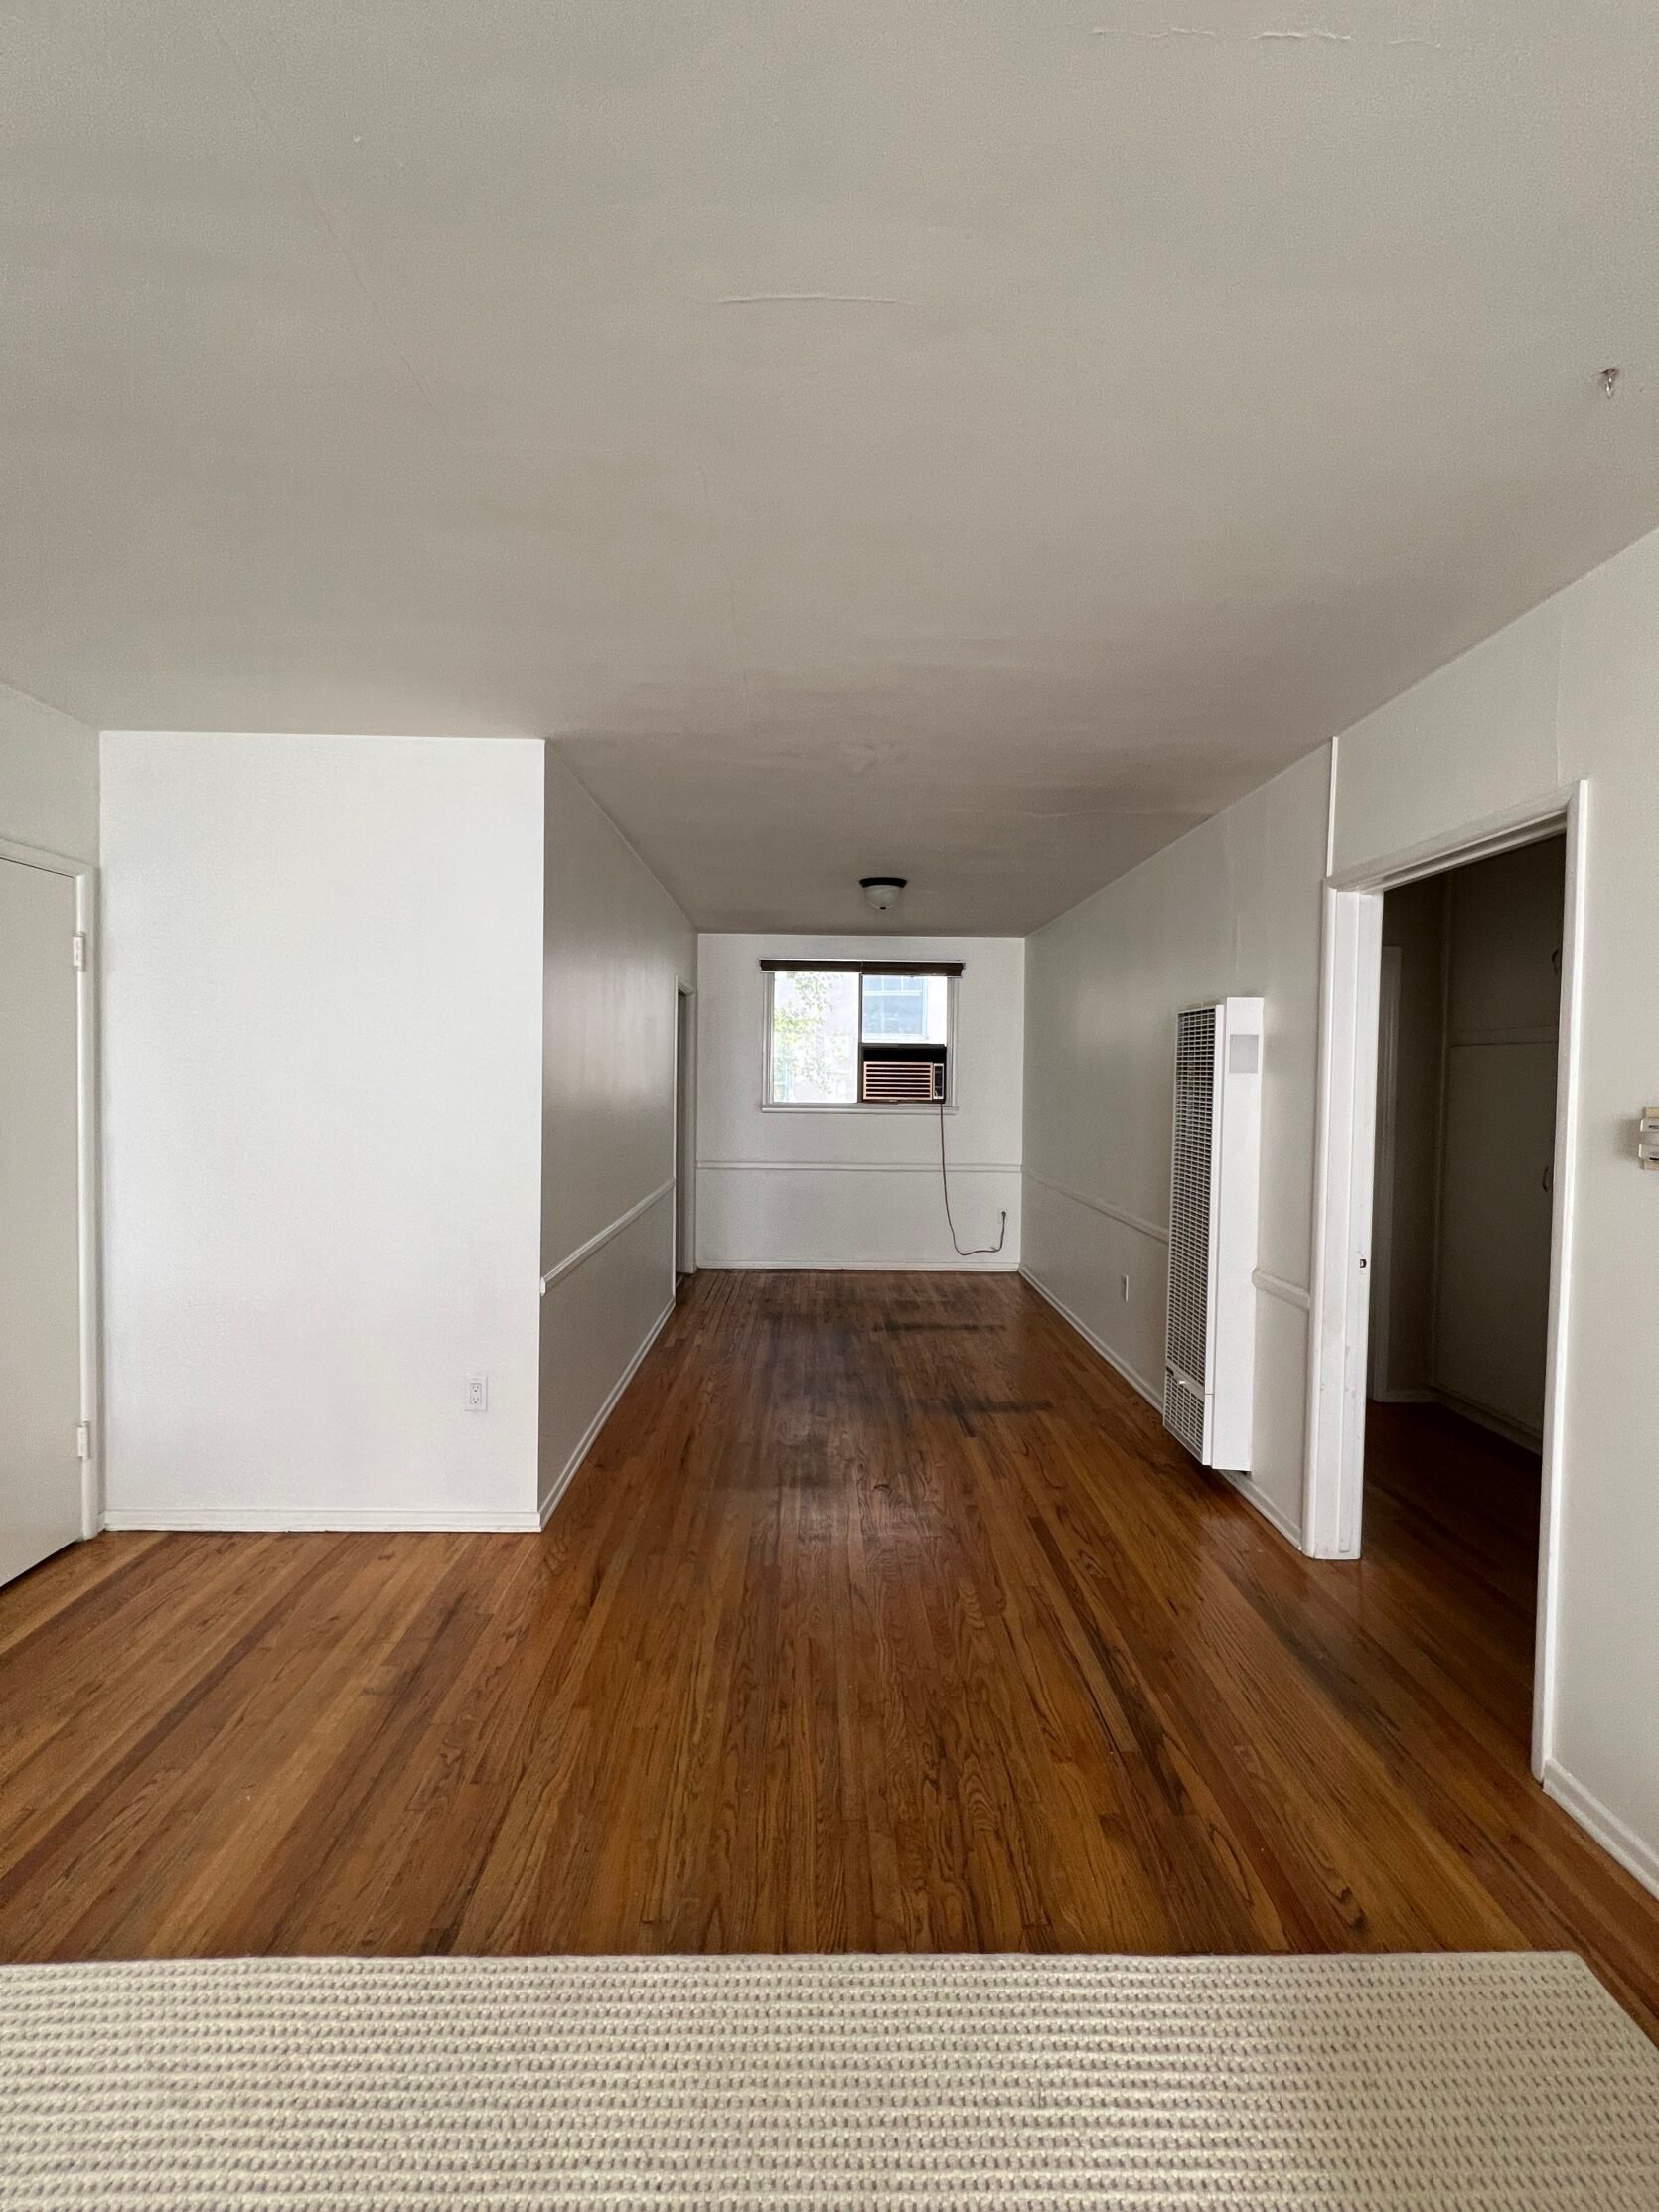
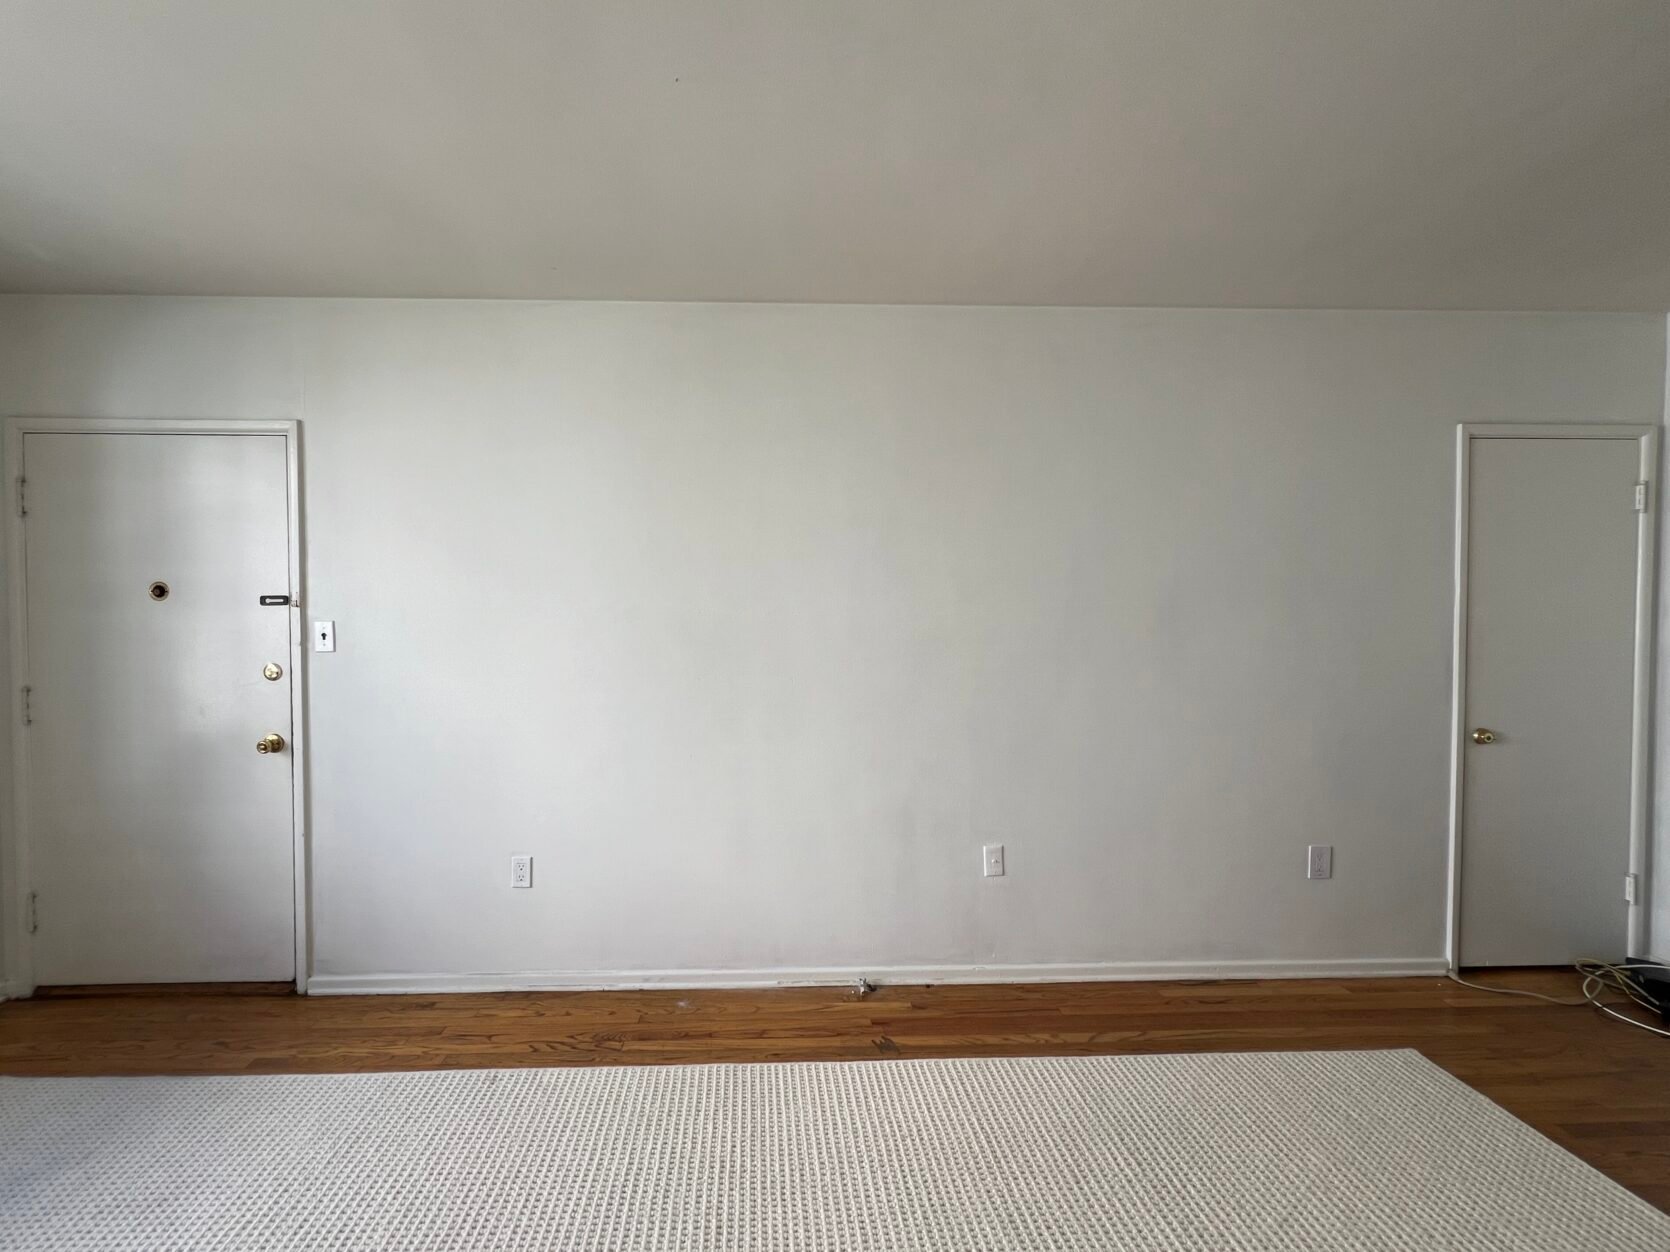
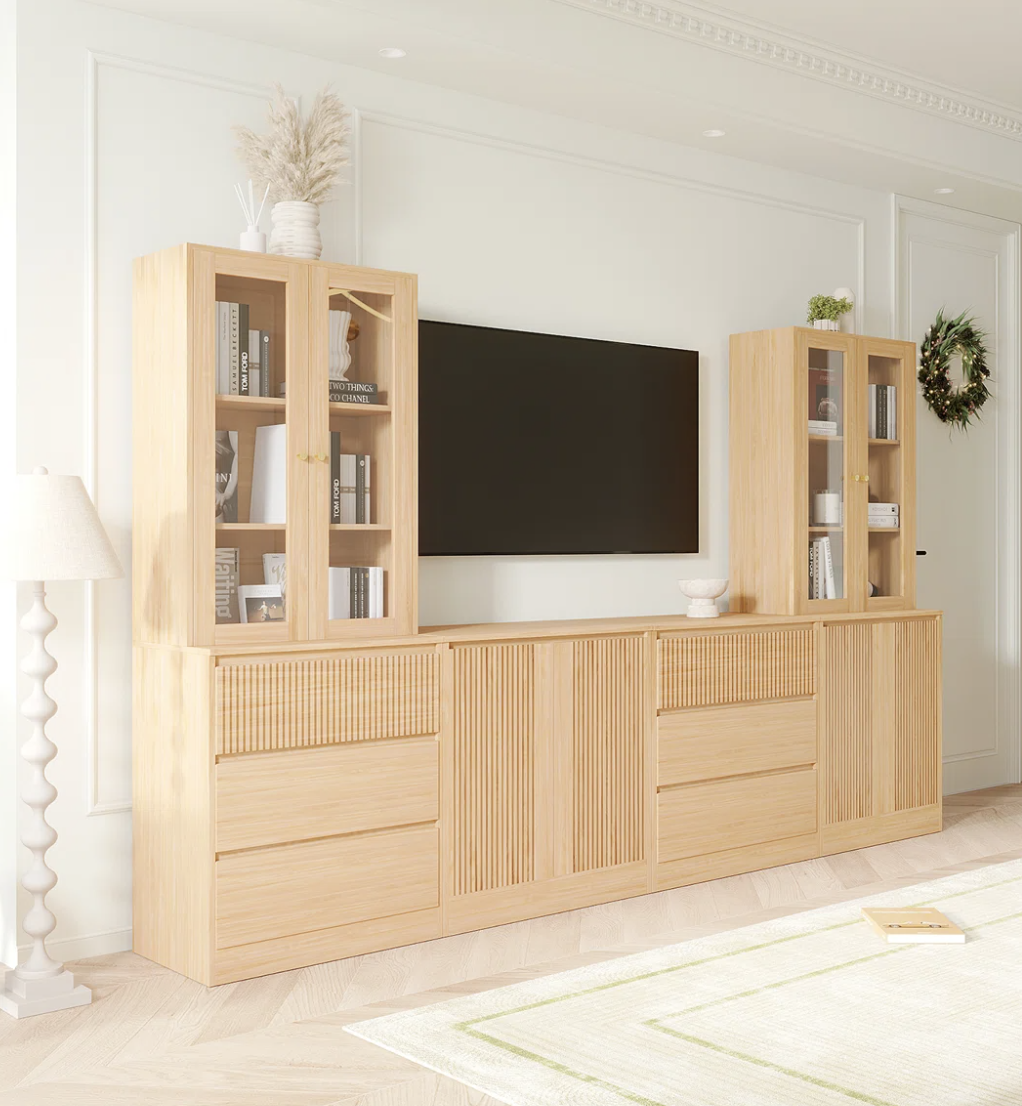
That smaller, skinnier room in the photo on the right is the dining area – I wanted to give you a sense of the entire space so you can understand that my precious dream bookcase had limited wall options in which to live. The wall that needed the most love and could best handle the statement of the bookcase was clearly this space between the two doors (the door on the left is the front entrance to the apartment, and the door on the right is now my closet speakeasy – which we just took professional photos of and have a full blog post reveal coming soon!!) This wall is also definitely the right spot for the TV in the living room, so I needed to find a bookcase that had room in the middle for said TV. There are A TON of ready-made media unit/tv console bookcase options online, so I felt like it should be a fairly easy thing to find until I realized…they’re also SUPER expensive! I wasn’t surprised by the cost of the Crate and Barrel, West Elm, or Article – the quality from those brands is great, and it’s a big space to fill, so I get it! It makes sense that these pieces range between $3k and $7k. I’ll show you – here are some of the pieces I found (and really love and actually considered purchasing) that would be great alternatives if you want to invest in quality but don’t want to pay for a full built-in bookcase/you can’t do a built-in bookcase because you live in a rental…
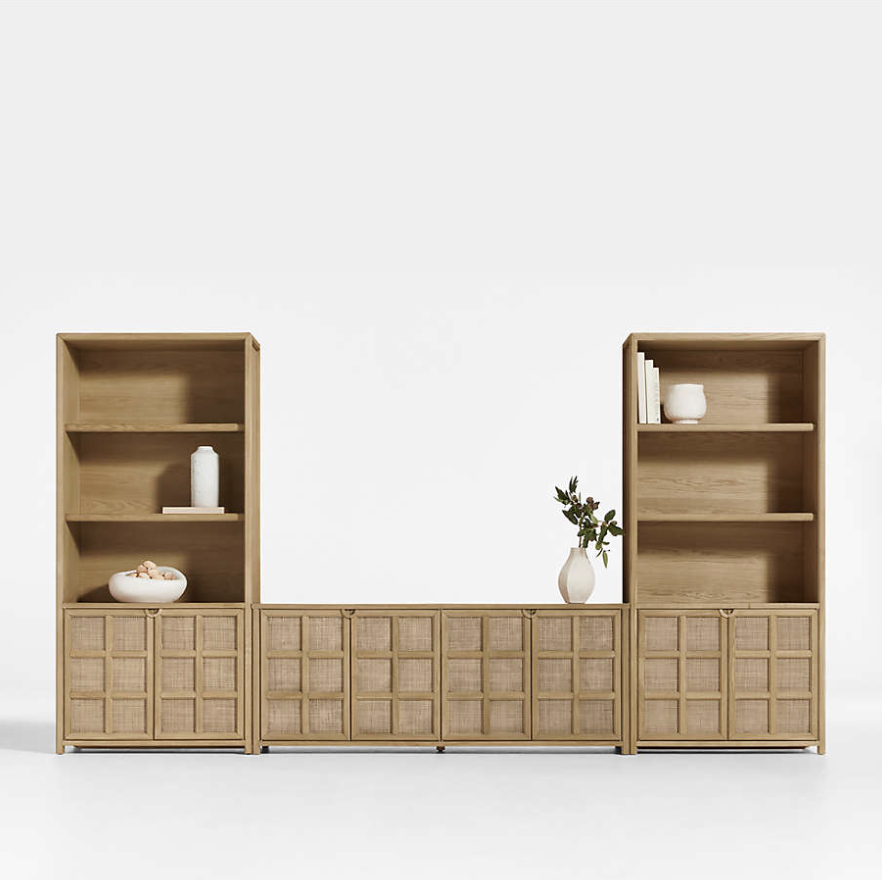
Left: Crate and Barrel Rattan Media Unit | Right: Article Torme Media Center
See? They’re so pretty and are truly not bad options when you consider the quality and how high-impact they are. BUT my main issue (again) was that I won’t be in this apartment forever, so I didn’t want to invest that much in this bookcase – especially since I wasn’t positive that I could take these pieces with me to my next place. The other small issue that bothered me with these readymade options was that they generally weren’t enclosed on the top. It’s a subtle thing, but I really wanted this to look more like a built-in, and the openness above the TV area just feels a bit unfinished to me. So I went back to the drawing board and started looking for options at more affordable furniture brands. And you guys…it’s crazy out there. I learned that even the IKEA media units are about $1,500 or more – WILD!!! I REALLY didn’t want to spend over $1,000 for this (and even that felt like too much). I wanted to spend more like $500 or $600 max because again, I knew this bookcase was most likely not coming with me to my next place, and I would probably just leave it at my apartment for whoever is coming in next. So I needed to find a balance of A.) not setting up a bookcase that’s actual garbage, B.) making sure it looked cute and stylish because I do design content creation for a living after all, and C.) not spending a crazy amount.
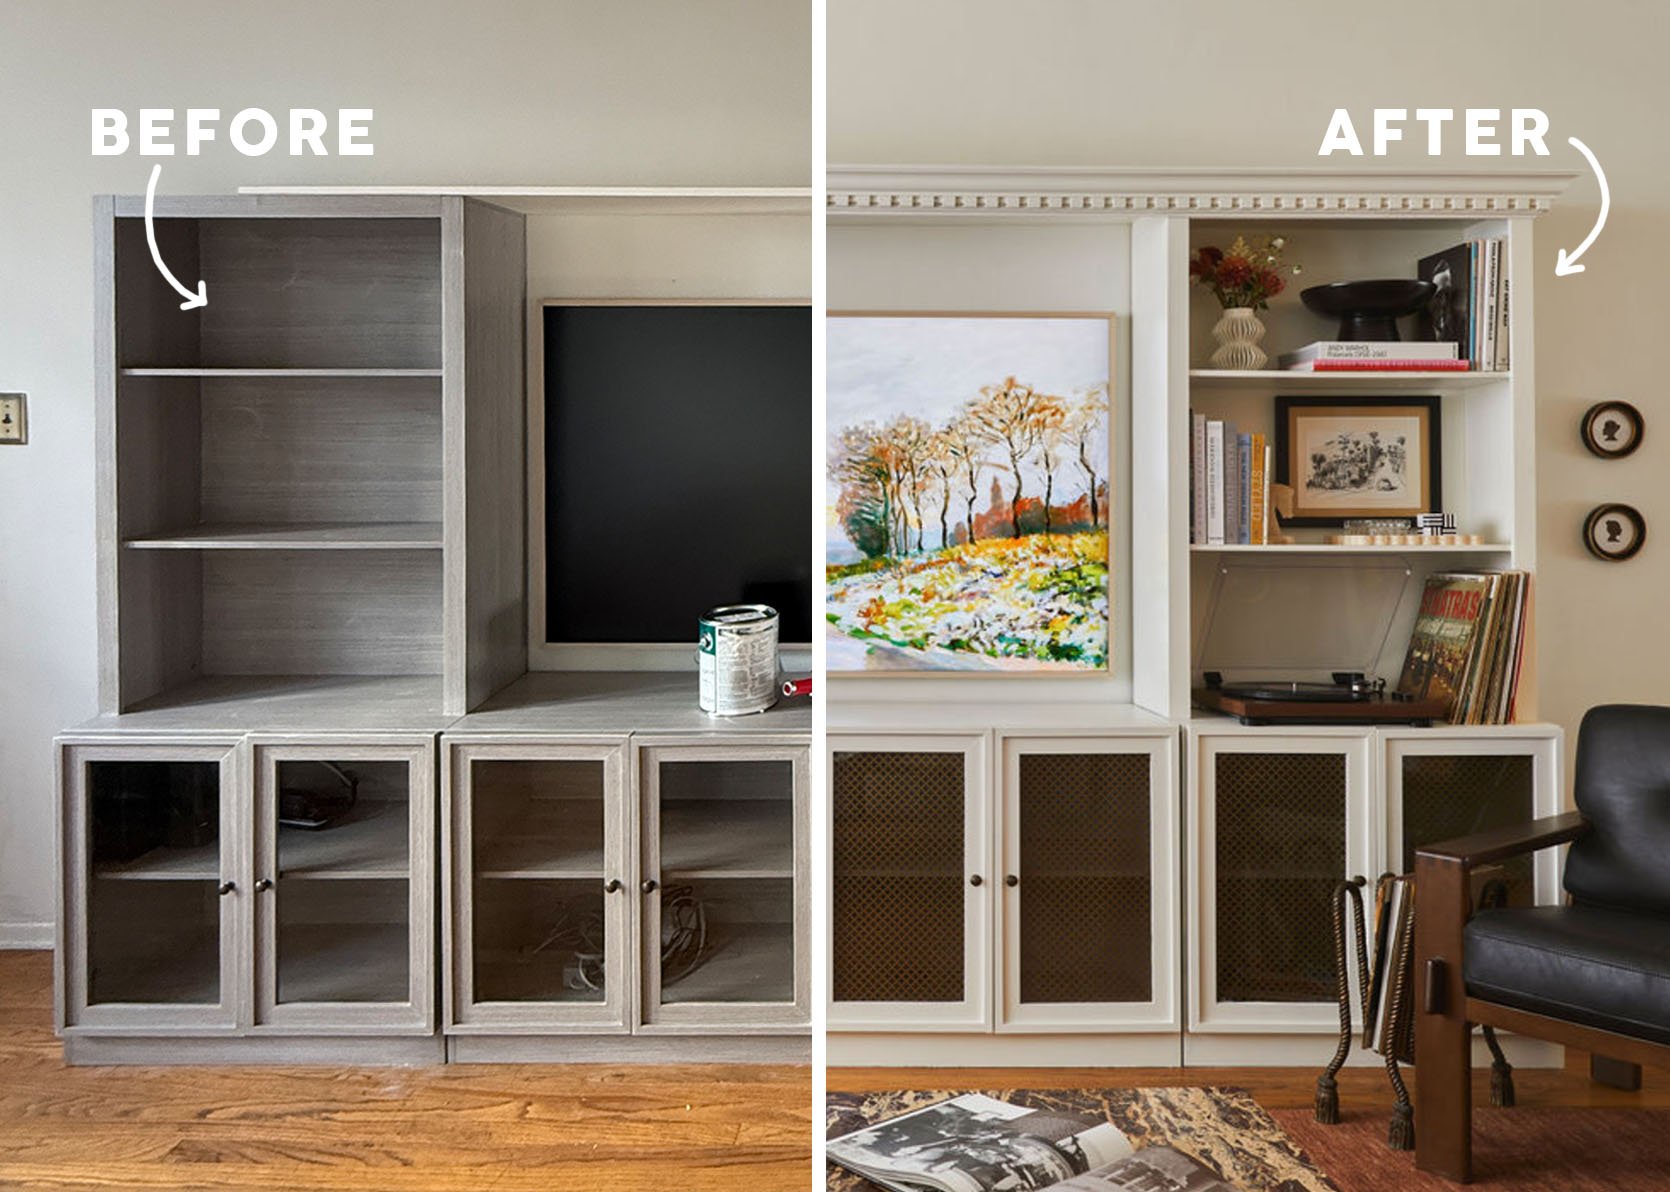
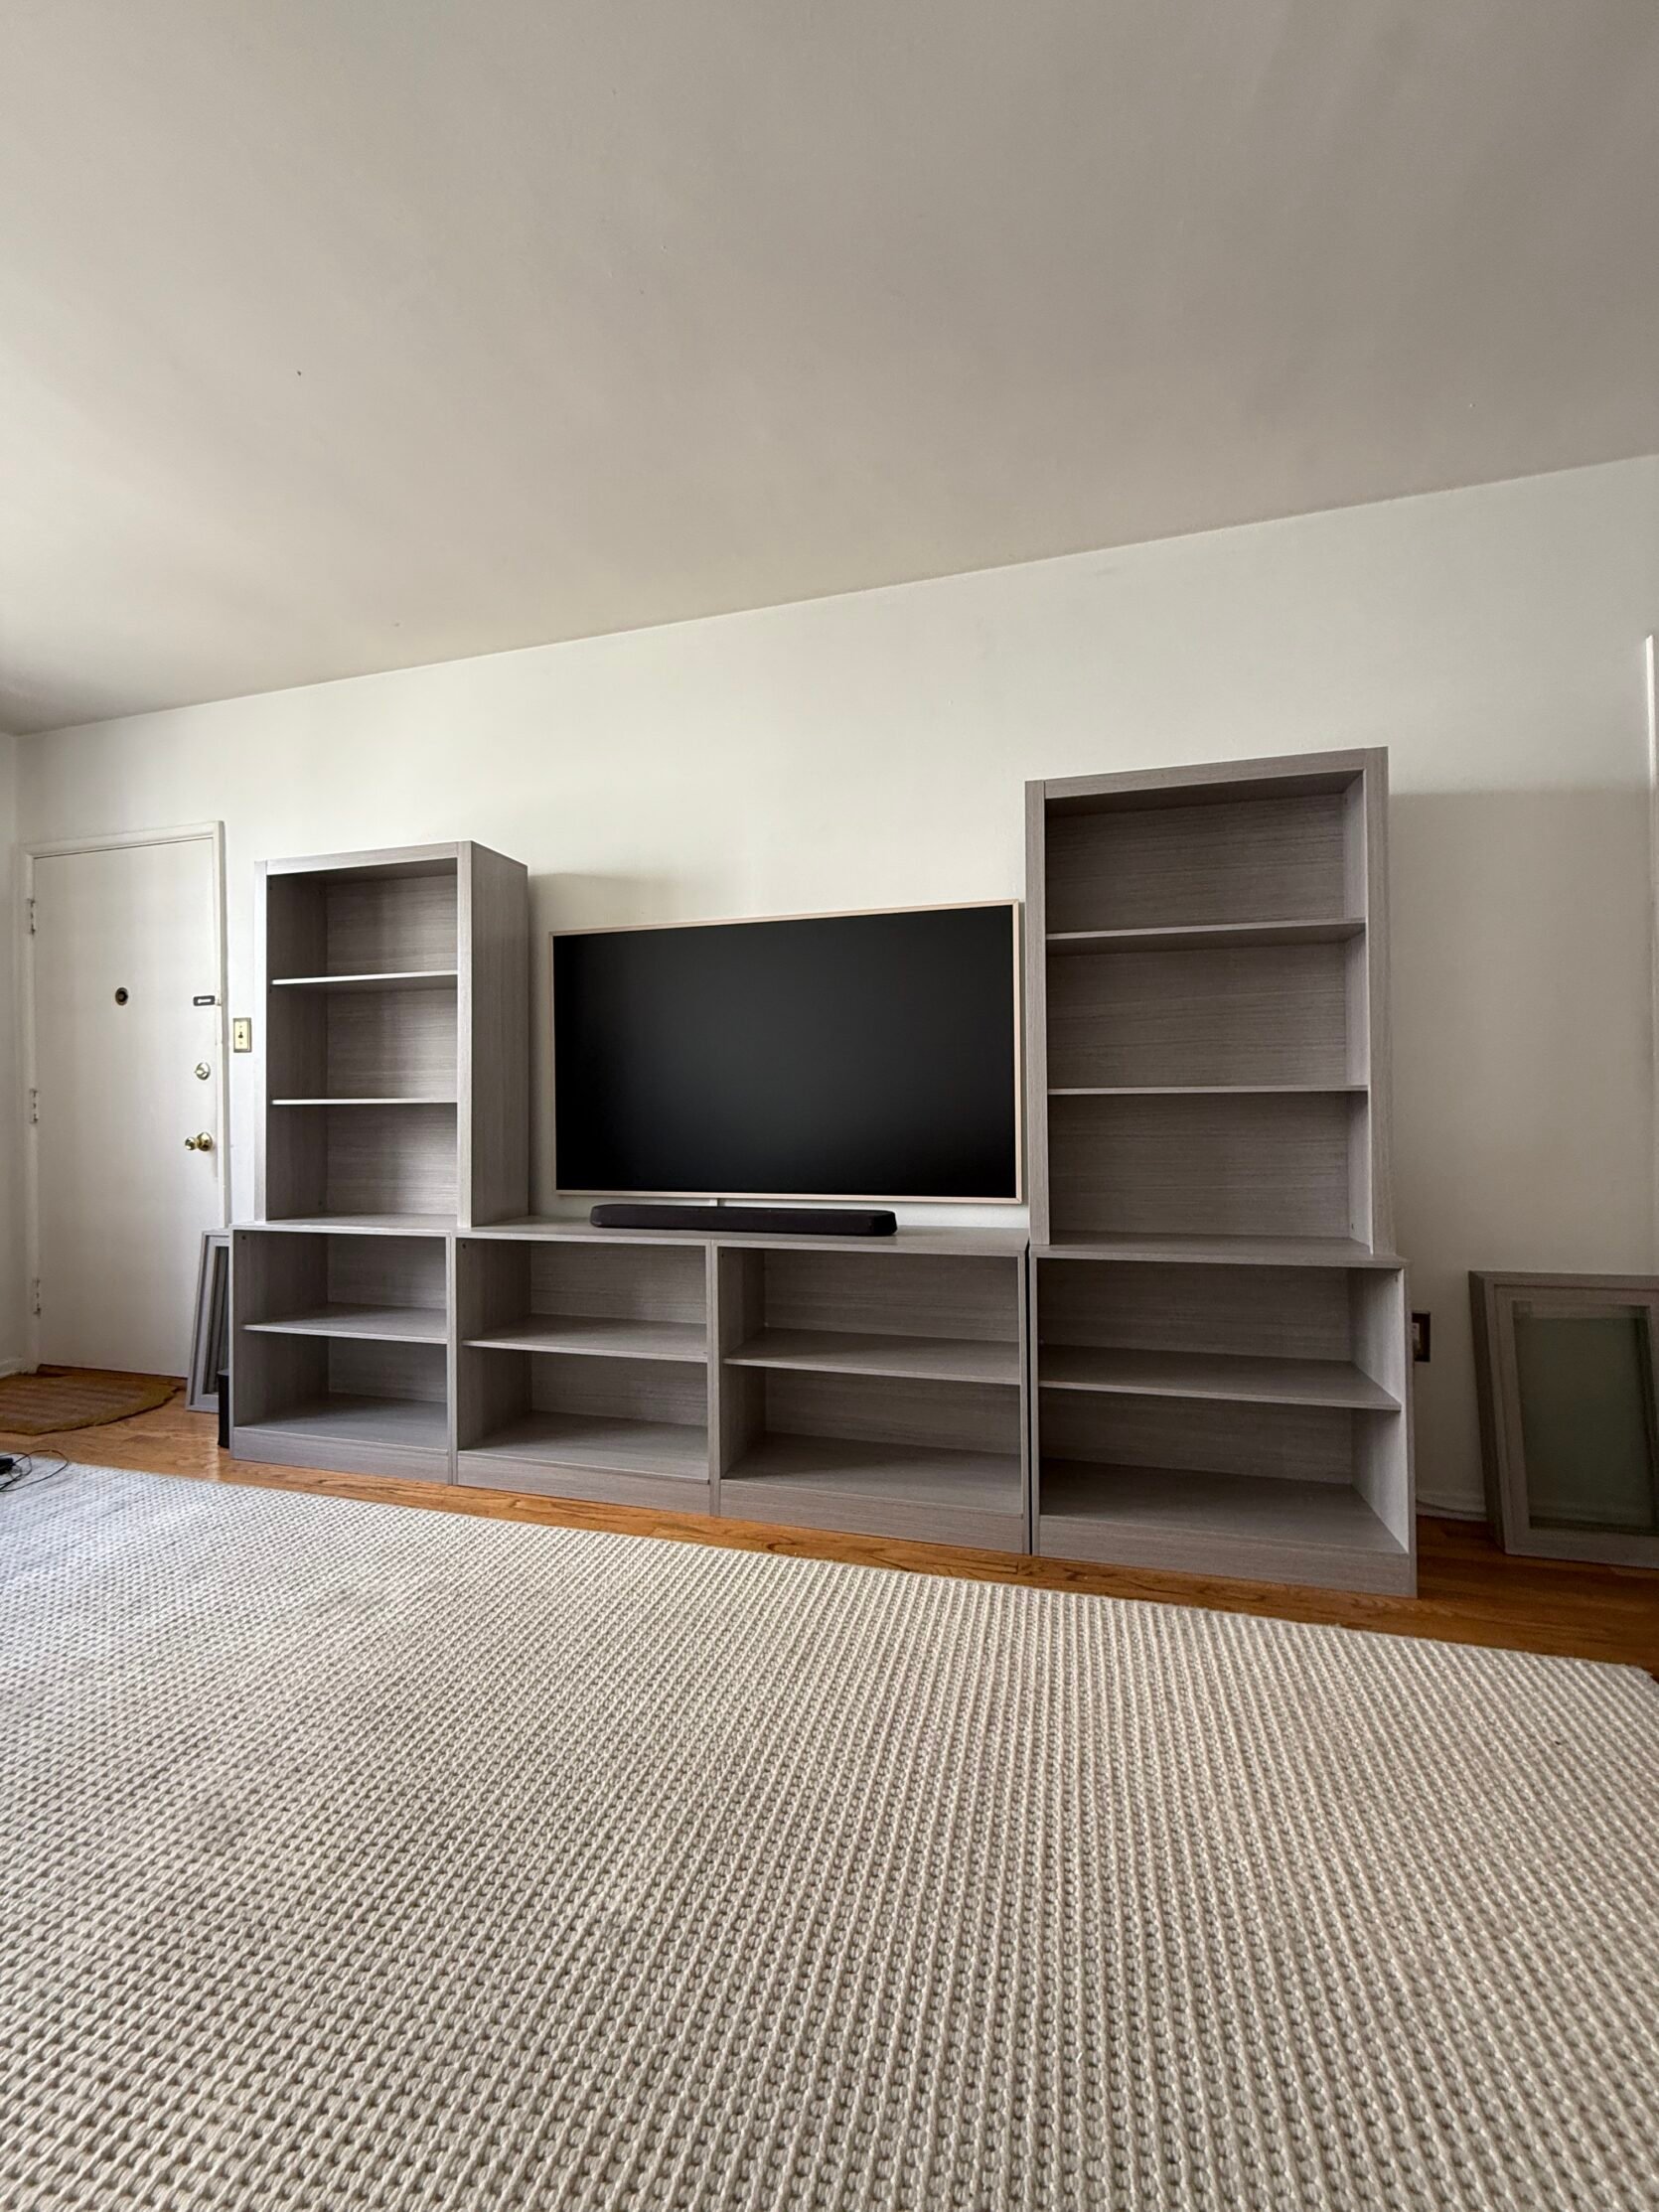
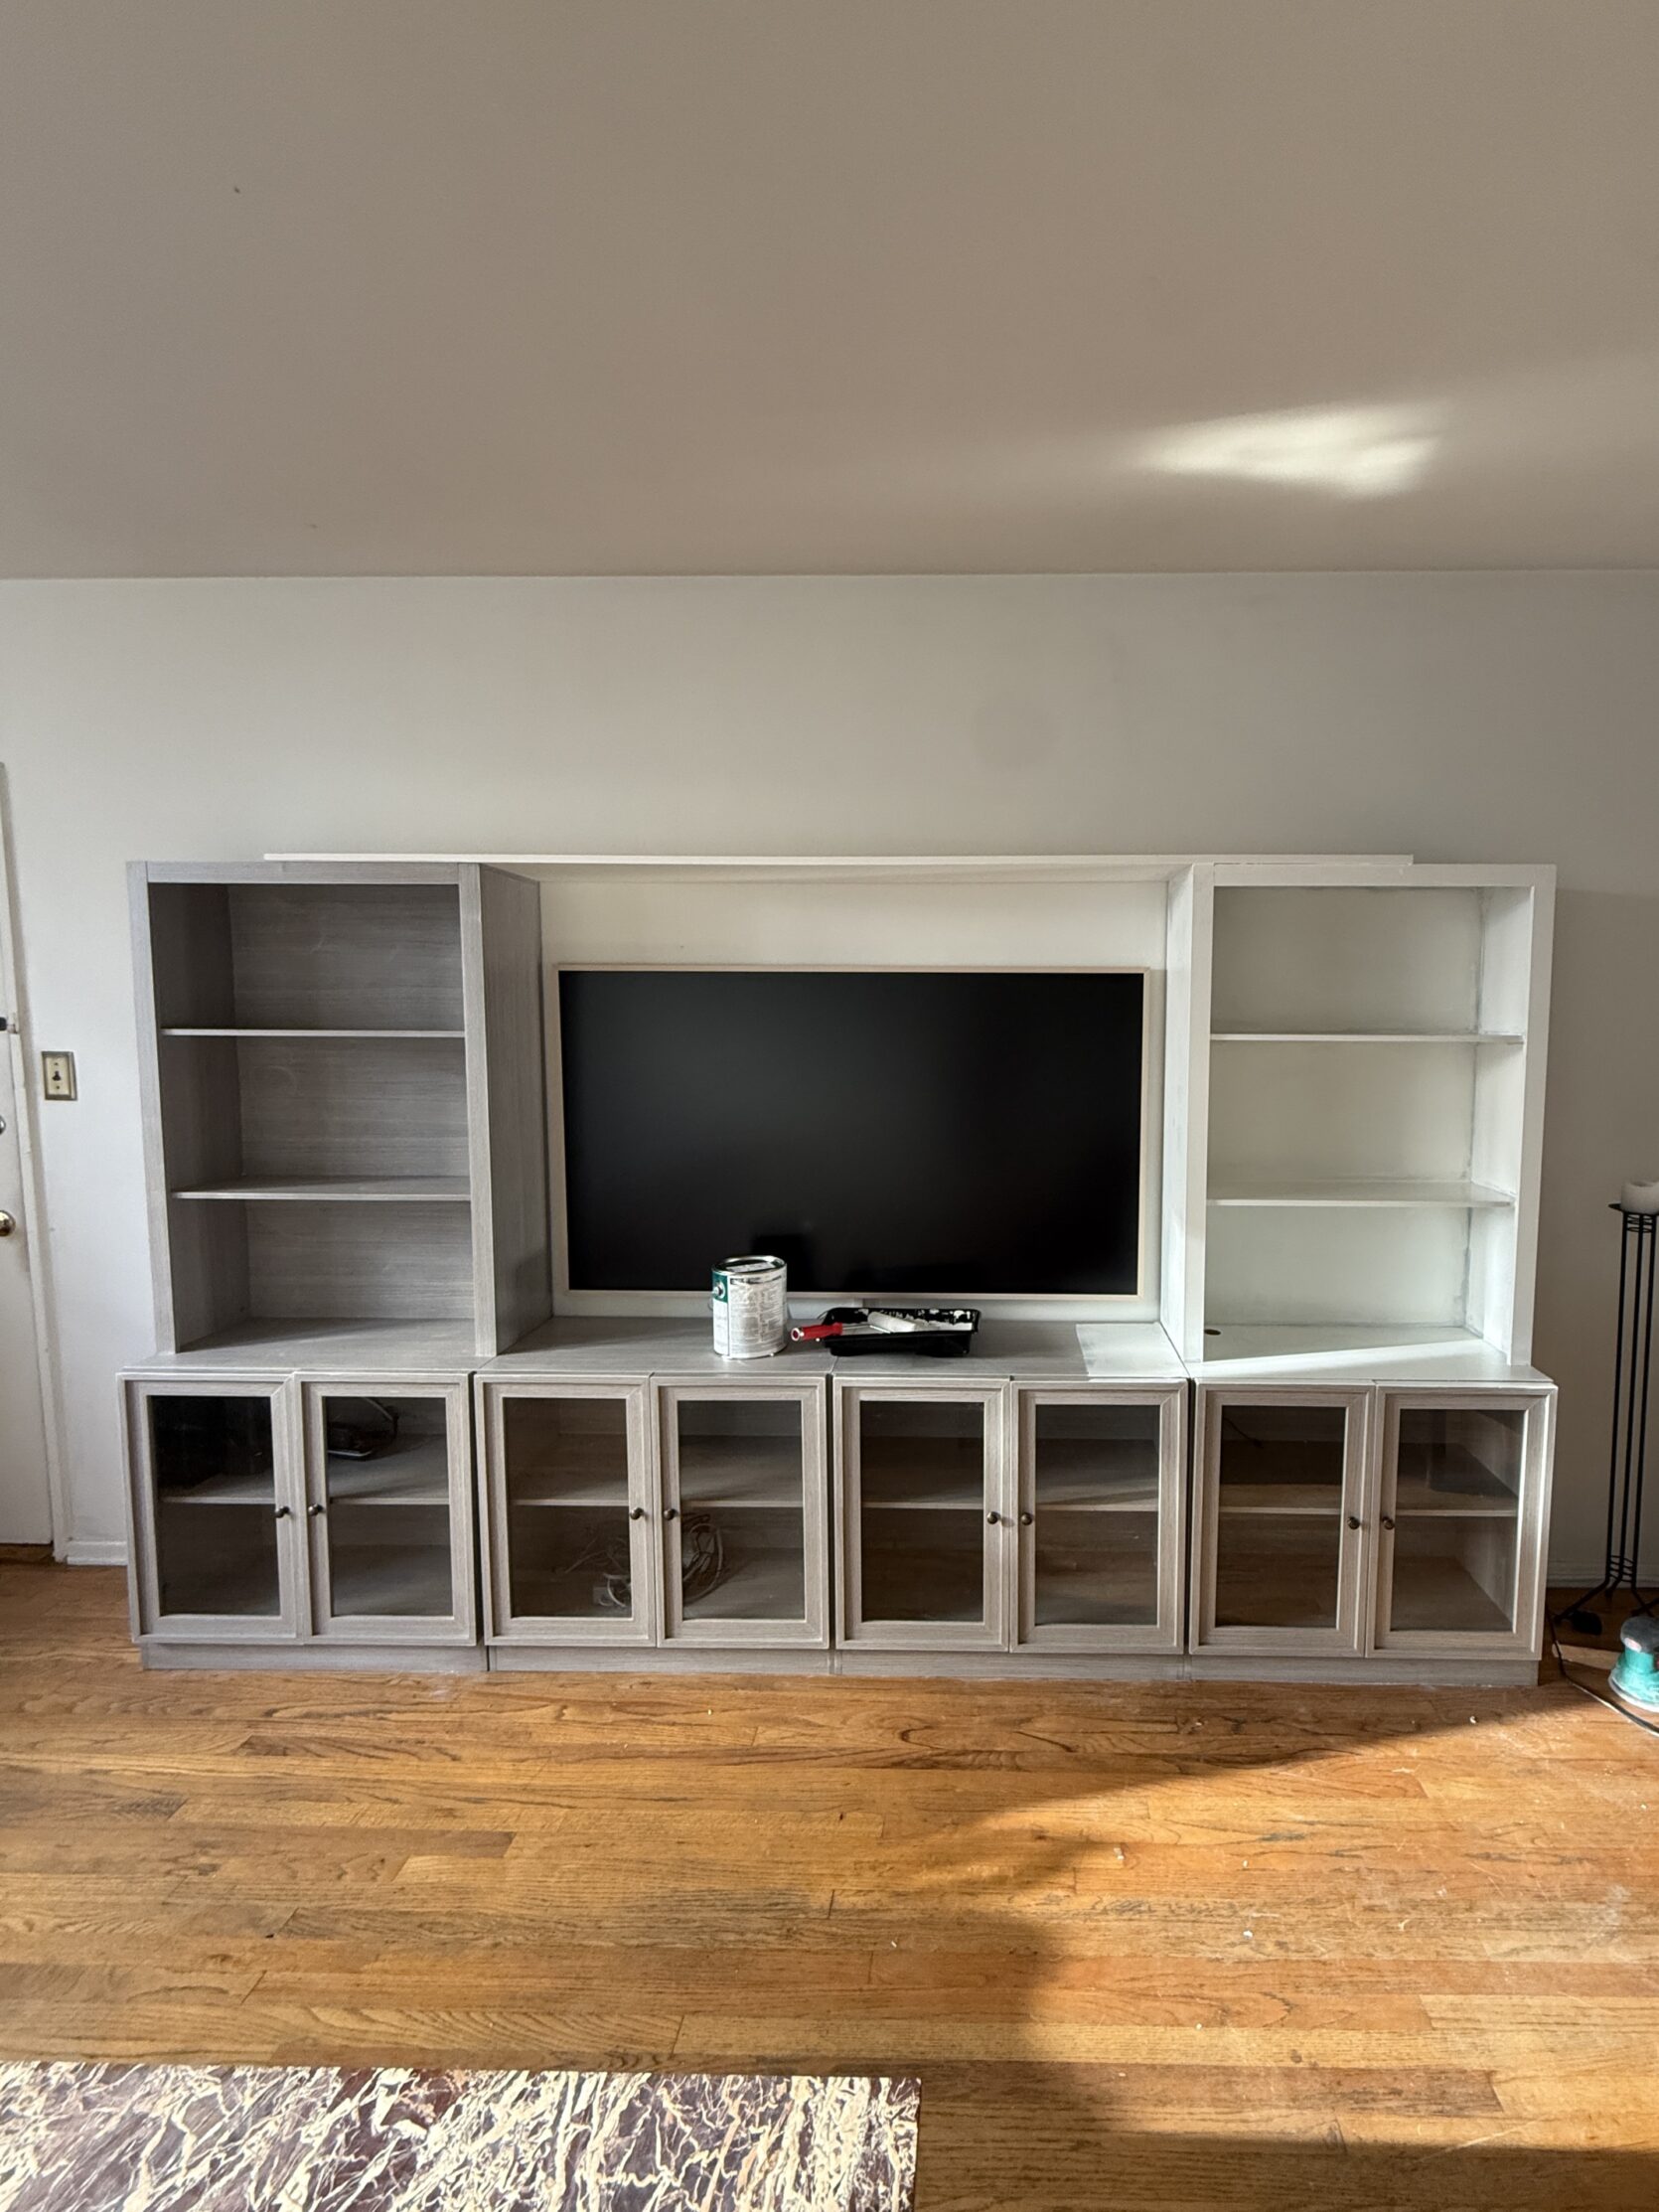
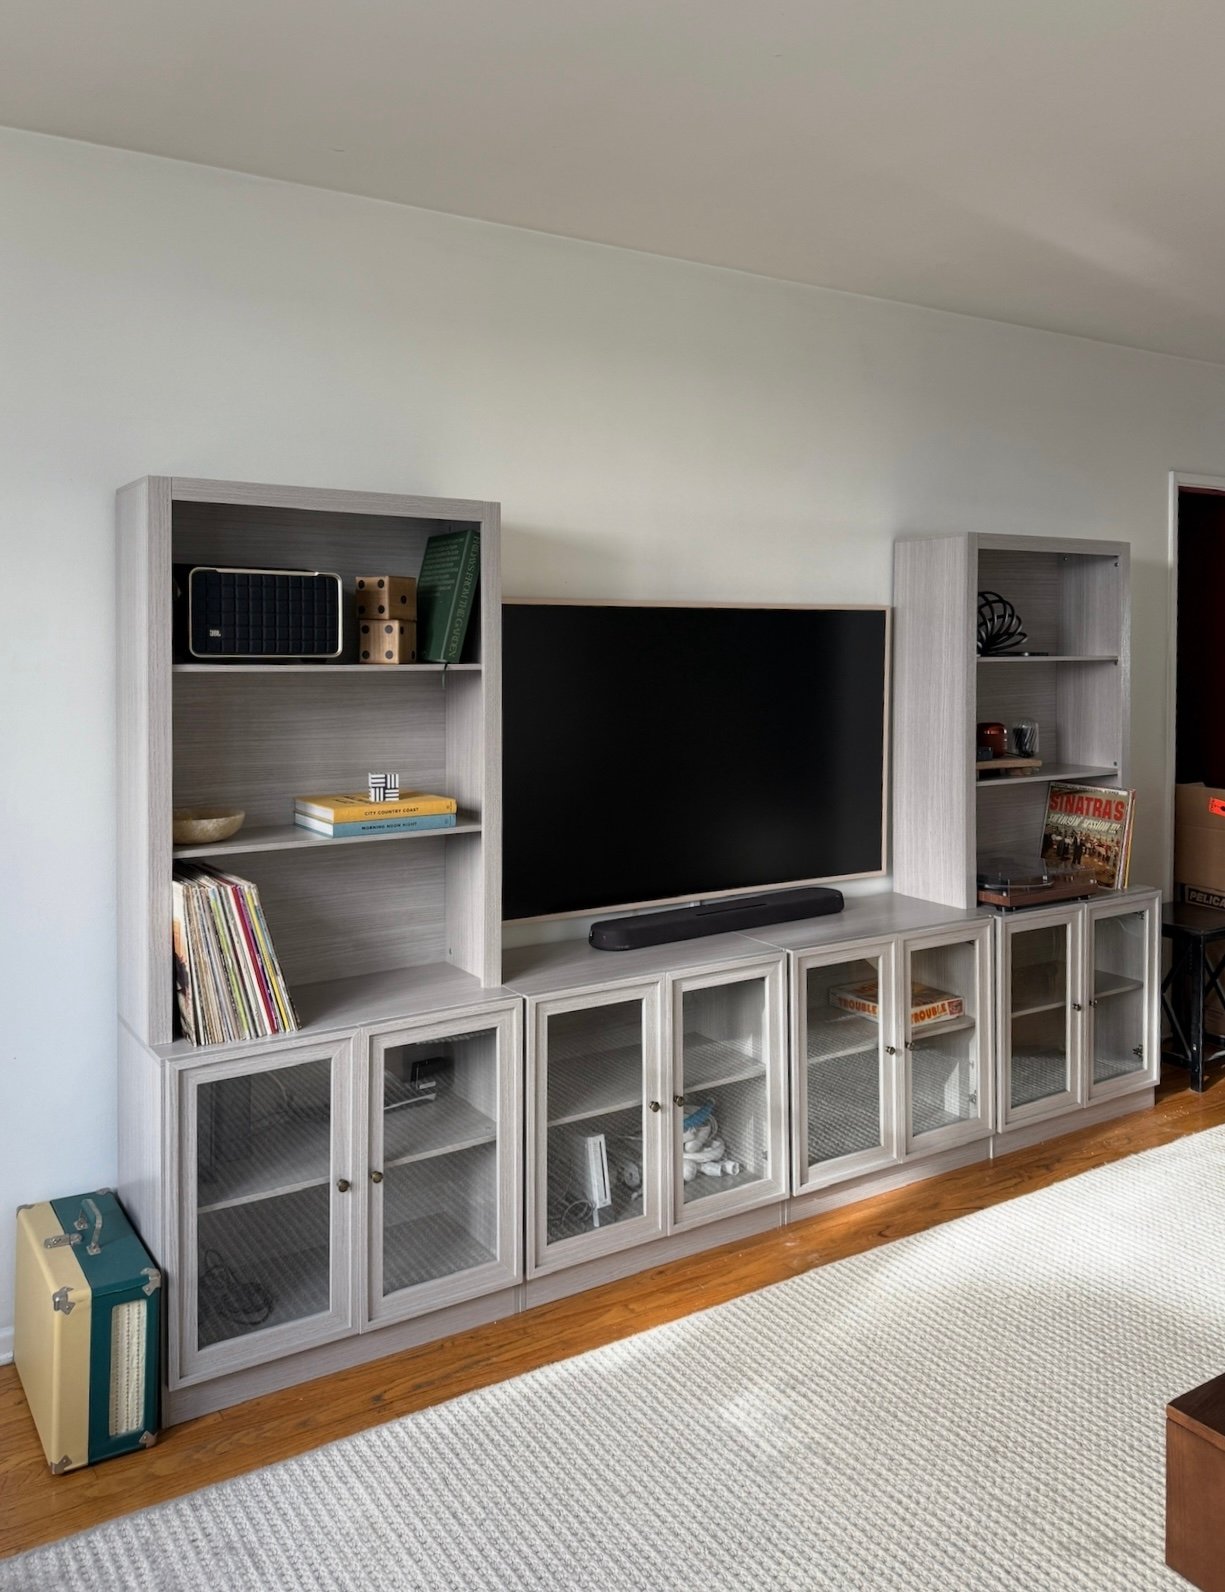
But after A TON of searching, I ended up finding THE PERFECT bookcase on clearance for $360, which was insane (it’s out of stock because it was on clearance). Don’t worry, I’m sharing super similar options at the bottom of the post, should you want to attempt something like this! It checked almost every box – enclosed storage on the bottom, and all of the bottom cabinets were uniform (which I think looks most like a real built-in bookcase). The size was perfect so that I could fit my 65-inch frame TV in the middle, and the bookcase itself would take up most of the wall space between those doors. The problems? For $360, you best believe there were a few. It was grey, first off, and it had glass doors so I couldn’t hide the messy TV box and such inside the cabinet, and it was still open on the top. For $360 bucks though (still a crazy deal to me), there was nothing I couldn’t fix – so I added to cart SO FAST and started my DIY journey to make it look custom.
Once the bookcase arrived, it was actually pretty easy to set up – my TaskRabbit/boyfriend helped, and he’s great at building furniture, so it only took about 3 hours from start to finish, which was surprising to me. For $360, I was impressed with the quality – but that said, it’s still mostly MDF, and anything you buy for this kind of price is not going to be the same level of quality as the pieces I linked above. I’m prioritizing budget, style, ease, and the impact this piece will have in the room. But even though this is where I decided to “save” instead of “splurge” in this living room, it truly did make the biggest impact in the space. The second it was up (even with the grey wood and openness above the TV), it already felt so much cozier. See for yourself:
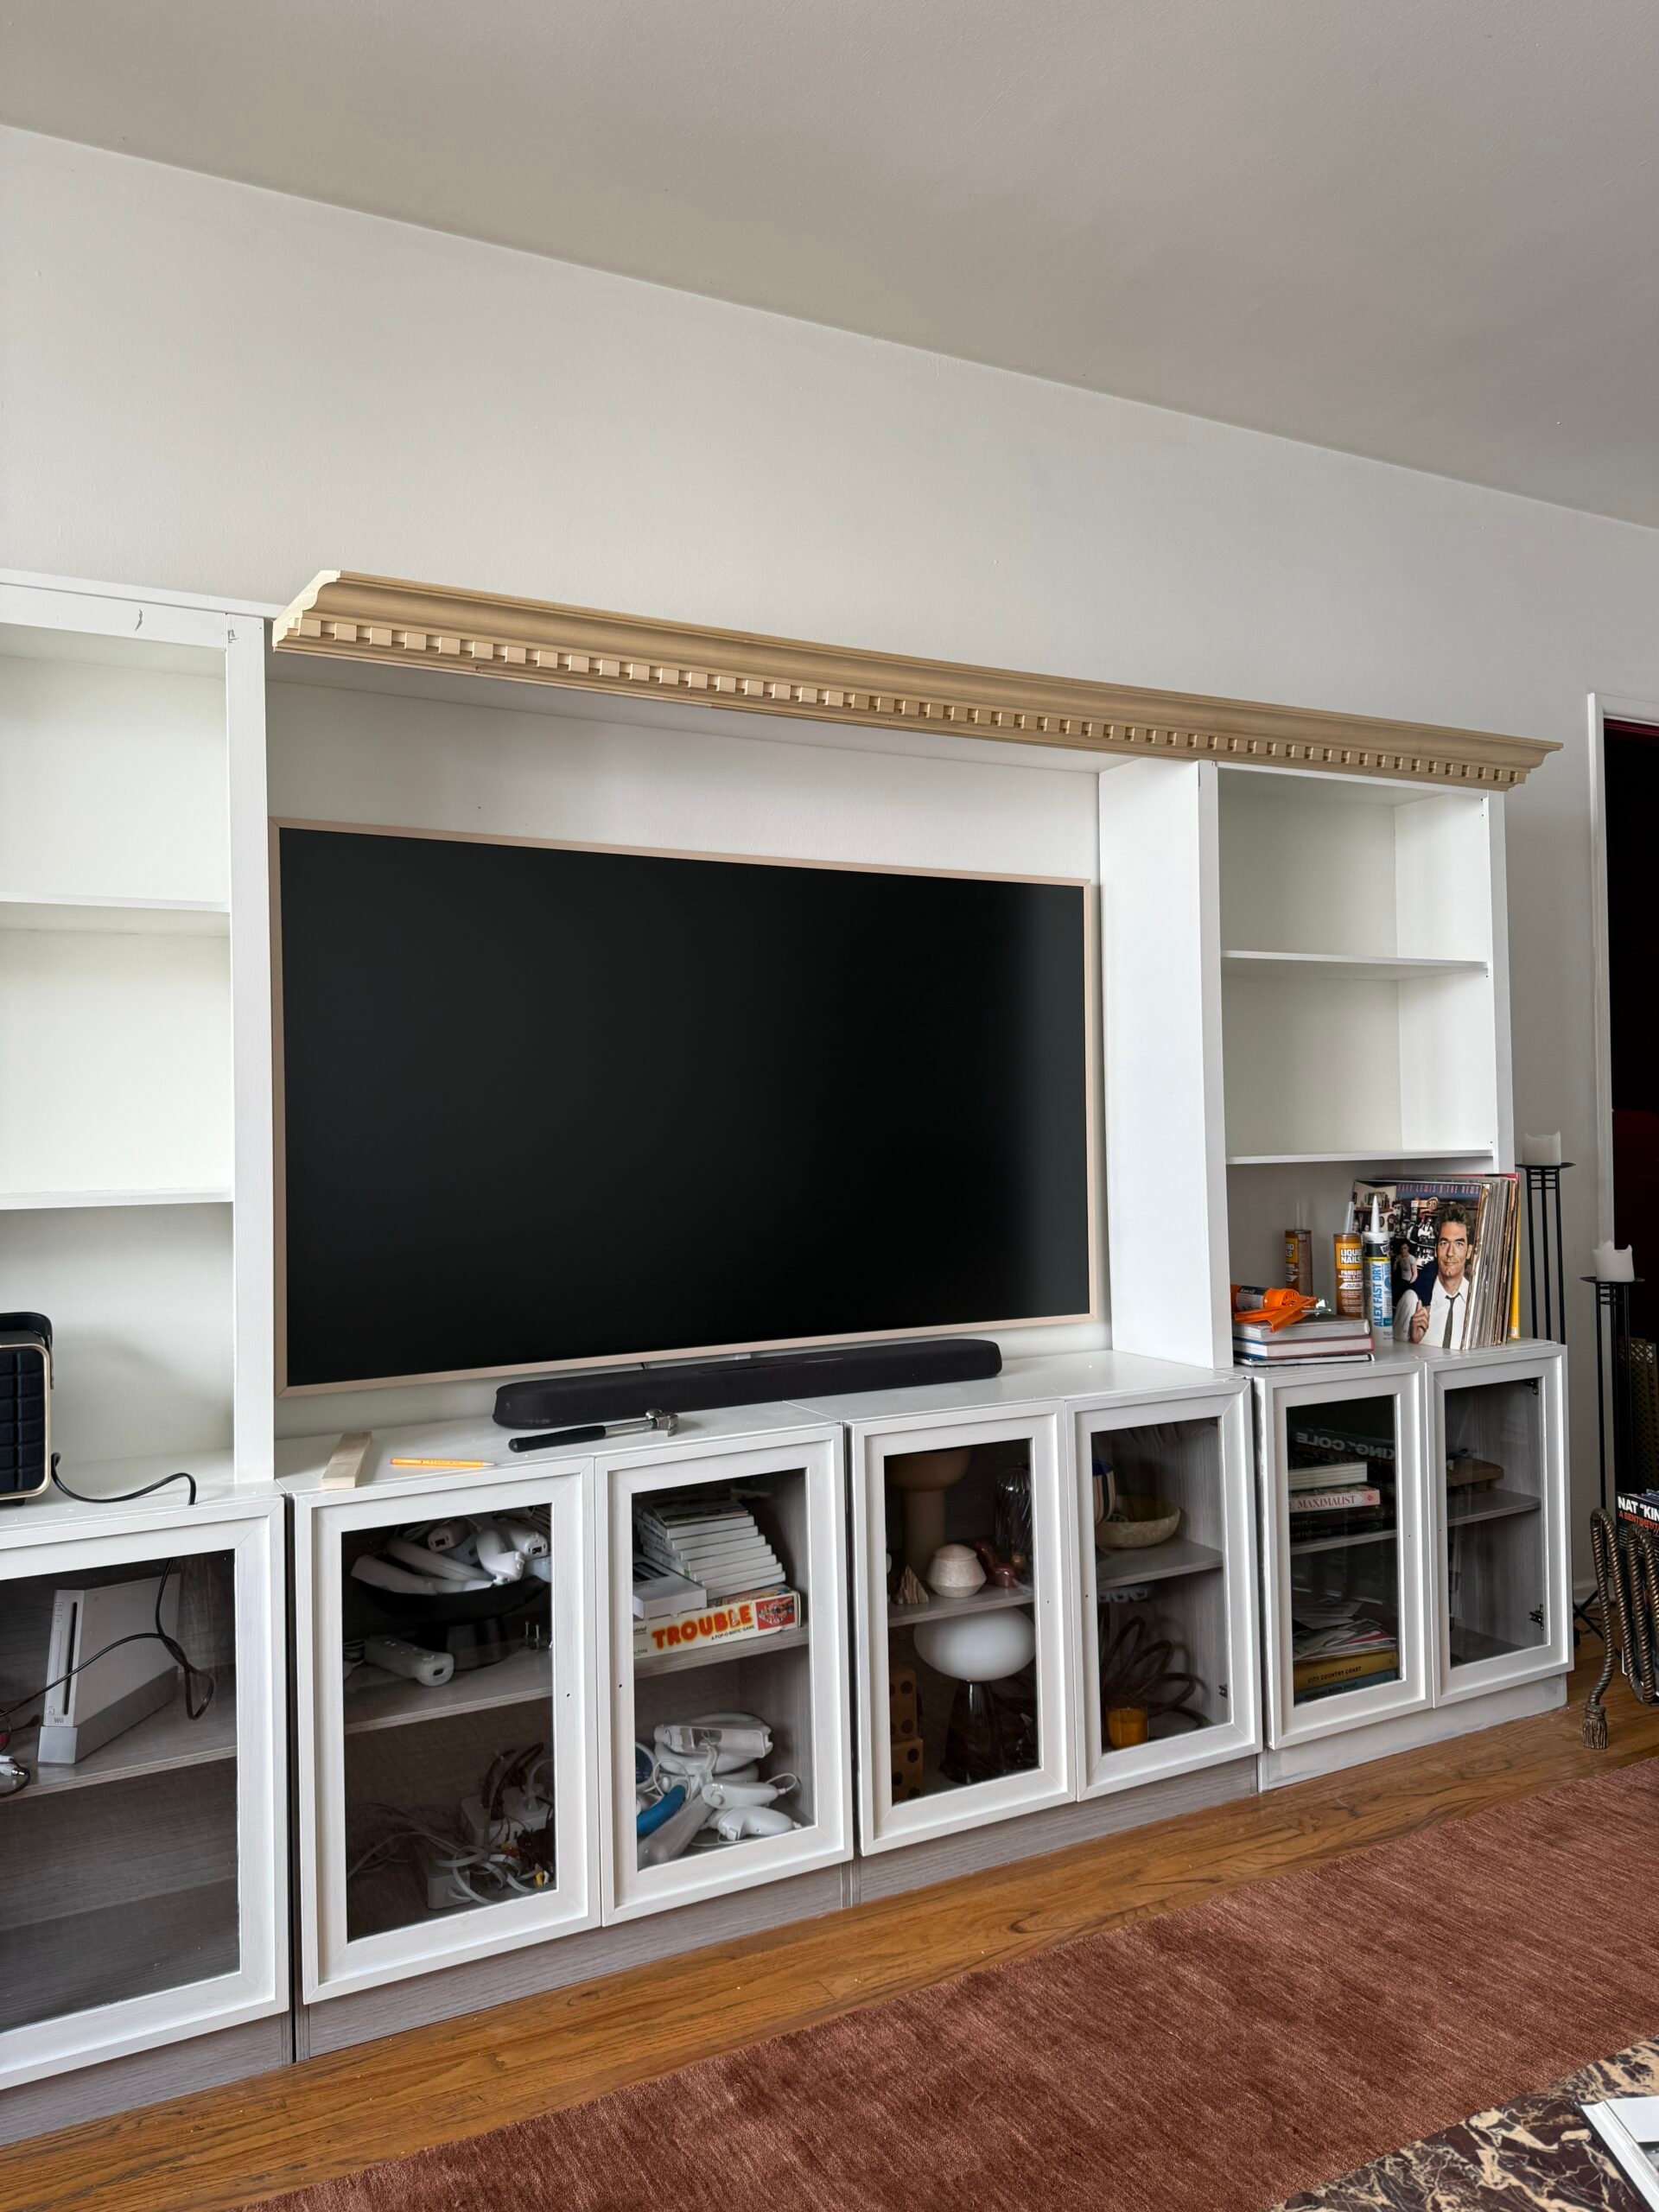
Once I put the doors on, I started mocking up how I could enclose the top – and then I got ambitious and thought…wait, could we build shelves on top of this and take it all the way to the ceiling?! I highly considered it, but then decided maybe it’s not wise to have that much weight on a budget-friendly bookcase when I live in an earthquake-prone state… So I thought about how I could reinforce it a bit instead. I had some trim left over from another project and thought, “omg that’s exactly what it needs!!” So we screwed in an 11 in wide x 8ft long piece of primed wood on top of the bookcase (which conveniently was the exact width of the top and we didn’t need to cut it down at all). It looked like this:
As you can see, before I installed the trim, I started painting the bookcase the same white as my walls to give it more of that “built-in” effect. I would highly recommend sanding and then using a shellac primer. I ended up just sanding and then painting because I watched this video, which showed scratch tests, and it seemed like just sanding was the best route to go, BUT after finishing this project, I wish I had sanded AND used the primer because I think it would have been even more durable. After my paint dried, I would say it’s hard to scratch the paint off, but if you REALLY try to scratch the paint, it will come off. All this to say – if you’re attempting this – learn from me and just sand and prime to be safe. Since I didn’t get the primer, I ended up getting a “more durable” paint specifically for trim – but if you sanded and primed properly, you could likely just get a normal paint in a semigloss finish and it should be fine!
Then this is where things get crazy. I enlisted my parents to bring their circular saw up to help me miter the trim pieces (no, I’ve never done that before, but how hard could it be? Boys do it…) We followed this YouTube video and couldn’t stop quoting the part where they say, “Now that’s a tight fit, Tommy,” the entire day. And this was pretty much a full-day experience – lining up the moulding was so much harder than we anticipated. If you are attempting this project, I’d honestly give the foam/lightweight mouldings a try (might be easier?). This was definitely the most difficult part, but seriously, once I get an idea in my head, it’s happening no matter what. We also screwed in a few smaller pieces of wood to the larger, primed wood piece we screwed in on top (which you’ll see made the weight of the wood droop down in the middle a bit for a second, but once we finished putting on the smaller wood pieces and the moulding, everything straightened out, so it doesn’t droop anymore. So – I would also just make sure that the top wood piece is really solid if you attempt this – definitely don’t get something too flimsy. The photo might scare you for a second, but I promise it’s perfectly straight and looks great at the end (this was a total trust-the-process moment).

I also would highly advise using a nail gun to nail the trim in if you’re using wood crown moulding like this – my dad brought one that was 15 years old (bless his heart) and it died on us mid project so we finished hanging the moulding with a few smaller wood screws and nails (which I would not advice for a seamless look but it worked when we were in our time of need – and starving and very much over it). I caulked and painted over the nails/nail holes so you can honestly barely see them, but again – DEFINITELY use a nail gun if you’re going to attempt this with wood trim! If you don’t want to use a nail gun, the foam/lightweight moulding and some heavy-duty adhesive are going to be your best friends!
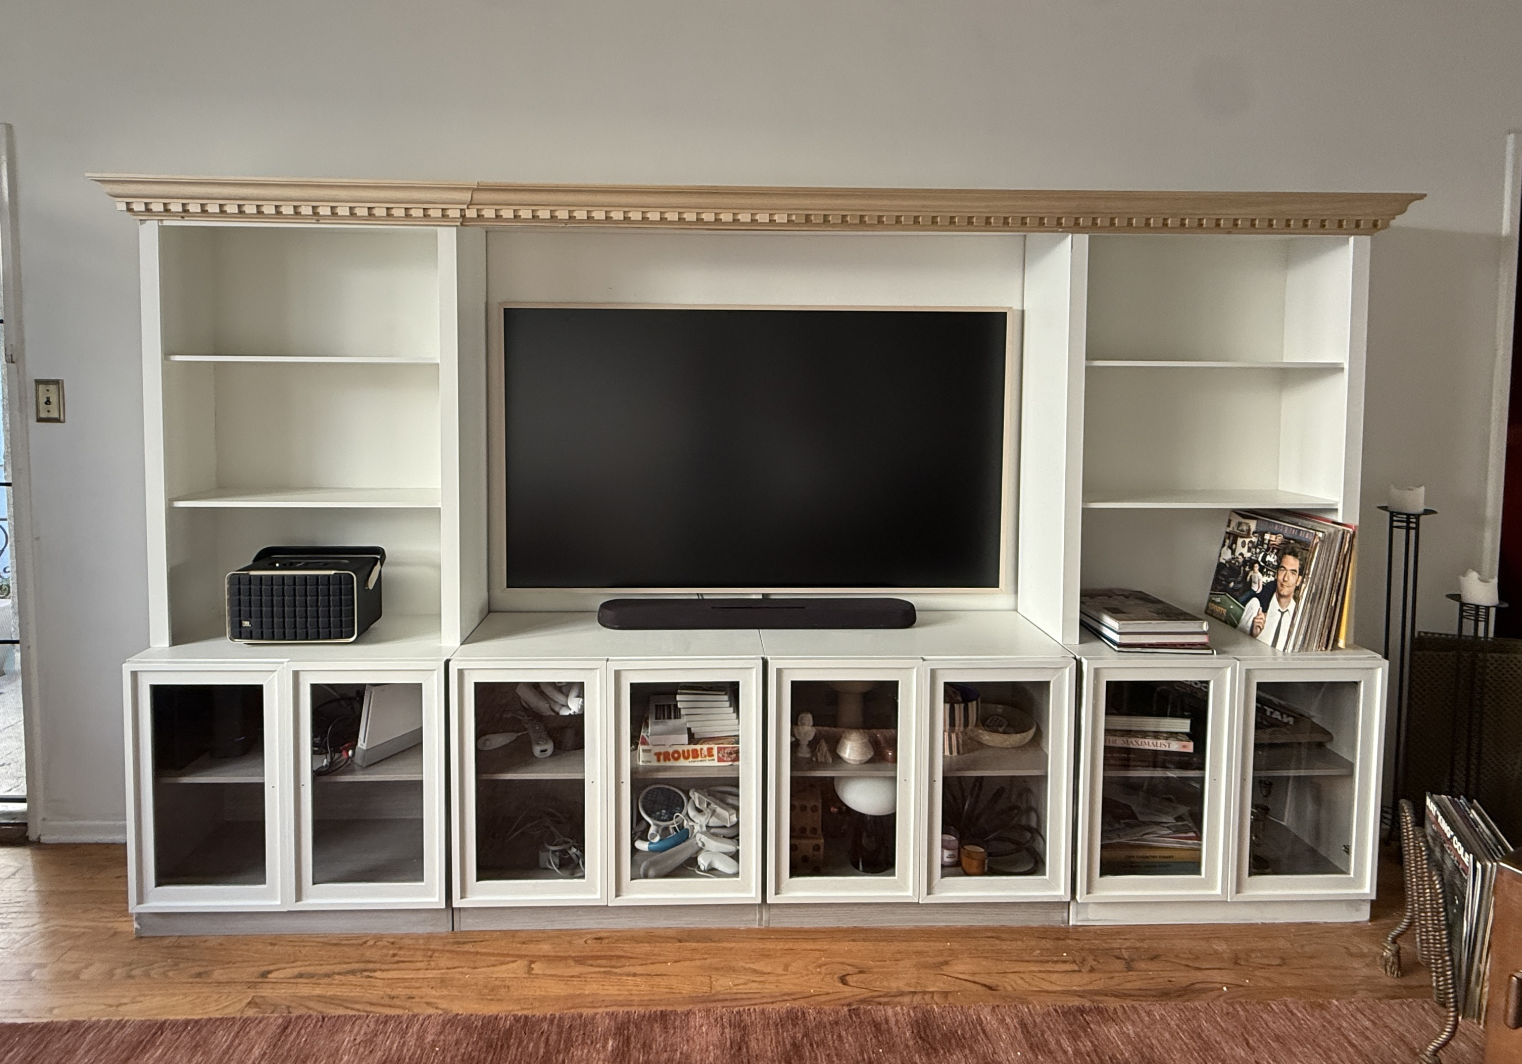
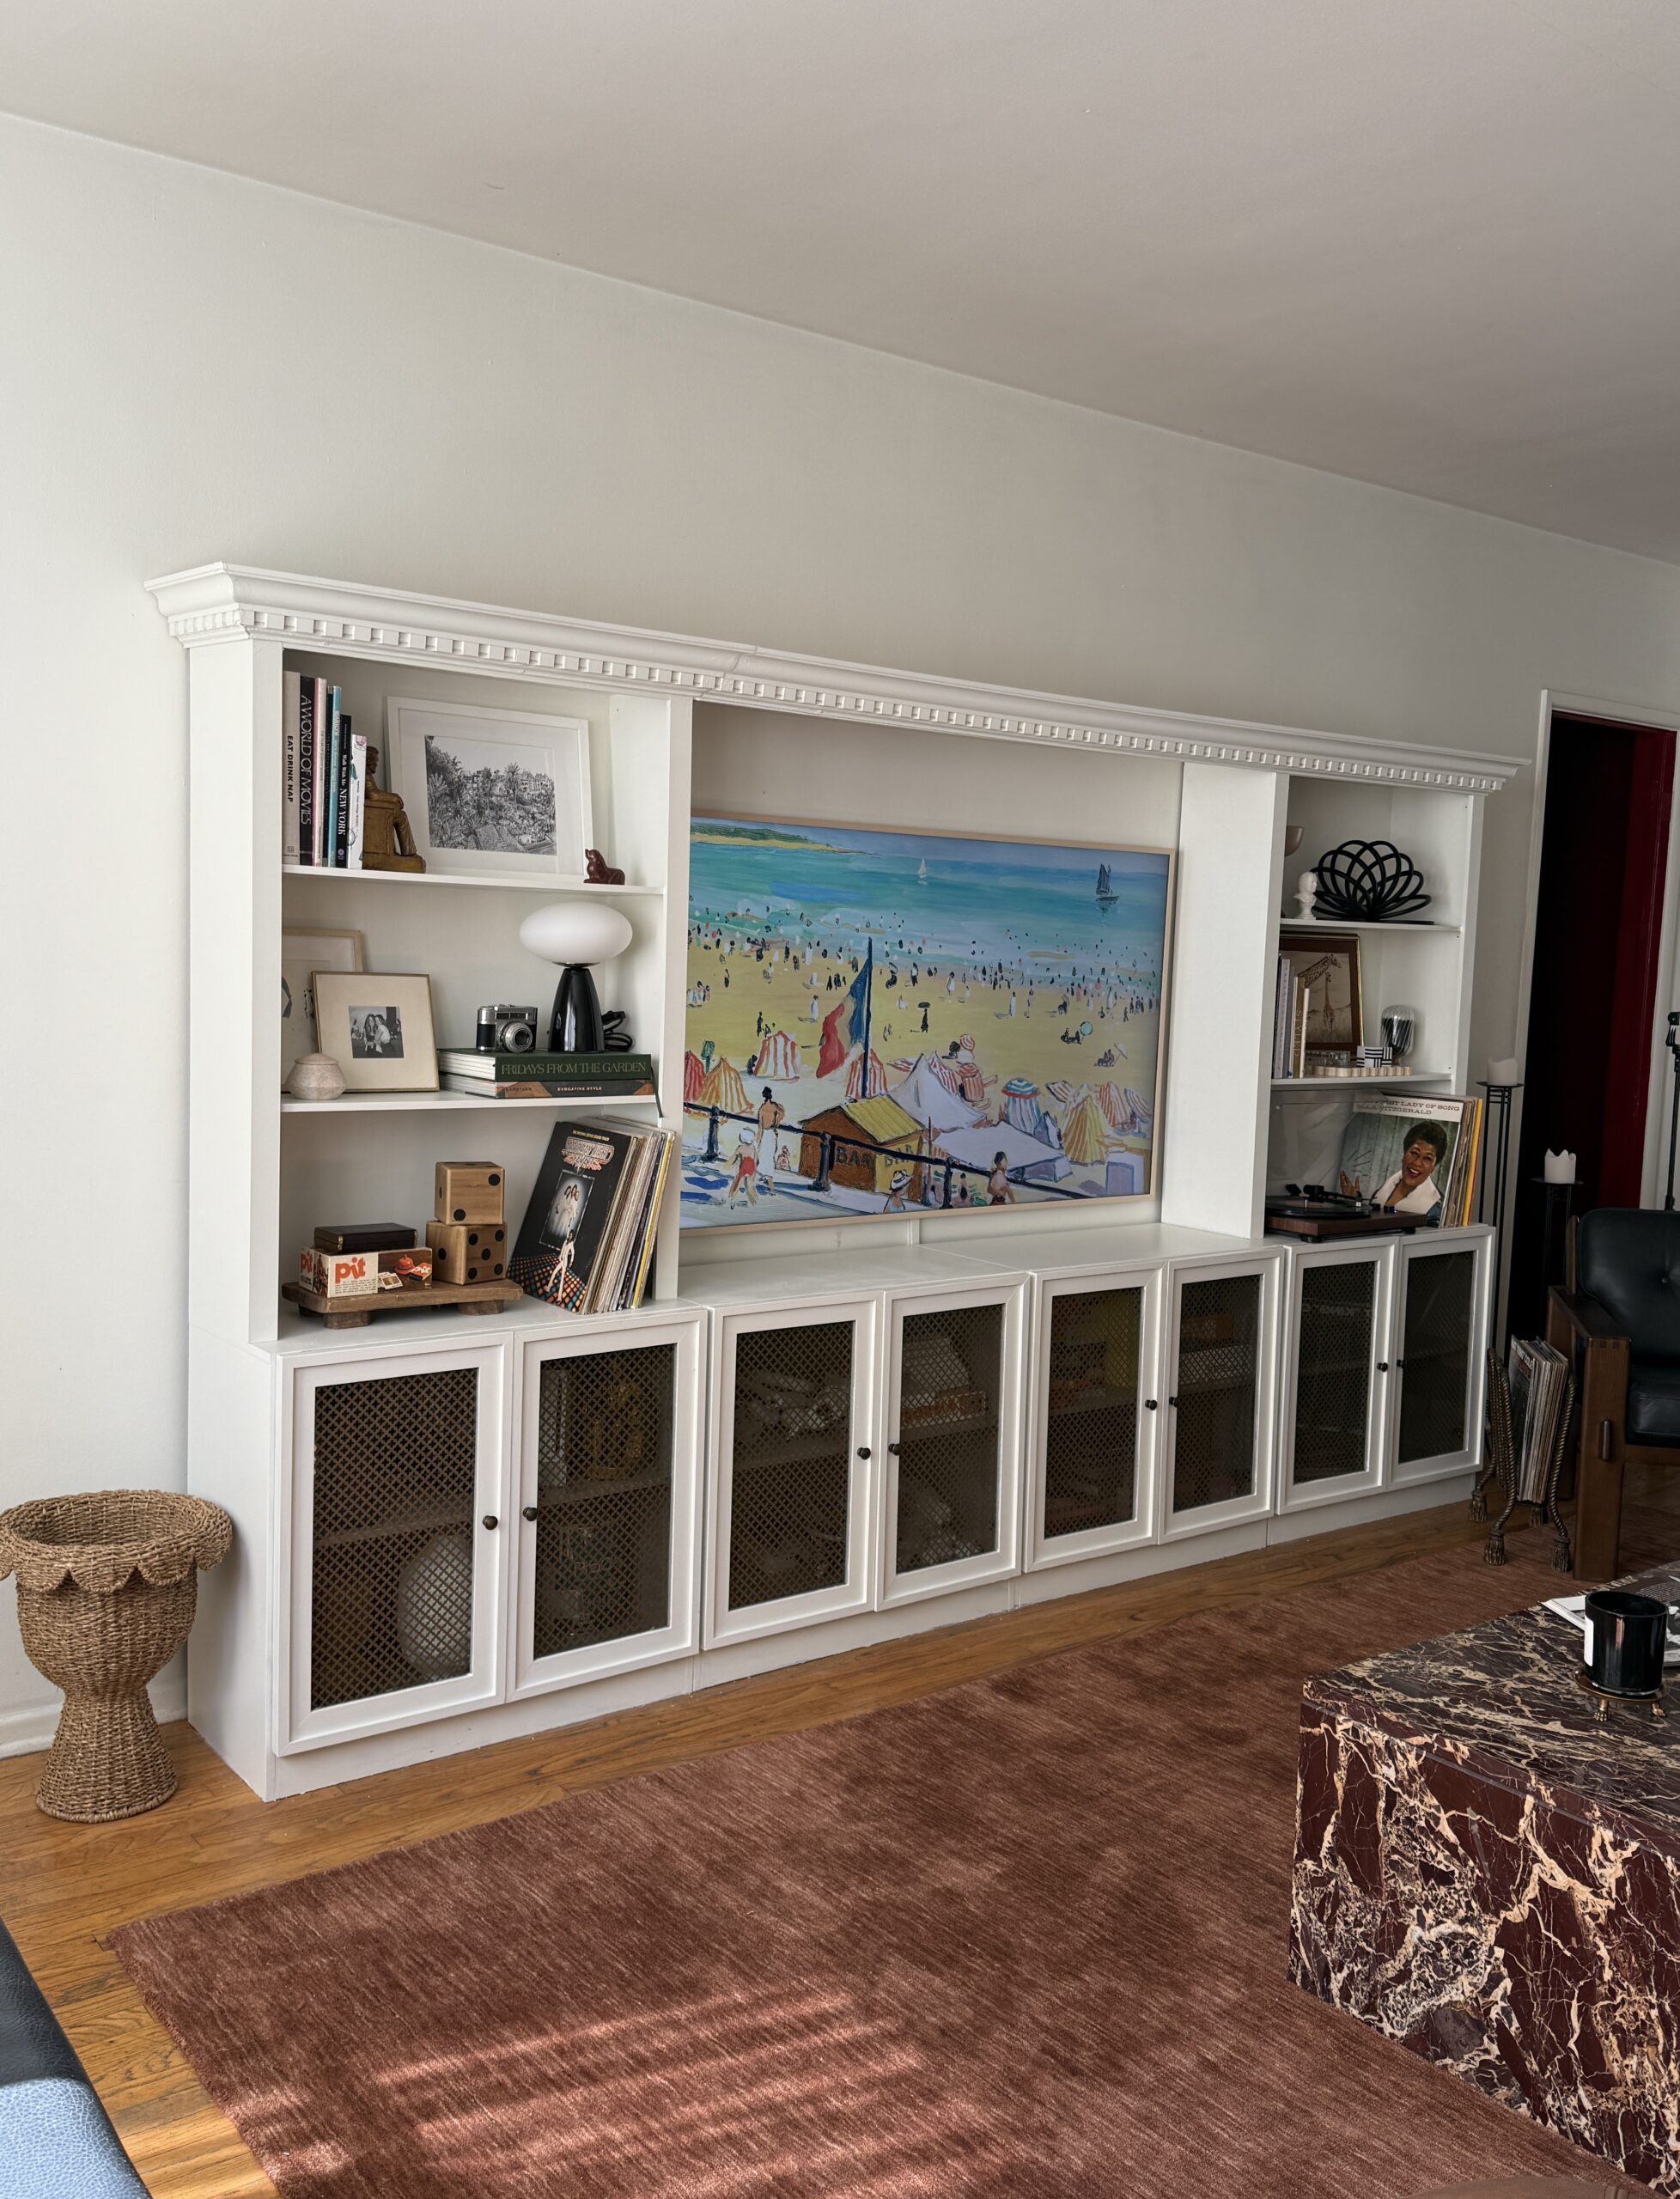
Once the trim was up (which was a miracle since my mom, dad, and I are NOT woodworkers per se) – this is what it looked like!! I’ll be honest we struggled to get the “tight fit tommy” aka the pieces to perfectly line up over on the left side as you can see (but somehow we did the corner cuts perfectly and so that was good) but once I sanded it down and caulked it – the joining pieces were not super noticeable (again, would probably have been easier with lighter trim). I was proud of my parents and I, so we celebrated our accomplishment with some margaritas, and overall it turned out SO great!! Such an upgrade from how it started. Now it was time to finish caulking the gaps, plus painting the trim and the bottom of the bookcase. Oh, and did you see those glass cabinet doors that hide nothing?? Yeah, don’t worry – I fixed those!! Check it out:
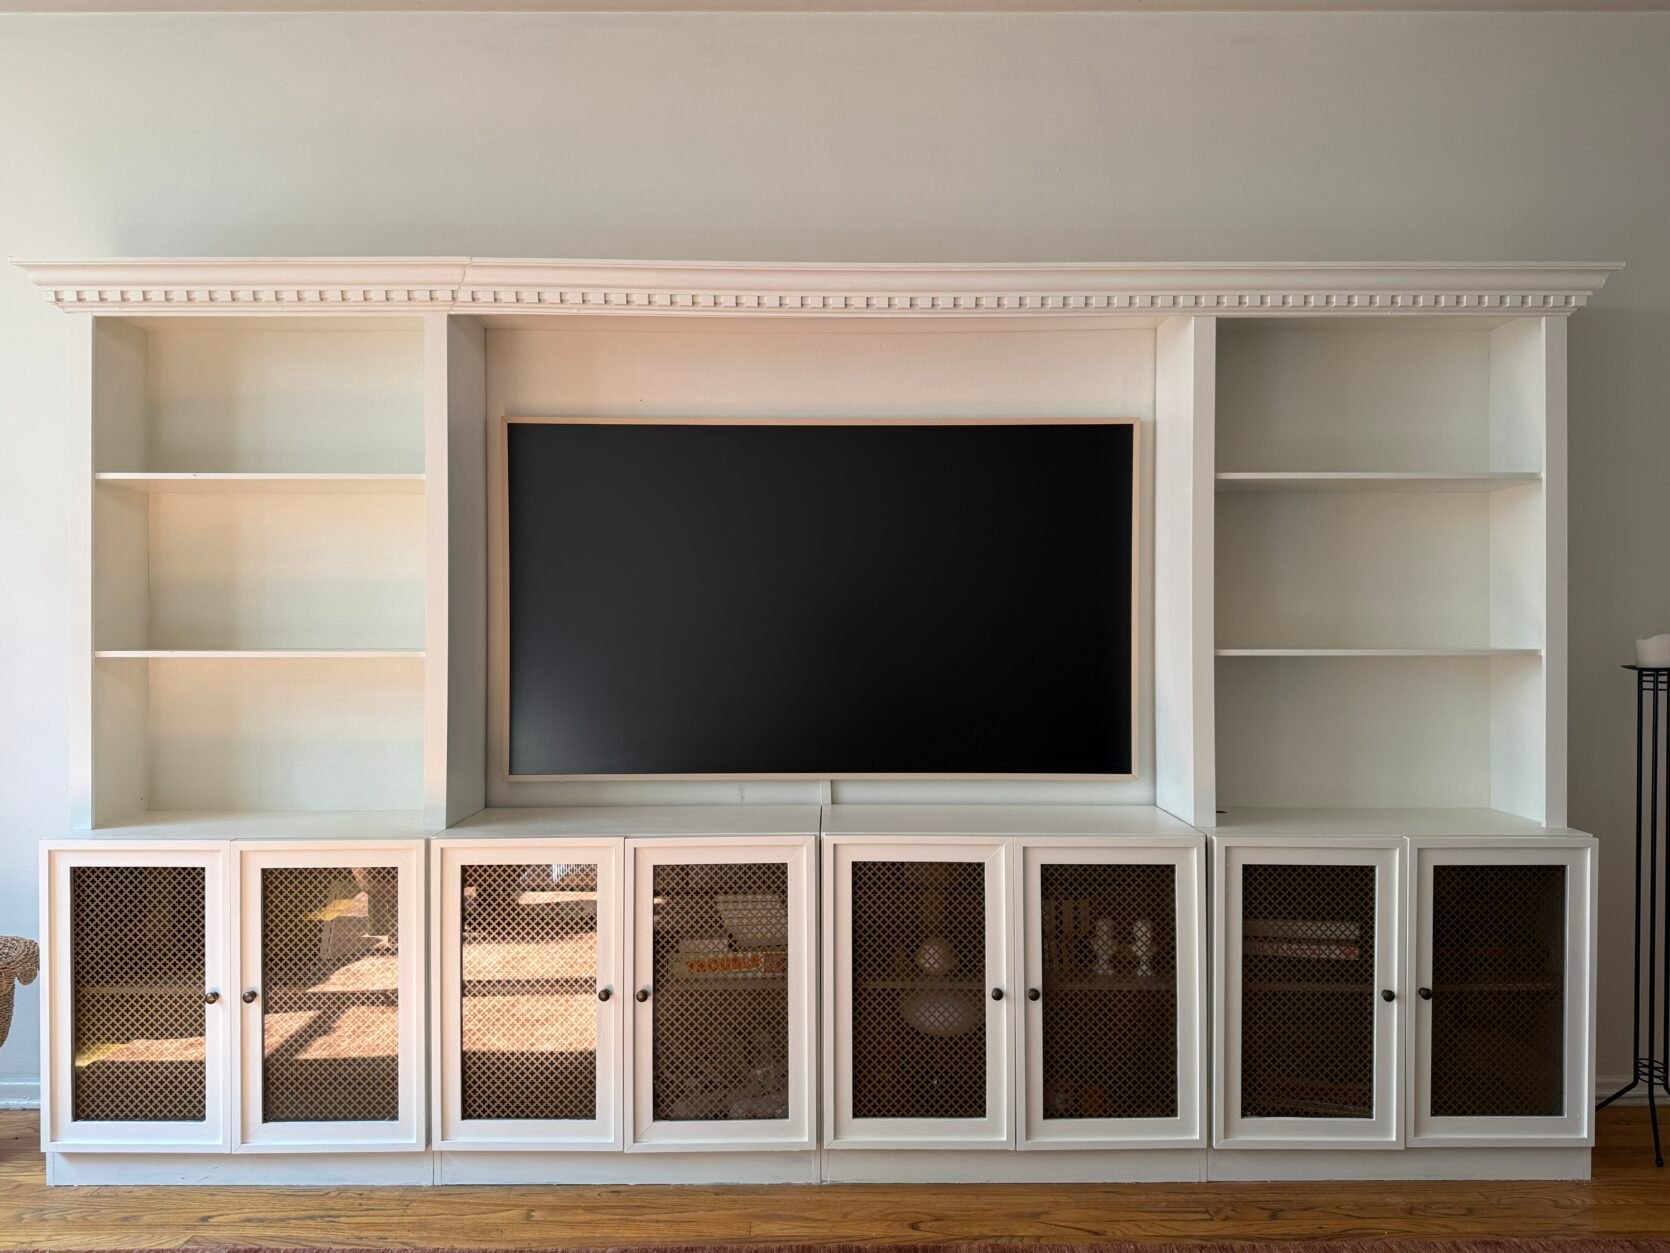
I found these perforated brass metal sheets for $20 each on Amazon, and they were the perfect size, so I ordered them and secured them to the back of the door behind the glass. I actually really liked the hardware that the bookcase came with, but remember, you could always swap that out if you found a bookcase with hardware you didn’t love as much! But anyway – ready to see the before/after?! Here you go!!
So here’s the full cost breakdown:
- Bookcase: $360 ($400 after tax)
- Paint: $70 (I bought the fancy, expensive trim-specific paint since I didn’t prime, but this could’ve been more like $45)
- Metal Sheets: $20 each (I got 8)
- Trim: $42 each (We used 3 of them! I already had these)
- Shellac Primer: $30 for 1 qt (Might need more depending on how big your bookcase is – again, I didn’t do the primer, but wish I did in addition to sanding!)
- Orbital Sander: $30+ (I already had this one!)
- Nail Gun: $40+ (Could rent or borrow! Or use until it dies and then give up and use some wood screws lol)
Total I spent: $630 (I already had the trim, but it would be more like $755 if you included that cost)
MAN, I’m so happy I was able to achieve my bookcase dreams for that price! I thought it wouldn’t be possible, but you can do anything if you just believe. It turned out so cozy and custom – you would never know this bookcase started as a $360 ready-to-assemble piece. But curious to know your thoughts – do you think it was worth it?! Would you attempt something like this? Let’s chat in the comments.
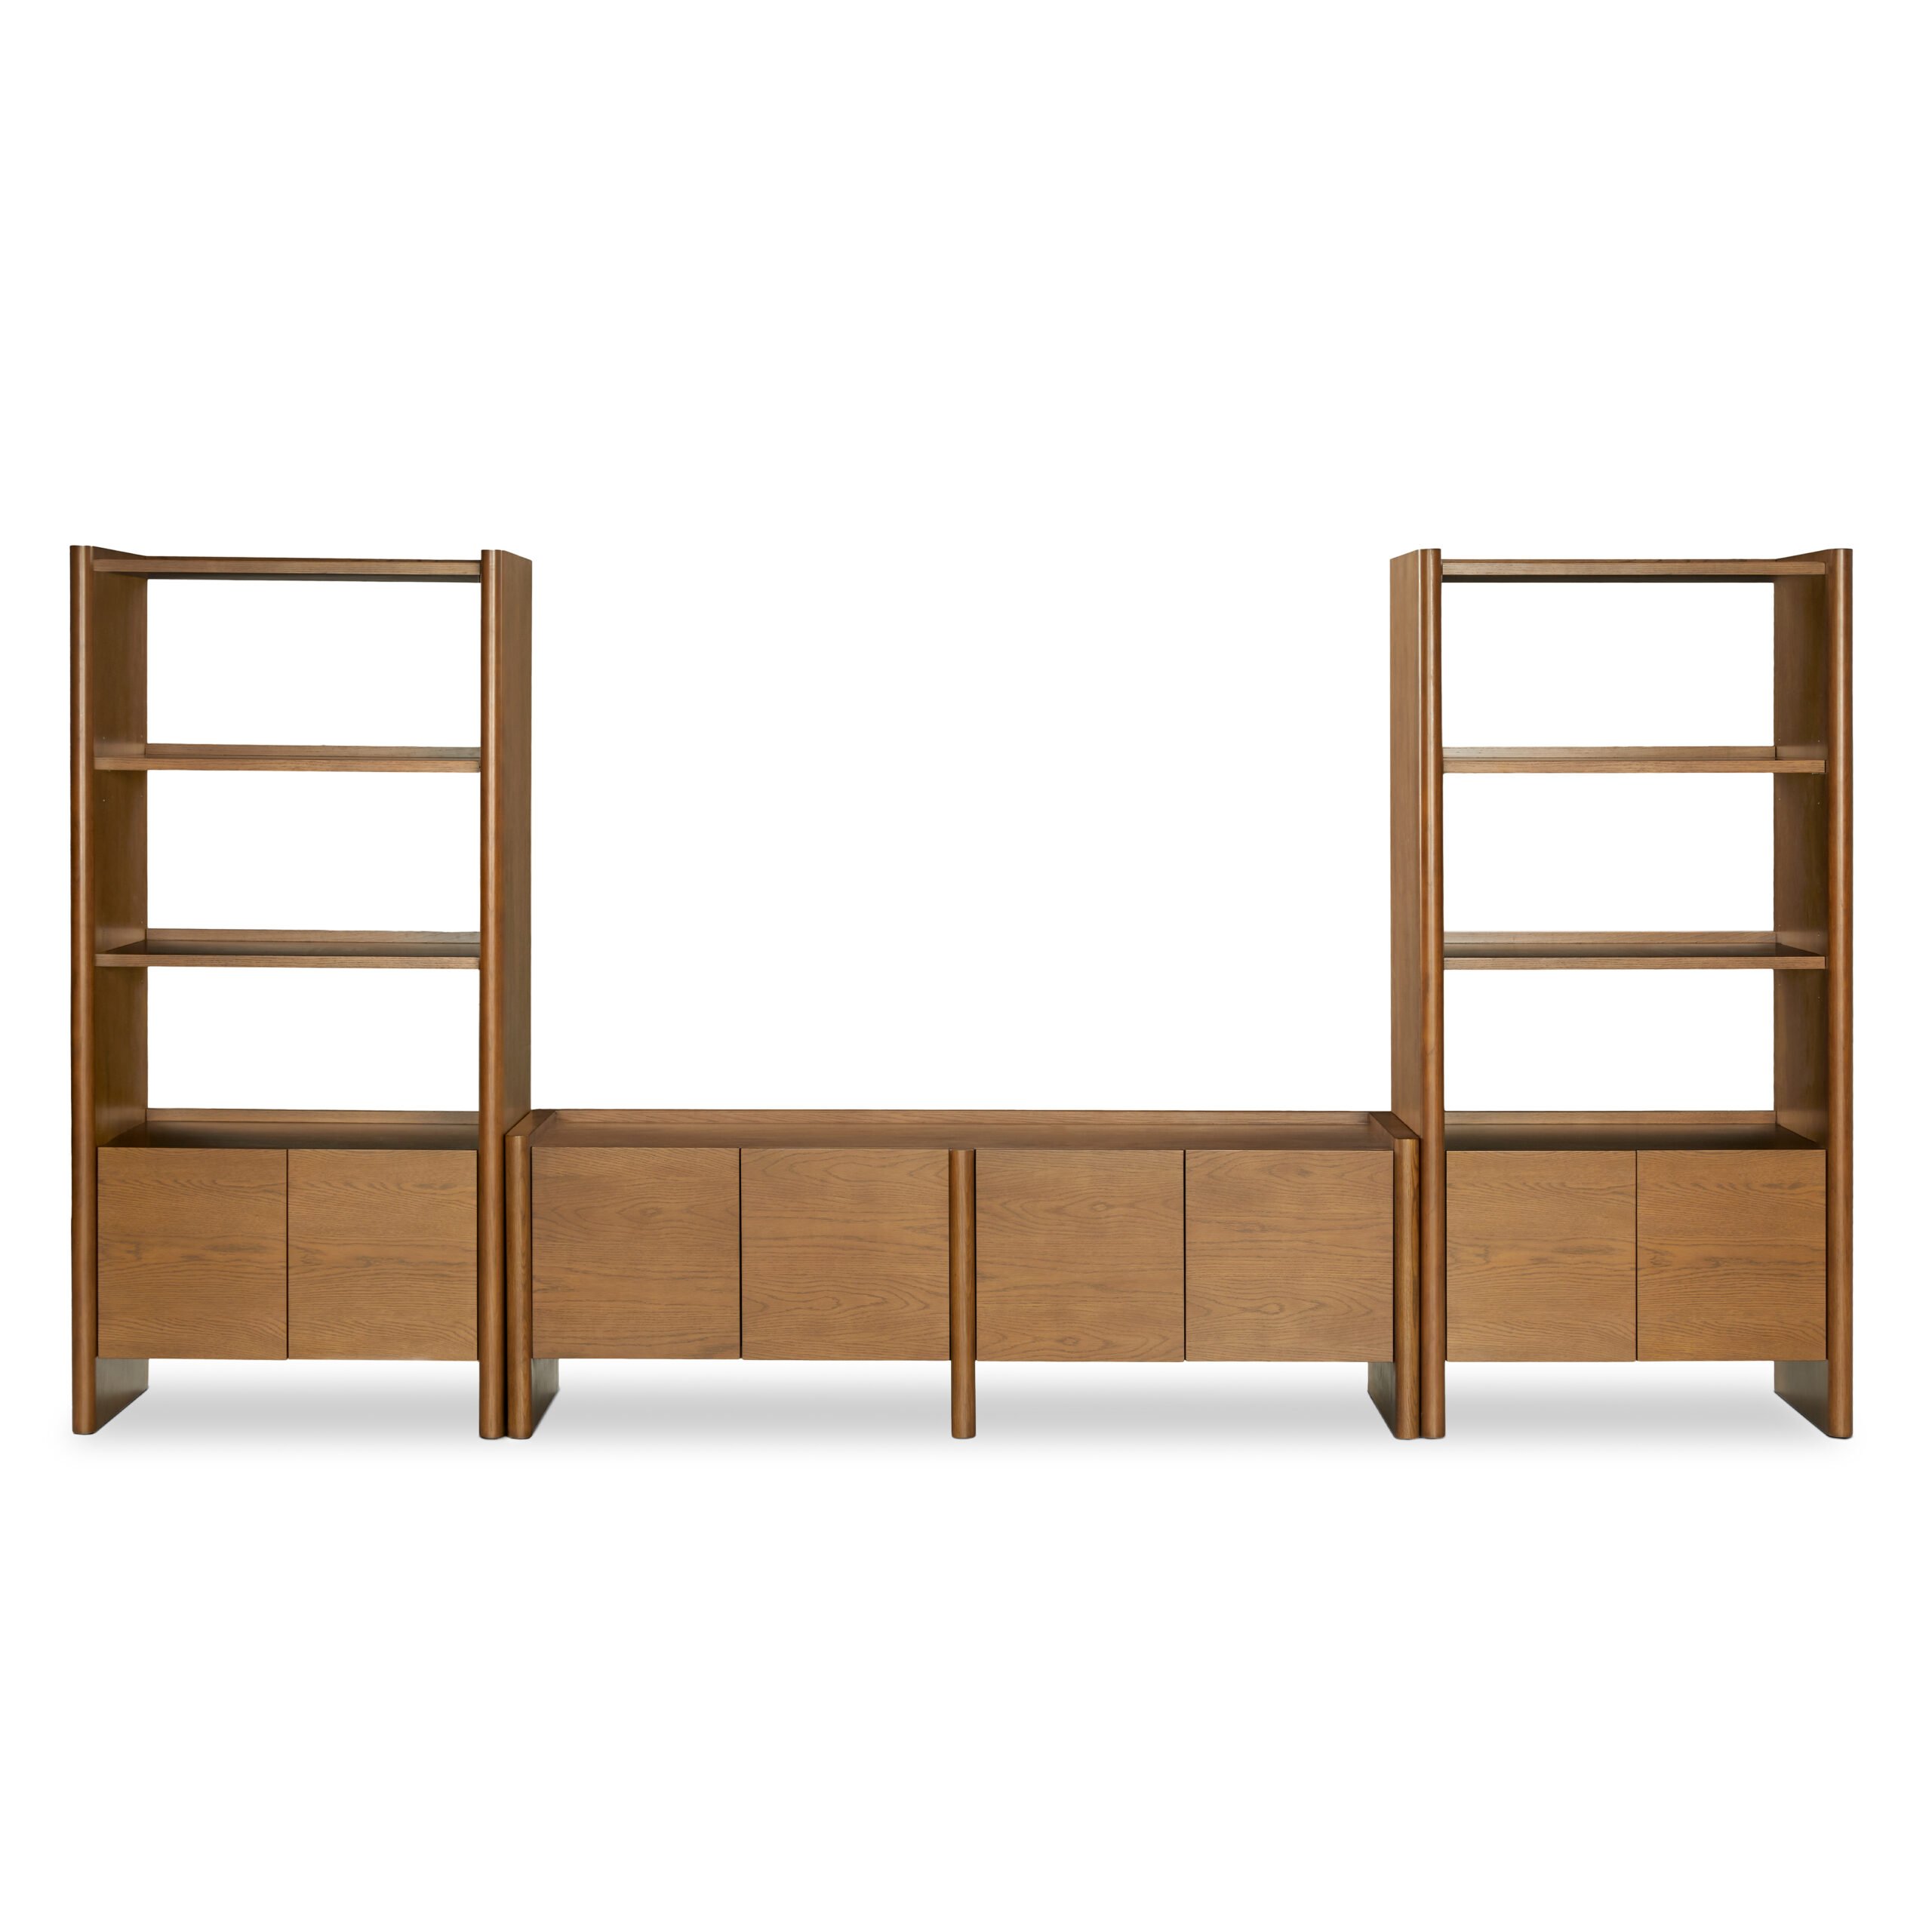
Also sharing some ready-made bookcase options if you want to DIY and customize them on your own. Note, some of them might not need to be painted/they don’t have the glass doors (those metal sheets added up!), so also factor the elements you may or may not need into the cost of DIYing these! Most of these run around $400-$500. You could also take the doors off if you want open shelving on top, and don’t forget you can always swap out or add hardware. Just thought I’d share some ideas, but get creative and have fun with it! xx
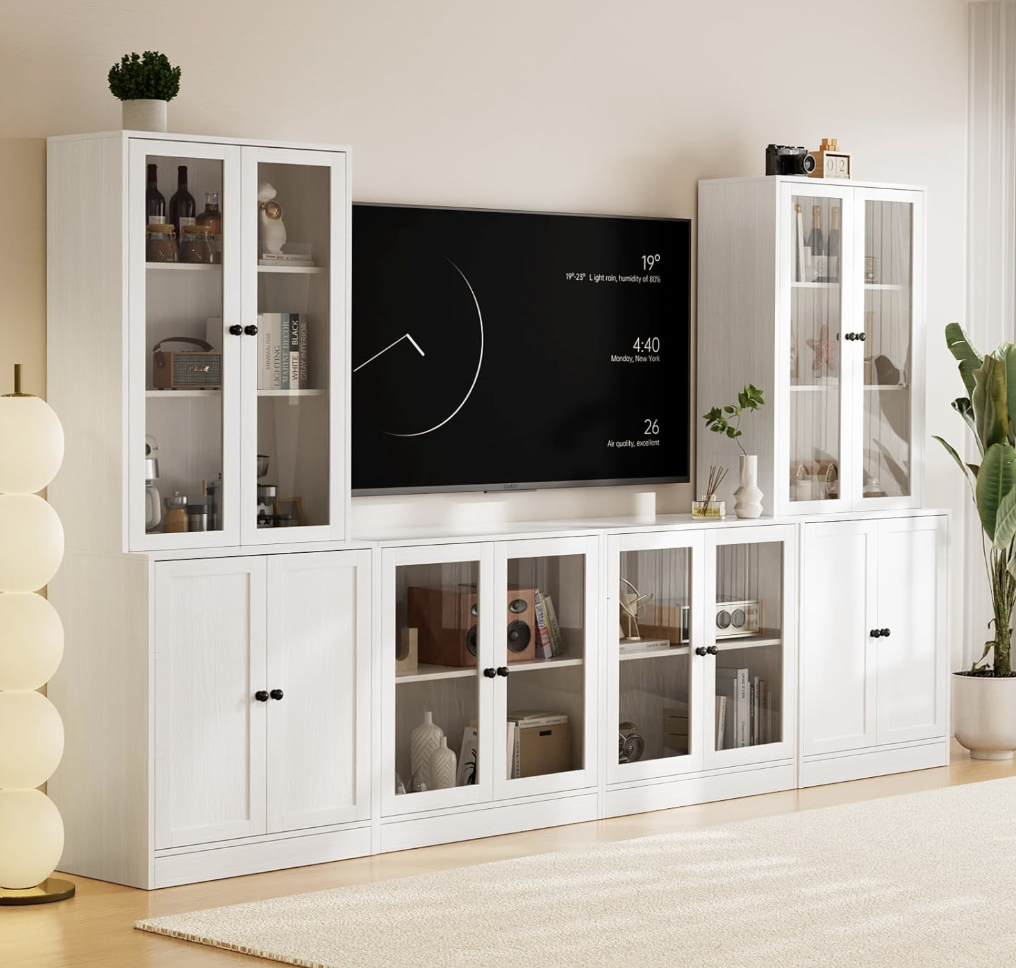
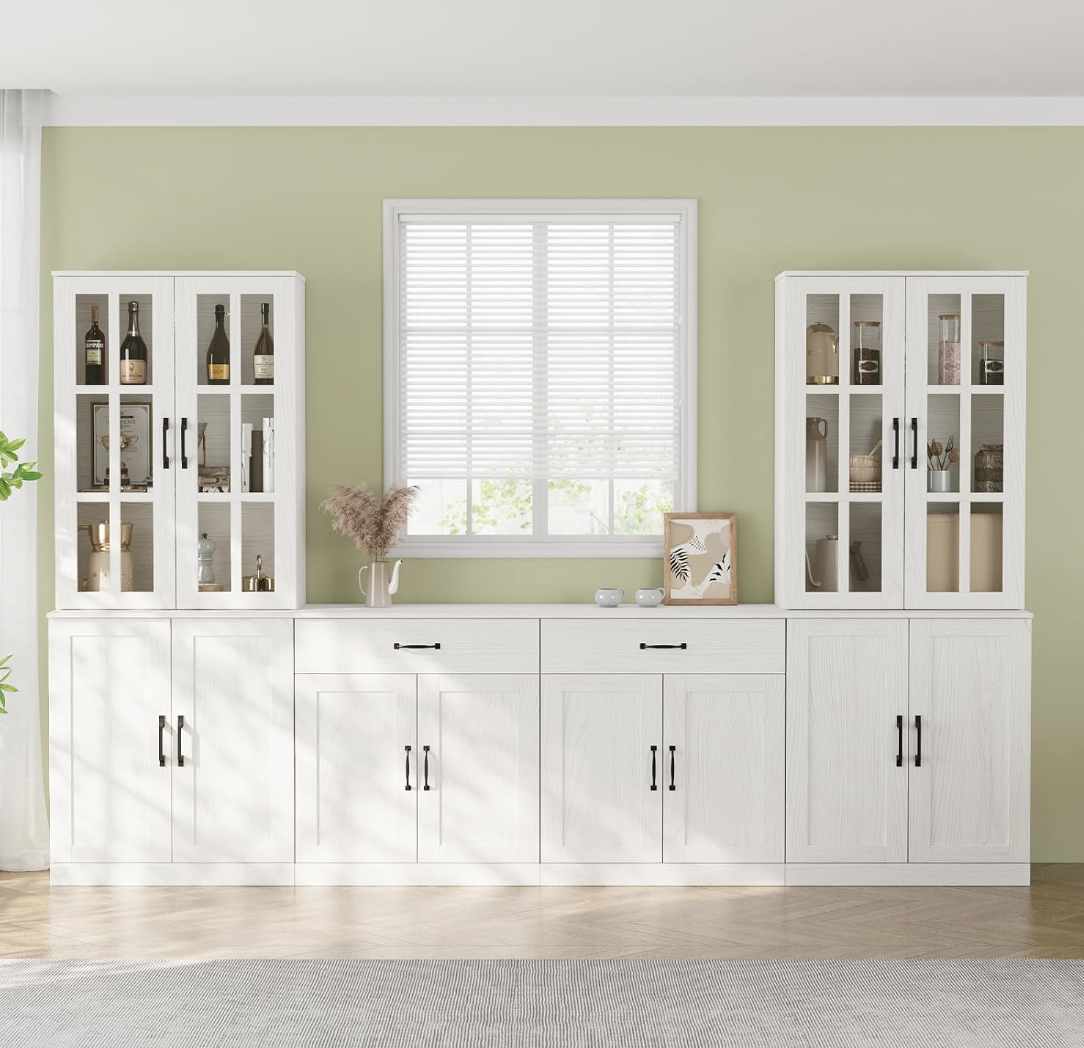
Left: White Oak Colored Bookcase | Right: White Bookcase With Glass Doors
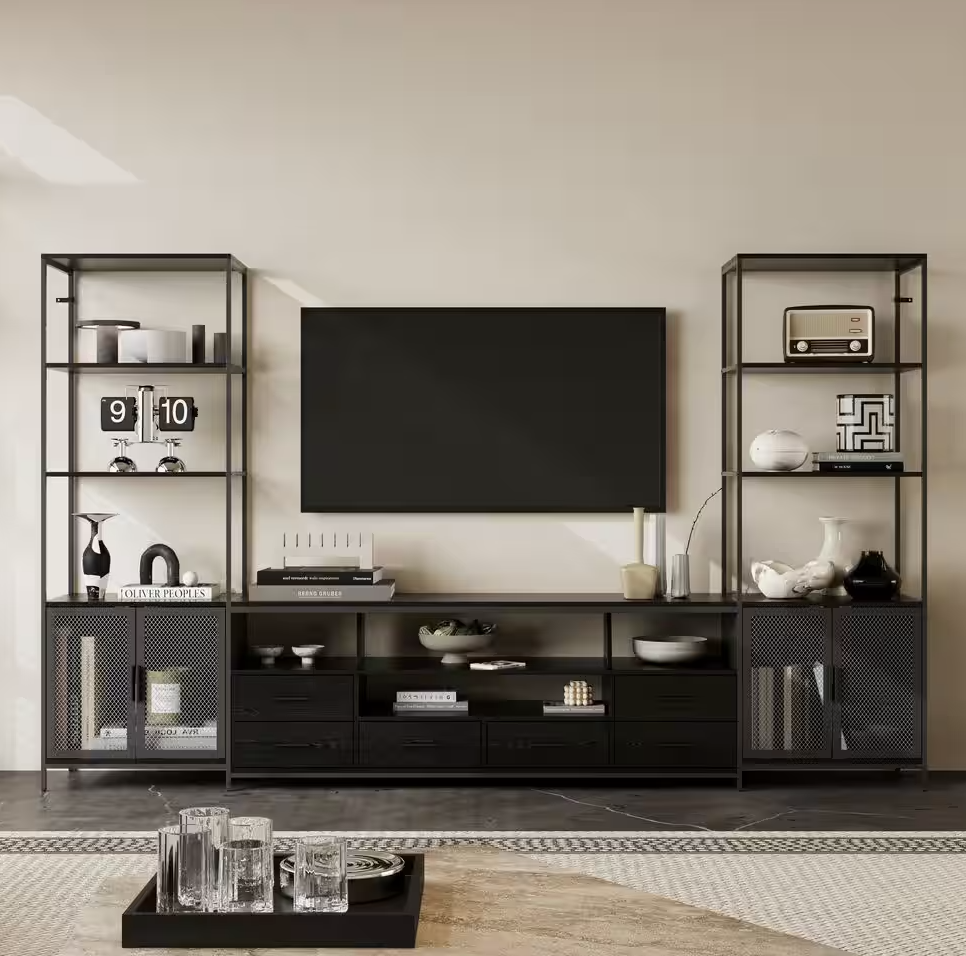
Left: Industrial Black Bookcase | Right: White Bookcase With Enclosed Doors
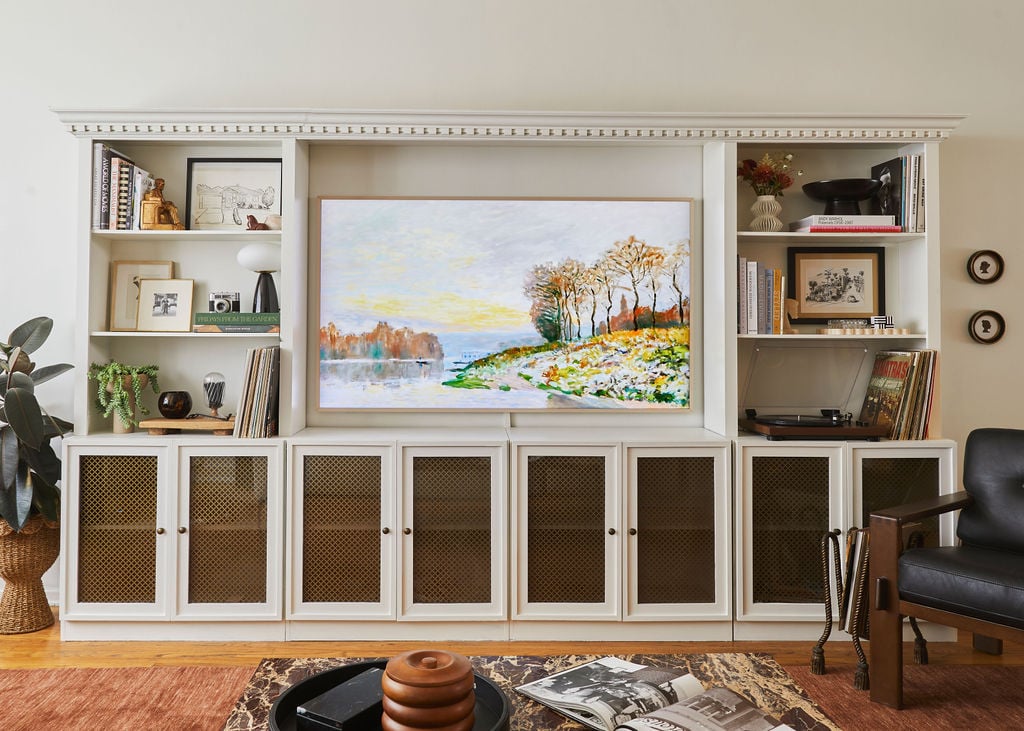
And lastly, here’s a sneak peek of the pretty photos EHD alum and amazing LA-based photographer, Sara Ligorria-Tramp, took of my full living room makeover with AllModern – which I’m going to be sharing with you next week! Stay tuned, friends!

Thanks so much for reading and for your support!! You guys are the best xx
Opening Image By: Sara Ligorria-Tramp | Design and Styling by Mallory Wackerman
Amazing job!
I’m not too familiar with Frame TVs. DO they have any components that need to go underneath??
Yes, there’s a thing that’s about the size of an internet modem. It’s connected to the TV by a thin translucent cord.
thanks
I have a Frame and love it! I paid my electrician to hide the cord in the wall, and the box component sits under the couch. It has connectors for a blu-ray player, gaming console, etc if you have those.
thanks
I have the TCL frame and it doesn’t have any components underneath! I did cut a hole in the bookcase though for the tv plug/wifi/etc so the bookcase could sit as close to the wall as possible 🙂
thanks
I’ve never even heard of the TCL Frame! No separate box and free artwork? Very interesting.
That trim completely transforms the shelves – amazing job!
thank you!!
Beautiful. Well done!
All the elements you added really do make it look more built in! And YOU did it! Woot Woot! This is a big project with learning along the way, great job staying the course. I bet you just beam when you return home, as you should!
I’d like to put in a word for thrifting this kind of thing! I see solid wood shelving units under $500 every day on FB marketplace. The world does not need more flimsy brand new furniture!
Yes!! I meant to add this in the post – will go back in and put it in! I spent SUCH a long time looking through marketplace and there were some great options – but nothing with the sizing I needed and nothing that would fit in my car or though my tiny 1950s doors! But if you could thrift that would totally be the way to go – especially if you’re going to paint it and could find something that’s solid wood!
Impressive!!
Love these types of posts.
This looks fantastic! I love the two little circle frame pieces on the far right as well. They add so much to the charm. Beautiful work! Thanks for sharing with us.
Thanks! They’re actually silhouettes of my roommate and I that I made! I just posted a video about it on my IG 🙂
Oh, that came out so well! This has given me a good plan for how to elevate the basic bookshelves in our music/library hallway. Thanks 🙂
I guess I just wish the whole thing was a color? And that there was a back to the TV section – maybe beadboard paneling (you could cut holes to allow tv mount)? It’s a lil unfinished feeling, still, to look built in.
But yeah super fiddly job to have done and looks nice. Impressive amount of work to do in your main living space, too! Well earned margs.
Second the other person who suggested it should be secondhand rather than cheap furniture……..
Small suggestion: add a 1 inch piece of MDF to each shelf edge facing out, so that it appears the shelves are slightly thicker than they are. Flimsy shelves are a dead giveaway – take a look at your “quality” examples to see the subtle difference.
So smart – I’m definitely going to do this!!
I used frosted glass window cling on a storage piece I have with glass doors, and it’s lasted for over 5 years. I’ve also used the reeded glass on in kitchens with no issues. Cheap easy way to turn glass front storage into closed storage.
Great ingenuity and planning to achieve your own custom book shelves. Looks smart in your living room!
Fabulous job! Using the same paint color as the walls is what really makes this work. I love the simplicity of the majority of the piece then the dentil moulding along the top to give it a custom touch. I agree with the comment that adding strips of moulding (you could use glue for these) along the horizontal shelf edges would take it to the next level. The next tenant will be delighted to have this. Well done, Sarah.
I was skeptical at first, esp with those glass doors, but it came out so nicely!! And as someone who has been searching for certain pieces of furniture on FB marketplace for literal years, I can totally see the appeal of getting a budget piece new instead – and as you mentioned, it’ll be there for the next tenant too. Who knows, maybe it’ll last for decades! Secondhand is great when it works out, but it’s not always the best solution.
I also love to read about a DIY project like this that you dove into without necessarily having a perfect plan or years of experience – it’s refreshing to see such a cool outcome from just a vision and hard work! The lessons learned are great too and v relatable. More posts like this, please!! (And peeping that red marble coffee table and interesting leather chair, can’t wait to see the full room…)
Where’d you hide your soundbar?
adding the brass panels to the glass doors was a genius idea, it really elevates the feeling of the whole project!
not that you asked for my two cents, but a shade of white like this on a piece of furniture reads to me like it’s the primer just waiting for a color. often people with actual built-ins are encouraged to paint them a different color than the wall to emphasize their gorgeousness (like emily did at her friend’s place recently). just something to noodle on! really great project with a lot of impact!
Stunning! How did you secure the metal sheets to the back of the glass doors?