
Emily's House
Our Backyard Makeover – The Final Reveal
Here she is, folks. The final backyard makeover reveal. Now if you are just getting here please read Part I (the before/tree butchering, and landscaping plan) and Part II (the process). We absolutely love it and spend most evenings and weekends out here. Right after it was done we joked that it was a frat house for parents of toddlers, because all our friends were over all day every day on the weekends. With two small kids, often being in nap-trap, having a yard has made life a tiny bit easier for us.

The path leaves from the patio and winds down to the guest room and back to the castle, and in the other direction it goes to a little seating area. We designed it to be meandering and look organic. There are some places where it’s 18″ and some up to 24″.

We could have just left it as grass and plants (which would have saved a lot of dough), but we loved the idea of it guiding you around and we definitely find ourselves walking on it. I wanted ‘English Country Whimsy’ and boy did we get it 🙂

There is decomposed granite in between the stones and little plantings that should spread. Some have really taken off and some are still growing slowly.
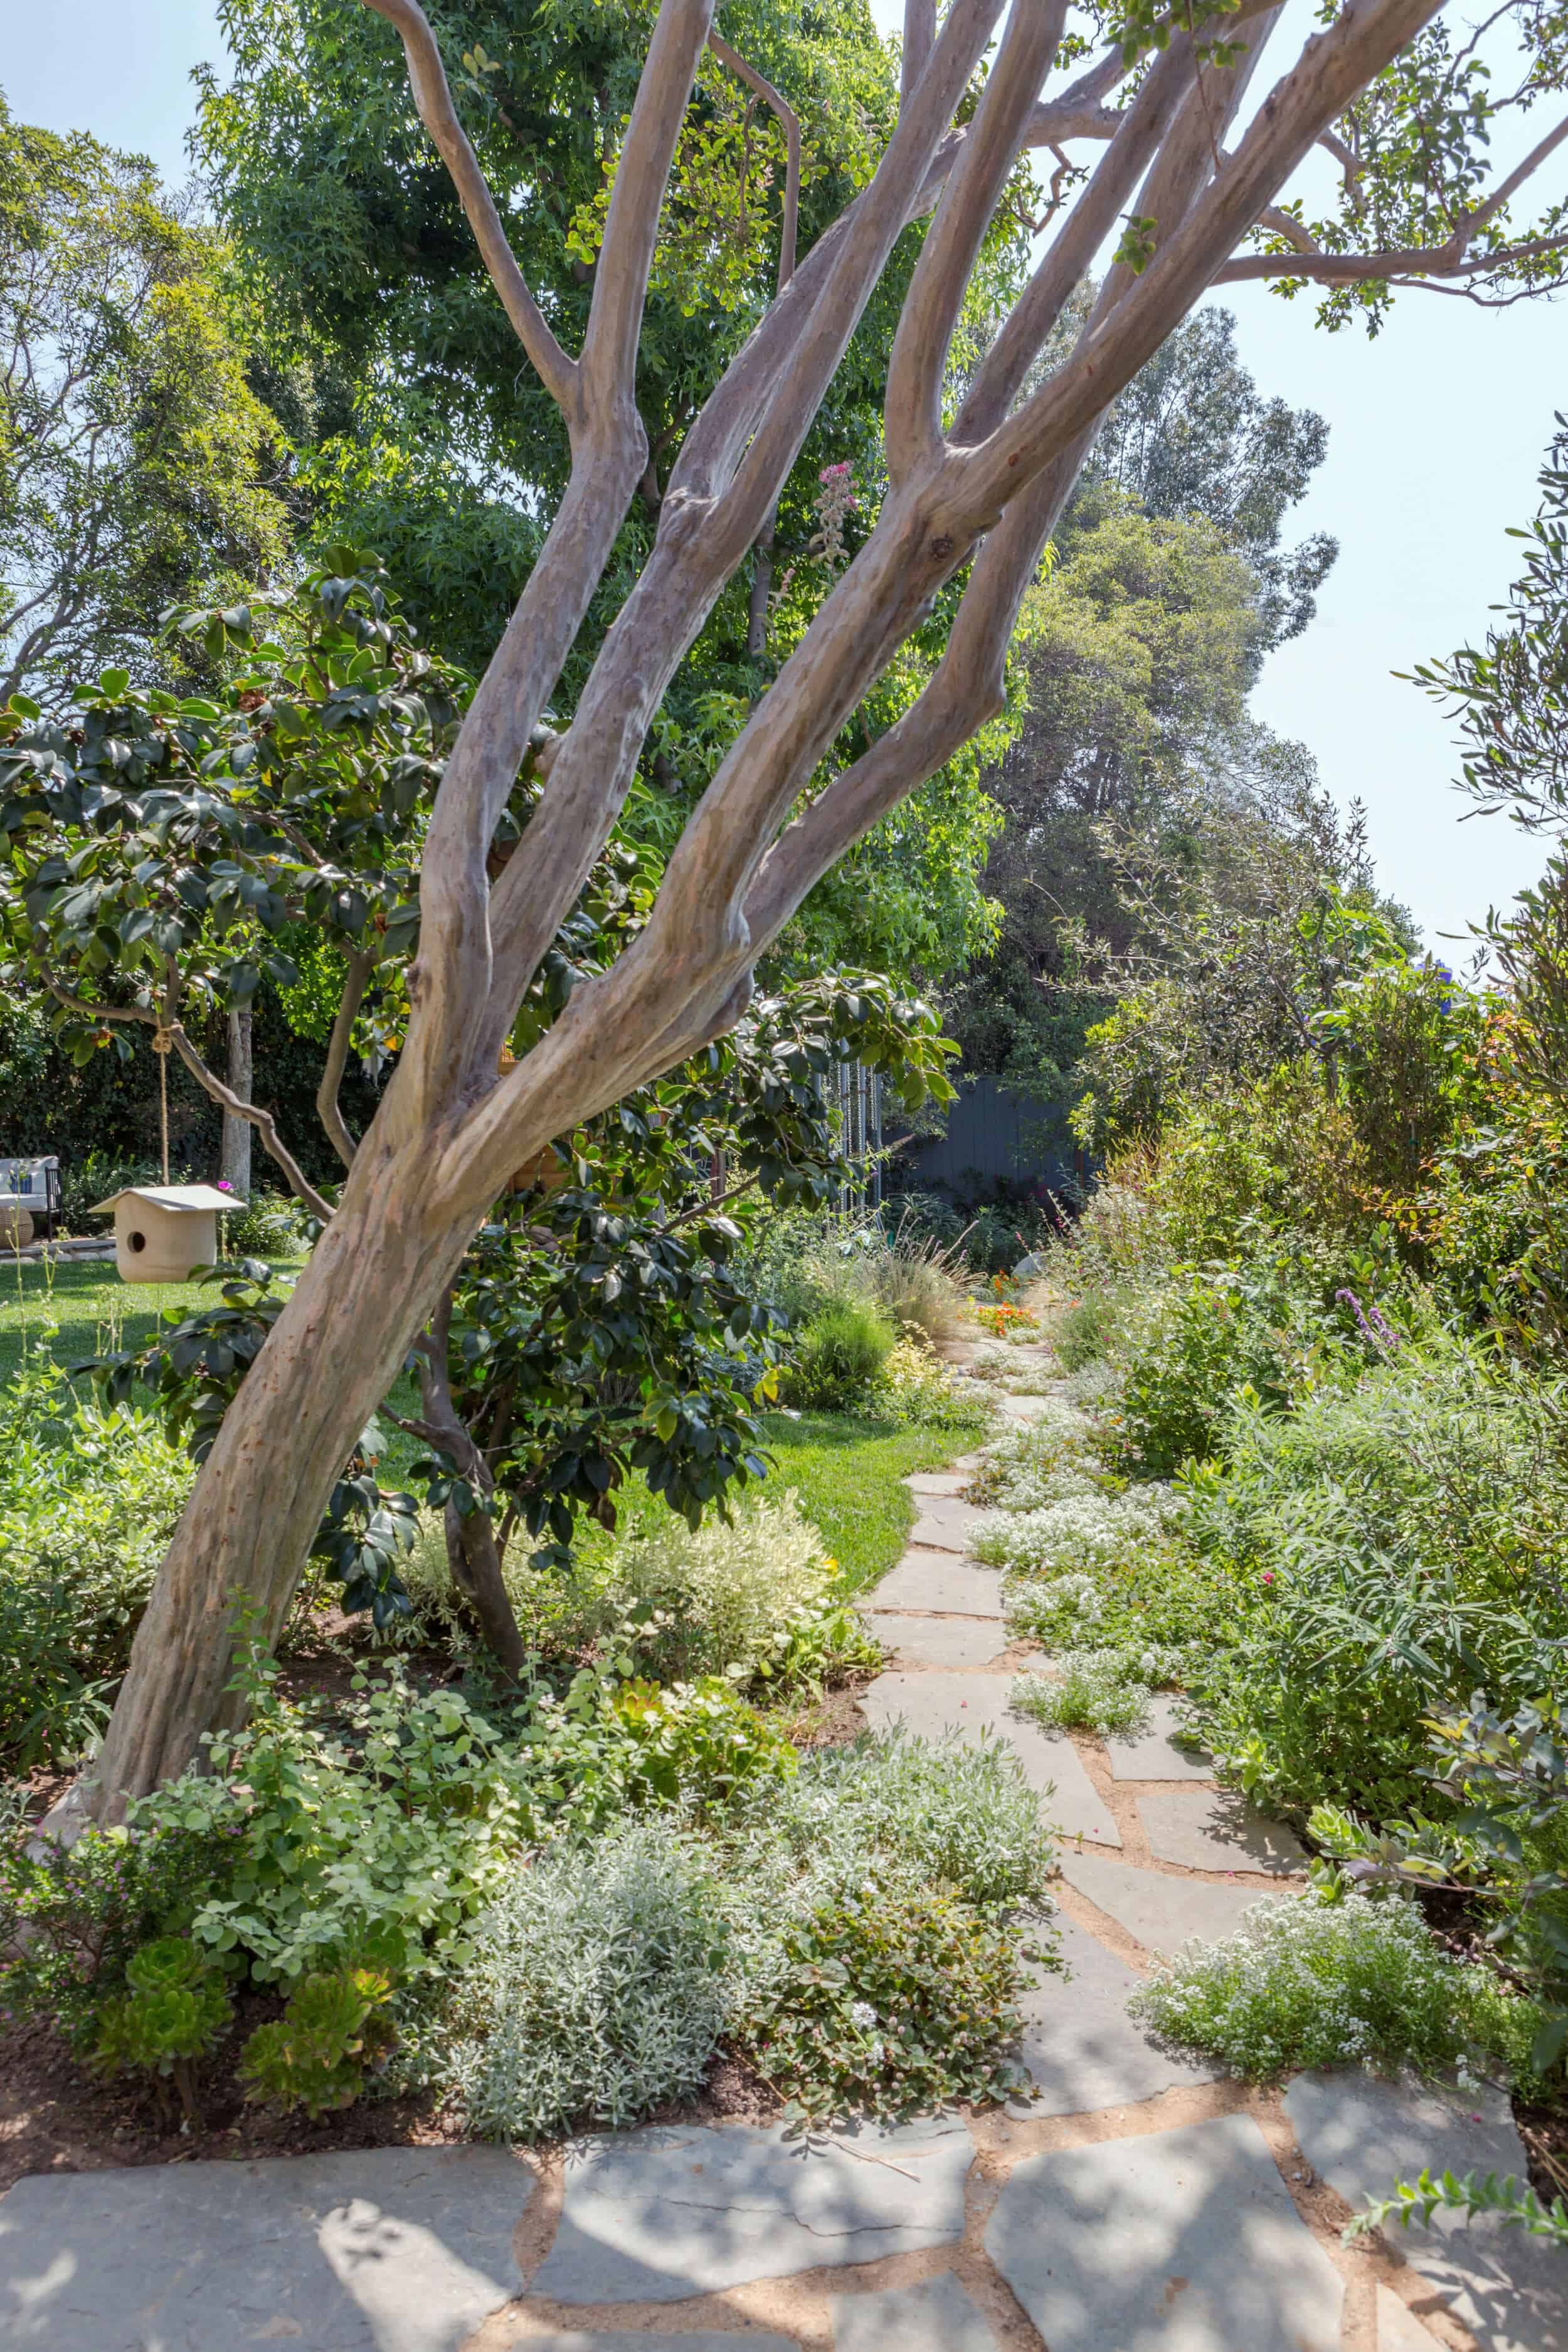


That is probably my favorite photo (above) as it really looks like a relaxed, happy colorful garden. I want to be there so badly and yes, we truly know how lucky we are to have it.

GOOD (NON-SHOCKING) NEWS: The trees and shade have definitely started to come back. The full canopy won’t be back for a while (again, read here if you don’t know what I’m talking about), but it looks good and healthy so I’m feeling much better. Thanks for all your concern and to those of you who sent flowers 🙂

We get enough shade throughout the day that we don’t feel like we need to smother our kids with sunscreen just to step outside.

There is always at least one big tree shading 1/3 of the grass, so it’s good. We survived. I lived through my emotional tree breakdown and I feel comfortable saying that in a couple years we’ll have more. But for now I KNOW that even 4 old growth trees as bare as they were, is an absolute rarity to have in a city, especially in a yard the size of ours.


The hedge is also back. It’s kinda unruly and messy, just how we like it. The trees planted along the perimeter help break it up. We still see the view but can block out some houses.


We hid the AC units, which are right outside the guest room. It’s a bummer for guests, but they can’t fit anywhere else without us paying thousands and thousands to move them. And we have nice shades for the guest room, so guests don’t have to stare at them (plus our guests are generally family and are hanging upstairs with us).

Eventually it will be covered with pretty jasmine and you won’t be able to see those condensers.
One of the things that I love so much about the design of the yard is having conversation zones for adults near the kids play areas. We don’t need to watch them all the time, but it’s nice to feel like we are together without us actually having to be under the castle with them.
First up is the stone patio:

The yard slopes a little and the roots make the area on the left much higher. So we built it up for a little seating area. We put two club chairs down there and it was such a lovely place to sit . . . until sap dropped all over the person who sat on the left. It covered the chair (and their hair) and was just a sticky mess. If anyone knows how to fix that let me know. It seems like it’s just one ‘wounded’ branch that drips, drips, drips (do you guys remember how our fig tree in our old house dripped sap all over our furniture/rugs? WHY AM I A VICTIM TO SAP?).
So when we shot the patio last week we took out the disgusting sap and dirt covered chair and left this one. So now it’s mostly a sitting area for one ’til I solve the problem:

And when friends are over we bring out more of those outdoor poufs. Obviously we could face it the other direction towards the castle but it’s so far cheated to the right due to the sap, so it just looks way better this way.


That’s me, watching Charlie pick up a handful of rocks and look at me with his ‘mama, I might throw these at Elliot’s face’ look.
Then over at the bottom of the slide there is another sitting area – a big boulder and a bench.

You can’t see it, but there is another big boulder tucked by the fence. Originally it was where the black bench is then one day (while auditioning for ‘Mother Of The Year!) we had some friends over, playing in the sprinkler, etc, when we thought – OOH LET’S MAKE IT A WATER SLIDE! So with the hose at the top of the slide Charlie took off, and flew down SO FAST, and he caught so much air his foot caught him a the bottom thrusting his face within INCHES of a huge boulder. It’s was like I saw my child’s life flash before my eyes. He ate so much dirt, covered in his teeth and eyes, but I was just so thankful that he didn’t knock all his teeth out or worse . . . The next Monday we hired some dudes to move it with a boulder jack and shove it towards the fence. That big one is way too far away to be a safety problem. Of course they can trip and fall into any boulder anytime, but that is a risk that I think is good for them. They can hit their head on concrete any minute of the day on the street and we think setting up these smaller, more manageable physical risks will help them in the long run (my mom is a children’s special education specialists and thinks that every fall that doesn’t lead to the ER is a physical success).

The boulders around the castle are also a great place for us to perch. They are typically full of chalk-drawings or water-colors, but I wear my “play clothes” so it’s fine.

In case you are wondering if the kids play underneath the castle the answer is YES:

They hide, under there and do treasure hunts, look for bugs with magnifying glasses, etc. The pebble pit has been great for trucks, etc. and Birdie likes to just put the rocks in a cup and dump it into another cup. One of the reasons we did pebbles instead of a sandpit is so that raccoons and our cats don’t use it as a littler box. Well guess what? Our cats are super flexible and happily adopted this area as well! It’s not that often, but it’s still unfortunate and we are spraying some sort of non-toxic citronella spray everywhere to see if that works. If not, we hear that coyote pee works which is disturbing. First off it’s DISGUSTING – it’s like if I don’t want cat and raccoon poop then I’m probably also the kind of person who doesn’t want coyote pee. Also how do they extract the pee or is it a chemical that just smells like coyote pee? It all sounds like a lose, lose. They only do it sometimes and it’s gross, but manageable. I just wanted to give that FYI because if you think that cats only want to pee in sand boxes, we just found out you (and I) are wrong. They don’t discriminate.

The kids really love that pebble pit and in fact play under there more than inside the castle – as I predicted. Goes to show that a much simpler fort would have worked, too, which we knew but had an excuse to do something more elaborate so we did (we rounded up a bunch of fort ideas here in the castle/pebble pit post).

Here’s Birdie eating her afternoon chalk snack. Look at Charlie smiling at her maniacally (I intervened, obviously, although don’t worry because it’s basically like eating Tums). In the background of the shot you can see where we put all the rocks that were removed from the previously super rock-heavy moat. Our rock dude bought way too many large rocks, so we piled them up in the back. A good tip is, if you are going to do this pebble pit idea, you just need a few around the perimeter and a medium sized or so clustered in the middle to give it that feel. There is a pond liner underneath (with holes in it for drainage) that keeps it from getting too dirty. But if you have a good contained area then you don’t need the bigger rocks either. Or of course you could just build or buy a box like a normal person.

Back to the landscaping. Yesterday I told you what all the plants were but today you get to see how Pete layered them. It’s a lot like interior design, folks. You want a variety of heights, textures, and colors, with the taller/bigger in the back so you create vignettes.

The vignettes are created around trees or focal points (like the castle, swings, trees, etc). It’s kinda hard to see, but can you see where the path juts-out on the right in the photo below? Well Pete wanted to do that to create more depth and interest, so it wasn’t just a straight line down the back.

A kumquat tree was planted there and as it grows it will help give the yard more dimension. The tip: stay away from keeping your backyard a square box.

We always wanted nooks and little zones to help it feel bigger and more textured. Especially if you have a newer house that might just have a flat lot, don’t be scared to plant inside and not just around the perimeter.
I can’t believe how the plants have grown since mid-April when we finished. Some things have doubled in size and have some pretty awesome weeds that are alive and filling in (not sure Pete would approve, but we don’t mind them).
A few things have died for no reason and there are a couple areas where I don’t think the soil is great because the plants aren’t thriving enough. Meanwhile, one oak tree has doubled in size and the other hasn’t grown at all – so weird!

We removed the growth on the old metal railing when we replaced it and we are still debating a climber, but then I think that there is enough foliage, right? Calm down!!! We planted with layers and boy has it grown in:


Pete created more vignettes around this new strawberry tree, which helped create another zone. Also that power pole in the backyard is really bumming me out. If anyone knows how to convince the city to bury them let me know. We photoshopped it out of some of the photos (not to fool you, but just because it RUINED the photo) but it’s there and I just want to cover it with faux branches.

We hung lanterns in the big tree to help add some lighting at night, and while it’s not exactly the Ojai Valley Inn (they did that) it is really lovely. We use solar candles that turn on around 8pm and off when the sun rises. They are in inexpensive Target lanterns that I had left over from the patio makeover, hanging from black chain. I kinda want to wrap the tree trunks in fairy lights for winter so they can hang out there after dark, but for now this is pretty great.

Charlie loves climbing the Camellia tree, which is surely going to break at some point as he gets older, but it’s pretty cute.

Sara shot a lot of details of the flowers as they are blooming:

We have a pinboard with all of the flowers/plants and bushes on them, but here are some of my favorites (although not in the exact color that we have).

We honestly couldn’t love it more. There are few tiny things that I would change but nothing that is worthy of a tip or a lesson for you. I’d just say plant in late winter/early spring, plant about 1/2 as much as we did knowing that it will grow so fast. Think about plants and flowers that attract birds, hummingbirds, and butterflies and that give of a fragrance. And if you live in a warm climate then think about curating your plants so that something is always flowering.
Thanks to Pete Hieatt from Deluxe Plants. You were lovely to work with and made our backyard dreams come true.
Here are some very satisfying before and afters. I used the ‘before’ from right after the trees were butchered, as that is when this backyard became my true obsession:

We didn’t paint the house, it’s just warm winter light versus summer light. Also our contractor clearly missed finishing the trim on the roof-line … ha.

One thing you may have noticed – we painted the swing set the same color as the back-fence (Downpipe from Farrow and Ball) and replaced the seats with new ones from Wayfair (which match the slide). Just did it ourselves with exterior paint and it looks totally brand new, although it still creaks like a creepy playground….

So satisfying, and so finished. It wasn’t easy or inexpensive (the cost is in the process post, see below) but now that it’s done I couldn’t be happier. Ask any questions in the comments and we’ll try to answer them as best we can.
If you want all the backyard posts leading up to this post, here you go.
Ideas for the most Family Friendly Backyard Ever | The Finished Patio (with Tile!) | Building Our Backyard Castle with Wood Naturally | Backyard Makeover Part 1 | Backyard Makeover Part 2
P.S. I’m still on our no-kid getaway and have slept 9 hours a night for 3 nights in a row! Sorry I was a little behind on this post, but by catching up on zzzzzzs I FEEL LIKE A NEW WOMAN. xx
***Landscape design by Pete Hieatt from Deluxe Plants and photography by Sara Tramp
For more reveals from Emily’s Los Feliz Home: Powder Room | Jack and Jill Bathroom | Living Room Update | Charlie’s Big Boy Room | Master Bedroom | Master Bathroom | Living Room | Kitchen & Dining Room | Elliot’s Nursery | Closets | Laundry Room | Elliot’s Nursery Update | Family Room Update | Kitchen | Updated Living Room


Gorgeous! I personally would invest in a $30K garden rather than a $30K bathroom any day!! Look at the usable square footage you have just added to your home … Your $$ were well spent , Emily.
Not a yard question, but where is the dress you are wearing in these picture from?? It’s so great!
Ha. Madewell but its not available anymore 🙂
Which post is the process post? I’m trying to see the total cost from design to finish… Thanks!
The process post that includes pricing break-down is Part 2:
A little WD-40 on that swingset might help it not sound haunted. Worth a try 🙂
Such a beautiful backyard, I feel calm just reading about it!
Thank you for sharing.
What a dream garden. Lovely. Maybe you could turn your house into a B&B and spread the love???
Amazing!!! What a difference. Looks great, you should be proud of how it turned out.
Gorgeous! Money well spent!
It is so perfect. and making a garden that looks so effortless and whimsical and organic is surprisingly difficult and very hard work, so huge kudos to your landscaper! I really love the stone path, especially.
This is so beautiful! You and your family are very fortunate to be able to have a yard this amazing! You’re children will have the most amazing memories here with the castle and the swings and trees..ahh it’s all just so perfect.
LOVE your beautiful oasis Em! You’ve done a lovely job with your new English country house and I really enjoyed seeing all of the before and after shots of the house. It always amazes me how updating the windows gives the whole home/backyard a face lift!
Question…I’m having SO MUCH trouble with mosquitoes this year!?!?!? Do you have the same problem? Any suggestions from the interwebs is much appreciated. I’ve planted citronella bushes near the patio and have candles…I’m about to just succumb and start spraying myself with DEET if I can’t figure this out. Every time I step outside (even if it’s only for a few minutes) I get another bite! And they itch like crazy! ARGH!
Not sure where you’re located, but I just realized this year that you can hire lawn care companies (like Lawn America… not sure if they’re national or not) to come and fog your backyard ~once every 4 weeks or so. It’s not 100% perfect [maybe 95%? 🙂 ] but makes a HUGE difference in the number of mosquitoes. I highly recommend it!
Please, I beg of you, don’t let a lawn company or anyone else bring poison to your house to spray around everywhere. The honeybee is essential to the survival of human beings, and killing mosquitoes will kill the bees as well. Not to mention all of that poison in the air which is frightening. Just say no! Okay, so what do you do? Try and be mindful of standing water where the varmints can lay eggs. You can get mosquito dunks for bird baths and ponds – they won’t hurt anything but mosquito larva. They work. Go to Lowe’s and get some citronella torches and some refills of the citronella oil. I have several of these around my patio and they actually work to repel mosquitoes while burning. One more thing, try and attract some bats to your house by hanging up a bat house. A single bat can eat something like a jillion and a half mosquitoes per night. Good luck to you. I sympathize as I have mosquitoes too and they think I am delicious.
I use essential oil in citronella on my pulse/bite points. You may smell but it works and isn’t toxic. Also bat houses. They eat up to 1000 mosquitoes in an hour and they are not scary rather helpful ?
Obviously where you live matters a lot! I live in the same part of the country as Emily and can say that mosquitos aren’t a huge deal here. If you have standing water around (i.e. a bird bath or the like) then you might have a bigger problem locally, but generally speaking it’s just not that big of a thing for us. I’ve spent time in the Rockies in summer though and OHMYGOSH is it terrible (and I can’t even imagine the South).
A good temporary solution is an electric fan outside. Mosquitoes can’t fly in a light breeze. We keep one near for just this situation.
I’m a mosquito magnet. There could be 1000 people around but they will all gravitate to me. I found out about oil of lemon eucalyptus this year and so far it’s been magical! I haven’t received one bite while wearing it. It’s even recommended by the CDC as a DEET alternative which I really love. I’ve just been applying some on wrists and ankles when I go outside and then mixing it in with lavendar and water in bowls with some floating citrus pieces as centerpieces. So far it’s working like a dream! I got my bottle on amazon for around $8.
Going to try lemon of eucalyptus. Thanks for the tip.
Just a note on citronella candles. KEEP AWAY from children. We know a child who inhaled too closeto one and ended up in emergency with breathing problems. Happens more often than you would think apparently.
Have been using catnip oil with some success. An electic fan in the yard works wonders! There are many natural remedies better for us and the environment (and our bee friends). Mosquitos are pollinators, too, i believe.
Congrats on your magical fairy land. Its beautiful! As for the sap, I don’t think there’s much you can do. I’d just pop up an umbrella or string up one of those sail shades until it stops.
I think you got pretty good value. It’s a very pretty garden and you were sooo lucky to have mature trees – I just can’t tell you how lucky you are. I know they were butchered but it was probably for the best in the longer term. Gardening is very different from other forms of design where there is more control over the final outcome. In my experience, to a large extent gardens design themselves!
Great series of posts. Excellent content and beautiful pictures. Happy you shared about the trees. You are entitled to be sad/stressed about something without you or others feeling the need to minimize it in comparison to the world’s darkest problems. The feeling of stress or sadness is the same regardless of the source!
Thank you 🙂
So, so dreamy Emily! I’m curious about your choice of backyard storage for all of the kid-crap…. Where do you put it? Is my daughter the only one with hoards of balls, pool toys, and chalk stashed in an eye-sore container? What are your suggestions for squelching the ugly outdoor toy clutter? Thanks.
Ha. We have a basket in the castle and on in the pebble pit. It al turns to garbage eventually, right? But we try to at least corral it so it doesn’t look like garbage strewn across my dream backyard 🙂
So beautiful!! I have a really fun logistical question–speaking of animals using the pebble pit as a bathroom… do you guys find that bird droppings are a problem with all your tall beautiful trees? We’ve had the same good luck to just move into a house with a few old growth trees and ahhh THE BIRDS. It’s a real downer when you’re outside trying to just chill while your kid plays and splat, splat, splats are happening all over the place.
You really hit this one out of the park- SO GORGEOUS!
thank you 🙂
Ah, this is stunning! So organic and lush! Looks like it has always been this way. I would love to spend afternoon there sipping lemonade and enjoying the beautiful space.
This is a gd DREAM! Seriously can’t stop staring. Looks so inviting and amazing!
Beautiful job Emily! Love your backyard. I have to say…when your adorable children are in the photos I almost forget what I am supposed to be looking at because I love seeing their cuteness….thanks for sharing your wonderful designs and family with all of us. Hope you have a fabulous weekend and that your adventure in Tahoe was the best!
I have to say it’s refreshing that you didn’t replace the swing set! It looks solid and functional, though admittedly not gorgeous. I would have absolutely kept it myself. But I’d love hear your reasoning behind keeping it, since you seemed to have gone out of your way to redo anything not portfolio ready in this house.
It is. its like SUPER industrial and brian wanted to get rid of it for months, but every day we sat on it and he starting coming around realizing that everybody loves swings – even grown ups. And why replace them with a less strong version? We all love them now.
This looks amazing!!! I love the meandering path and this has totally inspired me to bring some of my perimeter plantings in towards the middle of my tiny yard more.
Beautiful. It looks like it has been there for years. I love the plant choices and the trees are looking good. Everything mixes so well with the kid zones and your eyes are just drawn to the beauty of the space.
Other than a few spelling/grammar errors (a great indication you are enjoying your break) a lovely post on a lovely backyard. My favorite pics: Charlie climbing the tree!
Ha. whoops. Not surprised 🙂 thanks!
It turned out so lovely. It looks so established for such a recent makeover. I love it!
Random question about the extra rocks you don’t need… Can’t you take them back and get your money back?
Our local stone yards make you pay by the weight, and when you have excess you just return it and they weigh it to figure out how much money you get back. We’ve never had any trouble returning them. I just feel like that is free $$$ piled in your back corner!
Beautiful! What a dreamy space to spend your free time. Regarding your power line – it’s probably not the city, but your power and communications companies, depending who owns the easement. Undergrounding the lines is expensive, and unless there’s a public project along the line that could require the utilities relocate to underground, or the power/comms companies experience enough outages due to weather, etc, that it becomes financially beneficial for them to do the work. It’s a big project, and requires a lot of coordination with multiple companies. It’s not impossible, but it’s not for the faint of heart to tackle! If you have enough neighbors who would also be interested in undergrounding the lines, that can also sway the companies to relocate the lines.
This is truly gorgeous. I want to hang out there all the time. My only thing is that I would check with an HVAC person about the jasmine around the AC units. It looks awfully close, and as it spreads, it could choke them, which will greatly reduce their efficiency and life span. It could just be that the photos make the plants look closer than they are, but if not, it’s something worth considering. (Also worth considering: If you need work done on the units, the plants will likely get destroyed.)
Absolutely stunning and tranquil. Just looking at the pictures made me feel relaxed. Thank you for the wonderful ideas!
Good point on the HVAC. I just had an AC guy tell me to hose down my unit for dust and dirt to run more efficiently. I told him I already cleaned out the leaves from inside. When he hosed it down, I couldn’t believe the dirt that it sucked up. He said that I could blow out my unit if it is straining to run. Might be worth a check to see if you need to have the AC unit vents clear.
I put a bench in front of my A/C unit to hide them. The bench, with its back, visually blocks most of the A/C unit but also allows decent air flow around the units.
Agree on the beauty of this project and also on the AC unit. My AC guy said to keep my AC working at it’s most efficient all plants should be 18 to 24 inches away from the unit. Never touching it. At best if they have to work on your unit they will teat out the plants and at worst it could seriously affect the efficiency of your unit. A lot of $$$$. But it IS gorgeous!!
Im so relieved to see that your trees are looking fuller … I completely identified with your heartache over your butchered trees. When I was growing up there was a big old tree in our backyard that had some kind of arborial-illness and my mom was so upset that it had to be taken down… So didn’t think you were crazy at all.
Your backyard is pure perfection. And little Birdie’s dr. seuss pigtails are the cutest!
Thanks for covering your yard. I’m currently updating my landscaping and would love to see more examples. I live in Nashville and want the SoCal look. Currently, I have a desert like theme going. A few landscaping posts would really be appreciated. I’ve been looking at other sites, but none have that EHD flair. Thanks!
Next get a pool! Makes LA childhood extra dreamy. Best $$ we ever spent ; )
This is just beautiful! What a great design. I love English country gardens and you achieved a great effect in a small space! My only little quibbles as a garden fanatic myself would be that the path leading down to the stone patio on the left (looking into the yard) would look more like a path and less like border edging if you made it wider. As you can see the plants are already starting to spill over, an effect you probably want (I would), but your 18″ quickly gets taken over. Plus I think it would look more balanced. I’d also dig in the big boulders (especially the one by the bench) so they sit deeper in the ground and look more natural, rather than like they were plopped in. But the design and plant choice are fantastic! And I’m very happy to see that your “butchered” trees came back so well! What a relief. I would not add vines to your patio railing. Your before/after shot of that area reinforced it for me. It’s lovely to see the seating area through the railing when you look back at the house, instead of a wall of green. Invites you… Read more »
I totally agree with your constructive feedback and appreciate how thoughtfully you offered it. I too thought the path looked more border than path and love the open railing. Thanks for being kind in the way you offered your thoughts.
Absolutely agree on the railing climber! In addition, we had one all around our yard growing up and viney plants tend to be difficult to manage, especially with some much else around, I would worry about them starting to strangle some of the other plants. Also, bugs, spiders, and lizards love them and while that’s an inherent part of the outdoors you may not want to encourage colonies so close to your eating/relaxing/entertaining area.
I had the same feeling about the path/ border. Otherwise it’s such a beautiful beautiful garden. And I really love that you kept the old swing.
SO AMAZINGGGGGGGGGGGG
Gorgeous! One question–How will HVAC guys access your AC units when the plants surrounding r full grown? (We have that prob here and they always give me such grief!)
I just accept the occasional grief from utility and service men. Only affects me a day or two a year at most and so I have 363+ days a year to enjoy a nice view instead of catering to people who do not live in my house! Lol. Most vines are hardy enough they can be yanked and pulled aside when need be and still survive.
A big investment, yes, but worth it in California where you can use it 12 months out of the year. And worth it for the type of lifestyle you have-young children, casual entertaining. When I design for clients, I always ask “where am I? who lives here? what is the purpose of this space?” A large yard in California for a young family is an appropriate place to spend a large chunk of change.
Sidenote: I guess citrus trees wouldn’t work with the aesthetic, but I love the idea of being able have edible plants in the yard. Surprised you didn’t go that route.
i am obsessed with it! we’ve been doing a front yard reno for 10 months (OMG) and after we put our last water wise plugs in and let the “yard” grow in, i’m moving onto the backyard to make it as play friendly for the kids as you have! CA backyards can be the best! and i would have been surprised at the cost last year, but now i know how much landscaping can be and i say you did an AMAZING job for the price.
The garden is so beautiful, and it’s inspiring us to start working on our place. It’s English garden but looks modern, livable for a family. I noticed that the swing set is original but like how streamlined it is. Would you know where it’s from?
It’s beautiful! Can you share how much maintenance costs? I assume you would use a landscape service rather than try to keep it all going yourselves.
Yes, please share! I get overwhelmed trying to keep up with the landscaping we have year after year (pruning, planting, mowing, mulching, raking, watering, weeding!), and ours is much less than yours. Do you use a gardener, or did you purposely select low maintenance plants that will require little attention? Or maybe because of the difference in California and midwest seasons there just isn’t the same amount of work involved?
All gardens require maintenance…it doesn’t matter which zone you live in. I am a seasoned home gardener myself and hire out as well as do a ton myself. I am guessing the Henderson’s are spending $1K/month for maintenance…more when they have projects like pruning. I also live on the West coast.
Looks fantastic. The trees already look much better!
lovely vibe, such happy faces
would suggest 36 inches as a pathway, 18 to 24 feels narrow especially plants get bushier
how about a trellis type fence with removable panels around AC condensers, for ease of service and to keep plant and pets away (cousin’s dog favorite pee spot was by/on the condenser), the damage was so bad they had to replace the thing, warantee was invalidated
not super familiar with your climate…
clematis is a beautiful and delicate climber.
trumpet vine a bold (aggressive) one, has orange or yellow blooms
Also would have loved lemon trees (are they thorny?) or avocado trees
I love it, it’s beautiful. Worth every penny you spent. Congrats!
So lovely! I have couple questions/comments:
1. Regarding sap, like someone else mentioned, you’re only real option would be to put up some sort of canopy, which really could be gorgeous done right
2. The swing set, I saw you replaced the bar and rings with a bucket seat, obviously makes perfect sense for your kids ages, but as they get old please consider adding on back. That was one of my favorite things in our yard growing up and is great for upper body strength, dexterity, and reasonable risk taking (hanging from your knees, etc)
3. Do you have a gardener/garden company? Or do you care for it all yourself?
4. Did any sort of small vegetable garden end up taking shape? I know it was frequently mentioned, but not sure if I saw it in the post.
Gorgeous yard! You are lucky indeed!
Are spiders a problem? How do you keep them away from all of your zones, rocks, furniture, lanterns??
Really love how it looks timeless already. There will be some plants that need to be divided every year and pretty soon you will have an aha moment…”oh this is what a nursery does!” We often have a dozen or more plants that look just like they are fresh from the nursery on our street with a “free to a good home” sign on them. Our garden now is all about thinning out and scaling back so it doesn’t look like an overgrown jungle. Our neighbors scoop up the plants within hours! Once that castle gets weathered to silver, it will recede into the background as it should. I’m glad you kept the industrial swing set. It really suits the house and garden! Kudos to you and Brian and Pete!
This is clearly a case of “when life gives you lemons, make lemonade!” Now, if only you had lemon trees the reference would be more meaningful. Love it! Gorgeous! Magical! I haven’t read the process post yet, but did you put in an irrigation system?
It looks great, and I’m surprised at how inexpensive the cost was. Not that it isn’t a lot of money, but I got a rough quote from a few companies on just a FRONT YARD plan and most of them said it would be around $70k. I was truly shocked. Needless to say, we didn’t do anything. And I feel like L.A. is a much more expensive area than I live in (Austin, TX). Send your landscaping guy over here!
Your new outdoor space is absolutely gorgeous! I am wondering about the cat poo situation, and this may be a totally stupid suggestion because I don’t know much about cats (I am more of a dog person) but what if you put a litter box outside for them to use? Would they use it instead of the space underneath the castle? Kind of like a diversionary tactic…
OMG it looks SOOOO GOOD!!! I was very worried about the trees but they’re not even that bad now! Not HUGE and shady but totally adequate and you cannot even tell they were once butchered the way they were! So envious of your yard!
I cannot get over the gorgesousness of this transformation. I moved into a little post war brick house two years agao and the landscaping needs so much help. There isn’t even a walkway to our front door! Any advice on matching lanscaping to the style of your house? For example, I can’t imagine using brick pavers to make a path around our brick house but I’m not sure what else I would use. I love the bluestone you used here but would that clash with the style of my house? I agree with the above comments about wanting more landscaping posts! We’re working hard on the inside of our house but we have to drive up to the outside every day and having it looks so overgrown and messy makes us sad.
I had no idea you had a guest room! Haha
Love love your backyard! So dreamy. I agree with another commentor – well worth the money considering the added square footage!
That’s what I was going to say, no idea there was a guest room!! How did we miss that?
What a lovely space!! Question for you, did you do or do you plan on adding any drama thru hardwired landscape lighting? Your trees would be heavenly uplit and glowing at night along with hits of light sprinkled in beds.
From a northern gardener, Ottawa, Canada……I am so jealous of your 4 season gardening season. I loved reading the three part series, and feel your pain about losing trees, but the end result is spectacular! Well done!
I was just thinking the same thing! So wish we had that kind of growing season in Iowa where I am because then my brand new wide open 1/2 acre yard would look lush already 🙂 However, I am loving this English garden meandering look and think I’ll have to use some as inspiration!