Makeovers
A DIY Dining Room Reveal: How Chrissy & Pete Built This Show-Stopping, Built-In Bookcase
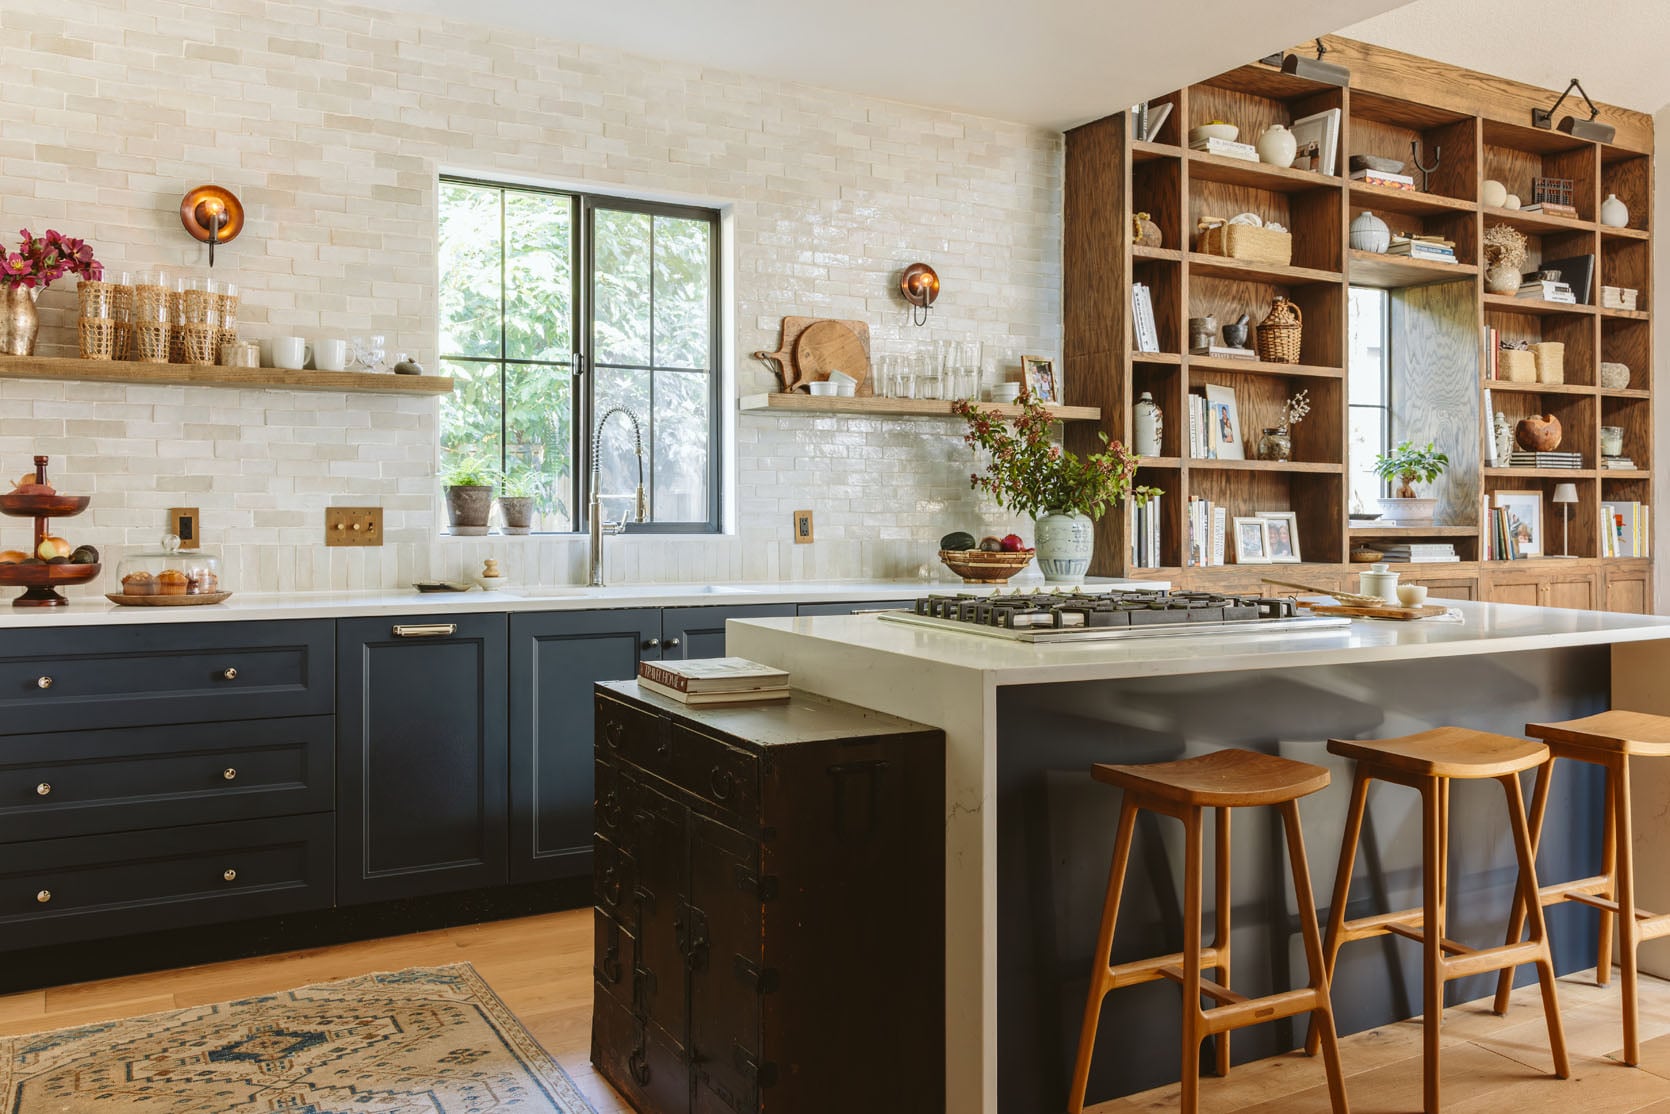
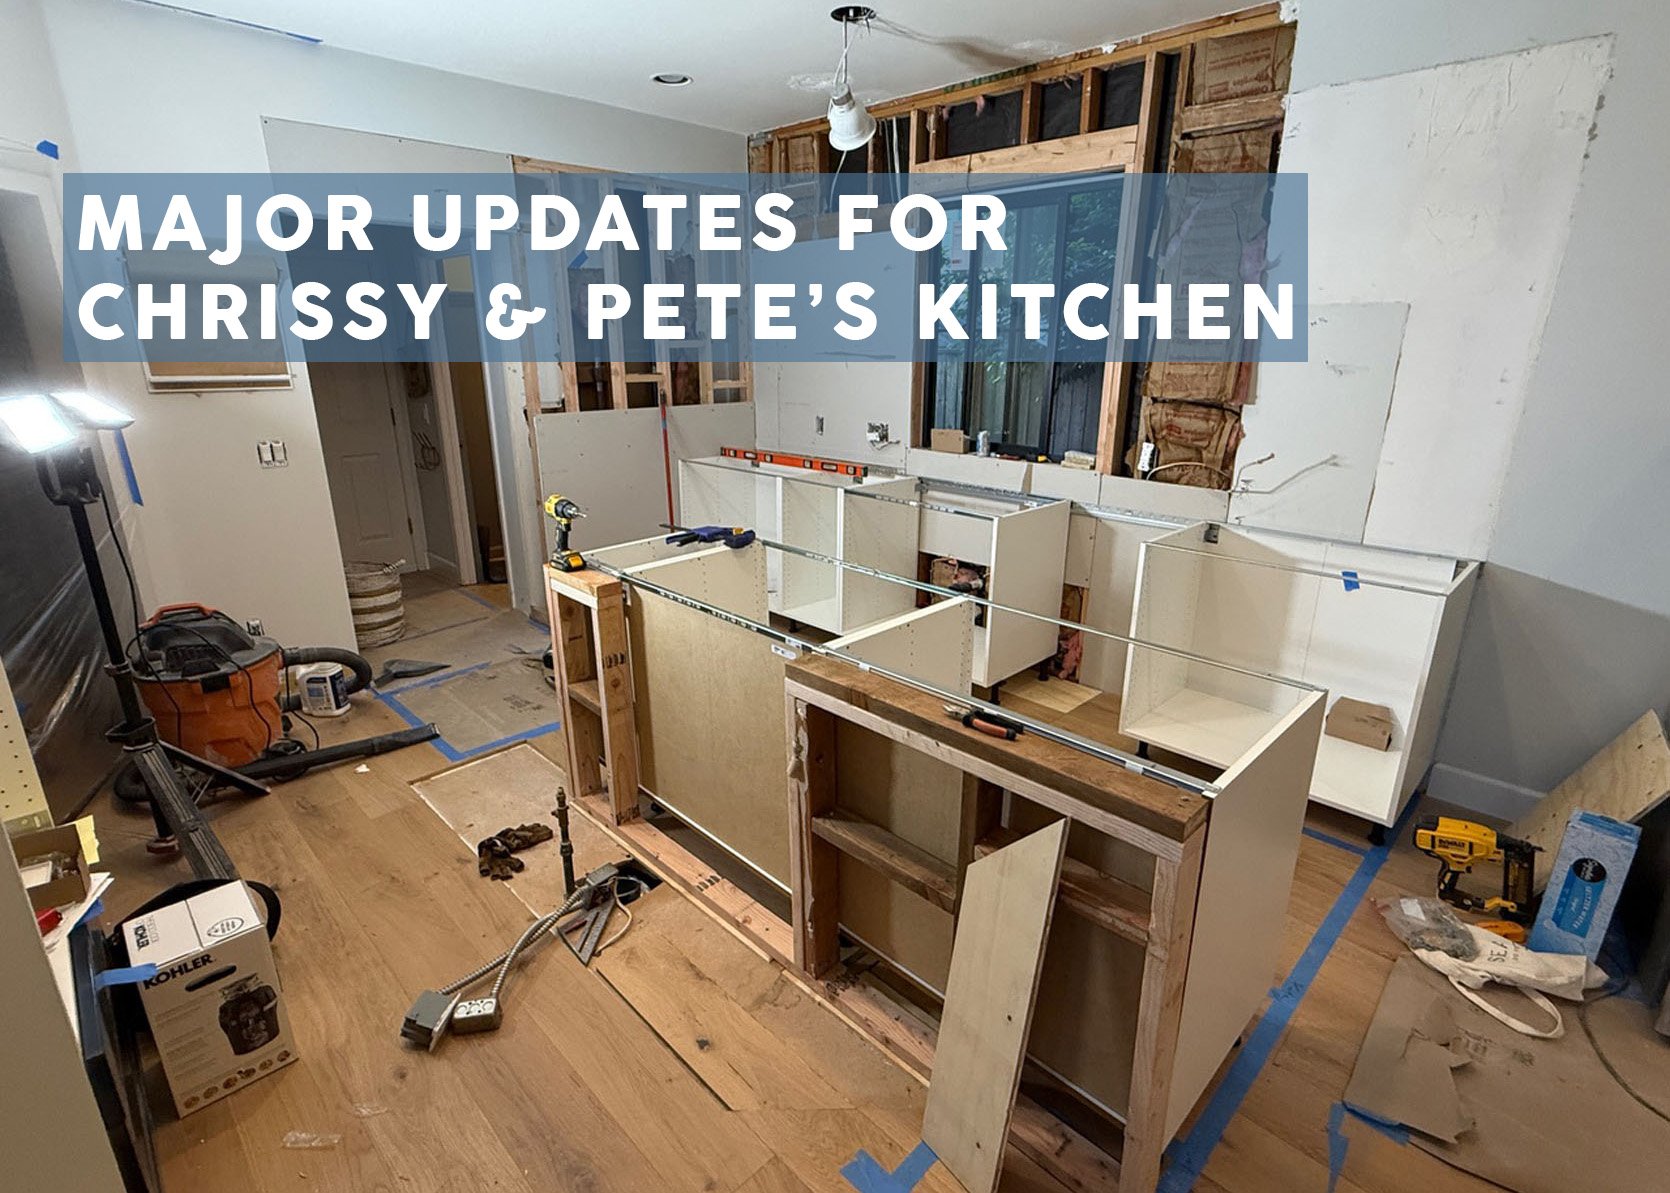
Last week, we shared our first Design Coaching clients’ kitchen reveal (if you missed it, you can catch up here). Homeowners, Chrissy and Peter, expertly DIY’d a brand new kitchen using IKEA cabinets as their jumping-off point. It was an incredible transformation, and if you saw the reveal photos, I’m sure you also caught a glimpse of the brand new built-in bookcase to the right of their kitchen. Well, we felt this bookcase warranted a dedicated post, and Chrissy and Pete were kind enough to break down some of the mechanics for us. The addition of this wood feature wall made SUCH a difference to the space. I mean, just look at this before and after…
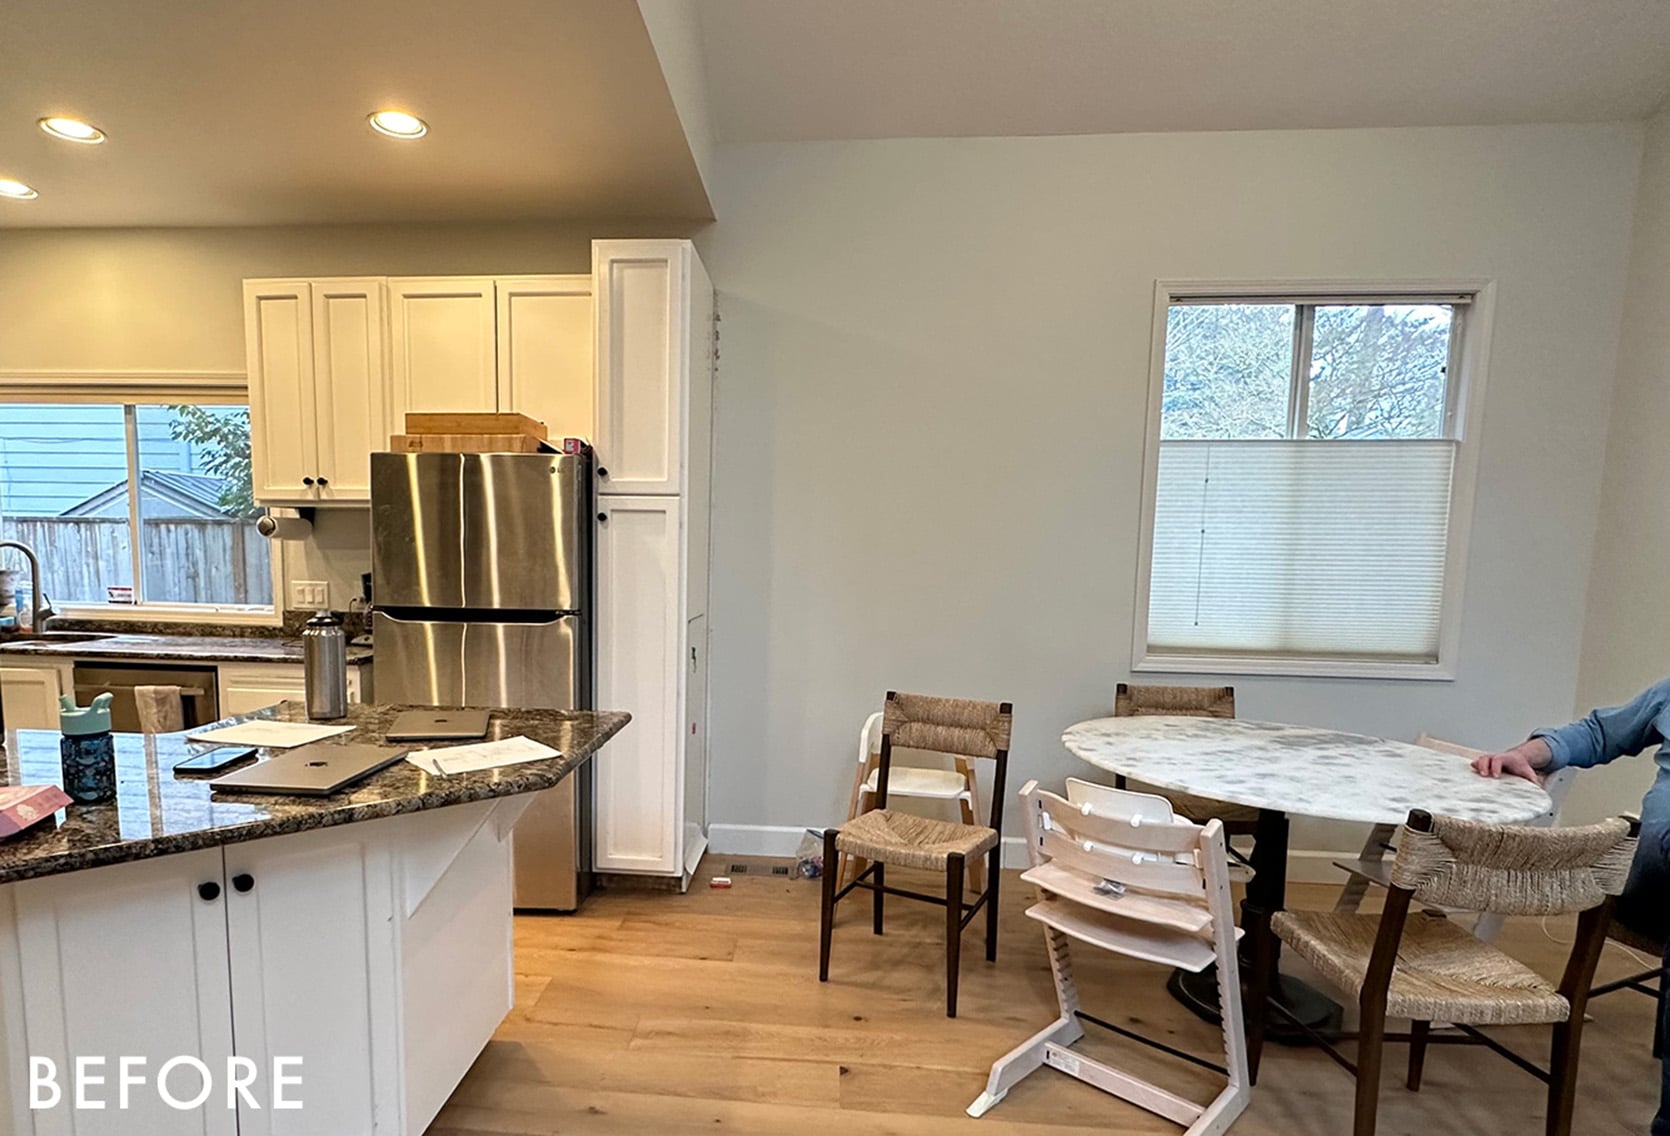
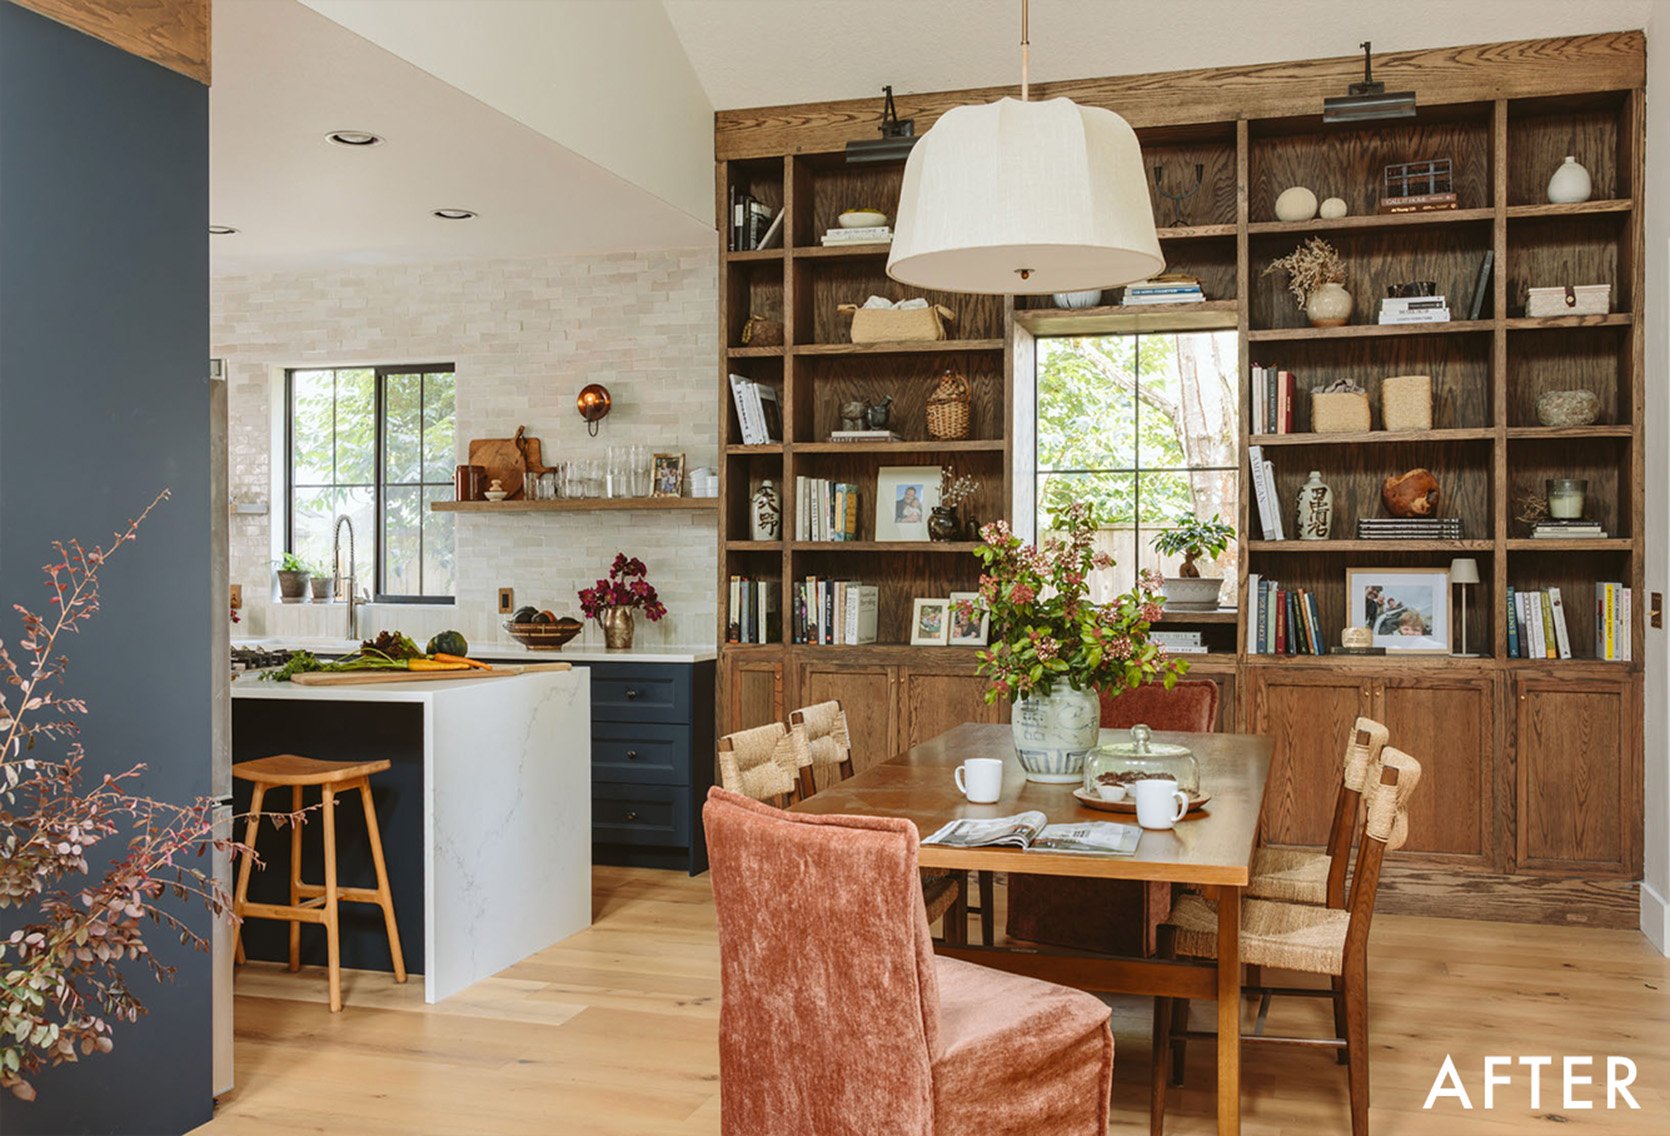
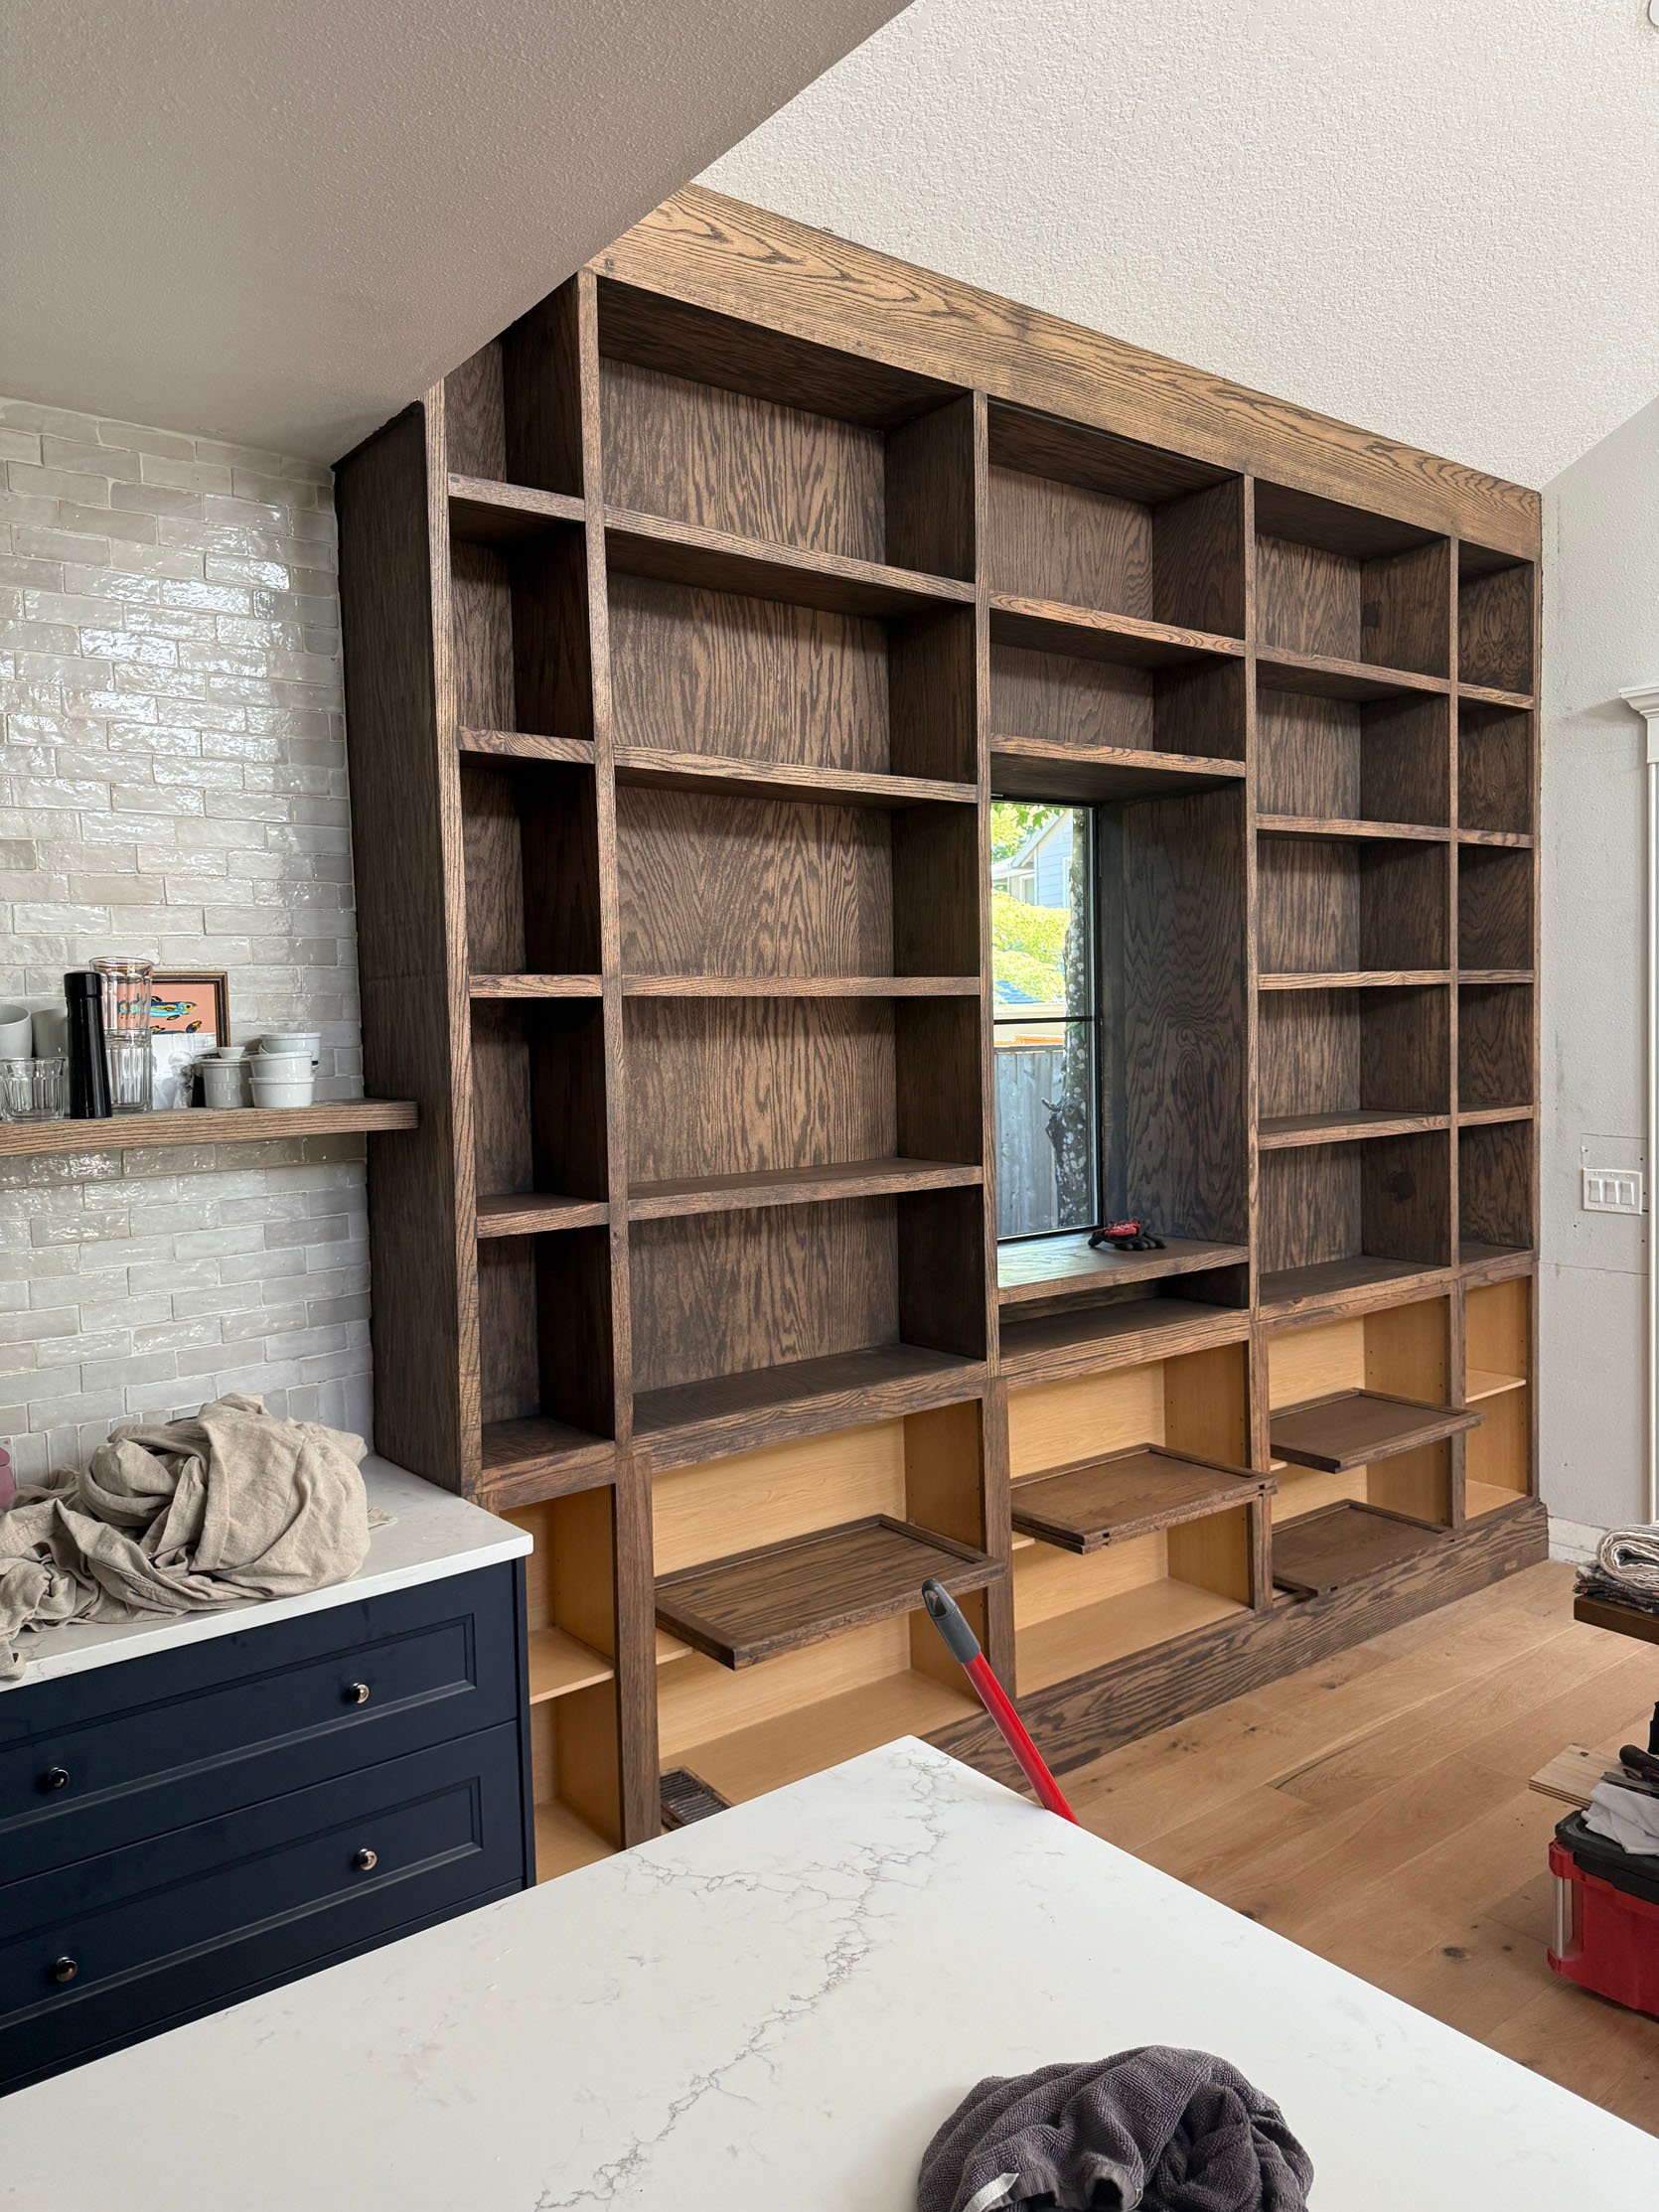
Before, their kitchen and dining areas were drab to say the least. The window sat off-center, and the difference between ceiling heights felt harsh. By swapping and centering the window, then adding a built-in surround, they not only maximized their storage but created a stunning focal point. One that served the overall design in a number of ways. Connecting it to the kitchen cabinets created a great visual stopping point for the tiled wall. And because the bookcase extends past the kitchen’s dropped ceiling, it makes the height difference between the two now feel intentional. Each space somehow feels bigger because of this, but by also bringing in the same wood tone to small elements of the kitchen design, the two areas feel thoughtful and connected.
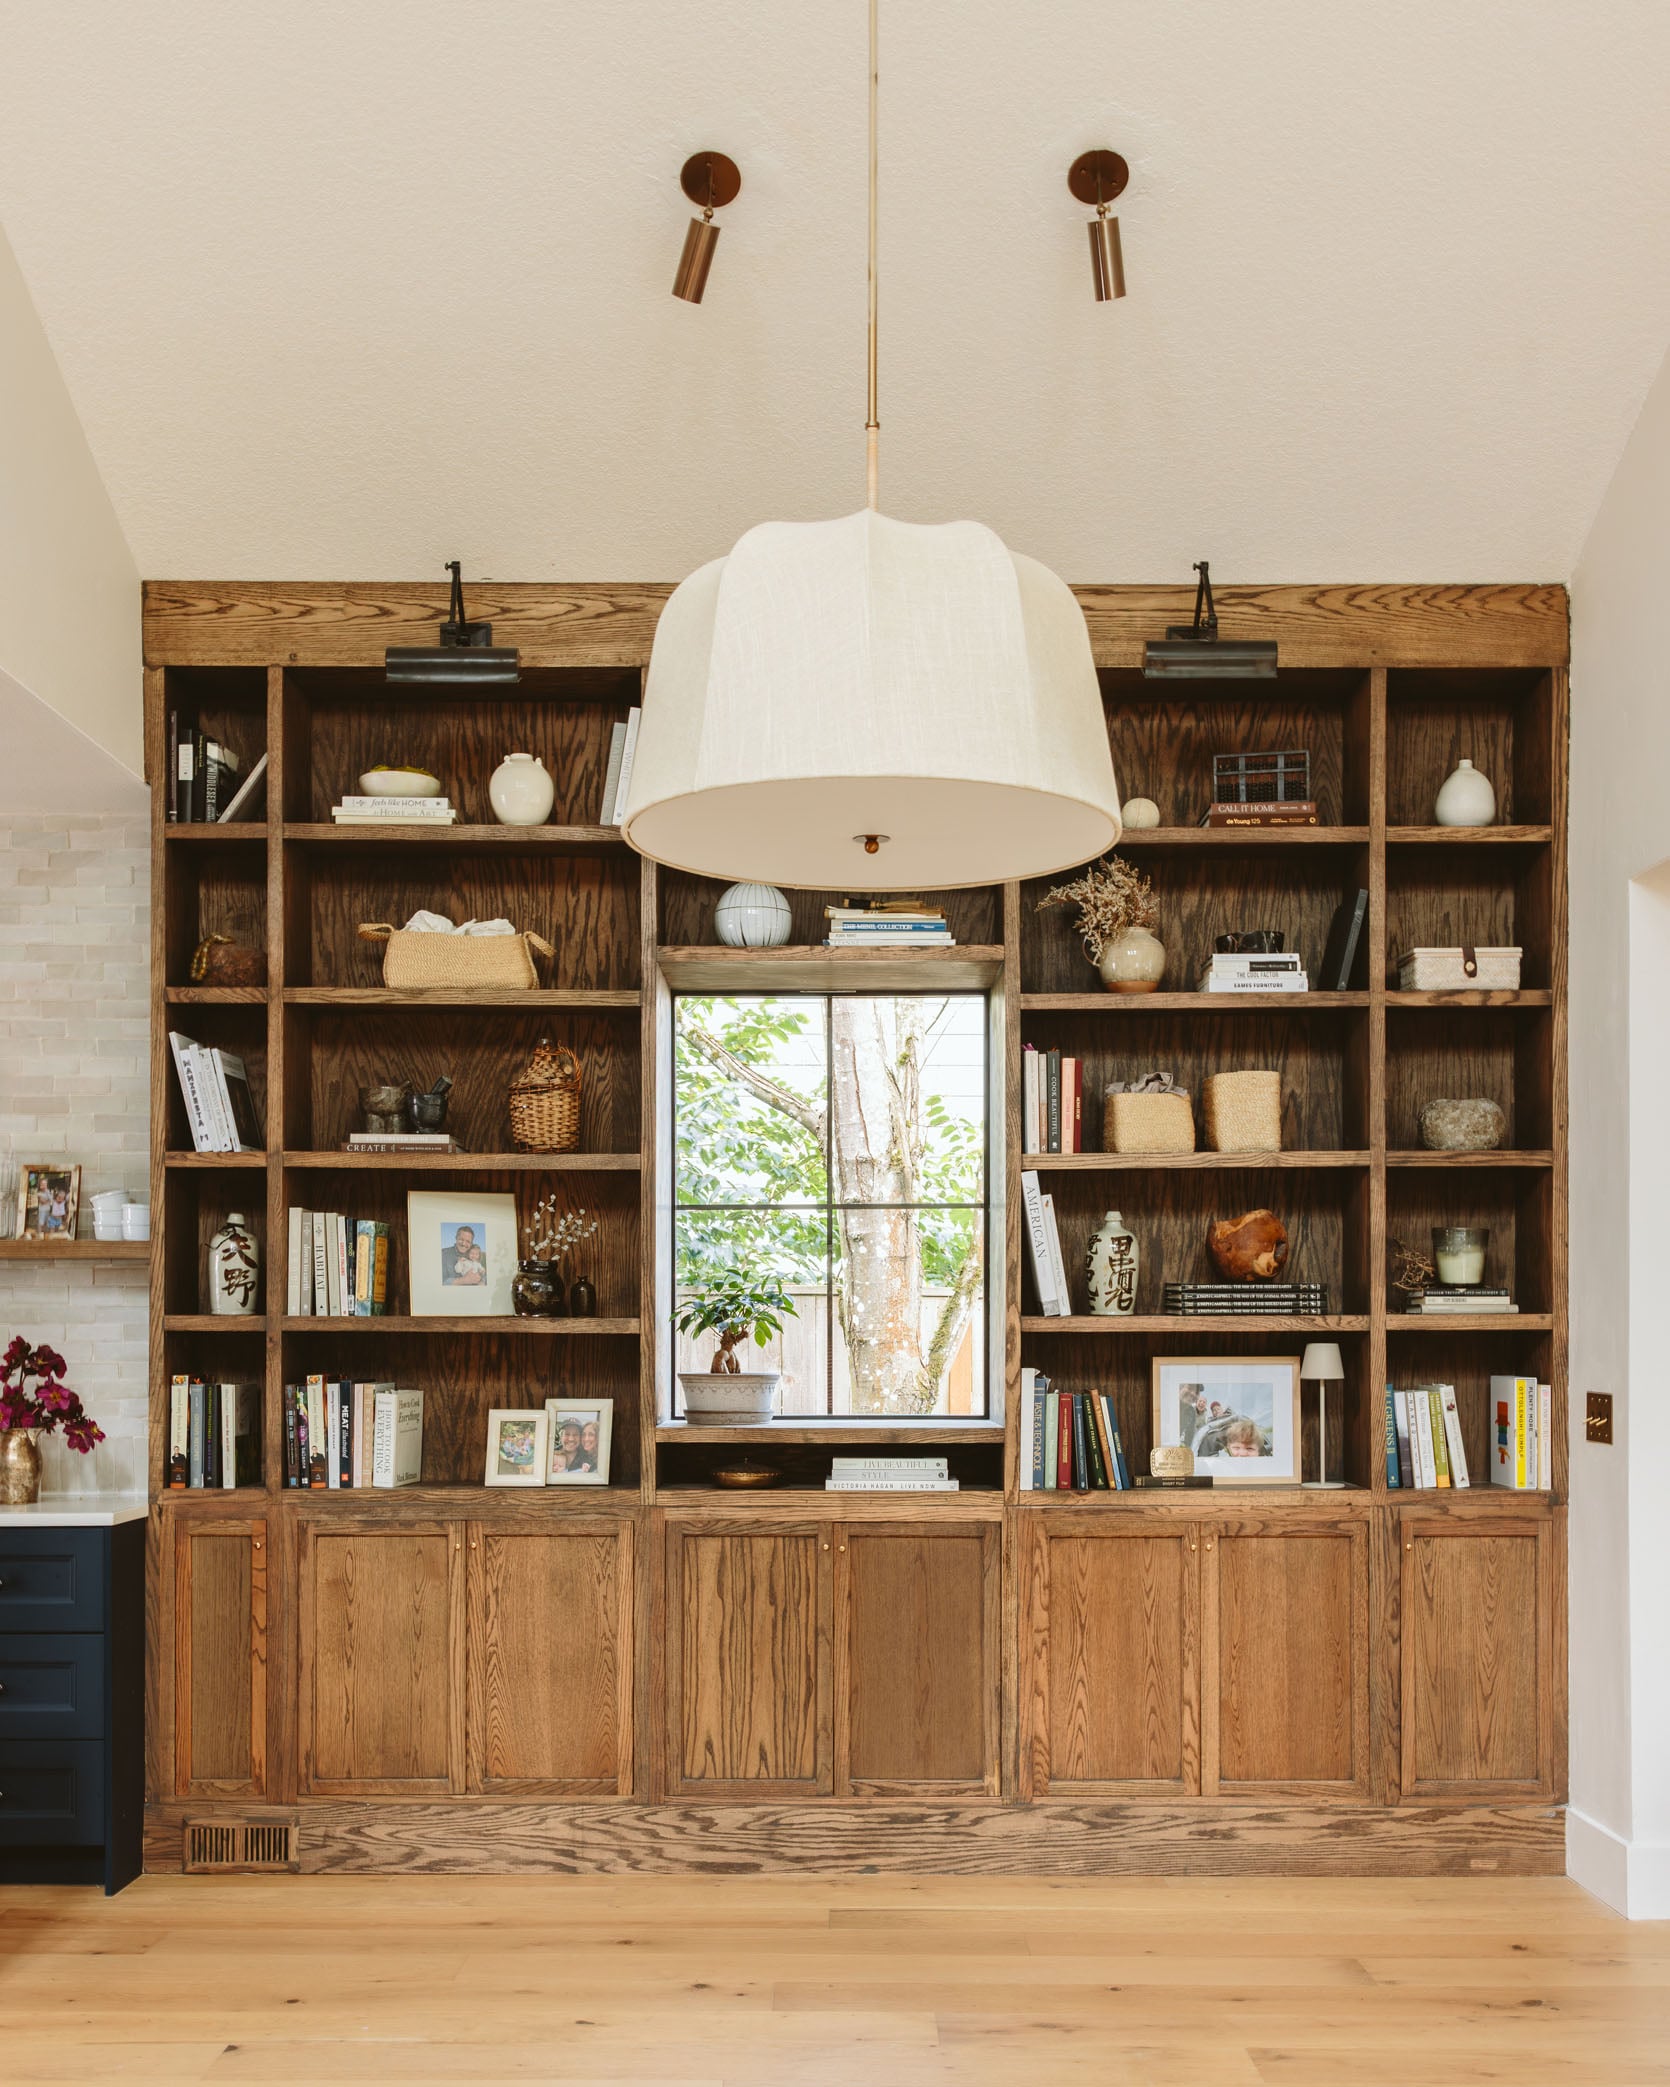
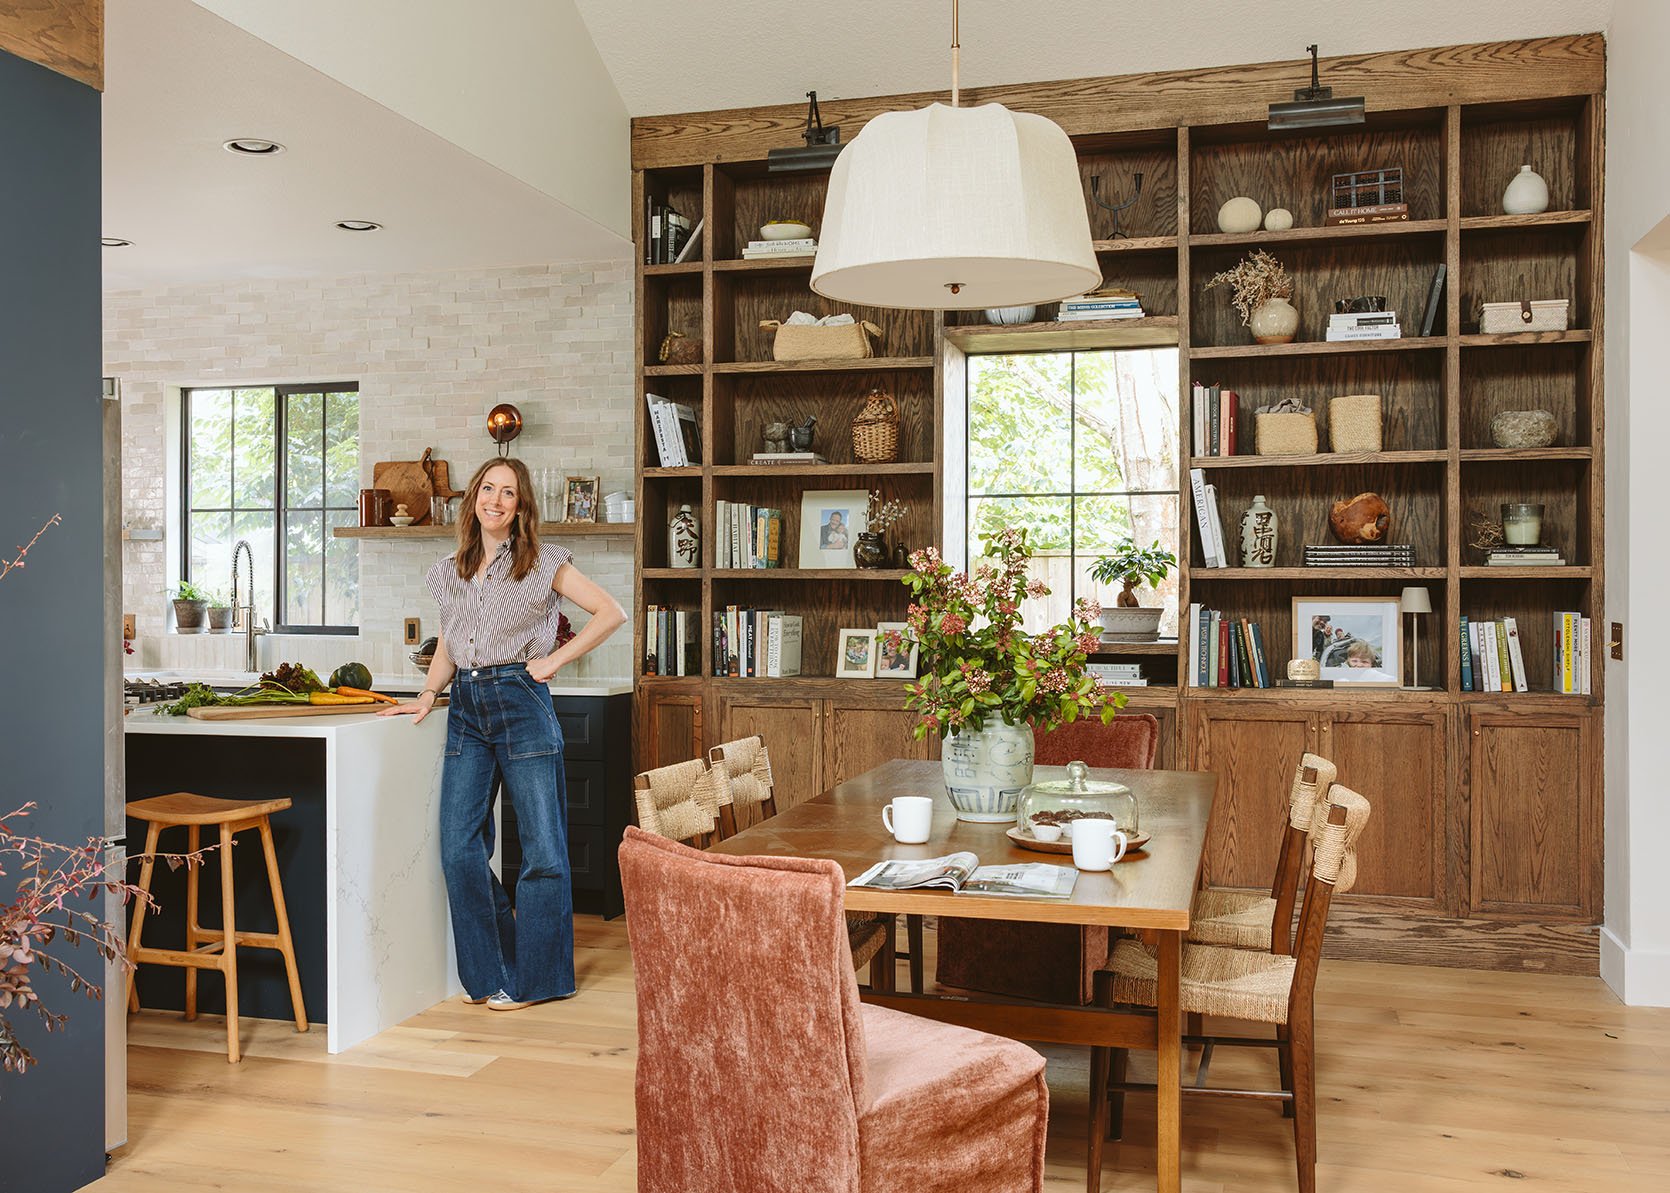
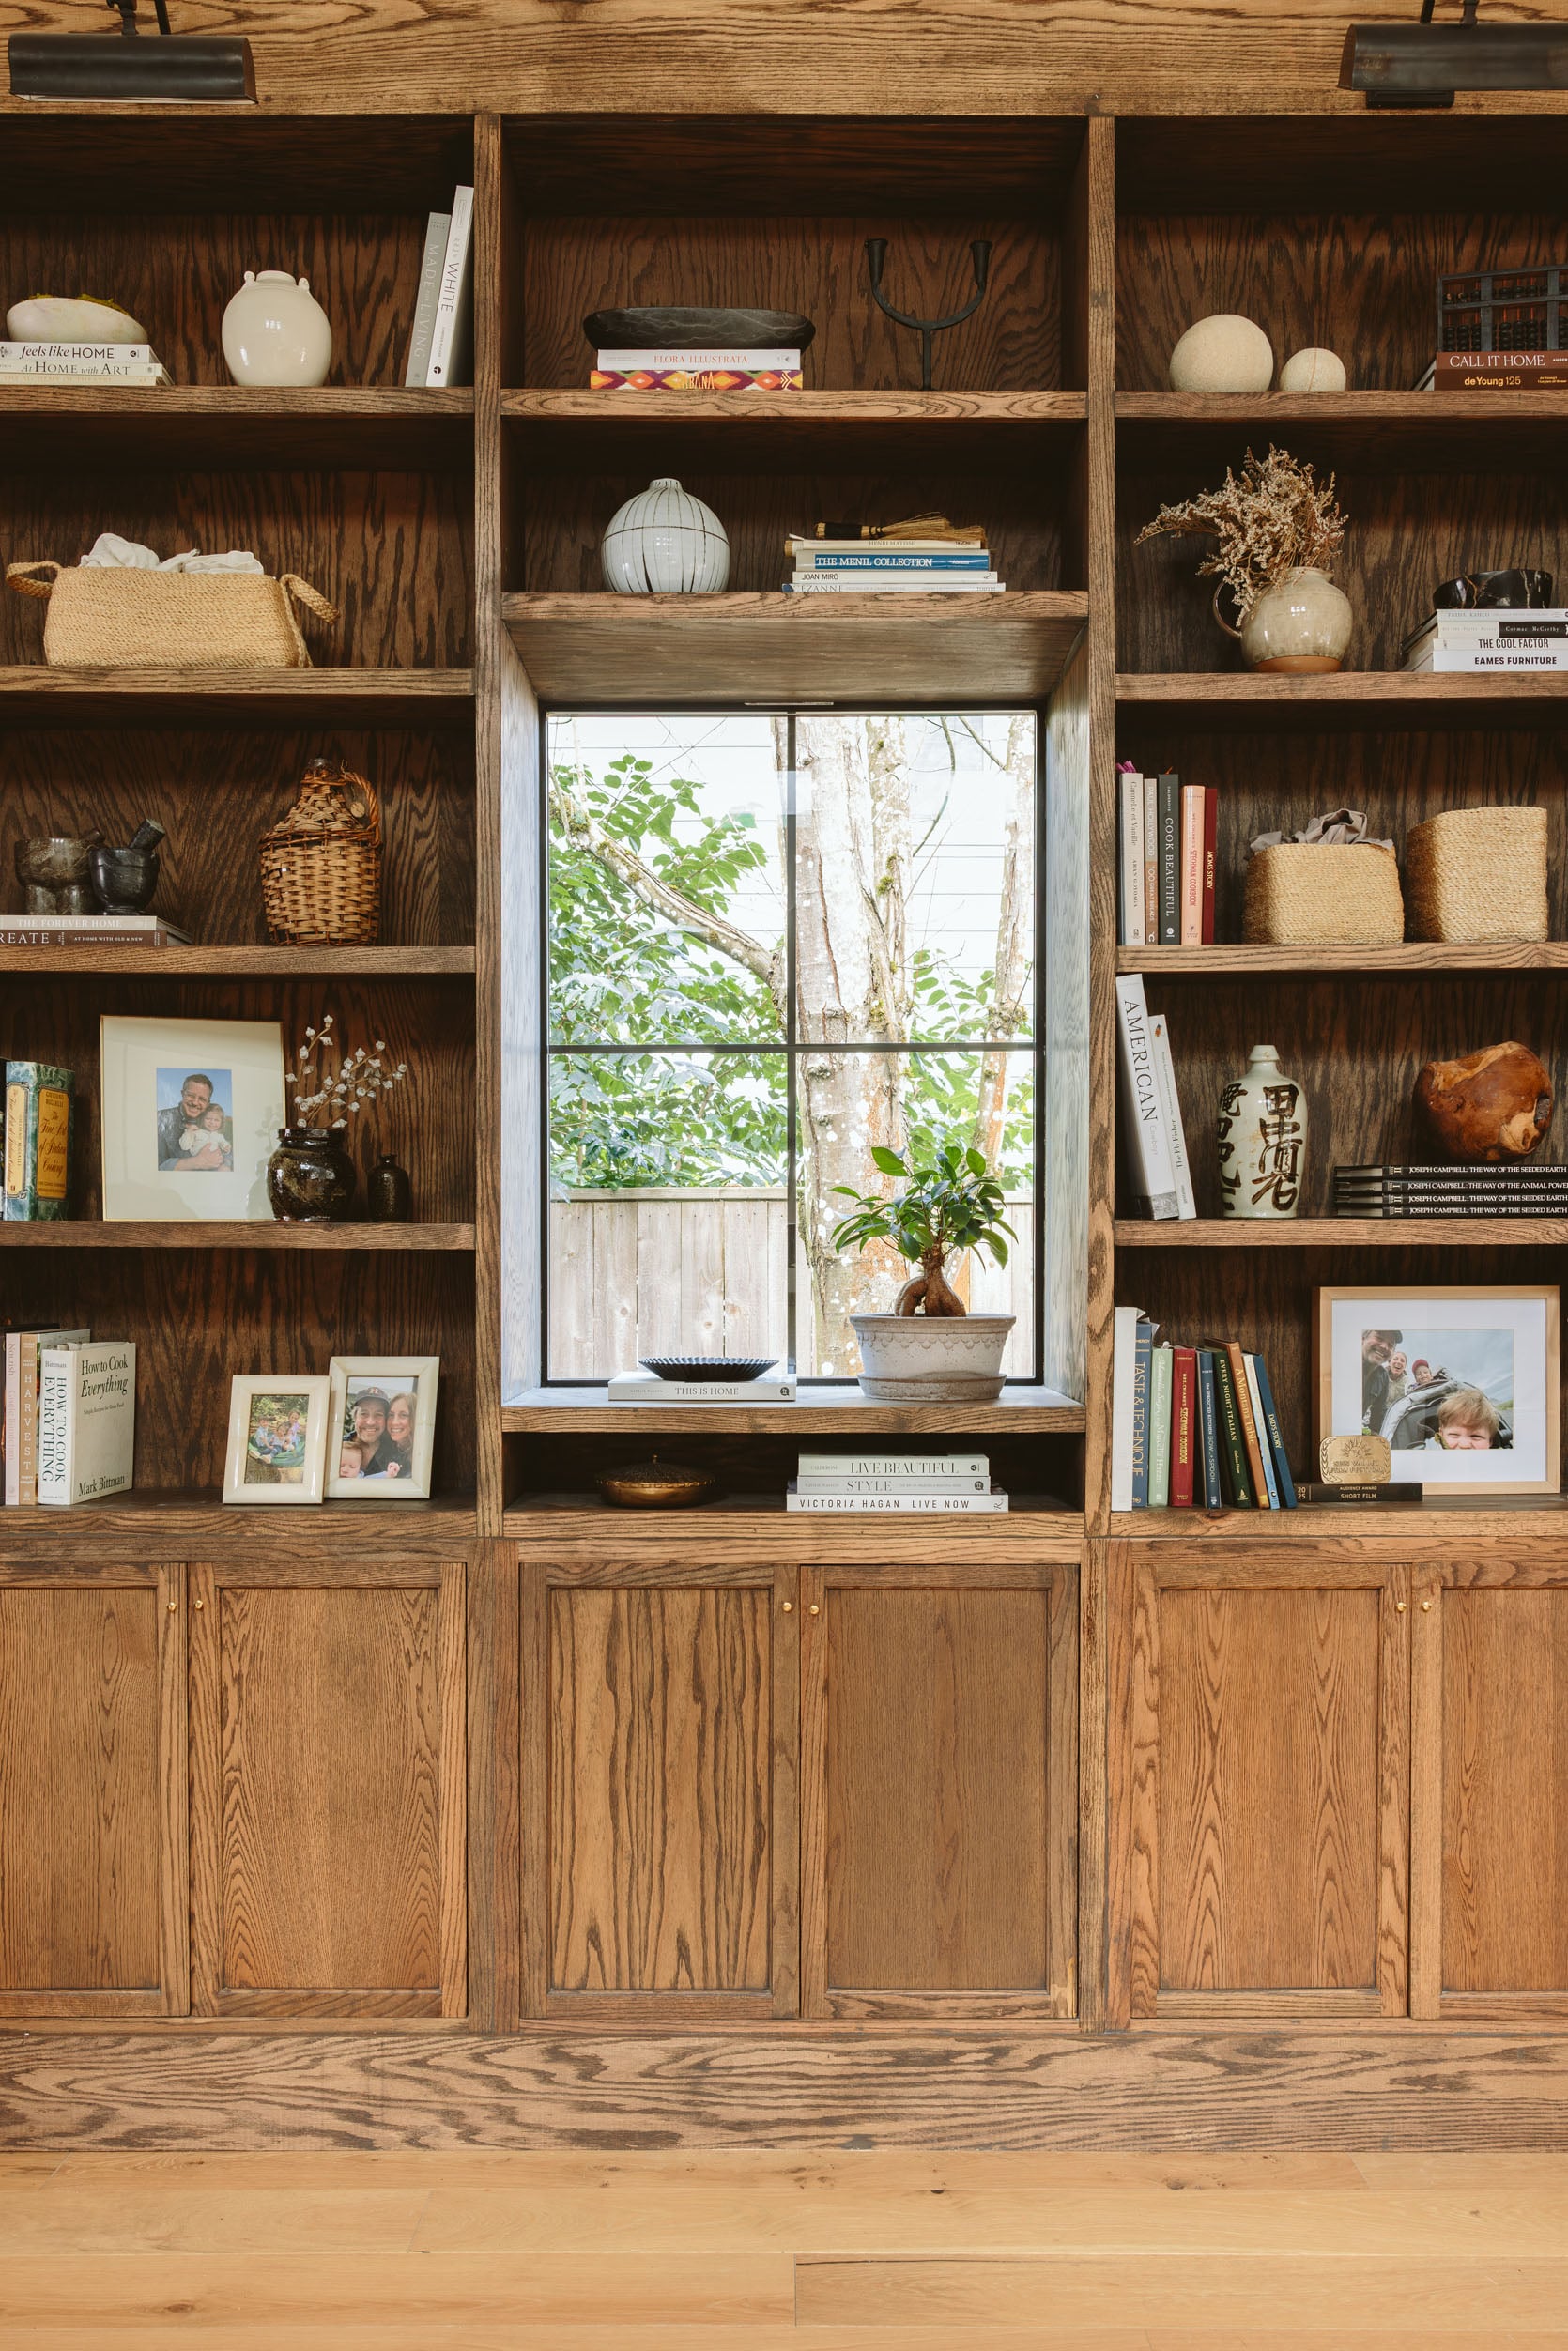
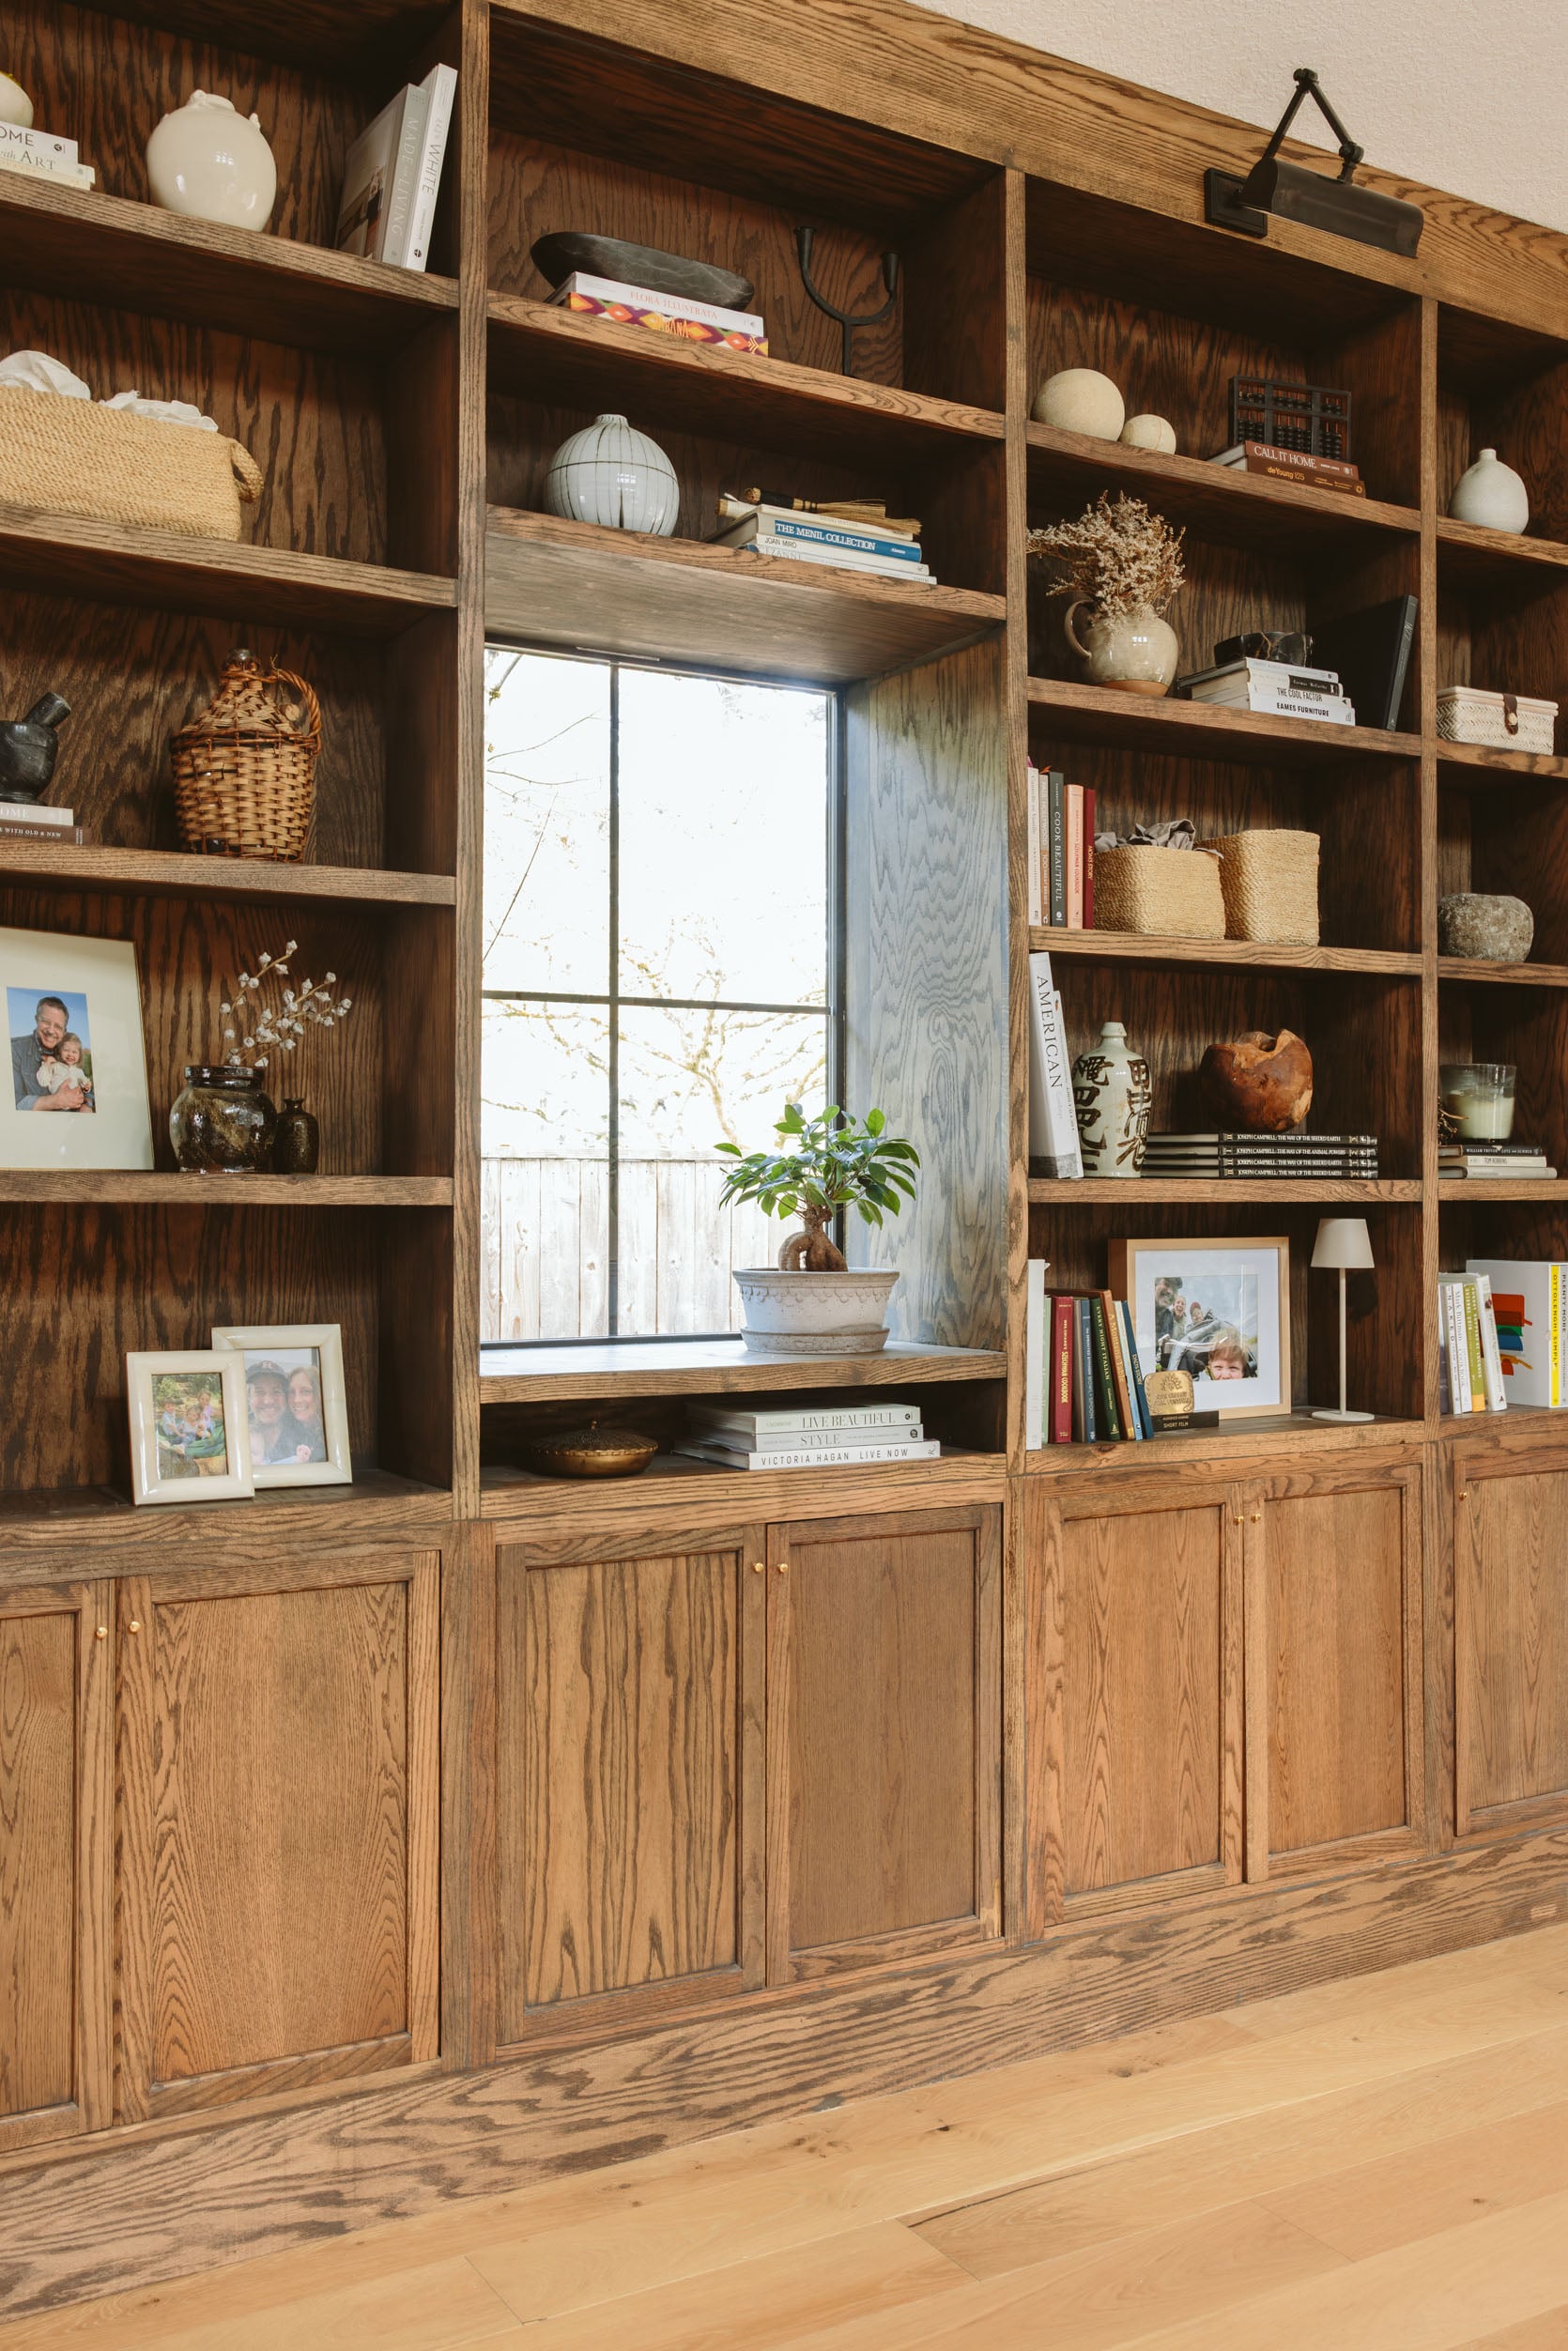
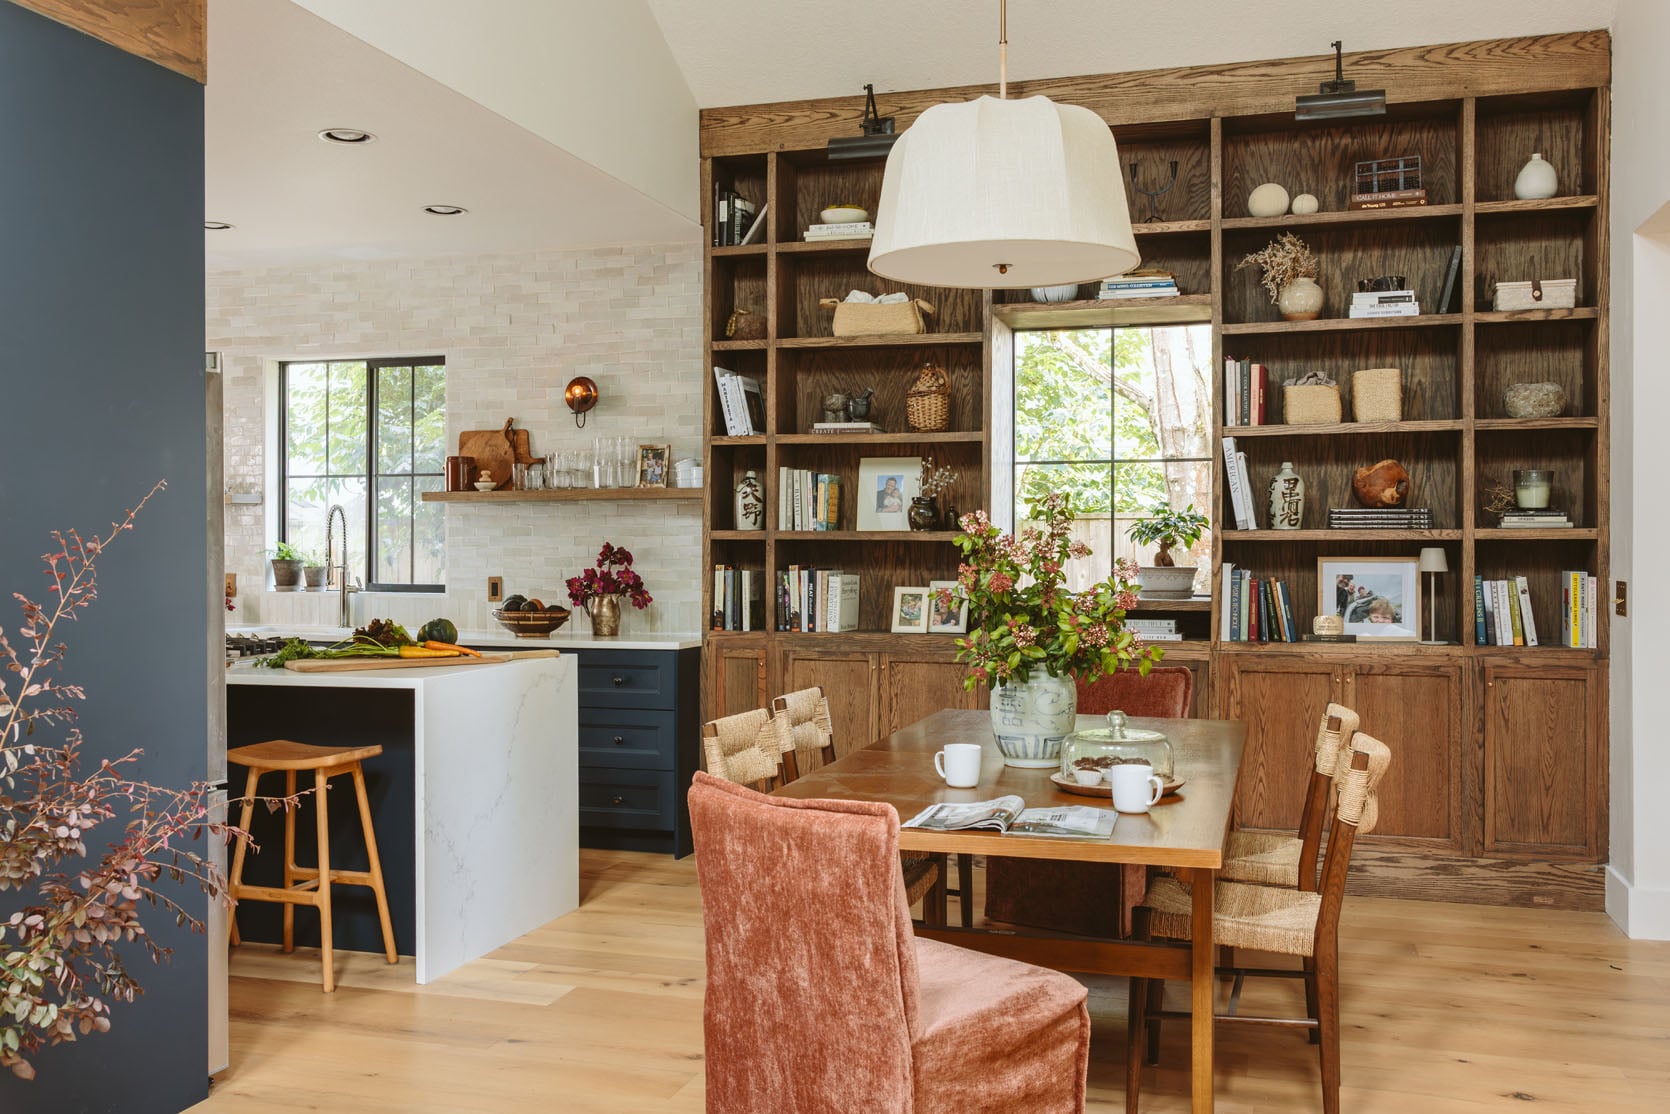
The bookcase in all its glory! We pulled the dining set out to really give it a moment. It turned out so good, and seeing it in person, Em, Marlee, and I were all wildly impressed that this was something they (yet again) tackled themselves. But just how did they do it?
You guys really seemed to like the interview style from last time, so I pestered Pete and Chrissy once more with questions about this build, and they graciously came through with answers – despite all having the flu! Rockstars, these two. So keep reading for a half-reveal, half-behind-the-scenes process post to see just how they accomplished this, should you feel like giving DIY a try yourself 🙂
What was your jumping-off point with this project?
Chrissy drew what she wanted with measurements, including bookcase depth, and we went from there! Because she wanted cabinet doors on the bottom, we figured out a way to “hack it,” so to speak. Since I’ve never built cabinet boxes before, I felt like that was the better move. We had fun together hunting around Portland for the right wood and stain we wanted. From there, I went to work, cutting, assembling, etc.
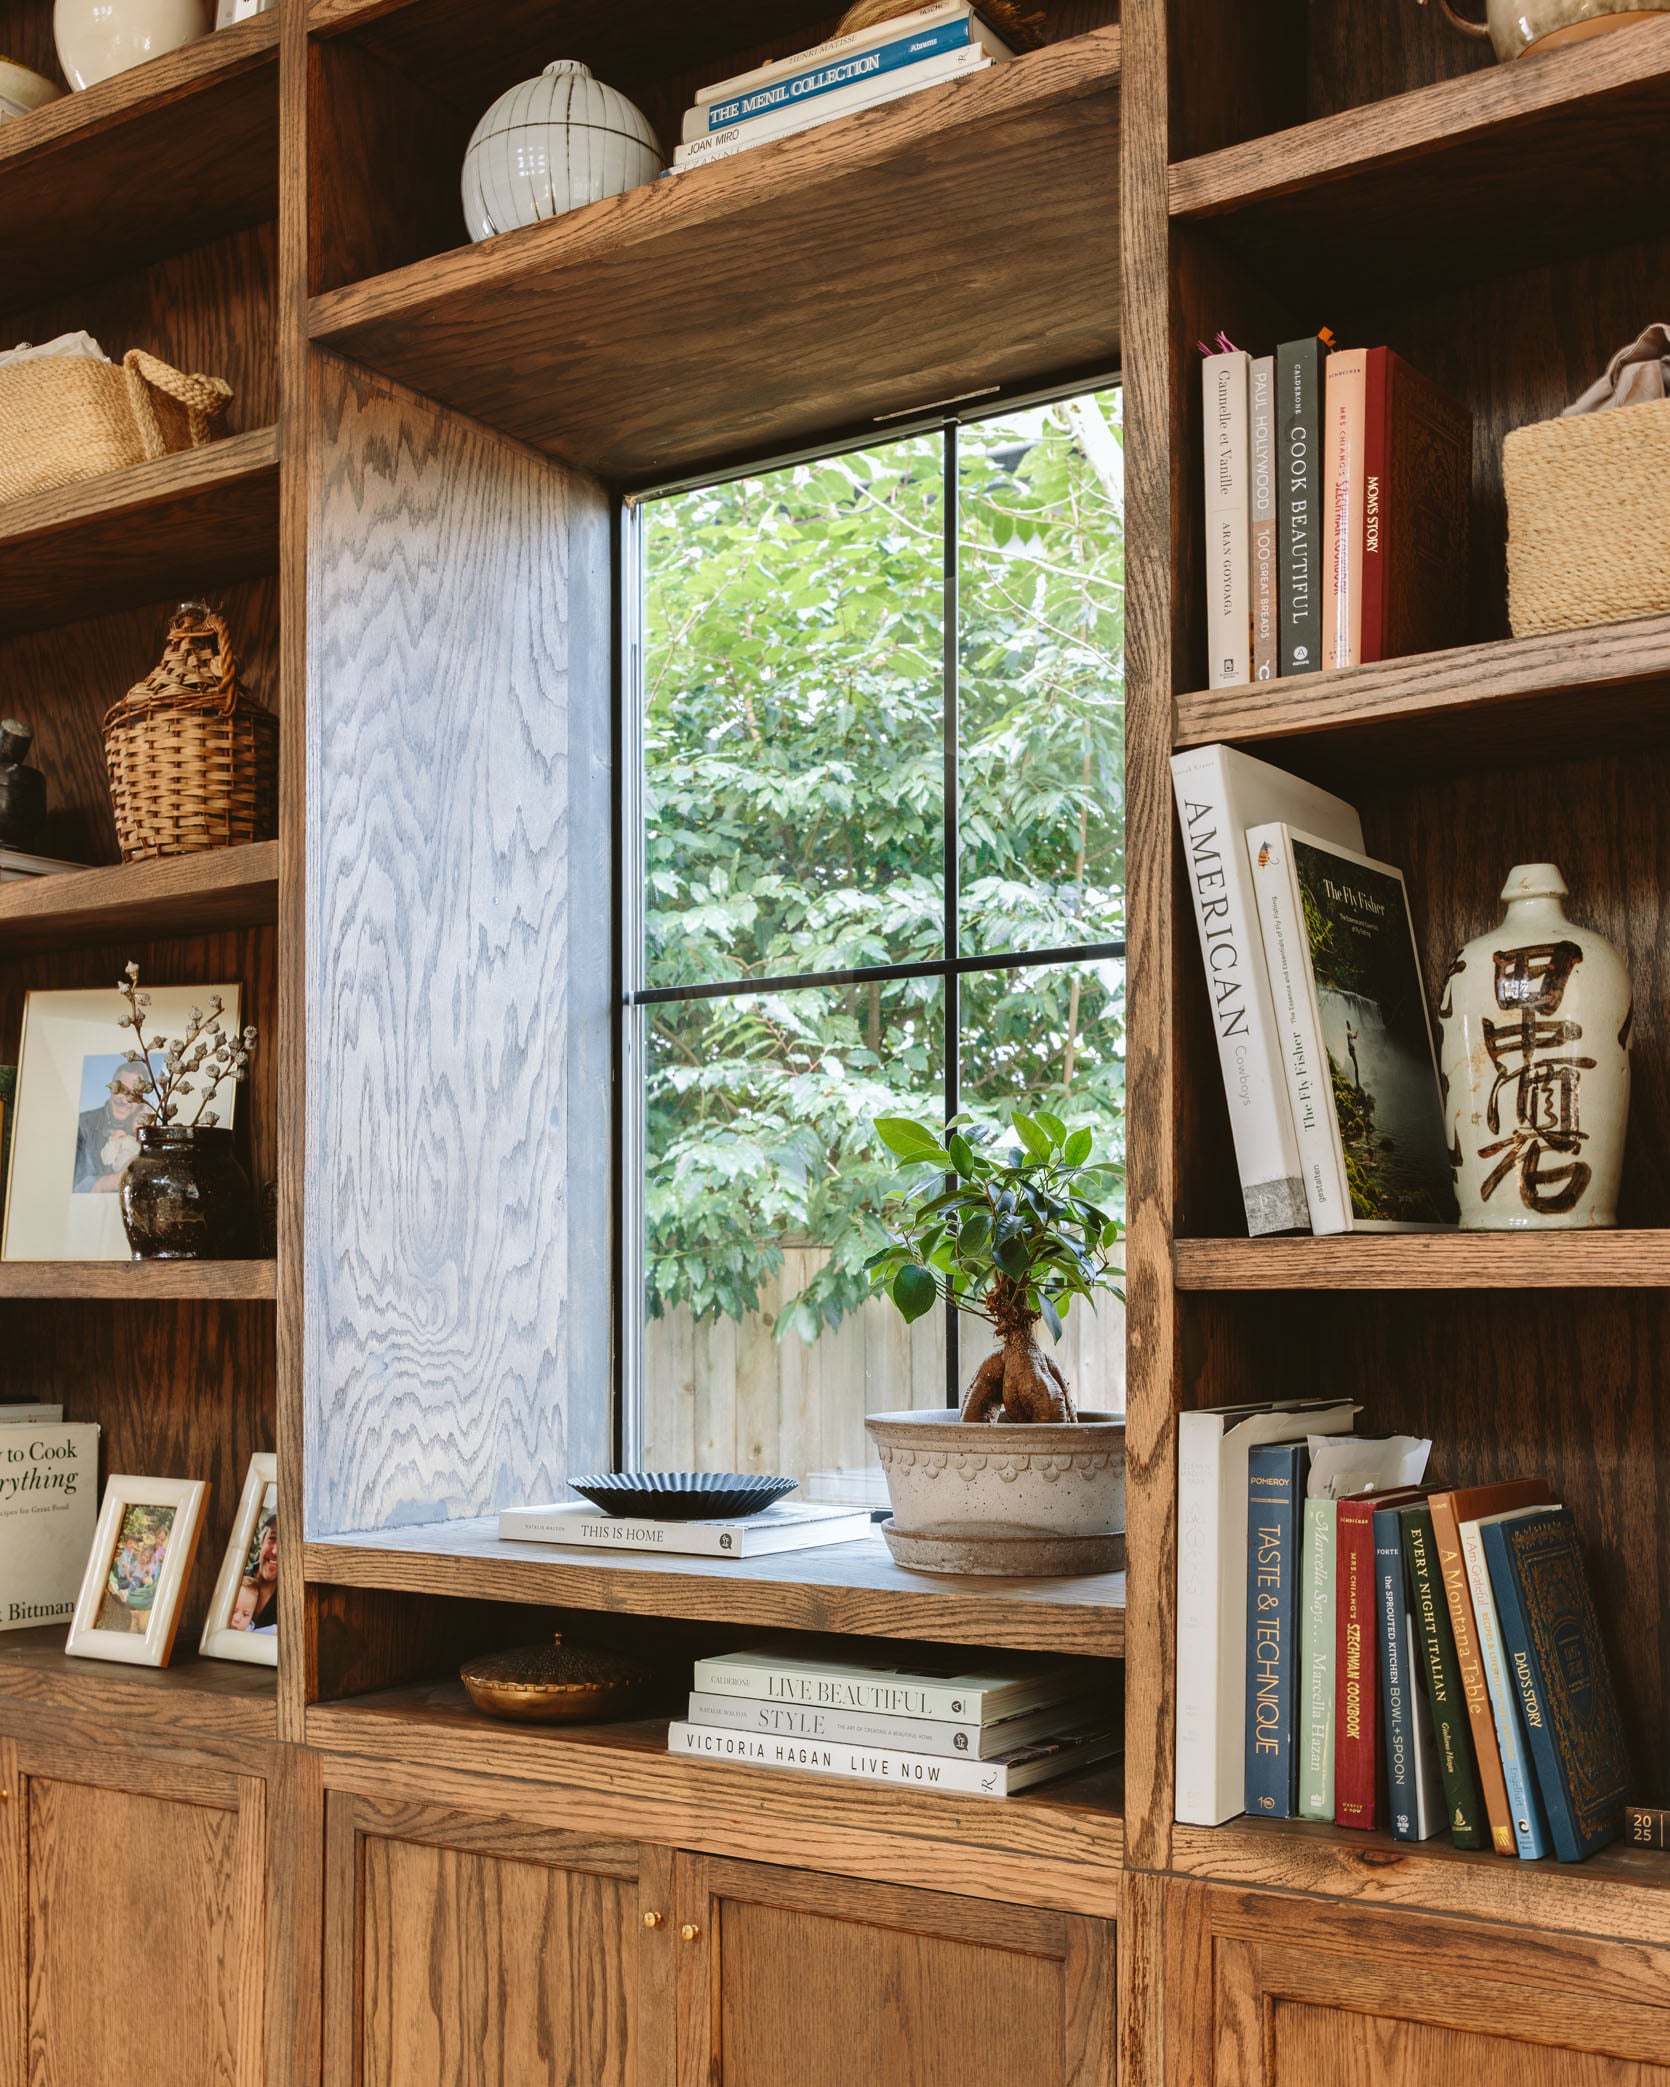
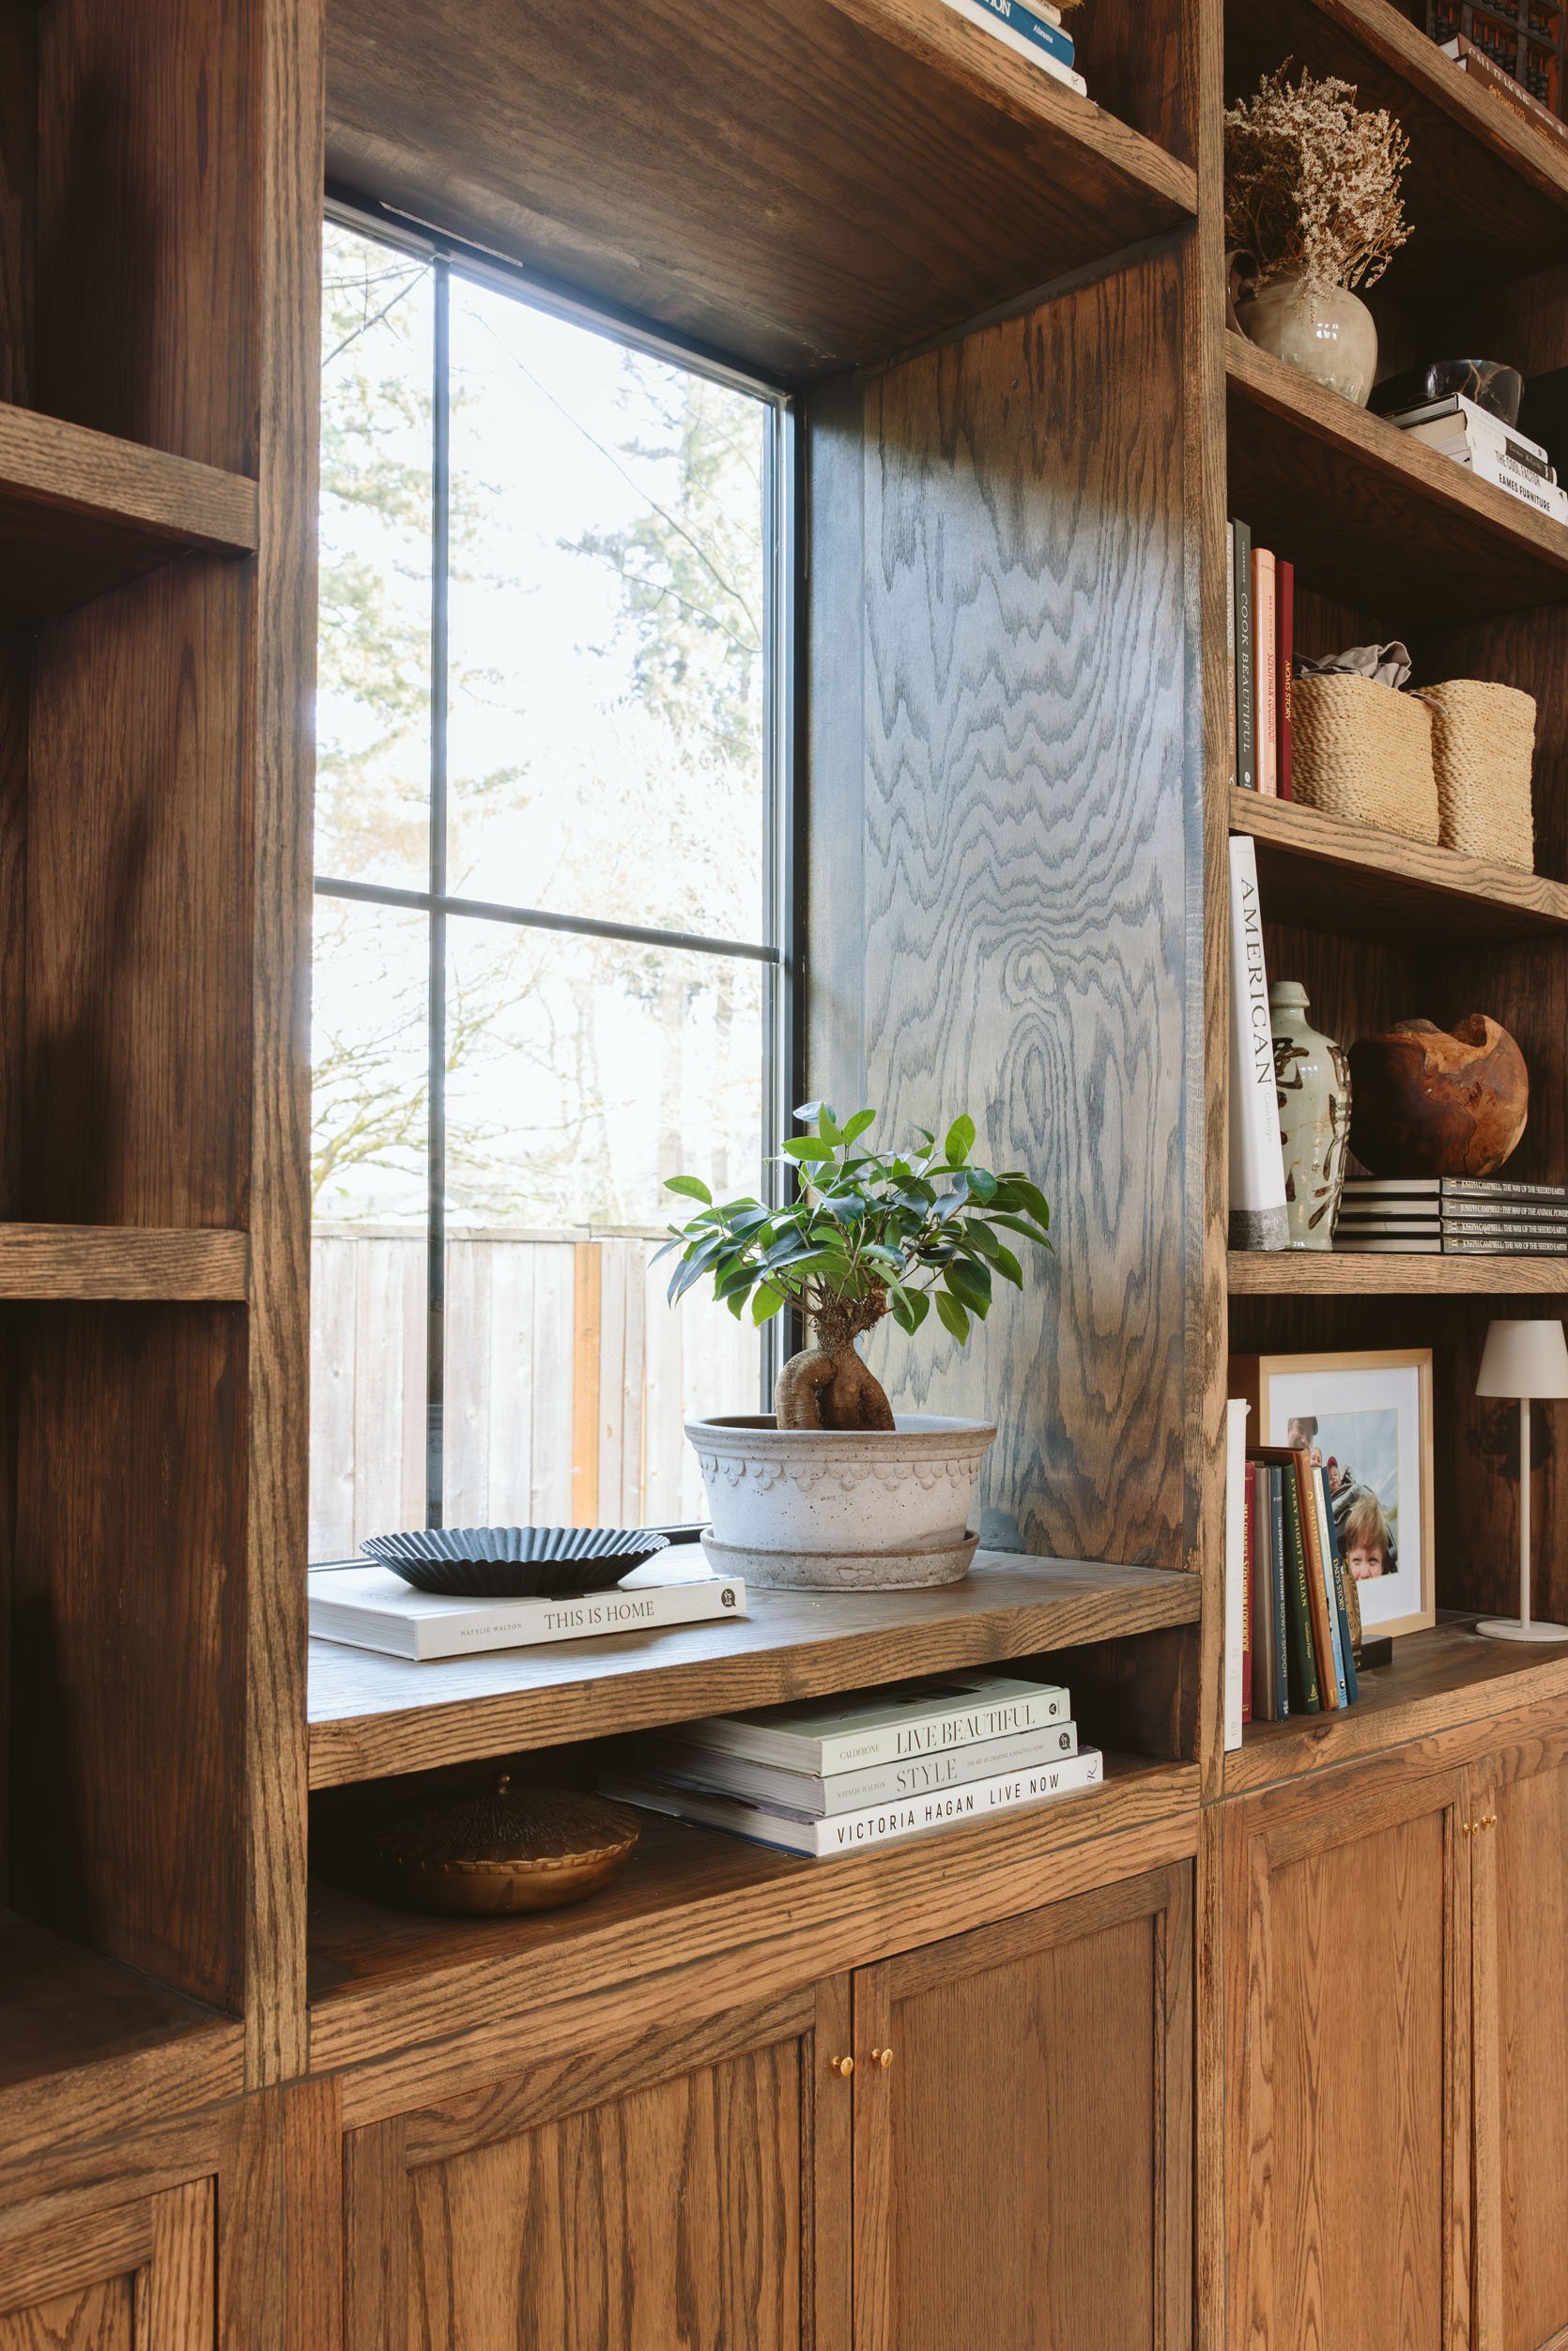
One of our favorite elements was seeing how much deeper the window sits from the shelves. Can you give us a peek “behind the curtain”? Pun intended. How did you figure that out?
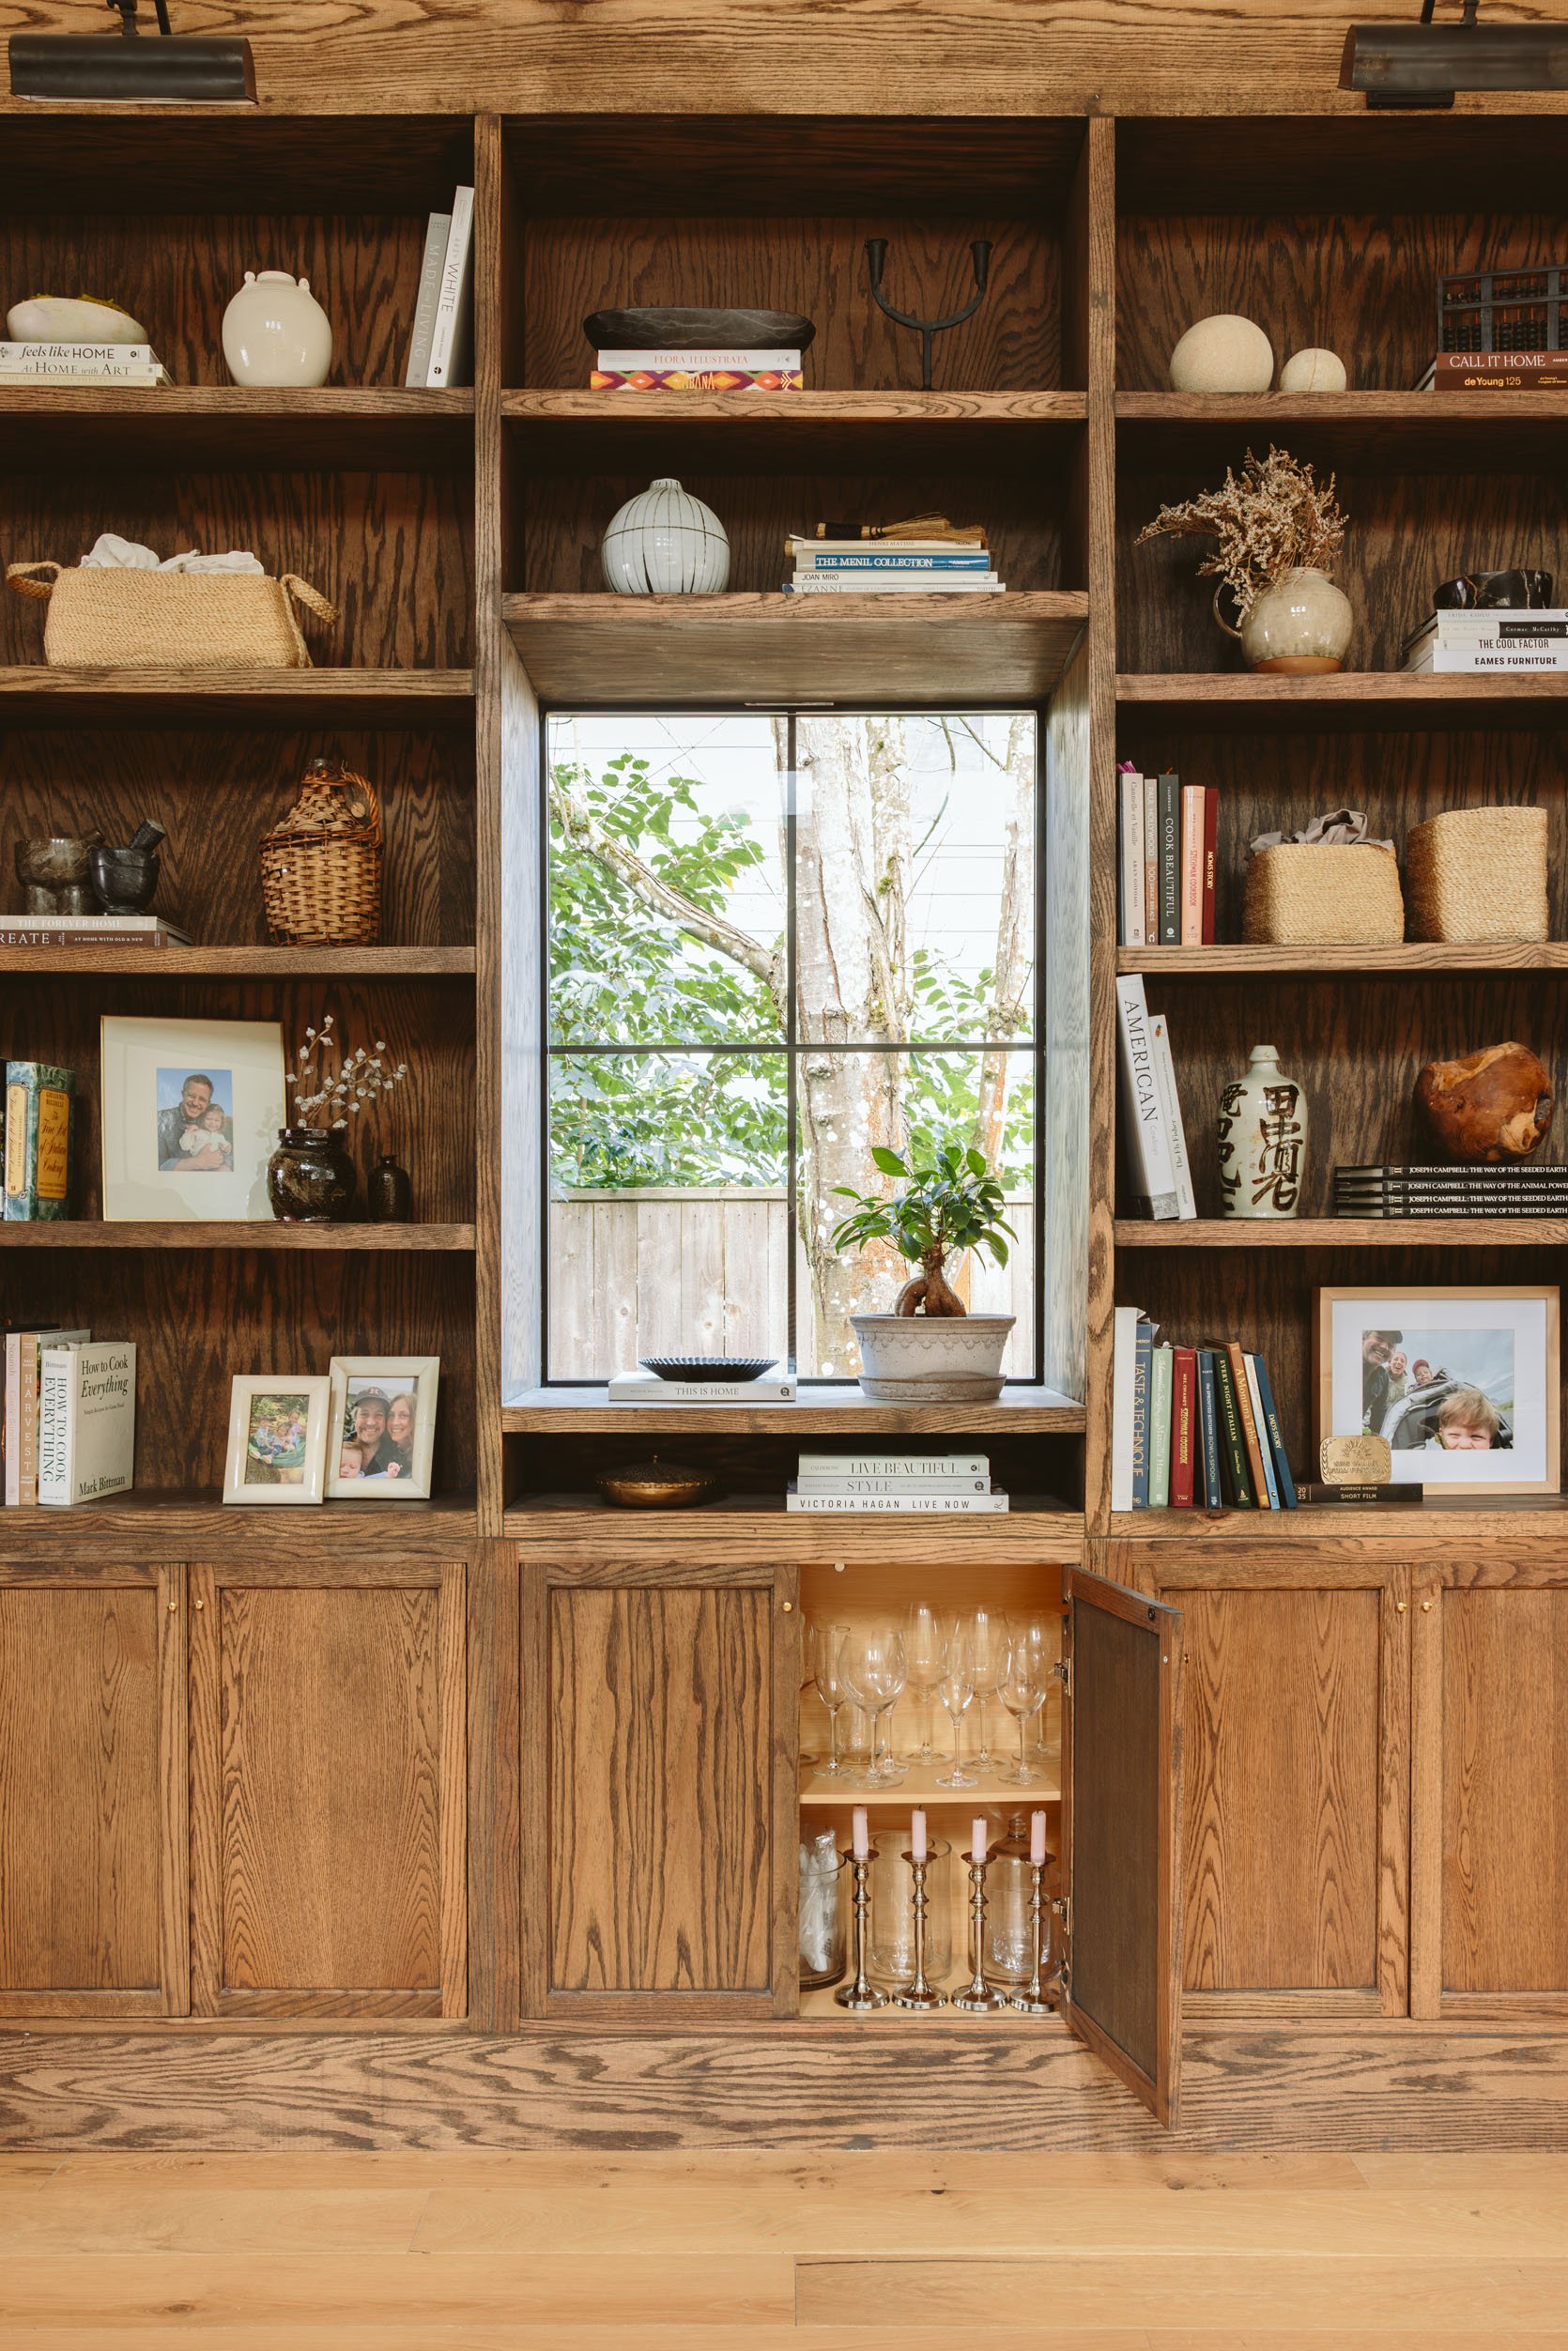
Chrissy only wanted the bookcase shelves to be 11″ deep, and I knew I wanted the bookcase to be incredibly sturdy, so I built a 2 x 6 vertical framework attached to the actual wall, behind each side of the bookcases and lower cabinets. By default, the window would be 6-7 inches deeper, and we liked that, drawing the eye in and out of the window. It also frames out a beautiful tree we have outside, so bonus all around.

Did you follow any plans?
There were no real plans – I just kind of cocktail napkin-ed it – and drew up a plan that was even across the wall. We had to choose cabinets that fit within the space, so we went with 2 single cabinets on either end, with 3 double in the middle…
Any troubleshooting here?
Cool thing – we had to re-route our floor vent into the wood trim at the bottom – luckily, Amazon has unstained oak vent covers, which I stained and mounted into the oak trim.
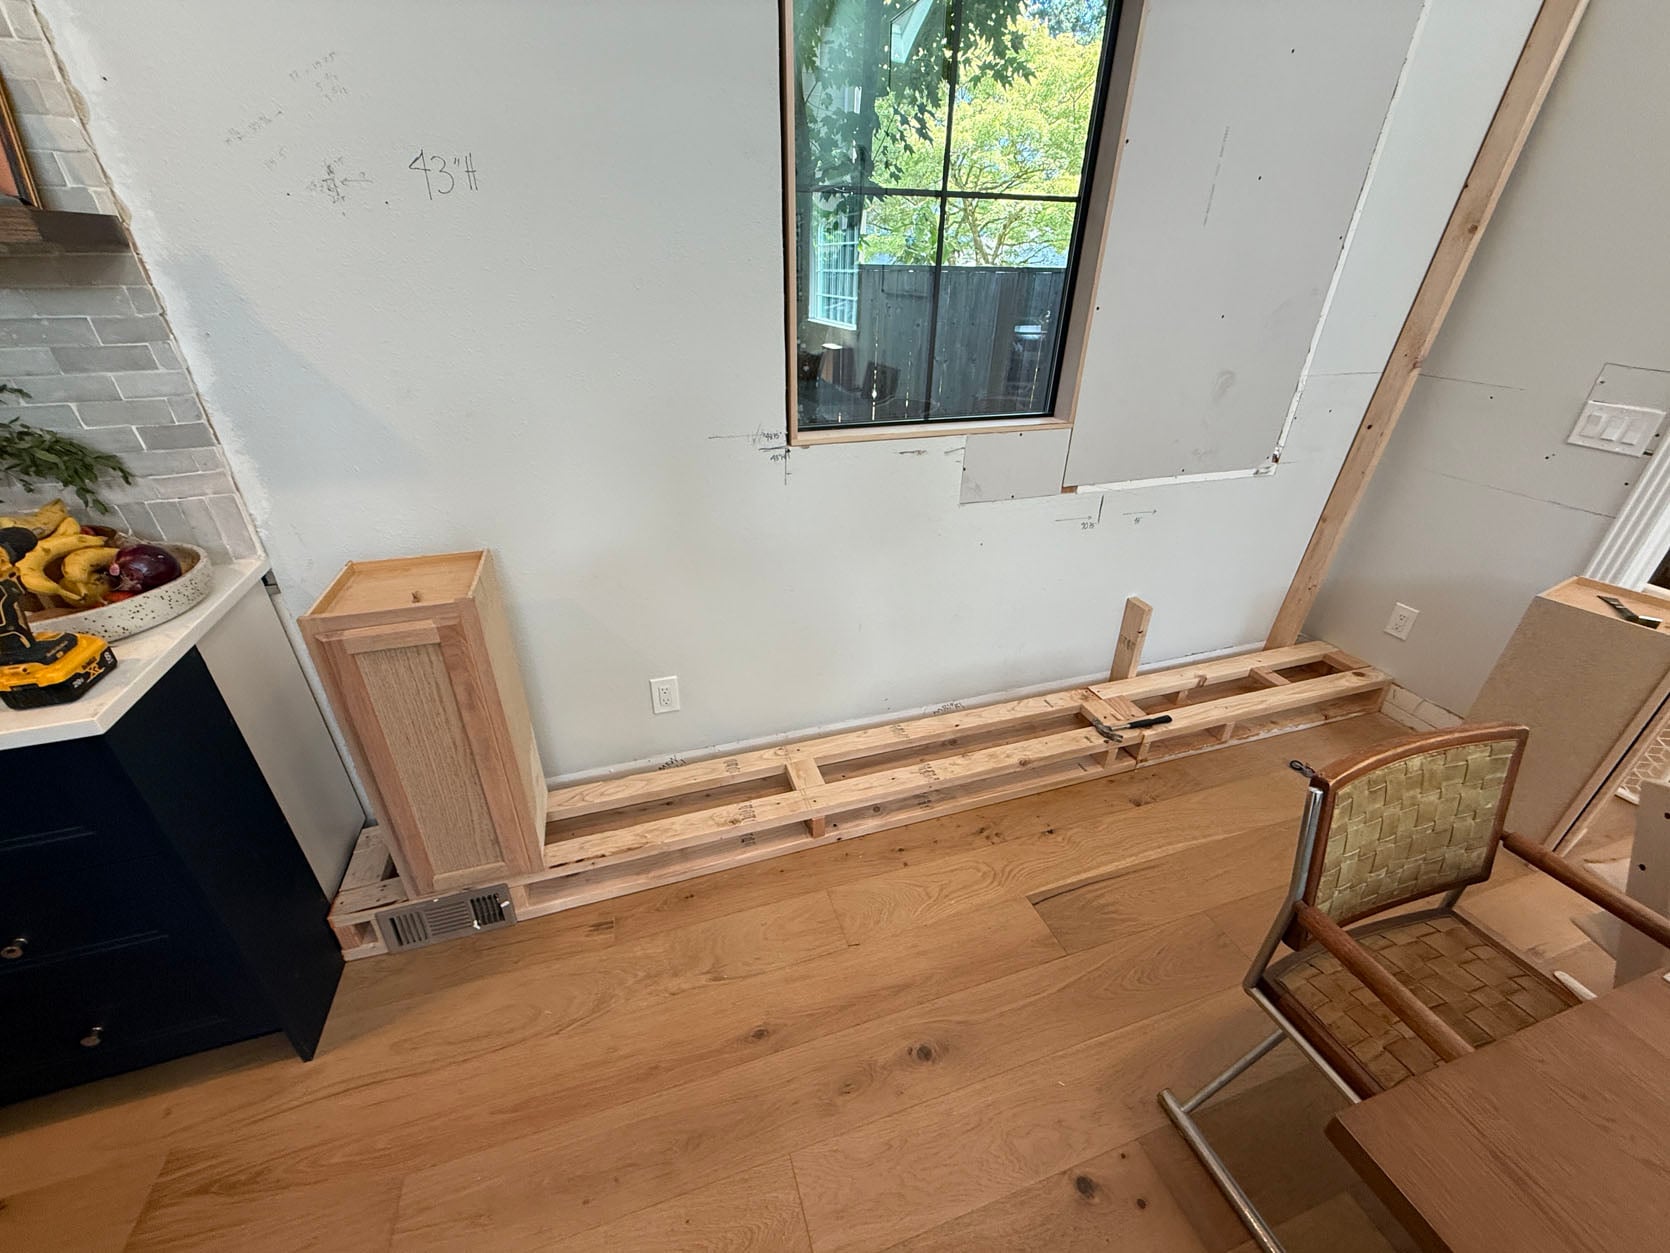
The individual base cabinets originally came from Lowe’s, and you may have clocked how different they look between process photos and finished product – and not just from staining! This type of unfinished, stock cabinet base can feel like a dime a dozen, with interior hinges making it so the doors rest shut on the frame’s base. But Peter was able to make the doors sit flush with their surround, really giving the bookcase an elevated, custom feel.
How the “hack” did you get the cabinets to look this good?!
Essentially, I cut all the cabinet doors down (all four sides of the door) and then found a particular hinge (shout out to Portland’s Woodcrafters) that would allow an overlay to become an inlay door. You can buy stock oak cabinets like these from Lowe’s or Home Depot, and you have to get a table saw to cut them down to be inlay cabinets. Took a few hinges to figure out the right mechanics, but finally got it right!
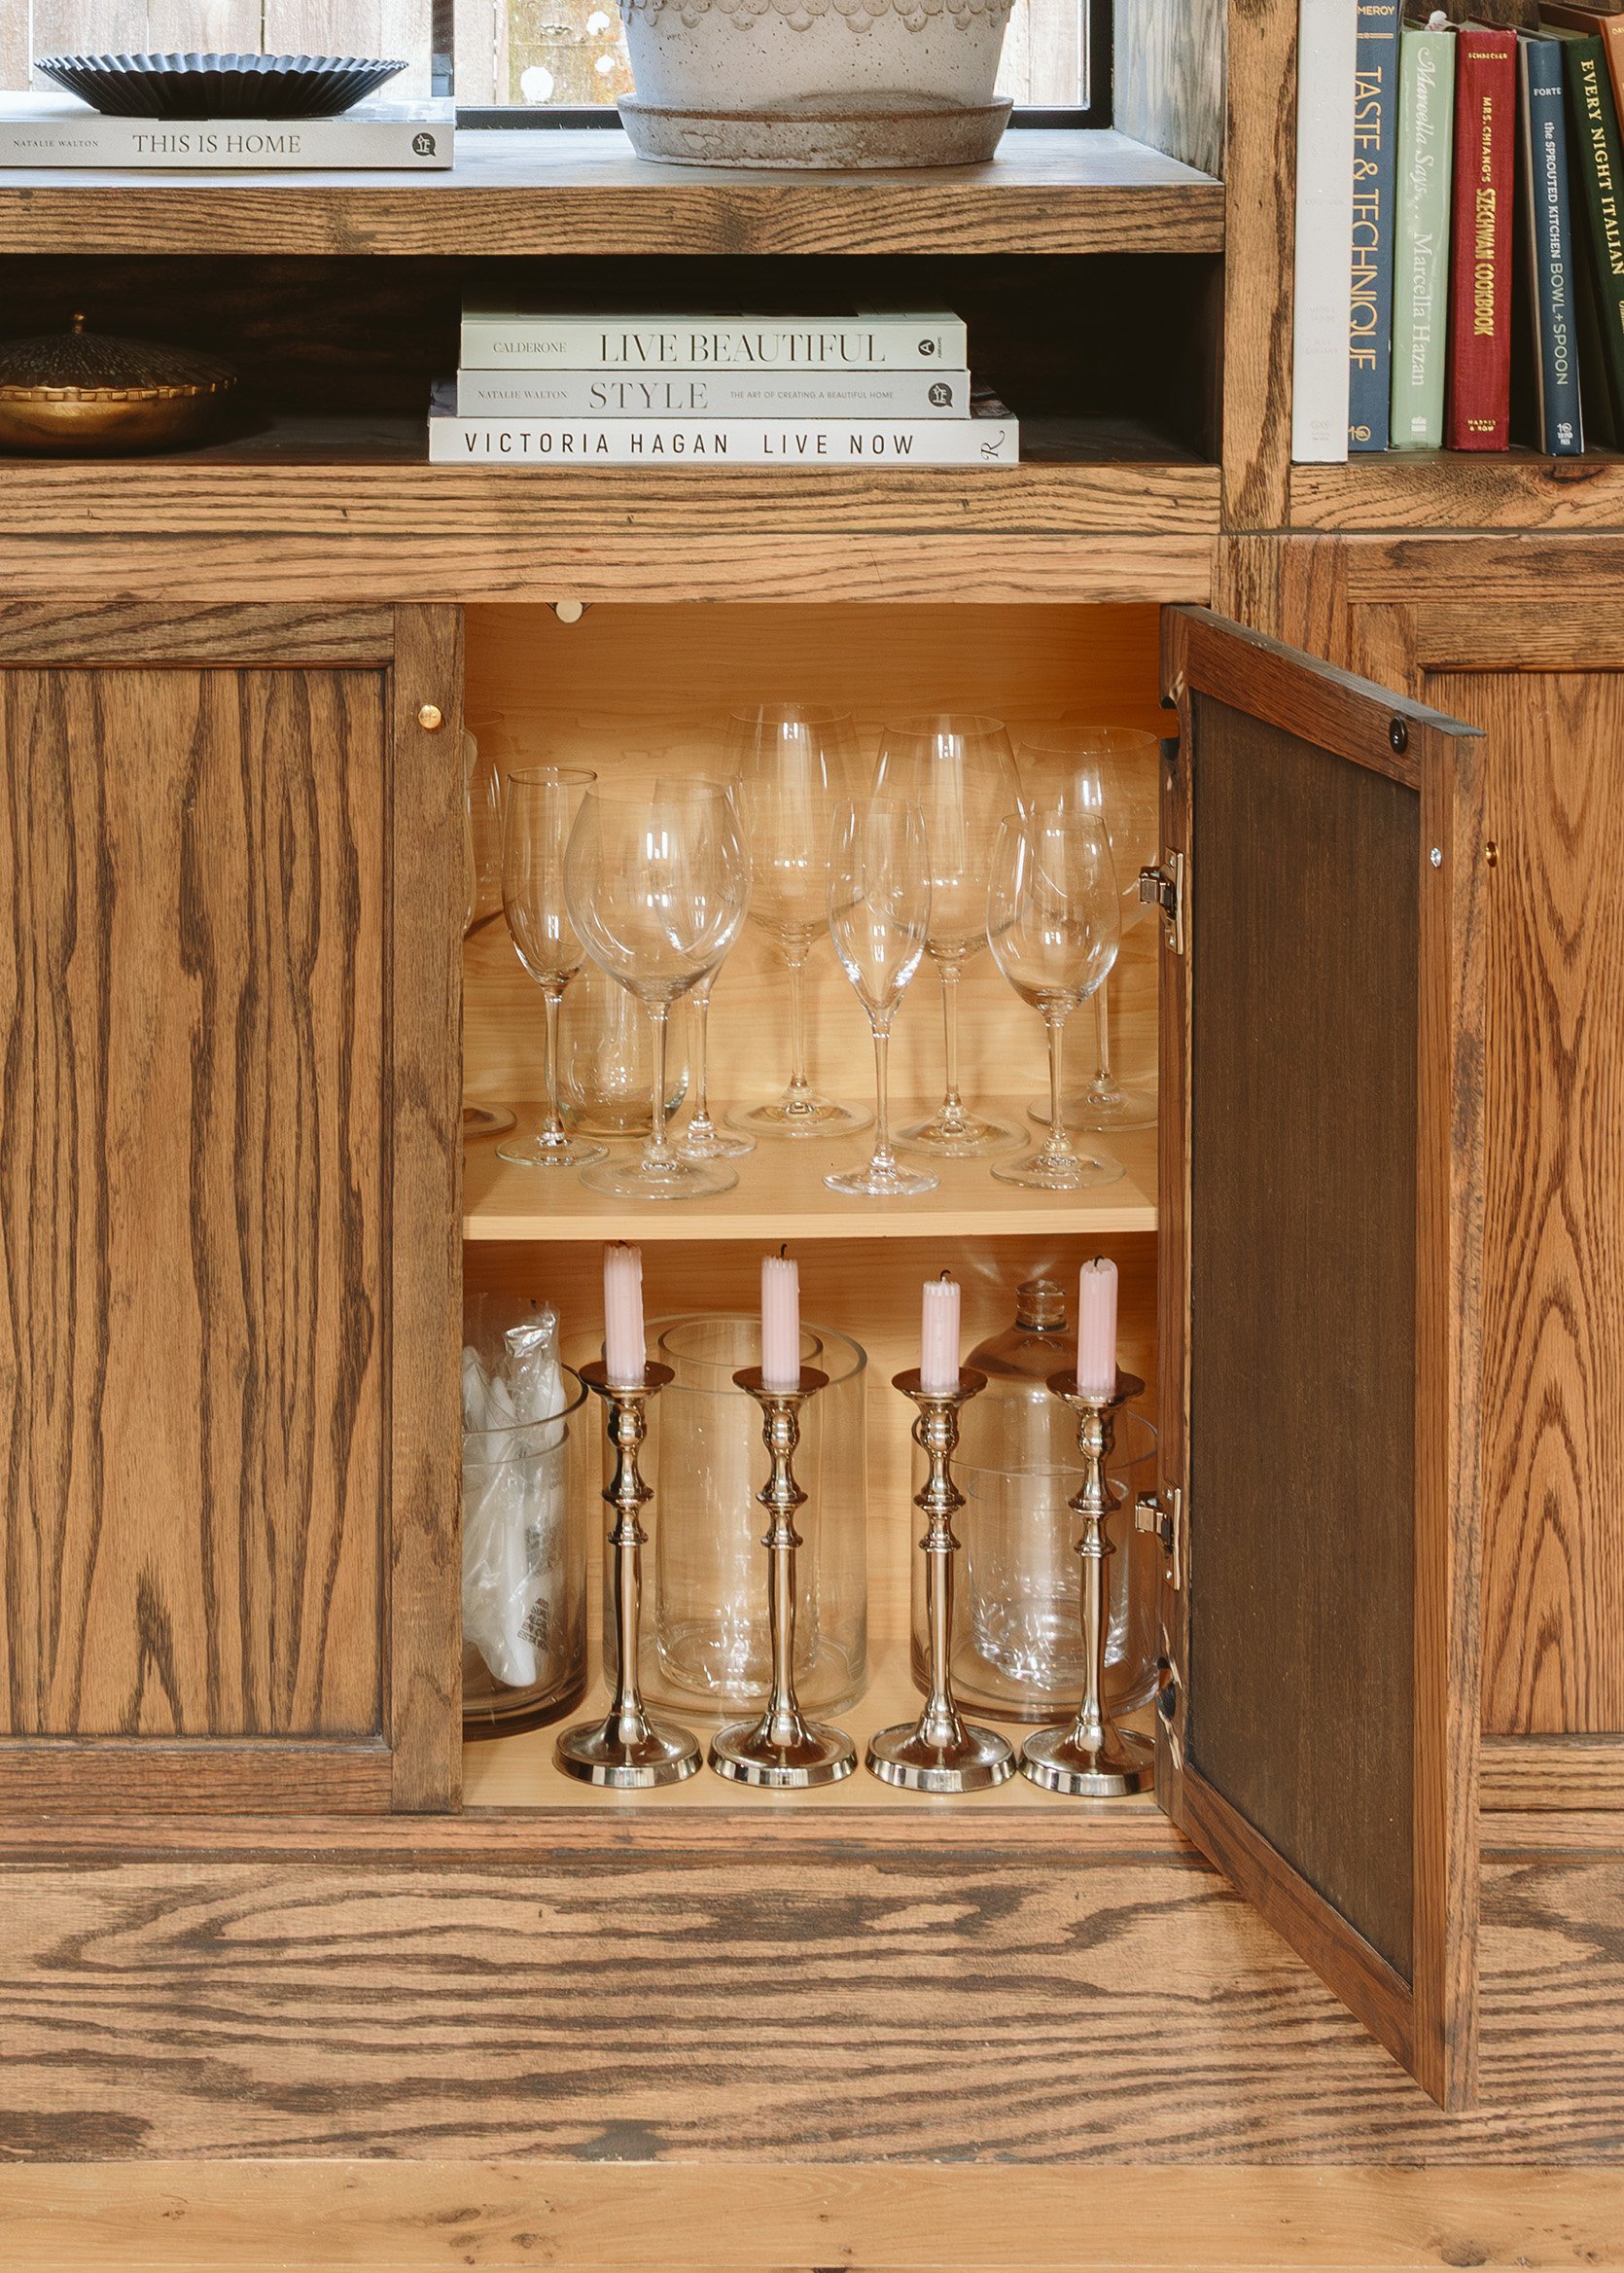
Here you can see how the doors sit flush with the rest of the build. Such a great detail! Taking a peek inside the cabinets, you might also be able to see the doors’ factory hinge cut-outs, with new hinges installed between them. By purchasing these specialized hinges, trimming down the doors, and using a hinge jig to get everything just right, Pete was able to make the transformation from overlay to inset, keeping costs down but looking luxe.
So just how difficult was this build?
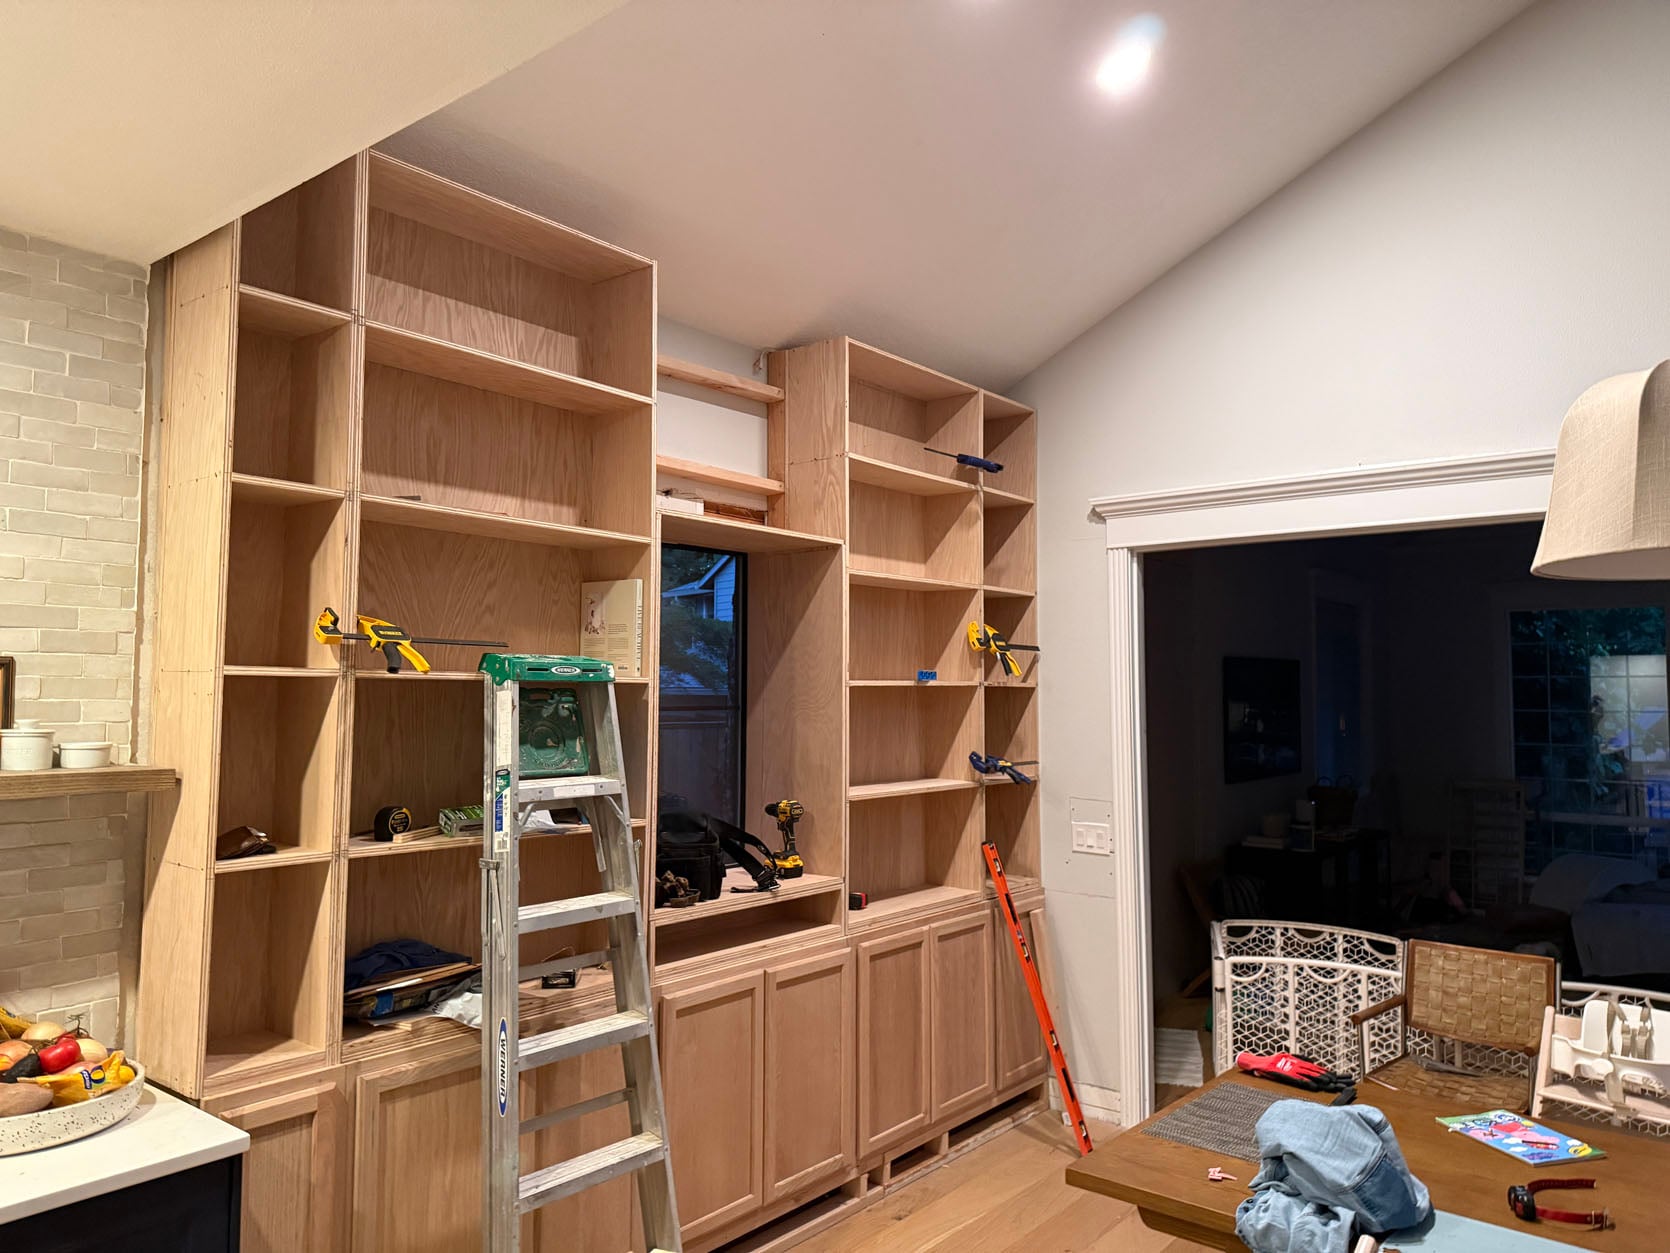
Due to the height of the built-ins, this was pretty challenging for one person. I could assemble them on my own, but I had to have Chrissy help me as I built the shelf boxes on the ground, and then had to lift them up onto the cabinets. They were pretty heavy, and I had to climb on a ladder to get them into place. Also, make sure to secure the cabinets to the studs in the wall. Very important!
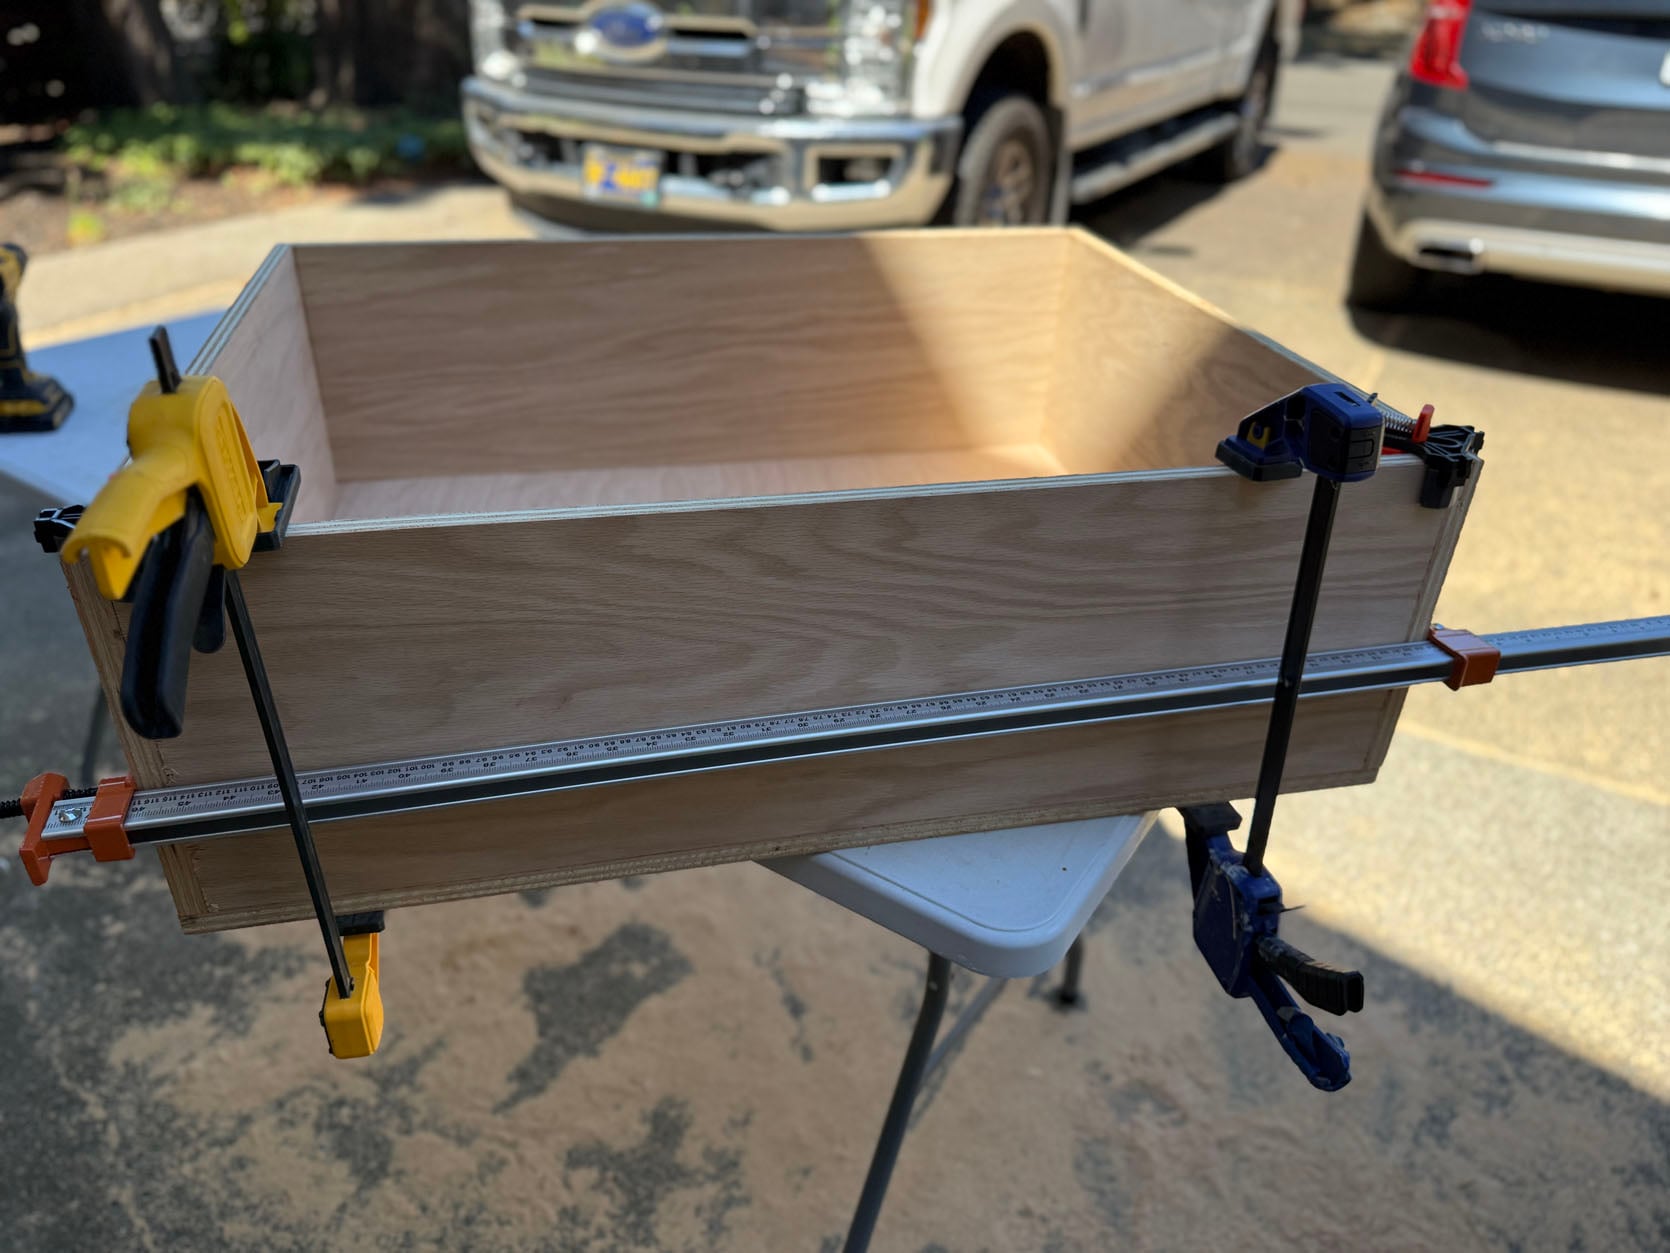
Pete relied on a bunch of helpful tools to pull this build together, XL clamps and a good table saw being two of his best friends. Some other great tools he recommends to have on hand? A laser level, a pocket-hole jig, and equal parts patience and perseverance.
How long did this whole build take you? Was it a team effort to get it across the finish line?
Total team effort. Chrissy watched the kids while I cranked this out, night after night. It was a massive undertaking, largely again, because I do not do this every day. Probably 10 days, working 4-5 hours a night. But it took a considerable amount of plywood and cutting it down into shelves with a table saw.
Speaking of wood, can you tell us more about what you used?
We bought all white oak — cabinets, plywood, wood boards, and then stained them darker for the effect we wanted to achieve; however, this could have been cheaper if we used a different species of wood. But the oak plywood was not insane in terms of cost.
What did you use to finish the edges and take it up to the ceiling?
That is one piece of milled oak. So not cut from the same oak plywood we made the bases from. It is a beautiful piece of wood, and the stain just loved it.
Ok, let’s talk stain! What did you learn about this process? Any helpful tools/tricks? Did you seal with anything?
From Chrissy: Nope, one coat and done! This stain is the best, and it’s non-toxic. Highly Recommend! Pete was able to stain in place, which saved time in the process (as opposed to staining in a different location and bringing it in after, stained) because there were zero yucky fumes. Actually, it smelled fairly pleasant.
From Pete: Stain can get super messy, and you need to learn how to work with it. Just a learning curve, but worth it. No sealant!
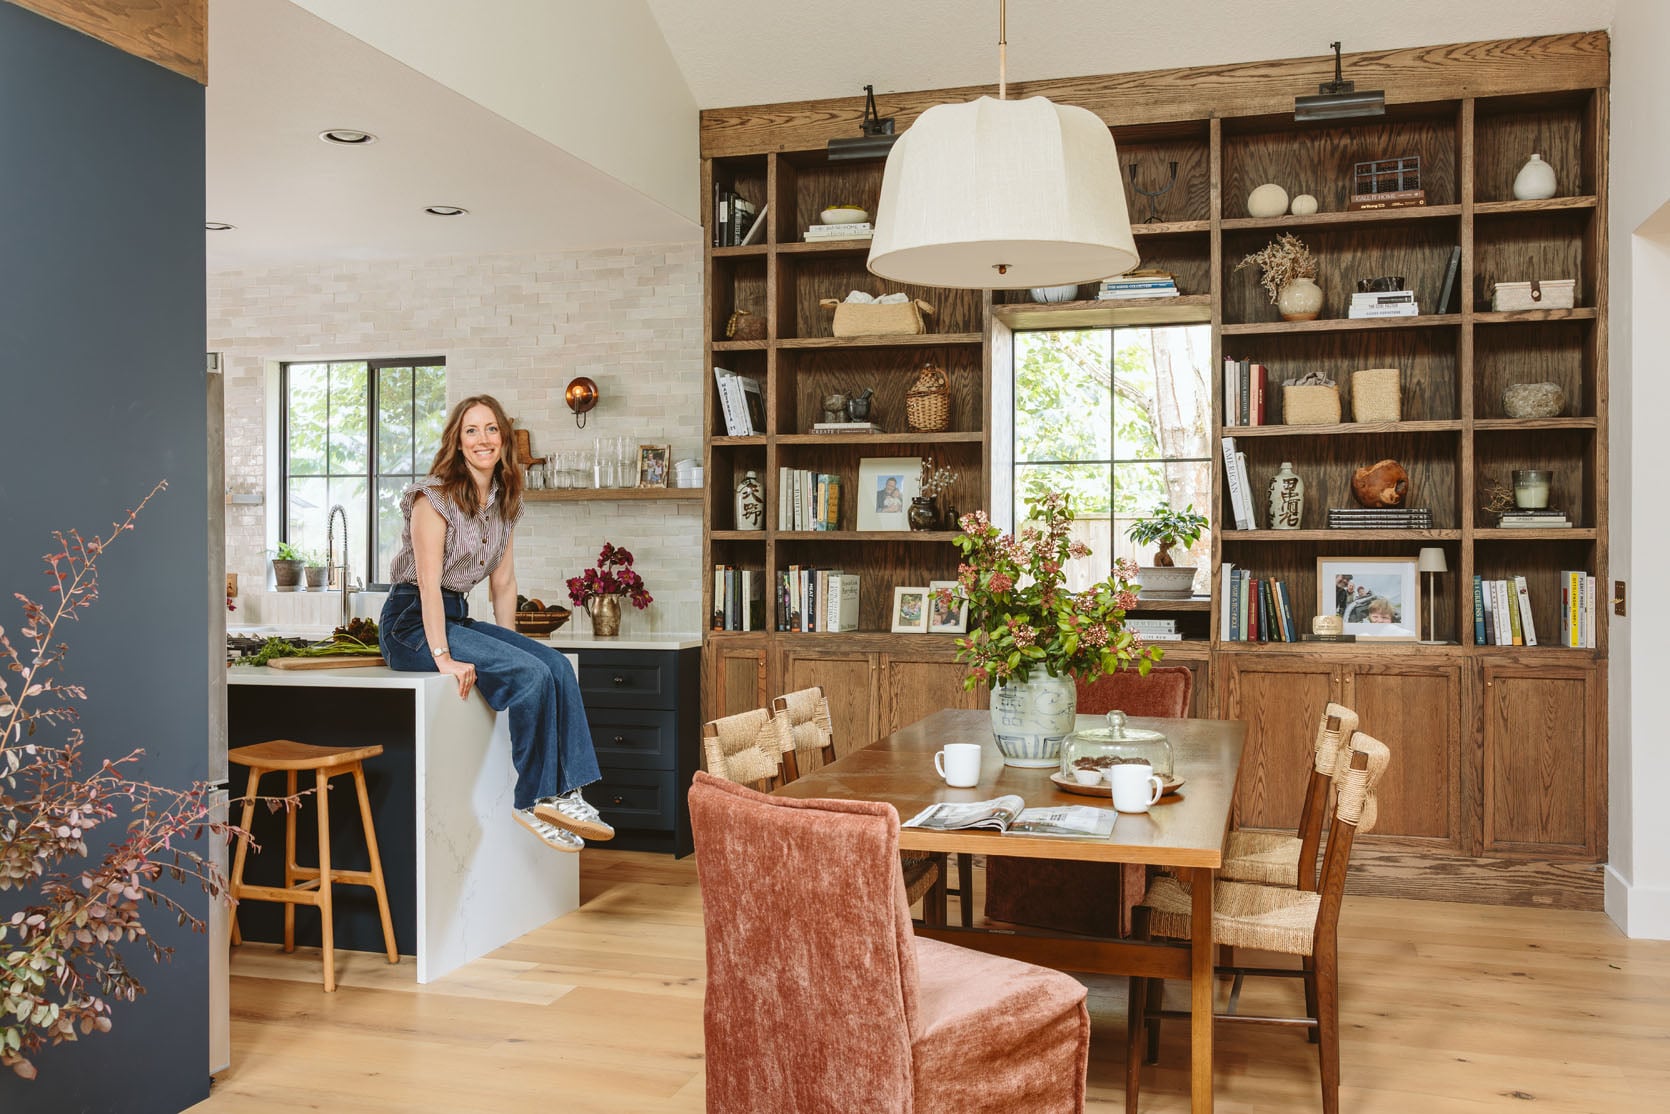
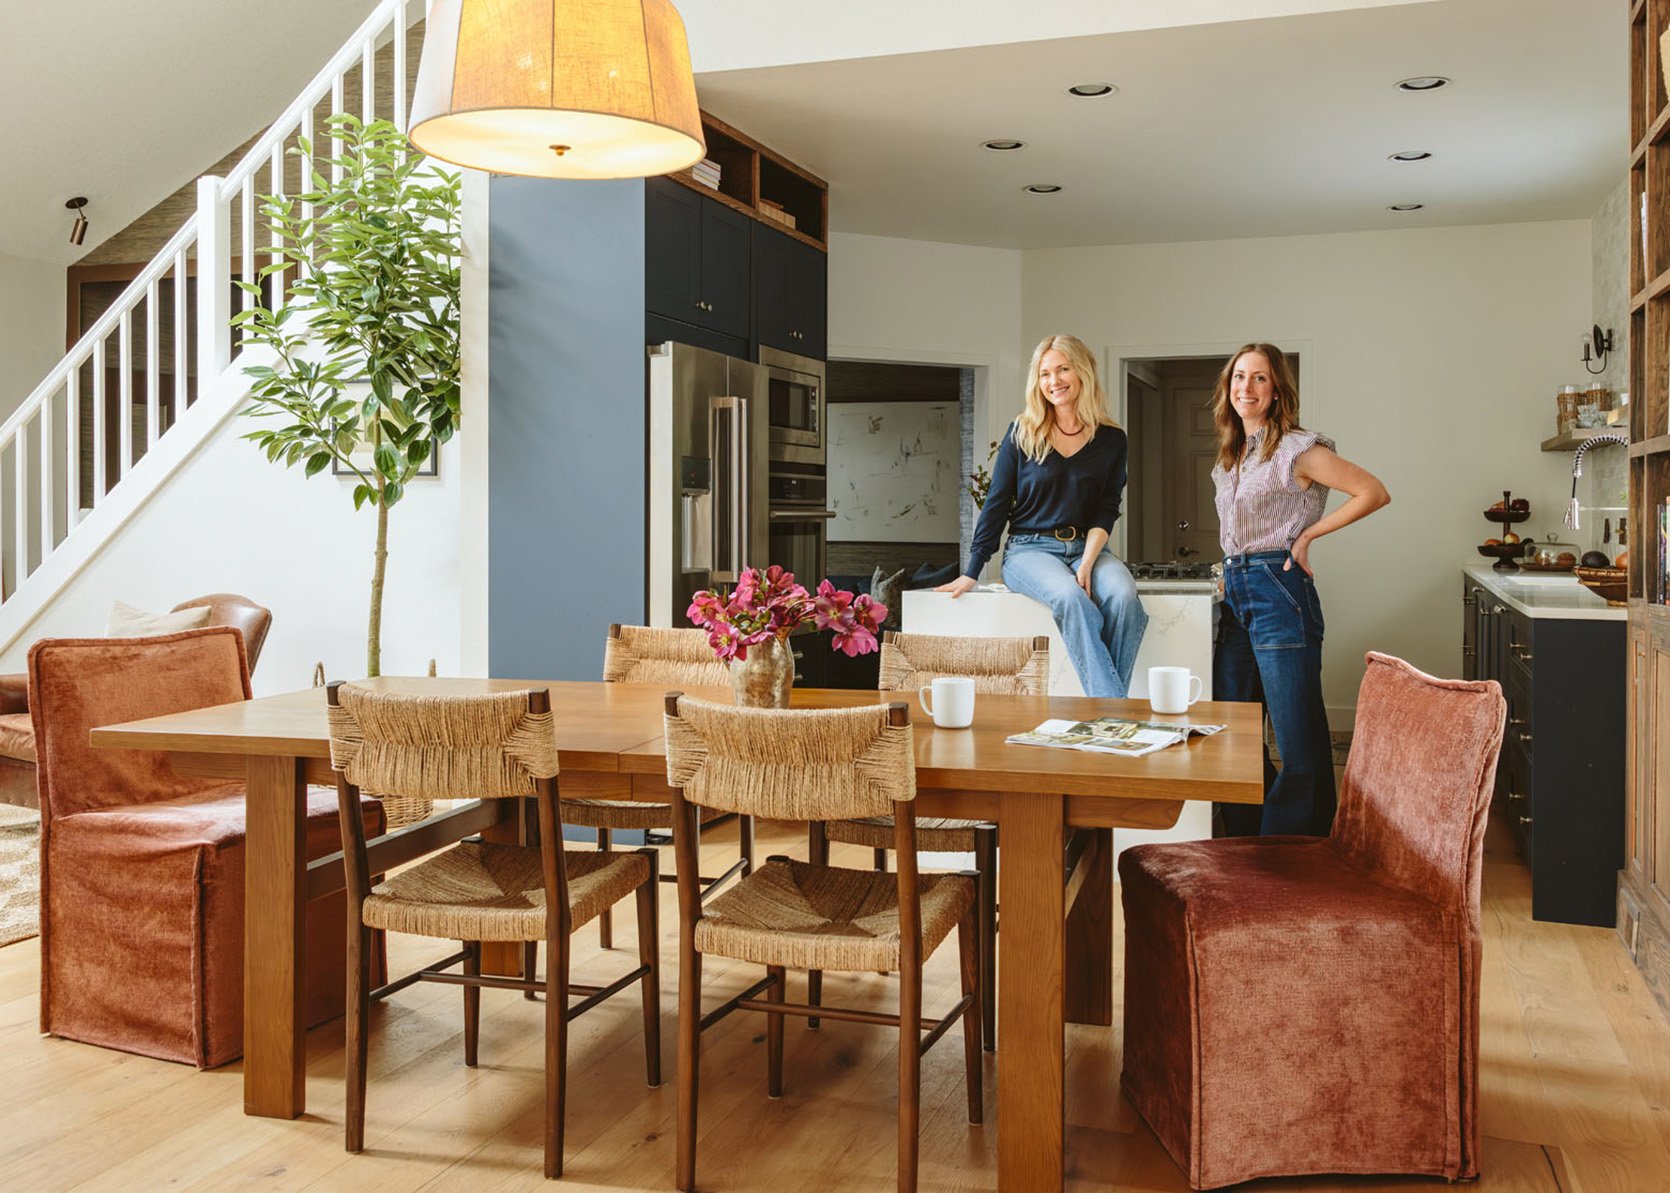
Well, the hard work paid off. The bookcase turned into such a beautiful focal point in the space, and the design integrates so seamlessly with their kitchen (another incredible Chrissy & Pete DIY you can catch up on here, using all IKEA cabinetry if you can believe it). Chrissy did virtually all the bookcase styling here, incorporating a beautiful collection of books, decor, and sweet family photos. She finished the room with a beautiful new pendant, this stunning table from Article, and a pair of chairs that are as durable as they are inexpensive, from Anabei.
In the early stages of this renovation, we had initially talked with Chrissy about this built-in being more of a banquette than a bookcase. When the design took final form, they decided a show-stopping built-in bookcase was a better vibe, and we totally agree!
What led you away from built-in bench seating?
I know Chrissy loves a banquette, I do too. However, at the end of the day, we felt a statement built-in bookcase would be best to address the separate funky ceiling heights and also create a more seamless transition from one room to the other (kitchen to dining room to living room) without being an obstacle (as the banquette would have been).
Is there anything you’d change or do differently? Oh! And what do you store in here? Our readers want to know! 🙂
From Pete: I am pretty happy about it, so I live with no regrets about this build! It was hard, but totally worth it in every way. It fundamentally changed this room for sure.
From Chrissy: We just love how it turned out. We are storing glassware, plates, placemats, etc, all typical buffet/dining room supplies. 🙂
Dining Table | Woven Chairs | Captain Chairs | Pendant Light
So there you have it, folks! Chrissy and Pete knocked yet another DIY renovation out of the park. The grand wooden bookcase pairs so beautifully with all of the elements in the kitchen and really gives this room a point of view, not to mention plenty of extra storage. A huge thanks to C+P for pouring their hearts into this project and being kind enough to share it with all of us. We think this bookcase build really paid off. What do you think?
*Design and Build by Chrissy Cambor and Pete Cambor, @camborhouse
**Styled by Chrissy Cambor and Emily Henderson
***Photos by Kailtin Green

Looks beautiful! What was the main value added of the design “mentorship,” in Chrissy and Pete’s opinion?
Curious about that as well. What I’m also wondering about: I always try to avoid to install “closed” bookshelves (or wardrobes etc.) against outdoor walls, because you want to prevent trapped moisture, which can lead to mold. Are the backs of the bookcases attached to the wall? Or to the 2 x 6 vertical framework, so there is a gap of 2 inches behind each “cube”? The last one would definitely be the safest option, although I’d never take the risk anyway, because I would want to be able to reach the outer wall, without having to rip things out. But maybe that’s the effect of having had a rental with severe mold problems, even without closed shelves or wardrobes, so I’m probably a bit mold-traumatized… 🙂 The build-in is really nice and I’m impressed they did that themselves. Not quite as convinced it’s the right match for this space: personally I think it overpowers the kitchen wall, which seems very empty now with only two shelves (I’d have done wall cabinets there to maxime storage space and get rid of the (cramped) kitchen island). Oh, and as an avid reader I honestly had to laugh at the “beautiful collection… Read more »
hiya. they did such an awesome job. I think every case will be different (we are doing another one that we are much more involved in the shopping and choosing each design element). The biggest value is how we suggested major layout changes in both the kitchen and in the dining room up front. Since Chrissy and Pete have great taste/style and had remodeled before they didn’t need us to weigh in on every decision (although we were available for that) so we were more involved in the layout and functional changes – more big picture than helping choose the exact knobs. Having objective fresh eyes with different sets of experience can sometimes give permission to take a risk or ideas to change direction, completely. She would present to us what she was thinking/hoping and we would give suggestions, tweaks, ask questions, etc. She originally wanted wallpaper in there, originally wanted a darker tile, originally wanted to extend the kitchen into the dining room (battling two different ceilings). So it was just a lot of fun conversations and weighing a lot of pros and cons, with outside perspectives that have a different set of experiences. It was SO FUN, honestly.
Gorgeous and functional. I love how you styled it Chrissy. It certainly changed the vibe in the room. Well done!
This is mind blowing!!! Chrissy and Pete you are AMAZING. This is one of my favourite main floors I’ve ever seen. Absolutely gorgeous and such brilliant choices to make the architecture make sense, and work well for your family. You are exceptional. Can you please become EHD blog contributors? Or somehow keep sharing your work on the internet (beyond social media because I’m not on it😁). I would LOVE to see the rest of your home as you design it!
INCREDIBLE! Simply amazing and what hard work. Also props to Chrissy for solo-parenting while this happened. That’s hard too!!! I would LOVE a deep dive into how he re-routed the floor vent. I have a cabinet project I’ve been putting off because it seems like such a hurdle to re-route venting.
Those tiny knobs on the lower cabinets… Could you please link to them? I absolutely love how small they are on this giant piece… It does something good that larger hardware would not accomplish. Brilliant.
So well done, Chrissy and Pete! Thank you for sharing so many details. As an avid DIY-er (also working around kids and family “real” life) I would love an even more in-depth post with details on the cabinet doors conversion (exact hinges used, etc.). They turned out exceptionally and what a genius idea. You guys make a great team.
Beautiful! Thank you for doing a post on this bookcase! Very inspiring and helpful.
Thanks, Kate! 🙂
Can you share the stain you used? Rubio Monocoat?
Beautiful! I have so much admiration for your confidence, talent, and patience to execute this project. Well done and thank you for sharing your home with us.
Where are those cute ceiling spotlights from?
I’d love to do this in my “library” spare room, but, this house is 124 years old so the floors are not square to the walls anymore, and there is some bubbling of plaster that means the walls are not flat. How did you make sure your base and shelves and cabinets were not only level, but lined up with the floor and walls, if you had an “off angles”? If you didn’t have that problem, what would you have done maybe? Very interested in your thoughts!
You have to scribe the piece to the walls. If you search “scribe cabinet to walls,” you’ll find lots of info.
Just Beautiful ! Really well done working with the two different height ceilings, It looks so thought out and special. The details are perfect, the cabinet knobs, all of the light fixtures ( hanging, ceiling mounts, bookcase mounts ) and those hinges ! We need info so We can Do it too !
I recently used the Lowes cabinets for a built in and would love to replicate the inlay doors because you are so right about elevating the look. Can you give more specifics about the hinge situation? Where are they mounted on the inside cabinet?
Looks amazing. End of comment.
Such a statement that transforms the whole space. Just stunning!