Design
RENO COACH PROJECT REVEAL: See How This Family DIY’d IKEA Cabinets And Made A Beautifully Bespoke Kitchen
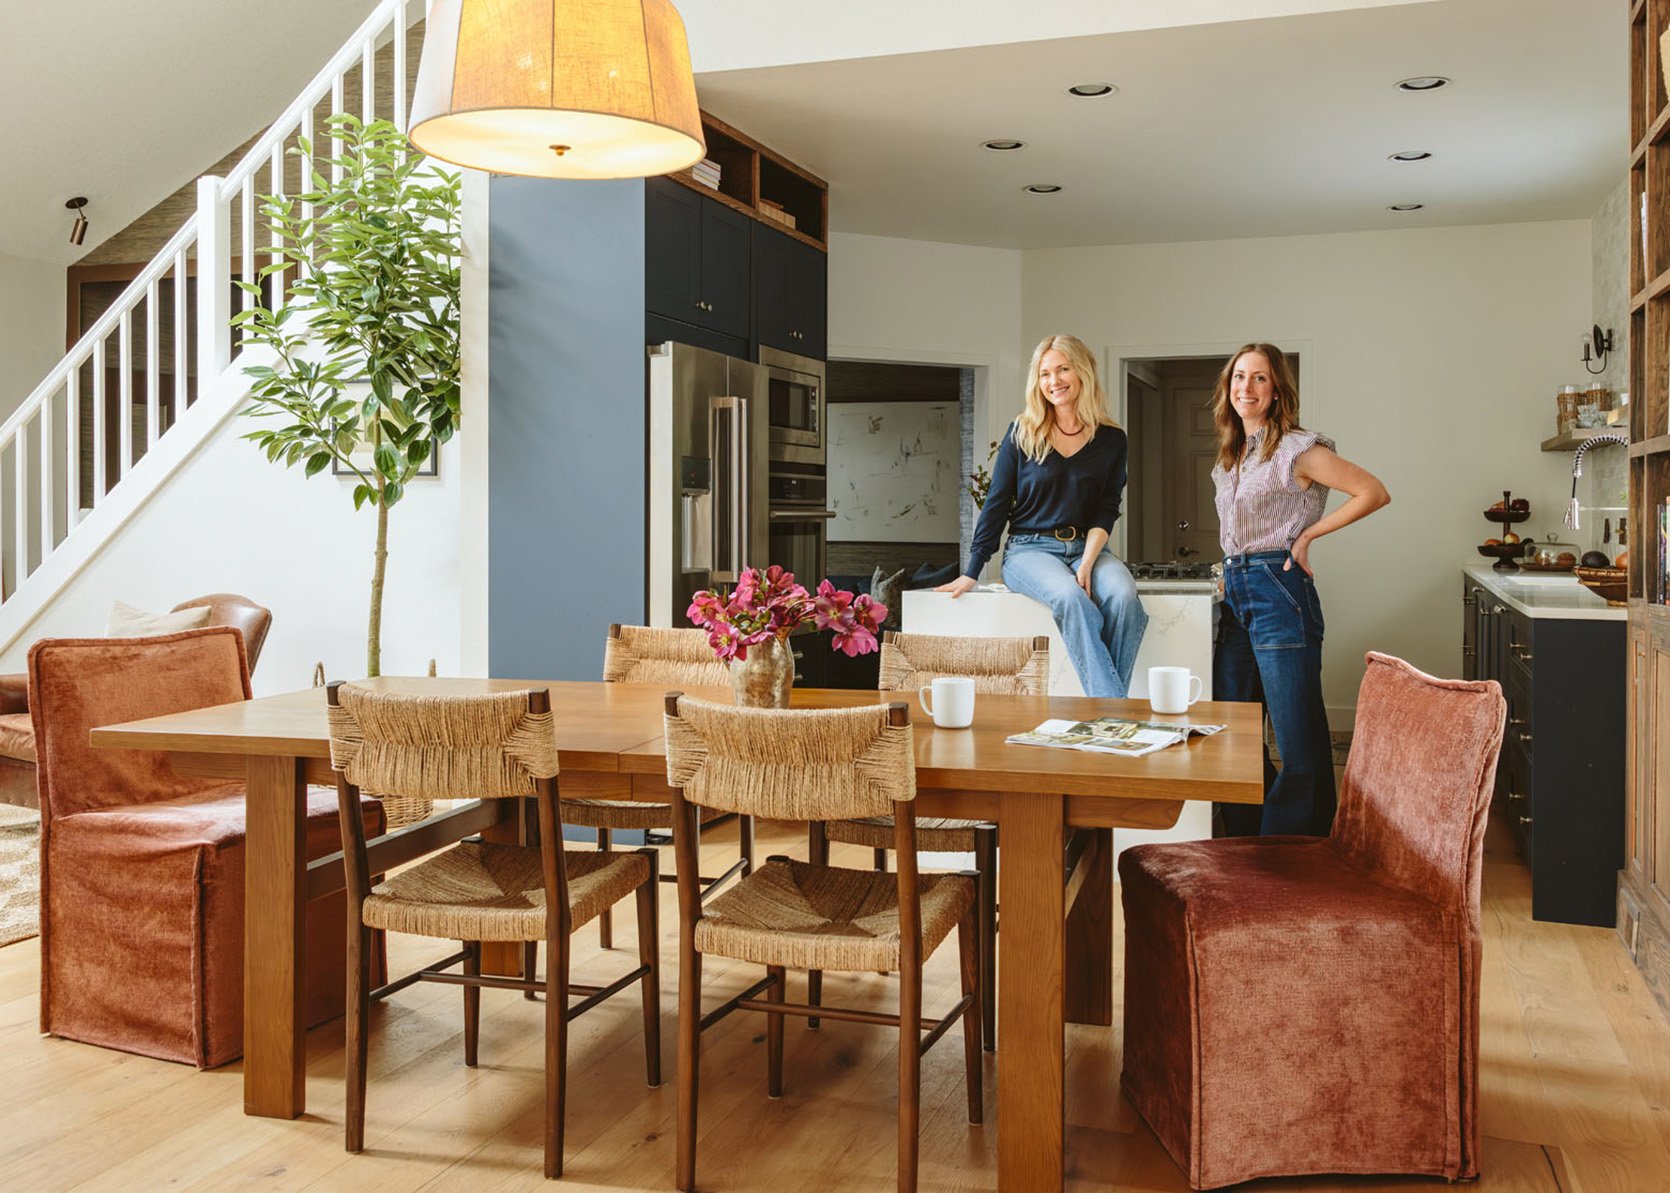
Welcome to the first reveal of the inaugural “Design Coach” series, where we help a family through their remodel (both emotionally and with design advice) and document it here. Chrissy and Peter could not have been better “clients,” what with great taste and incredible DIY skills. But with three kids under the age of 3 and a career that takes Peter out of town a lot, there were some risks and unknowns. But my goodness, we feel so lucky that they were such an incredible fit for this process (and personality-wise, they were a blast to work with, which makes a huge difference to me).
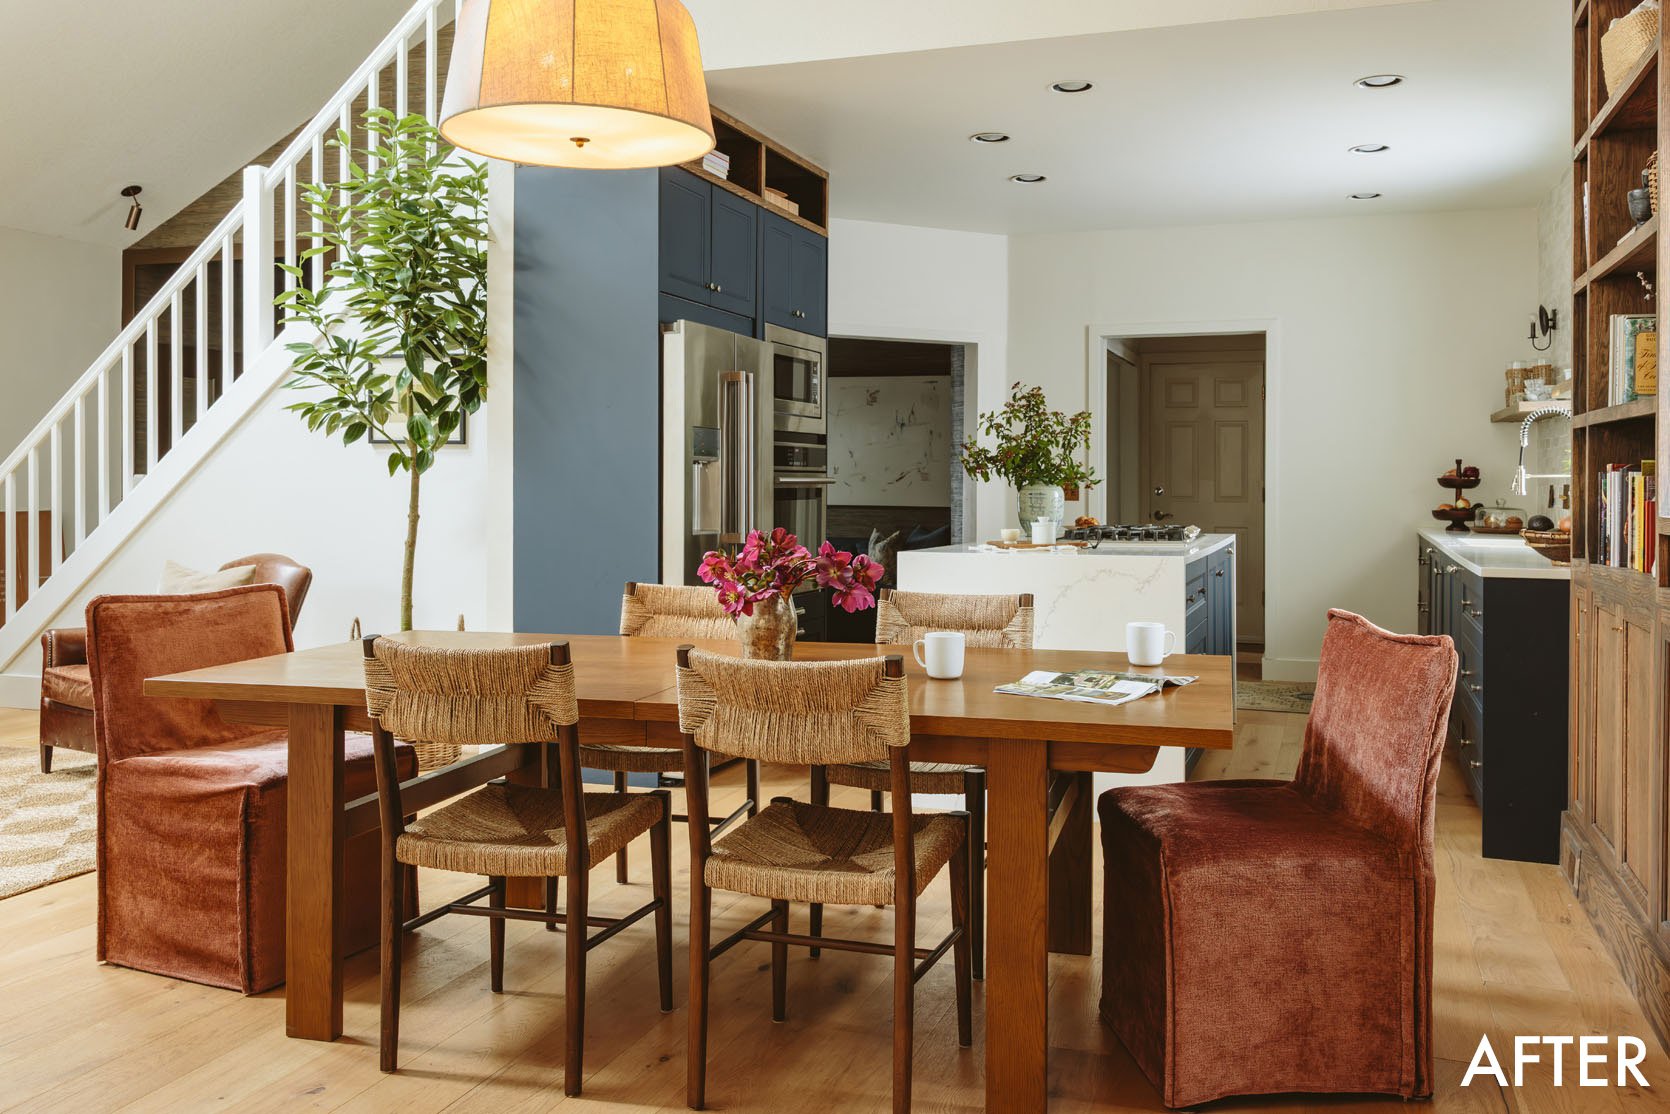
Dining Table | Woven Chairs | Captain Chairs | Pendant Light
We shot their finished DIY IKEA kitchen a couple of weeks ago, and this before-and-after is WILD, especially when you read how much they did on their own with three kids underfoot. They stayed very close to their budget, making compromises where they had to, and while it took a bit longer due to a 3-month stint in Kentucky, I honestly can’t believe how much they did in a year, themselves. They learned a TON along the way and were kind enough to answer all of our burning questions. Without further ado, check out this DIY IKEA kitchen by Chrissy and Peter.
A Total Transformation
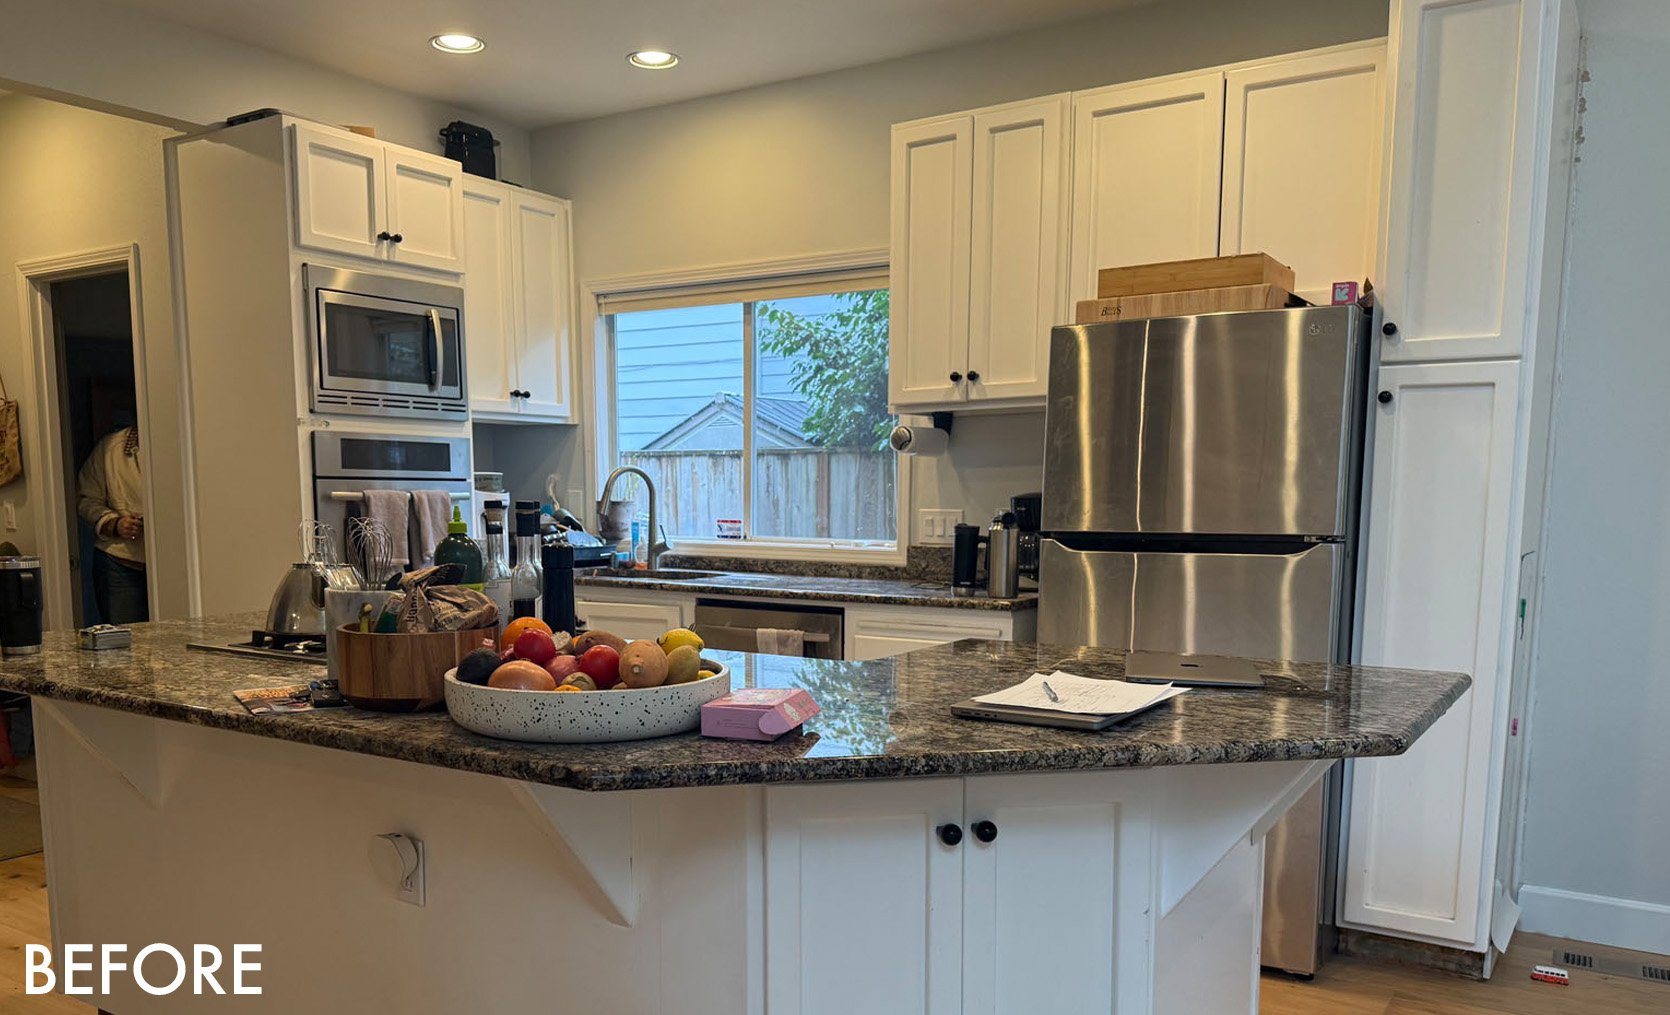
The kitchen they started with was dated, and the layout felt cramped. With careful planning and plenty of hard work, they absolutely transformed their space and really brought this new kitchen to life. To dive deeper into the process and see the work unfold along the way, you can revisit their last post here.
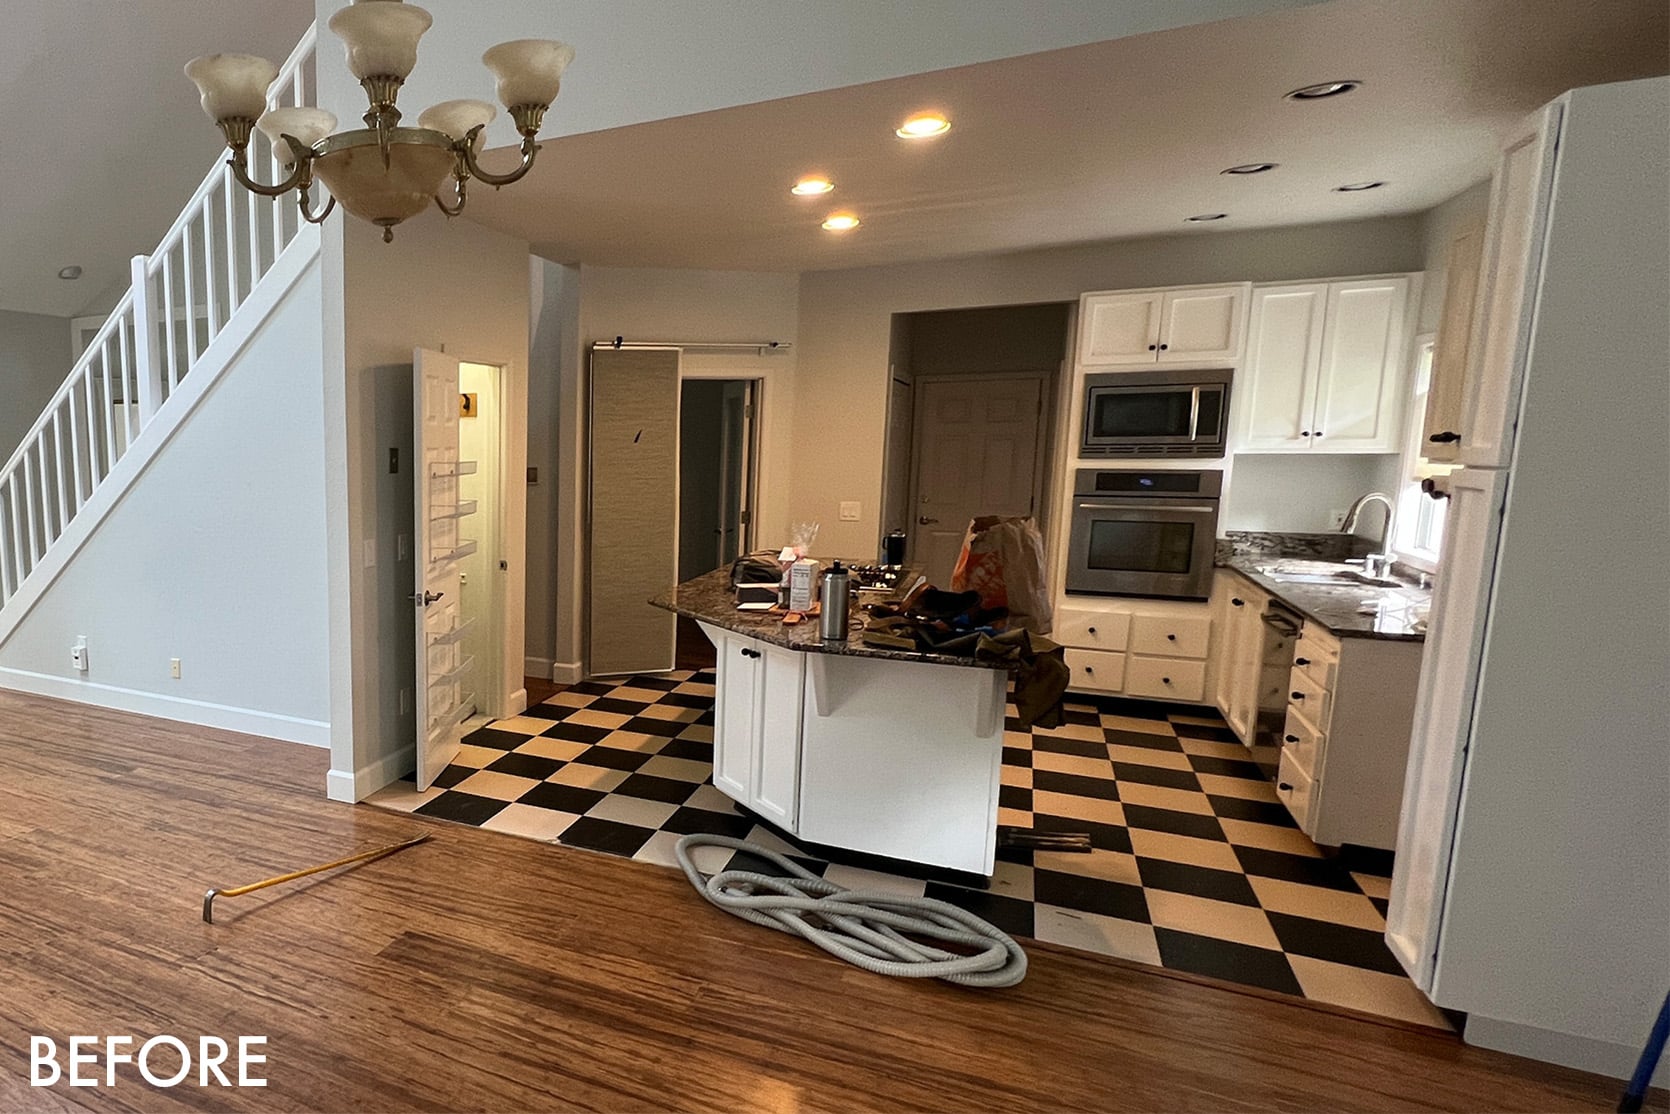
Now that their kitchen project is all wrapped up, Chrissy and Peter are sharing all they learned from this great undertaking.
The IKEA Cabinets
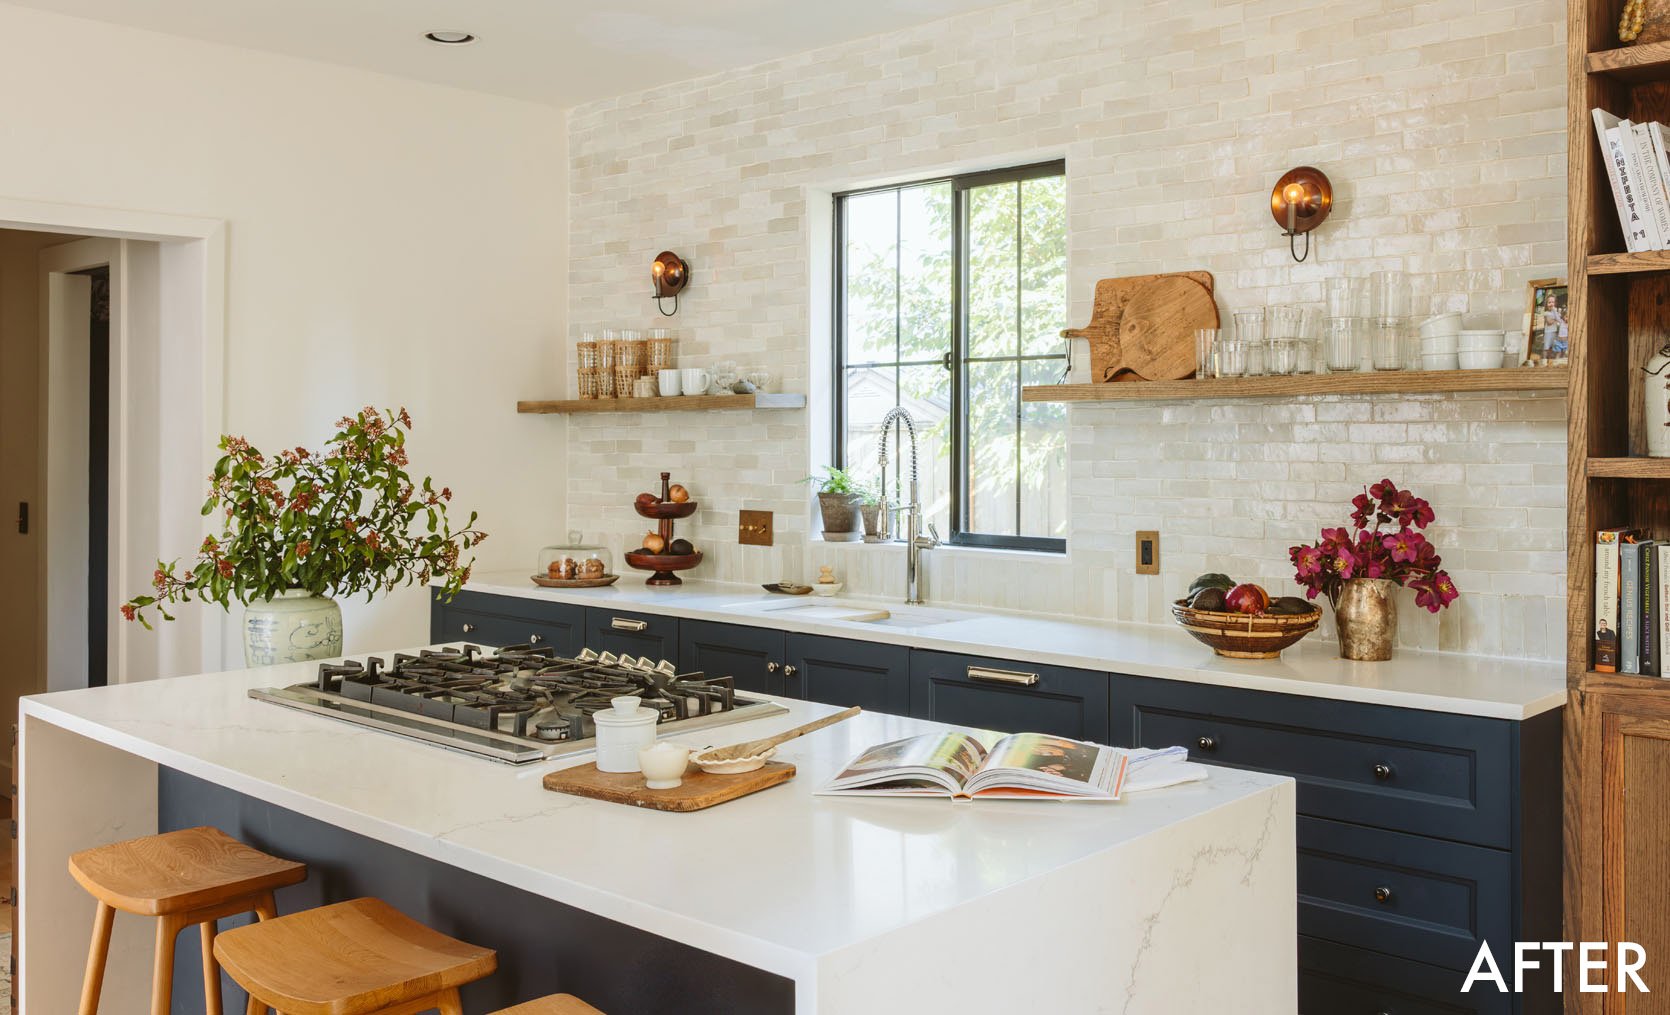
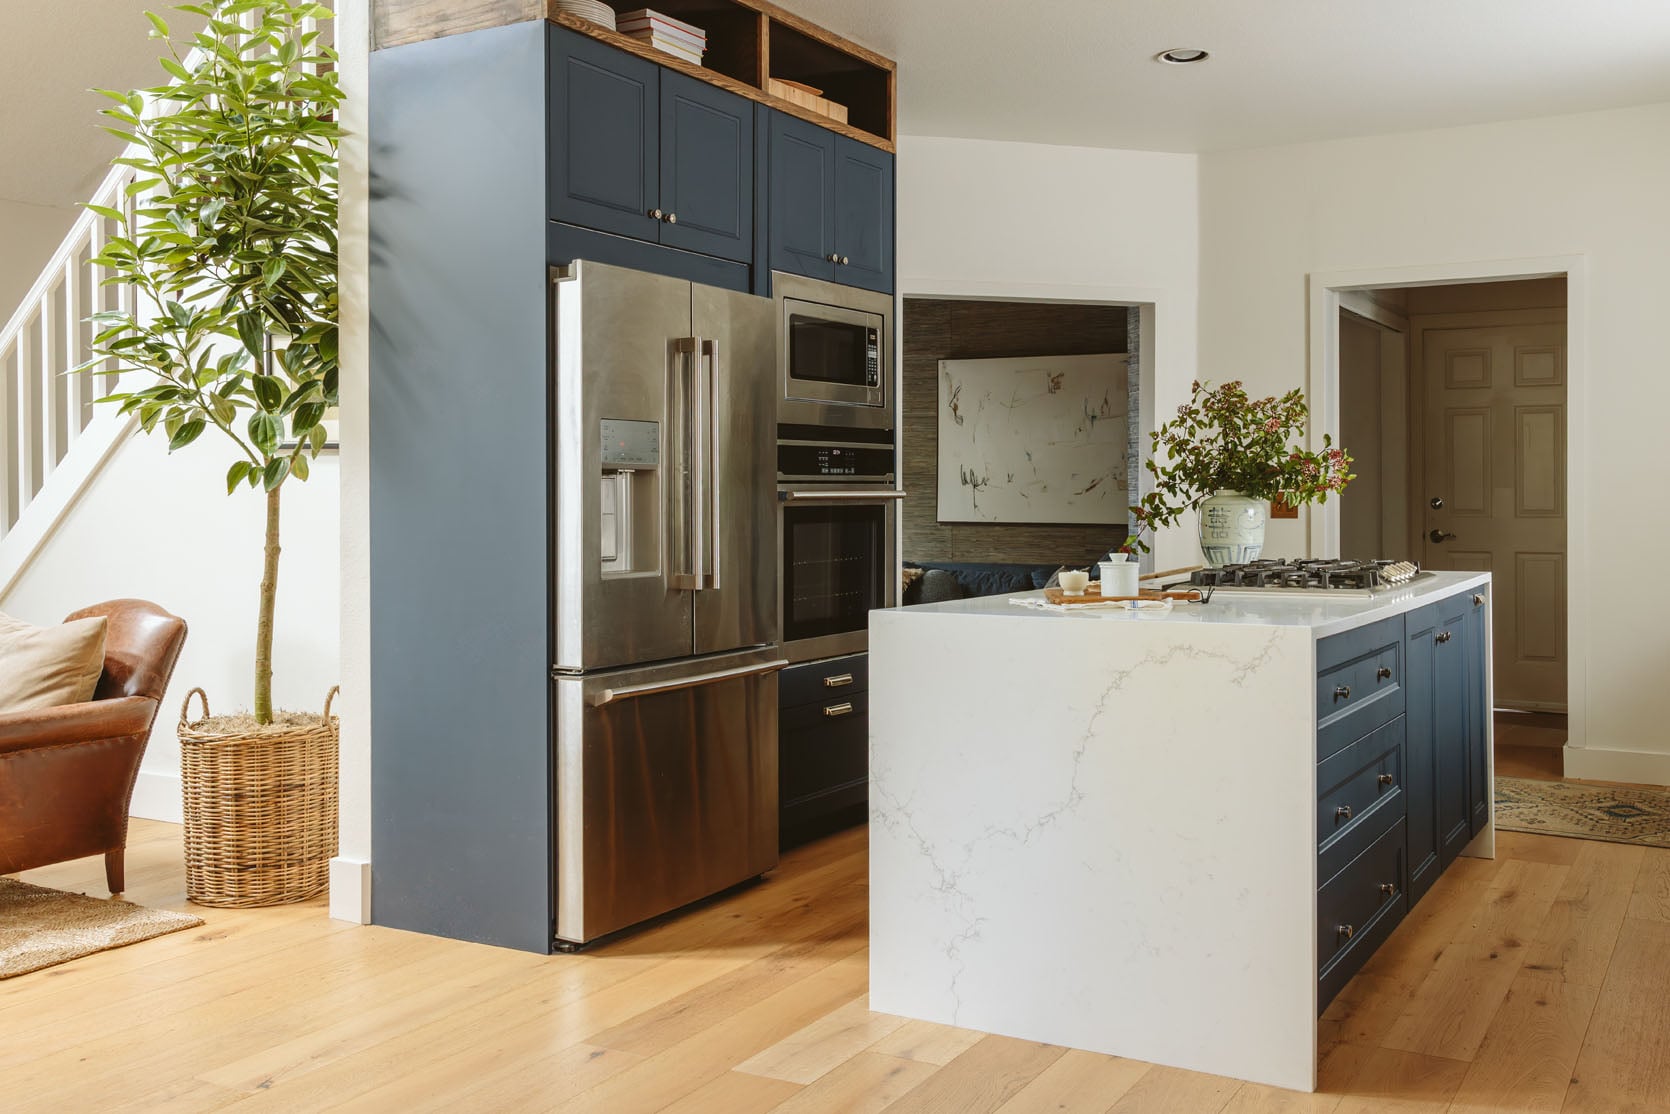
The navy blue AXSTAD cabinet fronts (a color IKEA is starting to phase out, so get them while you can!) and the SEKTION cabinet bases served as an excellent foundation for Chrissy and Pete’s DIY design. Starting with IKEA really helped them hone and customize their design.
AXSTAD Cabinet Fronts | SEKTION Base Cabinets | Knobs | Pulls
How happy are you with your IKEA cabinets?
They are fantastic. Truly so happy with them. We feel the matte navy blue really elevates the “IKEA” look. However, the finish is not for the faint of heart, because like anything matte, it’s hard to keep spotless. While we have young children, dogs, and are avid cooks, this doesn’t seem to bother us, but it’s worth mentioning. The warm soap/water combo does the trick!
How long did it take to build the cabinets yourselves?
Peter did it by himself, so a few hours a night, for a week. Once you get into the flow, it’s rinse and repeat.
How long did it take to install them all?
This being his first time, it probably took about 3 full days of doing it solo. So 36 hours. Like all new DIY projects, it just takes a beat to get the hang of it.
Did you follow IKEA’s instructions, or did you rely on YouTube videos?
We found that the instructions that came from IKEA were actually really user-friendly, but YouTube was a saving grace for sure. The panel-ready dishwasher door, for instance, took a bit of figuring out. YouTube is a great resource, and we have learned a ton using it for DIY projects.
Which cabinet types were easiest to install? The hardest?
The sink and the stove (no drawers!). But truly, the drawers are pretty easy, just time-consuming. The fridge and the oven were the hardest from a pure strength standpoint. Just physically difficult, so Pete needed a friend to help put the oven in. Oddly, the spice rack drawer was complicated to build, but we’re happy to have it!
How impressed are you with cabinet quality?
We’ve had three other kitchens from three past houses, and while this is our first IKEA kitchen, it surprised us in durability, features, and yes, quality — fantastic quality (for the price!), and we would definitely recommend it to those who aren’t afraid to roll up their sleeves.
Are there any IKEA must-haves that you would recommend to someone else?
Panel-ready dishwasher from IKEA was a no-brainer. And it’s totally affordable! Oh, and we really enjoy the “drawers within drawers” add-on feature IKEA offers. Great way to maximize storage space within the drawers. Having soft-close cabinets and drawers was important to us, and with the cabinets we chose, it was standard — IKEA for the win!
IKEA Appliances
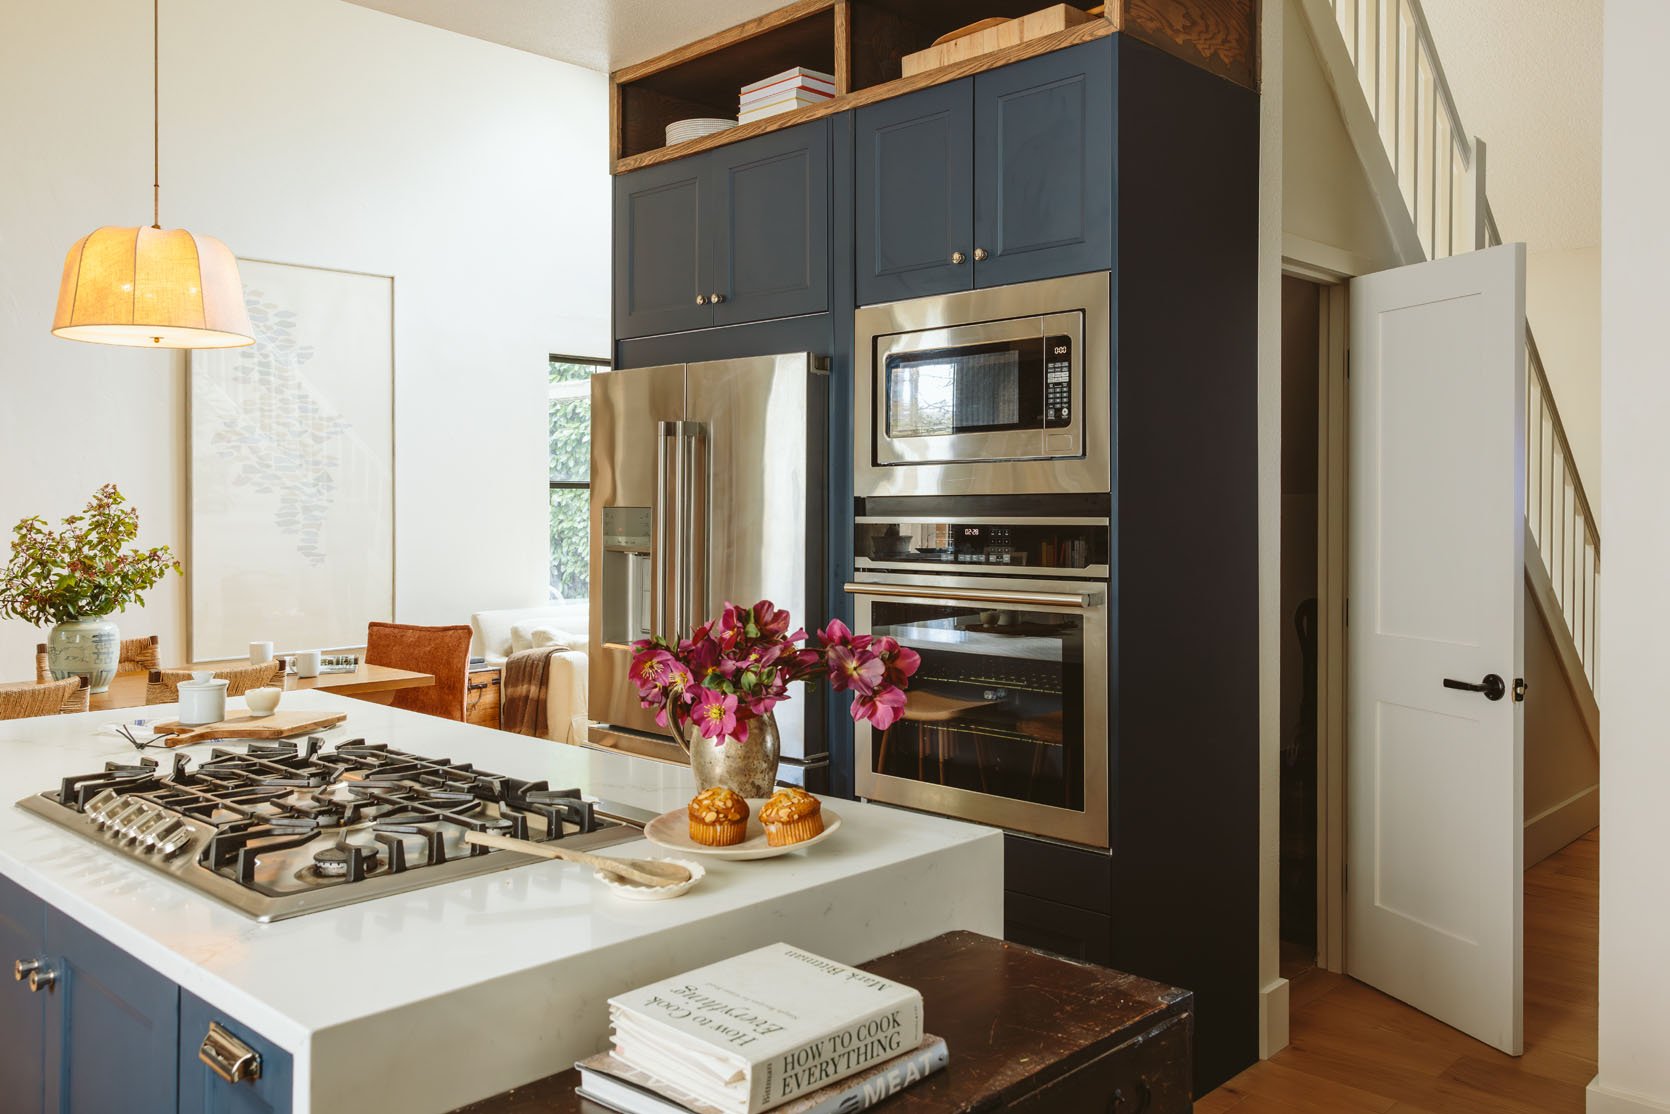
Stovetop | Fridge | Oven | Microwave
Did you purchase all of your appliances through IKEA?
Yes! It wasn’t crucial to the design, but it made everything easier when designing and using their kitchen planning tool, so we could just plug in those appliances using exact dimensions. We’re happy with them so far!
Were there any parts you had to troubleshoot or DIY?
So above the refrigerator and the oven, the ceiling height is 9 feet (roughly), and I believe the IKEA panels’ maximum height is 8 feet. We didn’t want the gap between the top of the cabinets and the ceiling, and IKEA didn’t have any matching gap-fillers. When we figured out we were going to do stained wood on the wall with the built-in bookcase, we decided to put a little matching cubby up there. It worked out great and tied in perfectly.
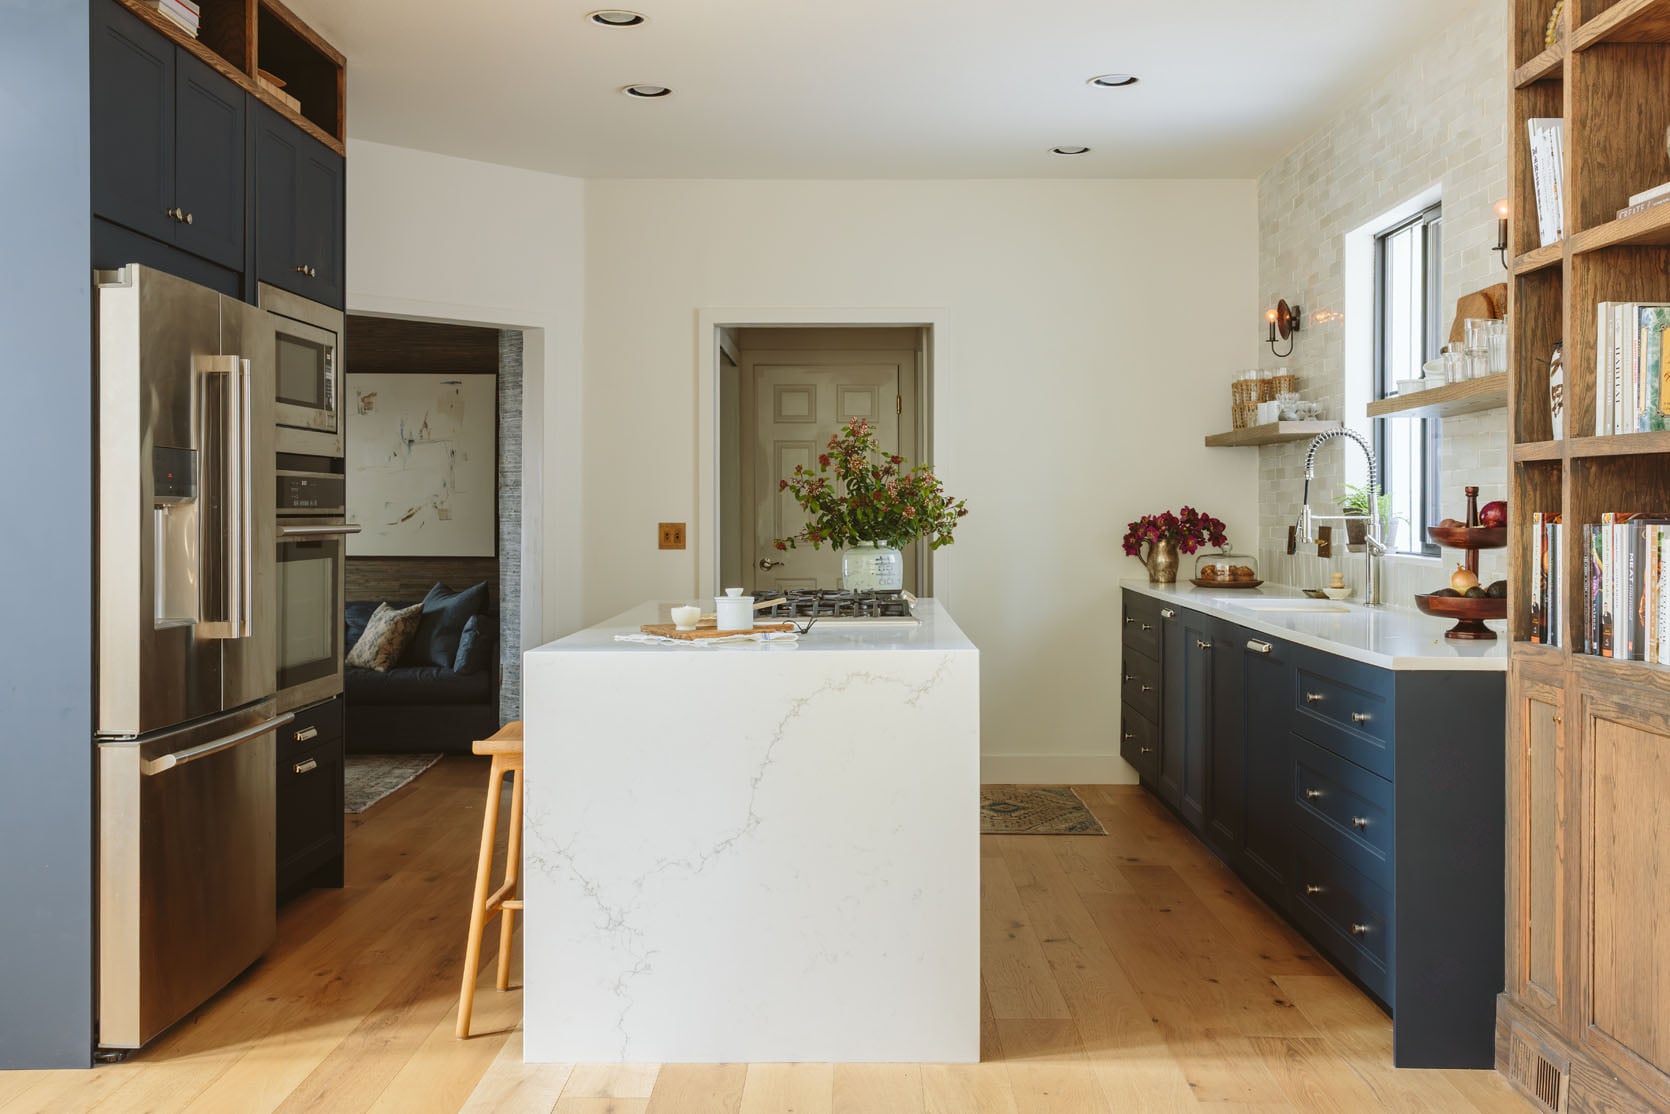
Planning Their Layout
One of the best things Chrissy and Peter did was shift their layout around. While a few readers had concerns that moving their everyday appliances to the old pantry wall would feel too far away, Chrissy and Peter report that this move has been a huge success.
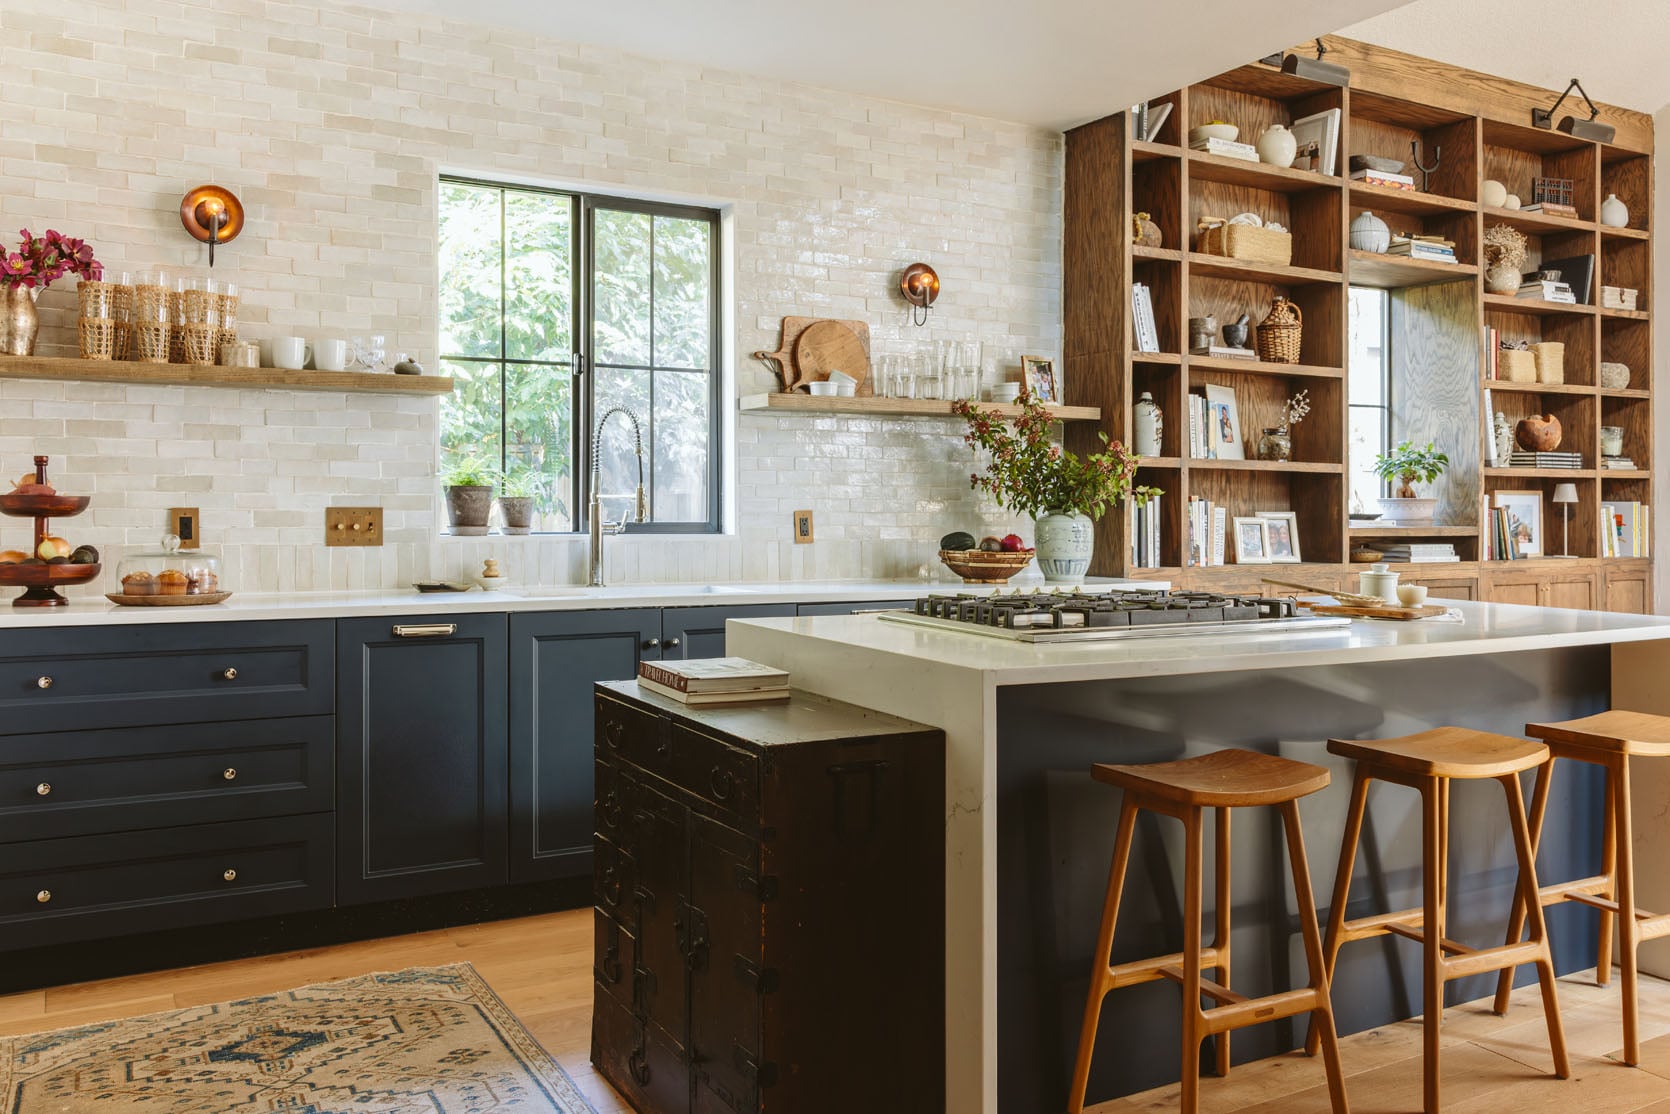
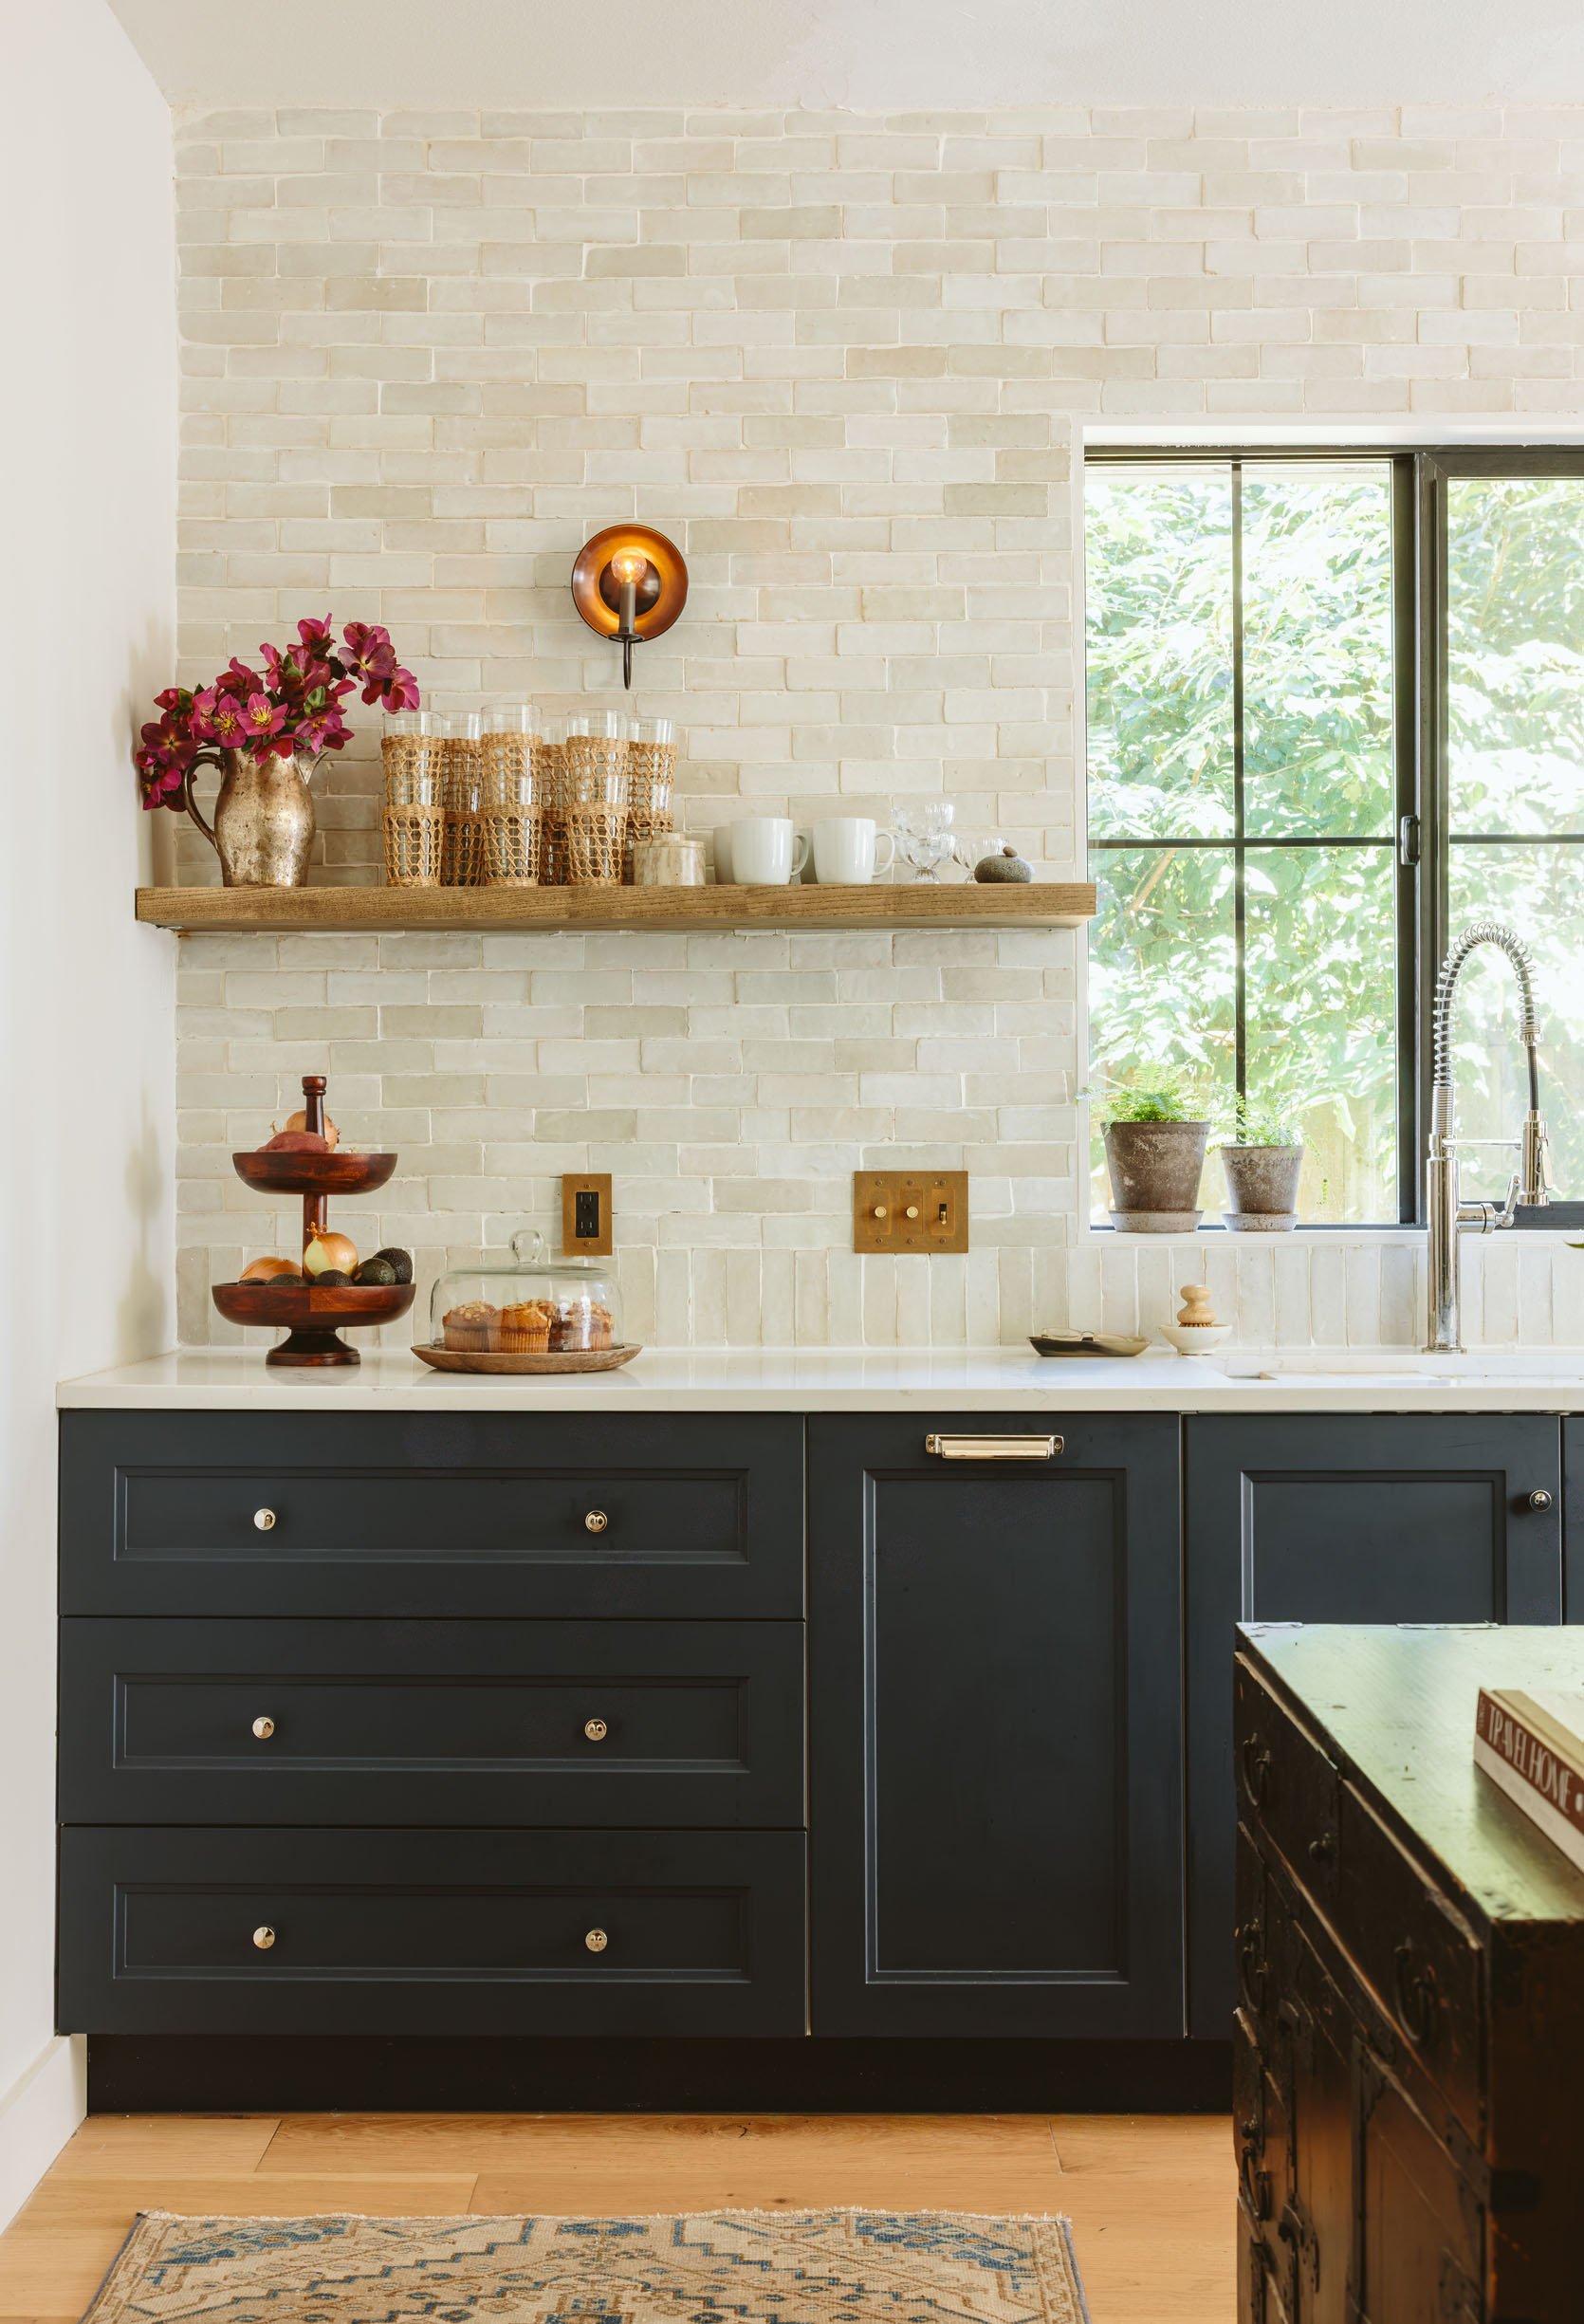
Floating Shelves (made by Pete) | Circular Sconces (vintage)
How do you feel about the new layout? Are you happy with the “appliance wall”?
We absolutely love the layout — walking around to the fridge? Not even a thought in our minds. We like the separation as it alleviated potential bottle necking on one side of the kitchen. Flow is so important, and while the footprint is technically smaller, the way we use the kitchen works well for our family and makes the most sense. The biggest takeaway here is that by moving the pantry opening into the hallway, we were able to utilize a previously underutilized wall. Thus giving us the illusion of more (usable) space. Bingo!
How helpful or accurate was IKEA’s 3D planner tool?
Very accurate and pretty essential to the whole process. Chrissy led the charge on this, and it really helped make sure everything would work perfectly in the space. The interface was pretty reliable; you have to make sure to save the build so you don’t lose it. But a super helpful tool for sure.
How was the ordering and delivery process?
Amazingly, everything came as expected. You just have to make sure to put in the time to verify that the order is right. And definitely making the appointment with the cabinet specialist and going in-store to walk through it with them is a MUST – at least for us. This allows you to double, triple, and quadruple to confirm you got it all right. It will take a few hours, but it’s worth the time.
DIY Drama
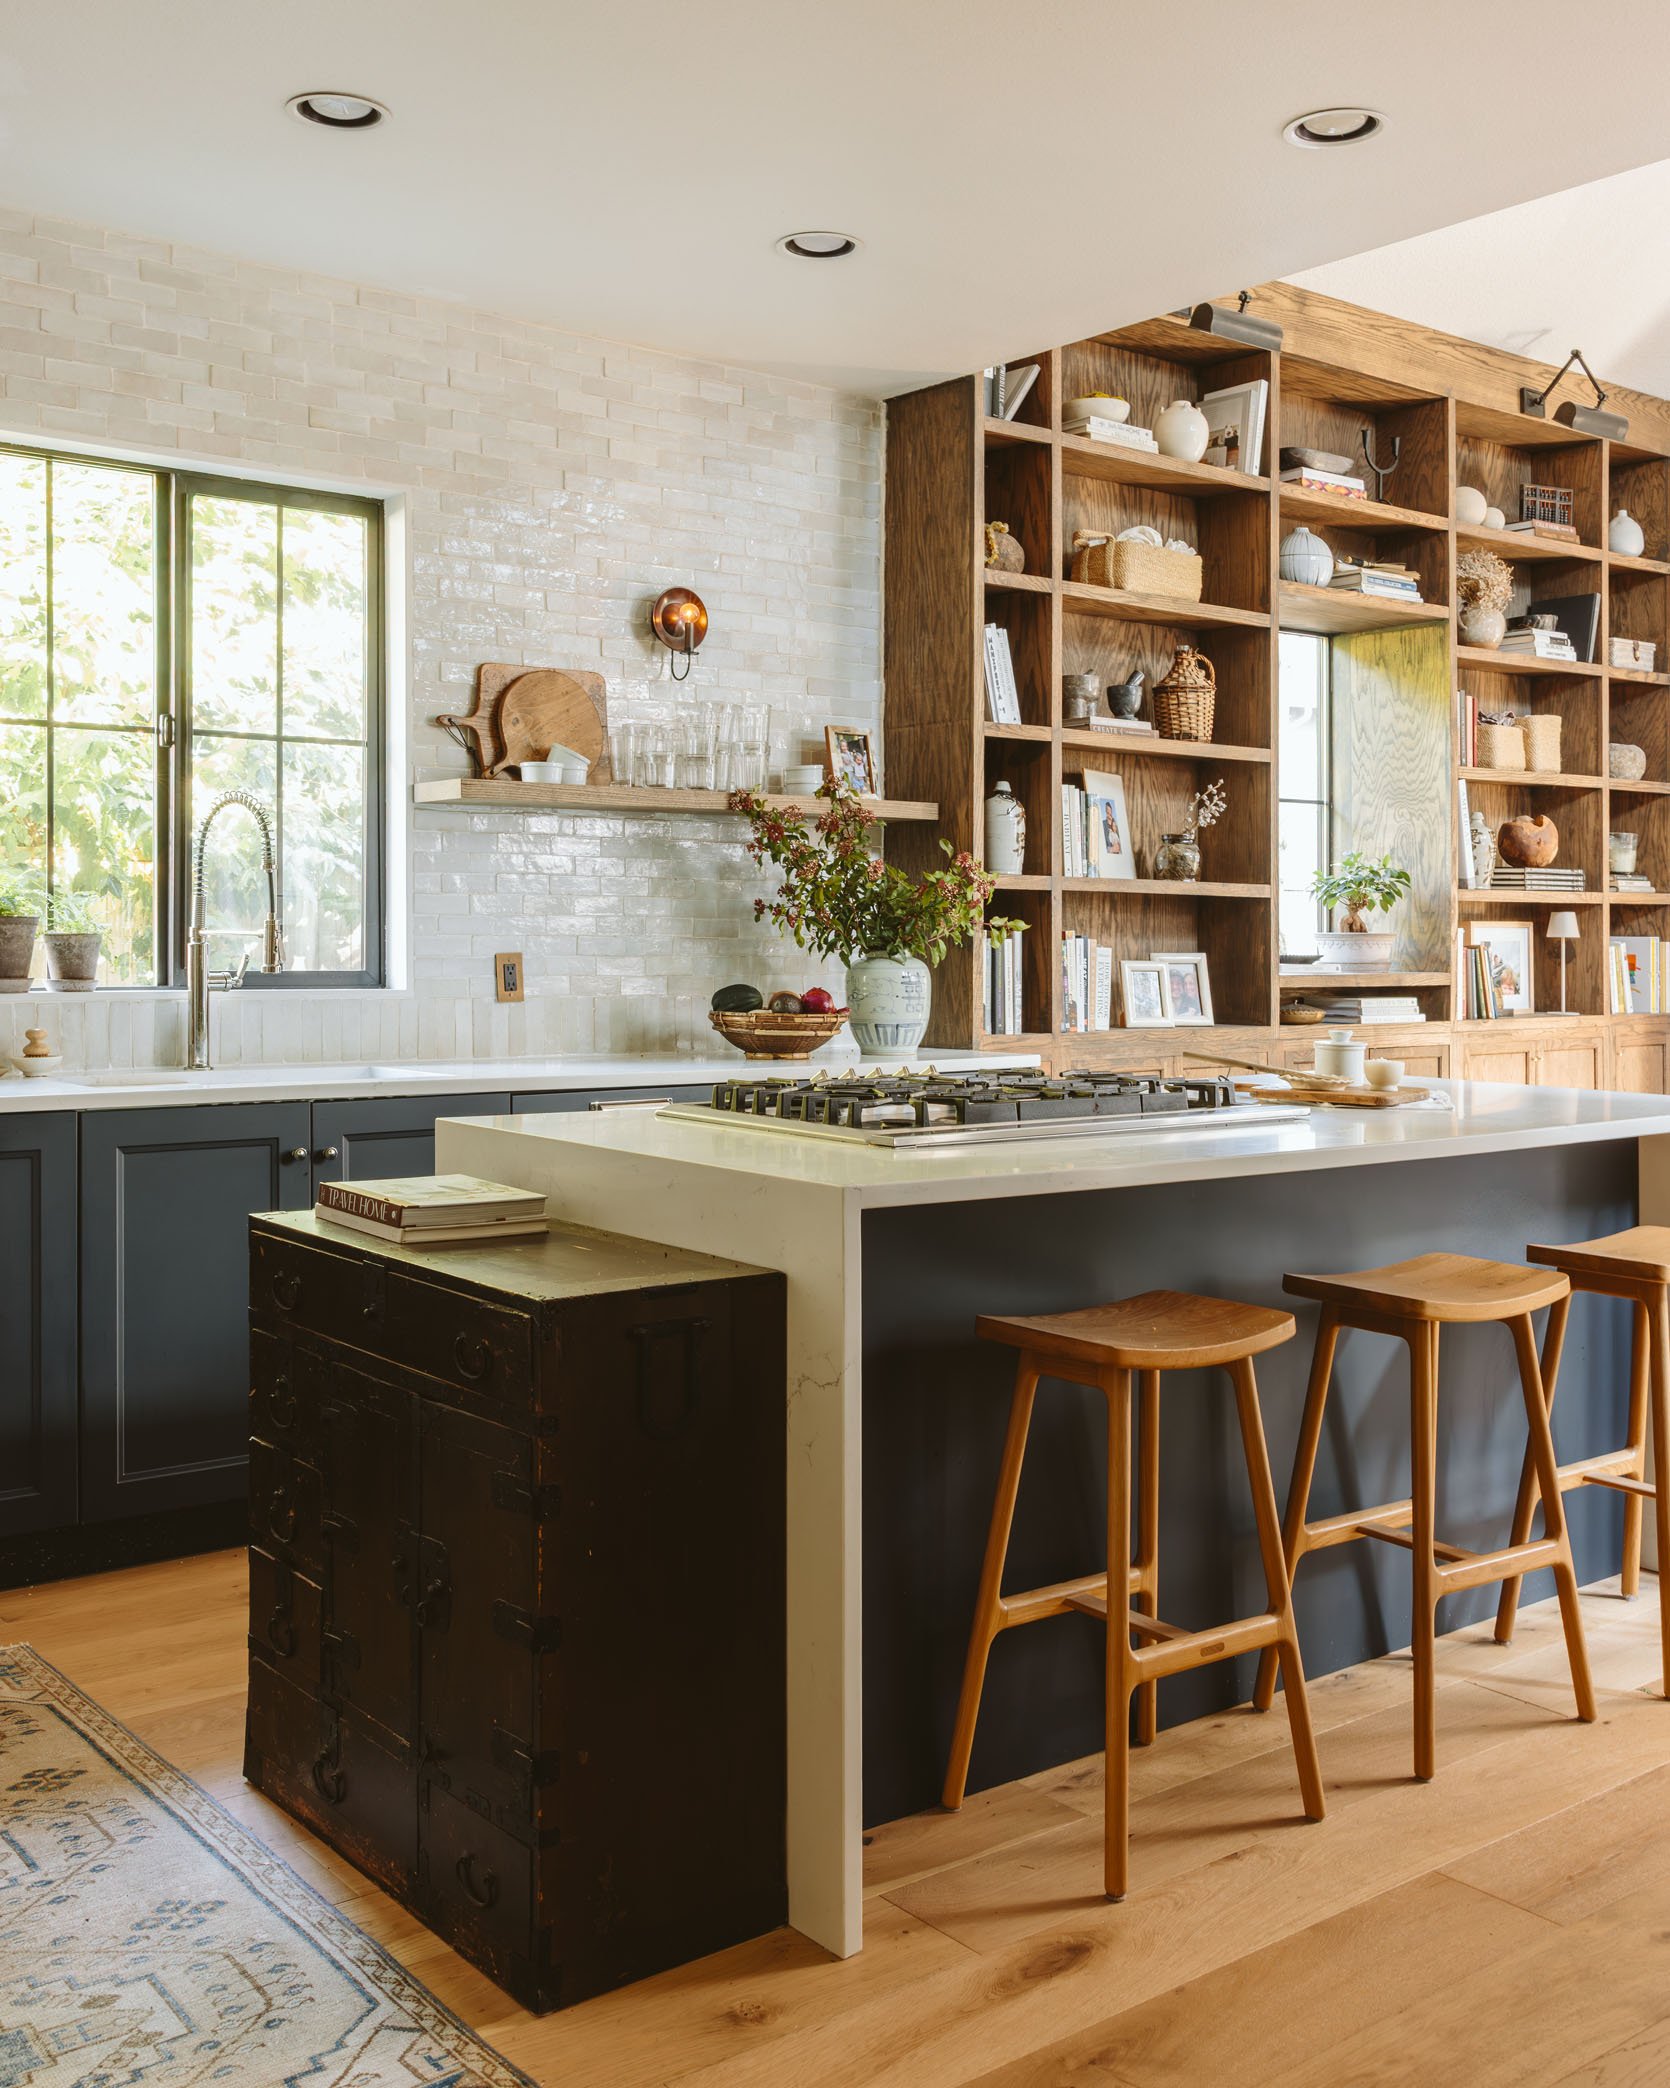
Japanese Tansu Storage Chest (antique) | Runner | Stools
What was the most stressful part of this project?
It was the island. We had to move the gas line (one of the things we contracted out to do), and fix the hardwood floor (again, we contracted out for this). The periscoping vent is something I installed myself, and that was a whole thing. To make an island, you have to build a support brace that you can attach the cabinets to, and you have to make a space for the vent. This was incredibly time-consuming, hard, and stressful, because the fabricator was cutting the stone based on the precise measurements of this vent. IE – no mistakes (I did the math probably 5000 times to make sure I got it right) and in the end, it all worked out and fit LIKE A GLOVE. The back panel is also IKEA. Used my table saw to cut it just so, and it worked out perfectly!
The Countertops
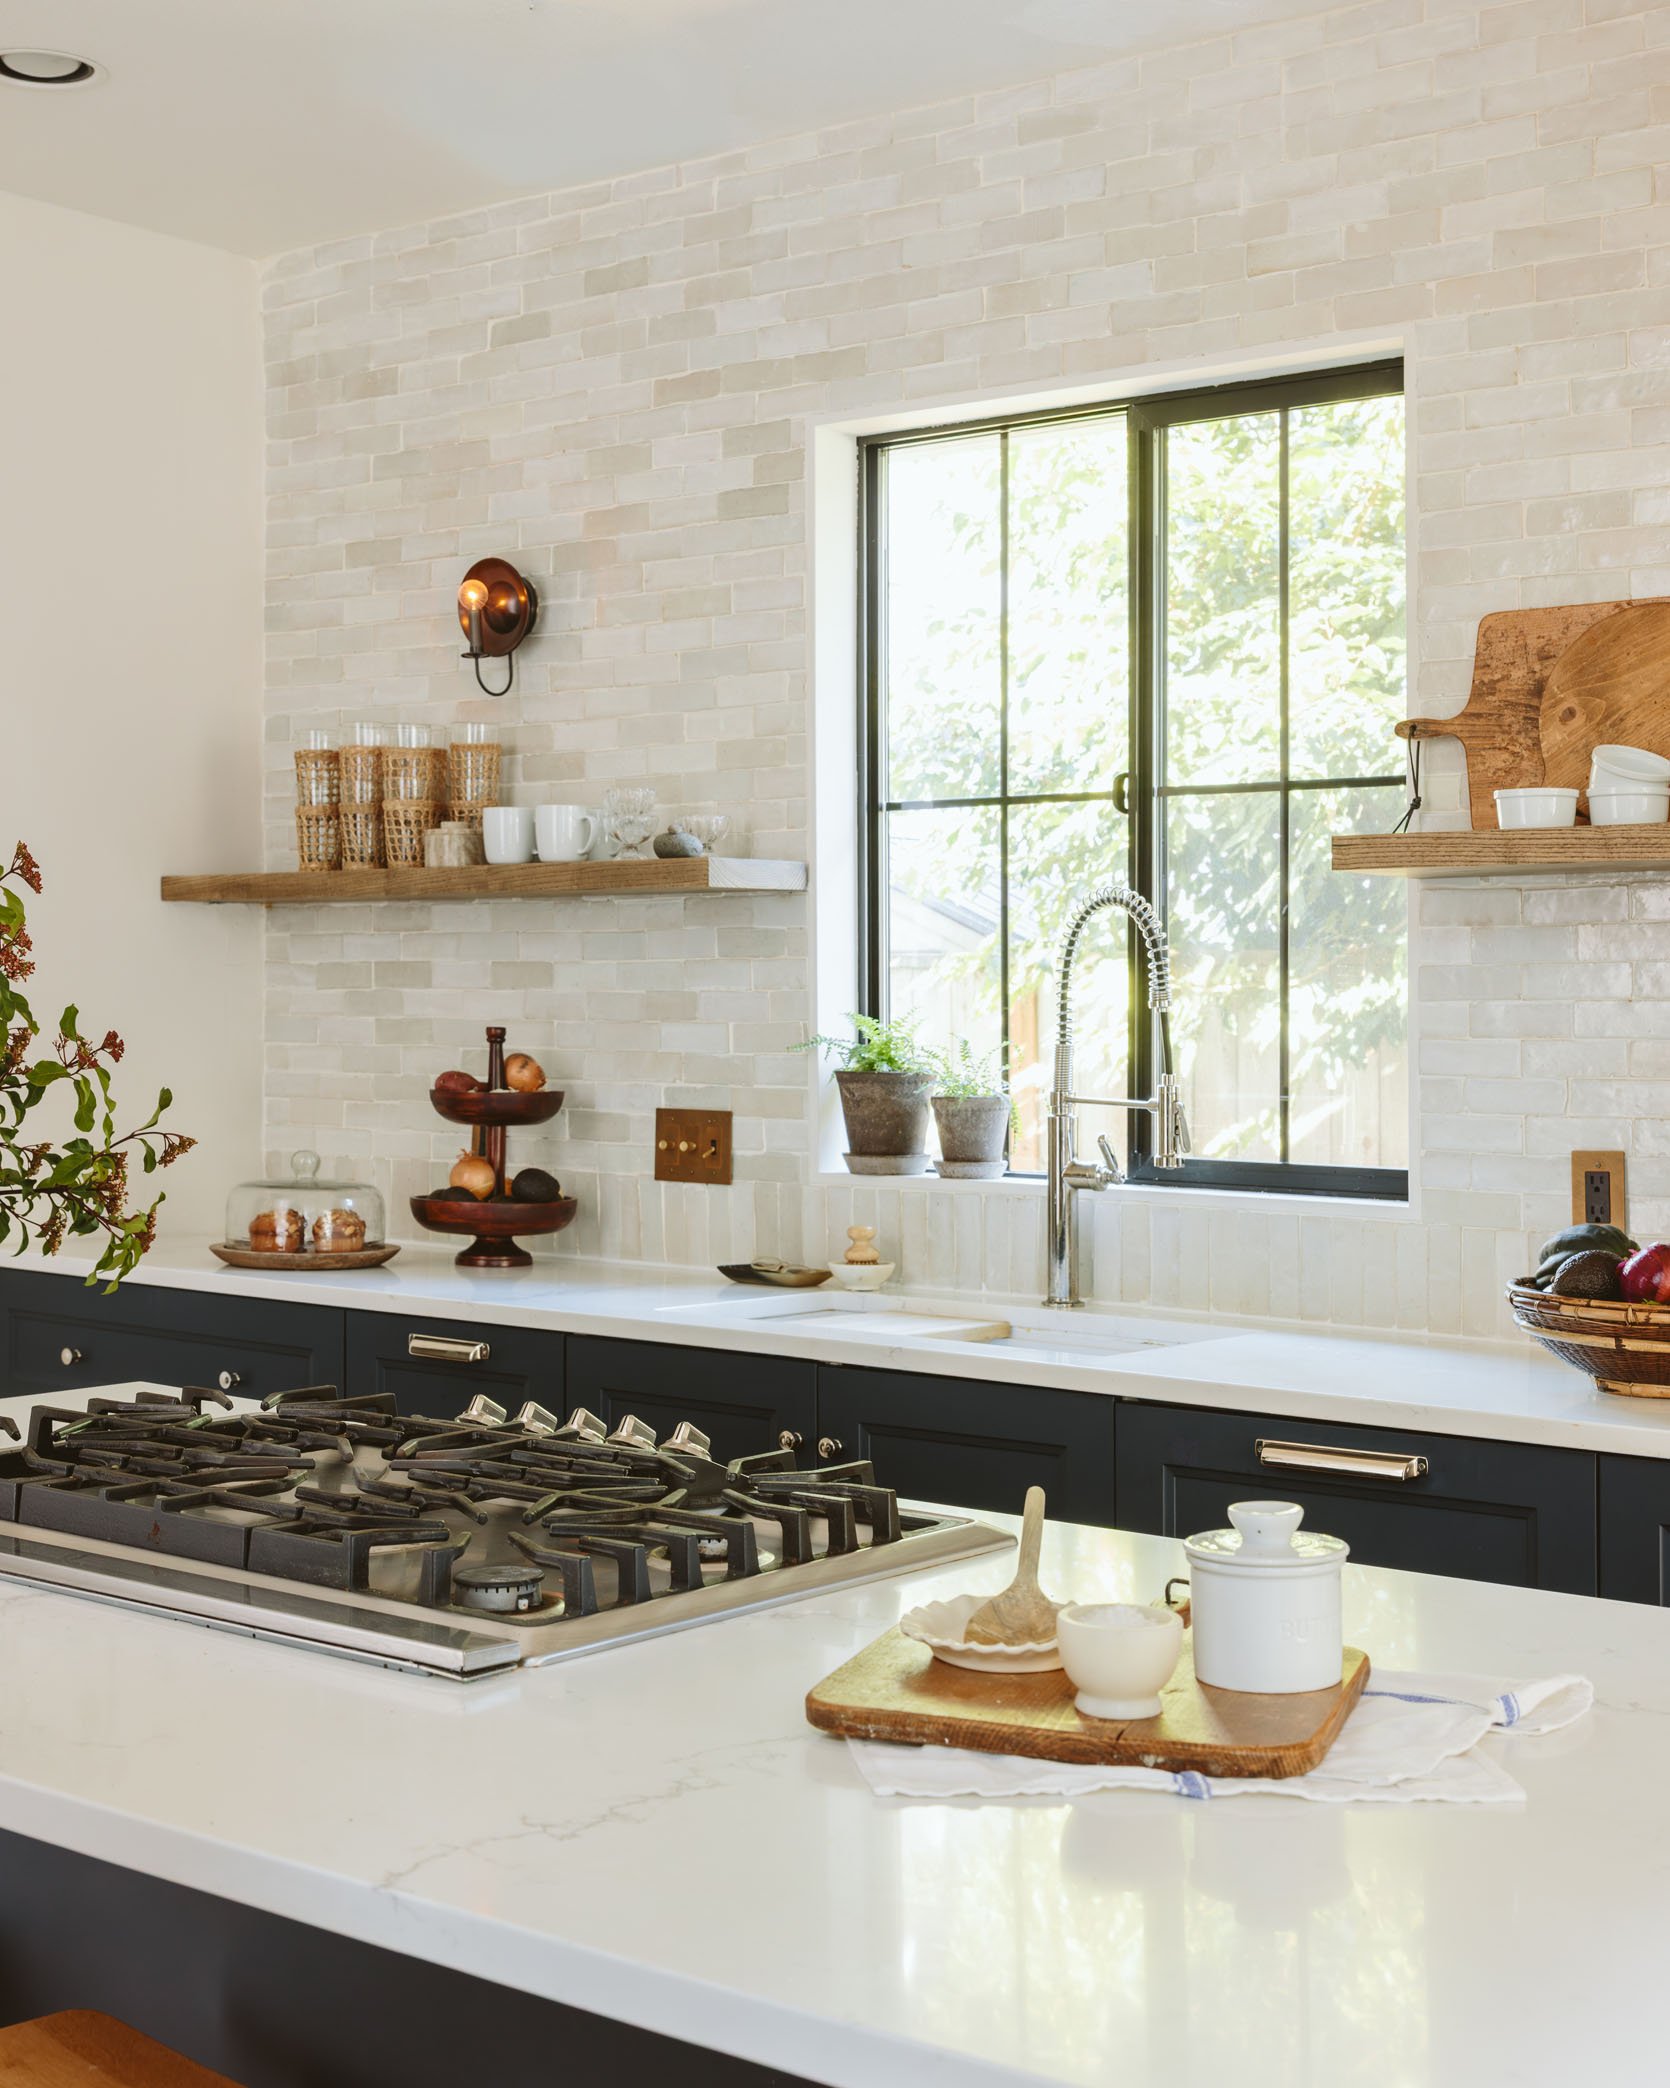
Why did you decide to go with this quartz countertop?
IKEA did have a variety of countertop options, including quartz — we just wanted a more specific looking quartz. And yes, true to form, quartz counters are overall durable and affordable* (depending on where you live… in Oregon, for instance, it’s nearly the same price if not more than natural stone). I wouldn’t say staining has been eliminated. You just have to be careful.
How did the waterfall style work out with the IKEA cabinets?
The waterfall is great. We were definitely hesitant about it at first – from a design point of view, they were not our first choice, but we felt it was the best way to deal with making the IKEA island work. Due to the cooktop being on the island and the periscoping vent fan, there would have been a large gap in the end panels, and the waterfall ensured this was covered up seamlessly.
The Tile And The Floating Shelves
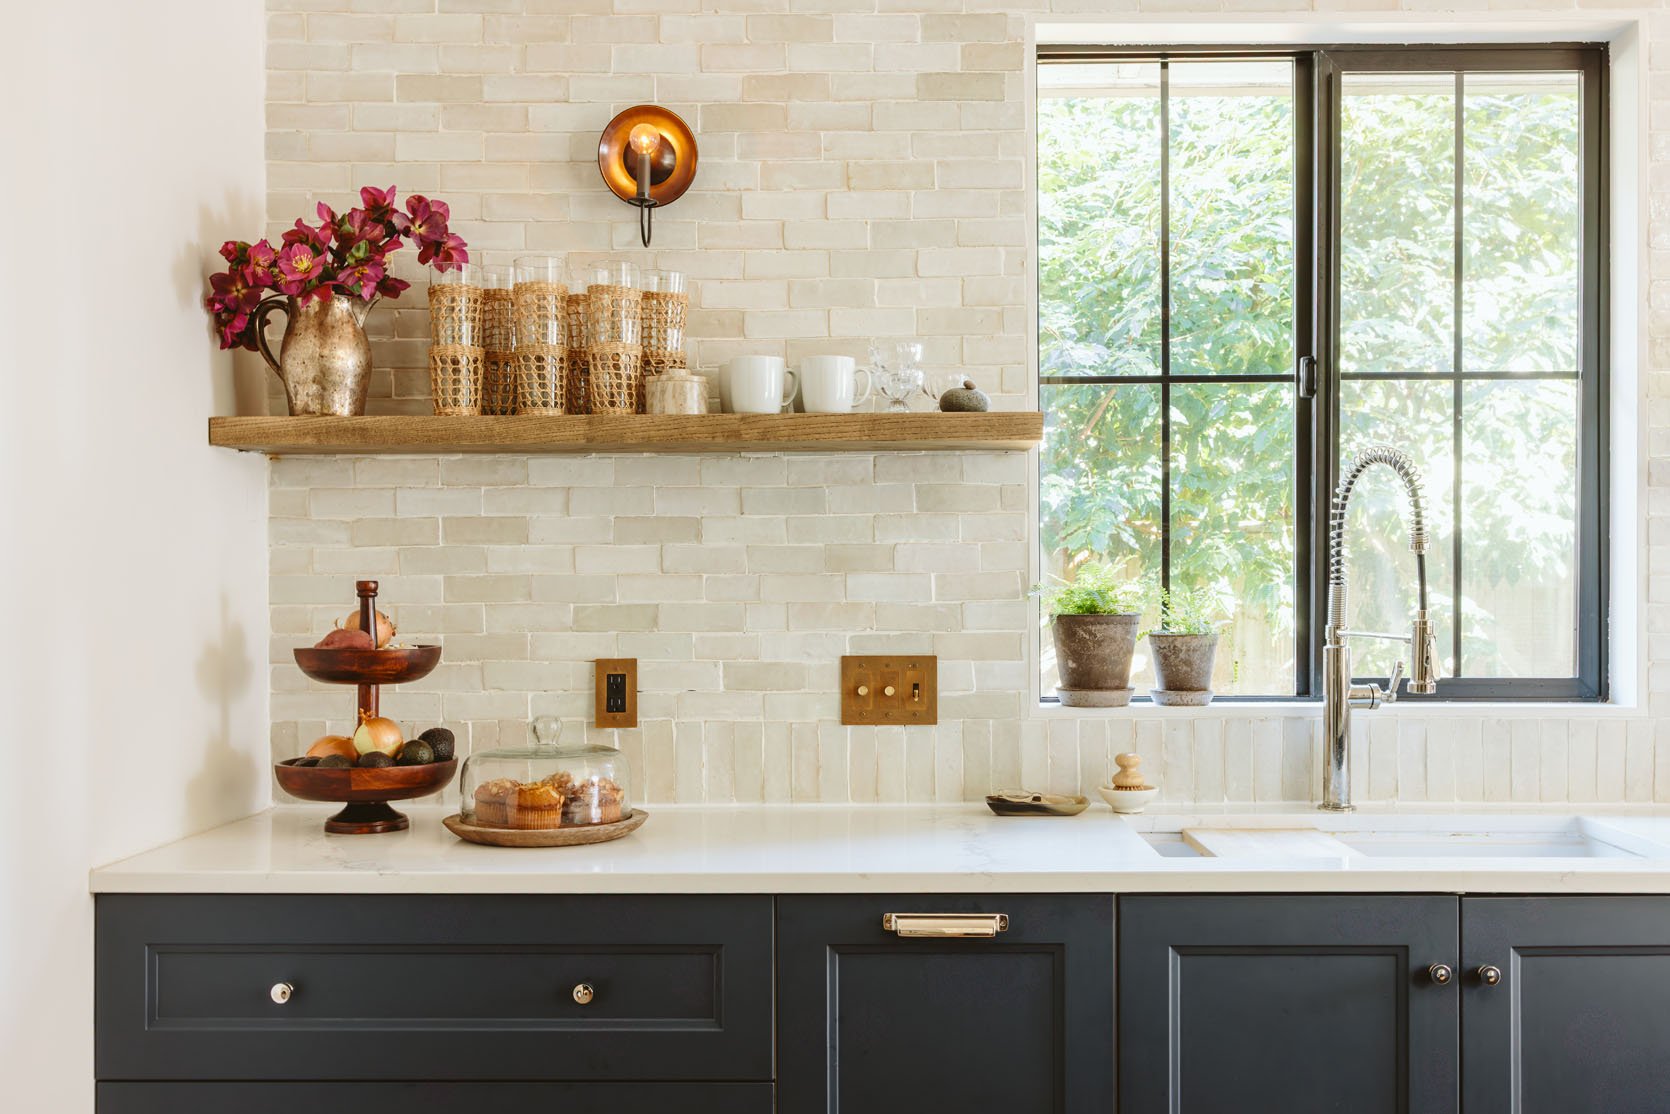
Tile | Grout | Switchplate
Was your tile worth the splurge? Would you “Zellige” again?
Yes! It’s worth the splurge 100%, and yes, we would do it again. And again. We prefer the
imperfections and color variations — the depth they give to our space, swoon. Re: soaking the tile (read about that here) — look, for all the folks who blow-dry their hair before curling it, that’s all soaking is. The blow-dry step before curling. It doesn’t have to be perfect, delicate, or precise. Give it a quick soak (faster with two people to assembly-line it) and then tile. No biggie.
Are you happy with your decision to do floating shelves instead of upper cabinets?
For our space, it felt like the right decision — while upper cabinets have a place, here it would have been
too congested, and eliminating the uppers really opened up the space.
The Lighting
We chose to save the majority of the existing can lighting in the kitchen in an effort to help keep our budget in check. We moved a few lights around the window/sink area, as well as got rid of one. That way, we were able to use that budget towards lighting in the dining room, where we felt it made a bigger impact.
Final Thoughts
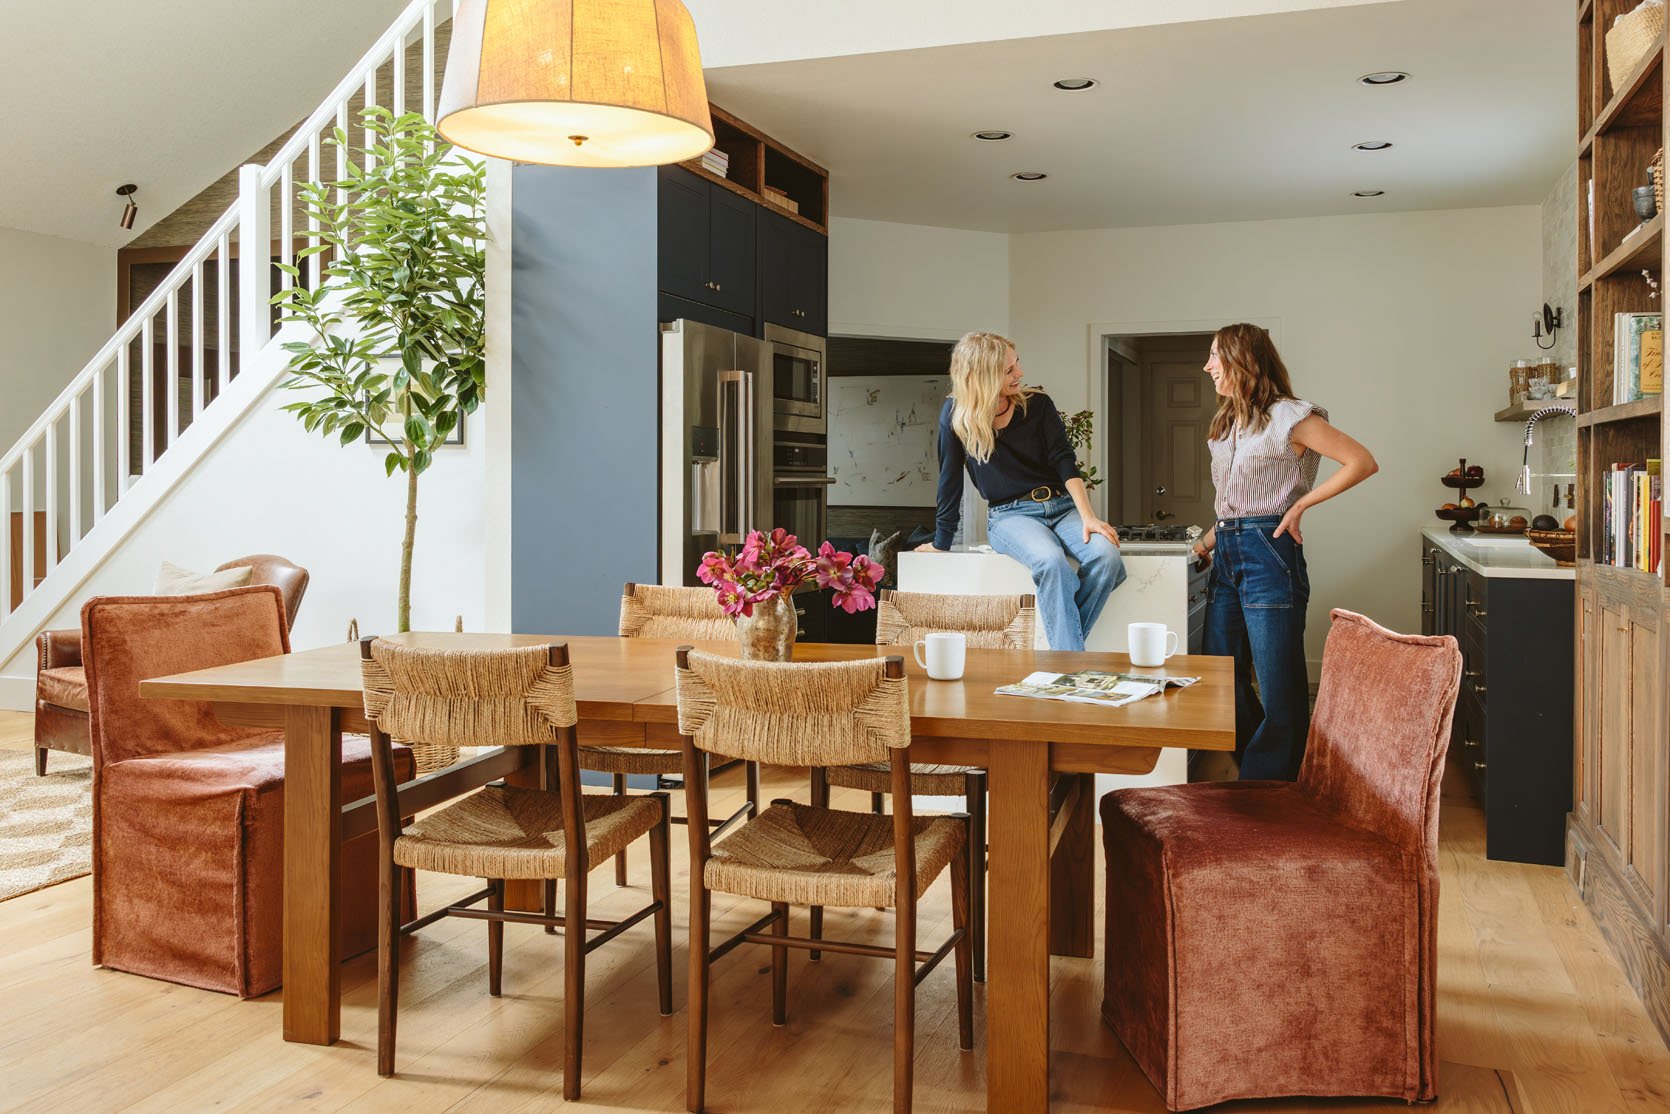
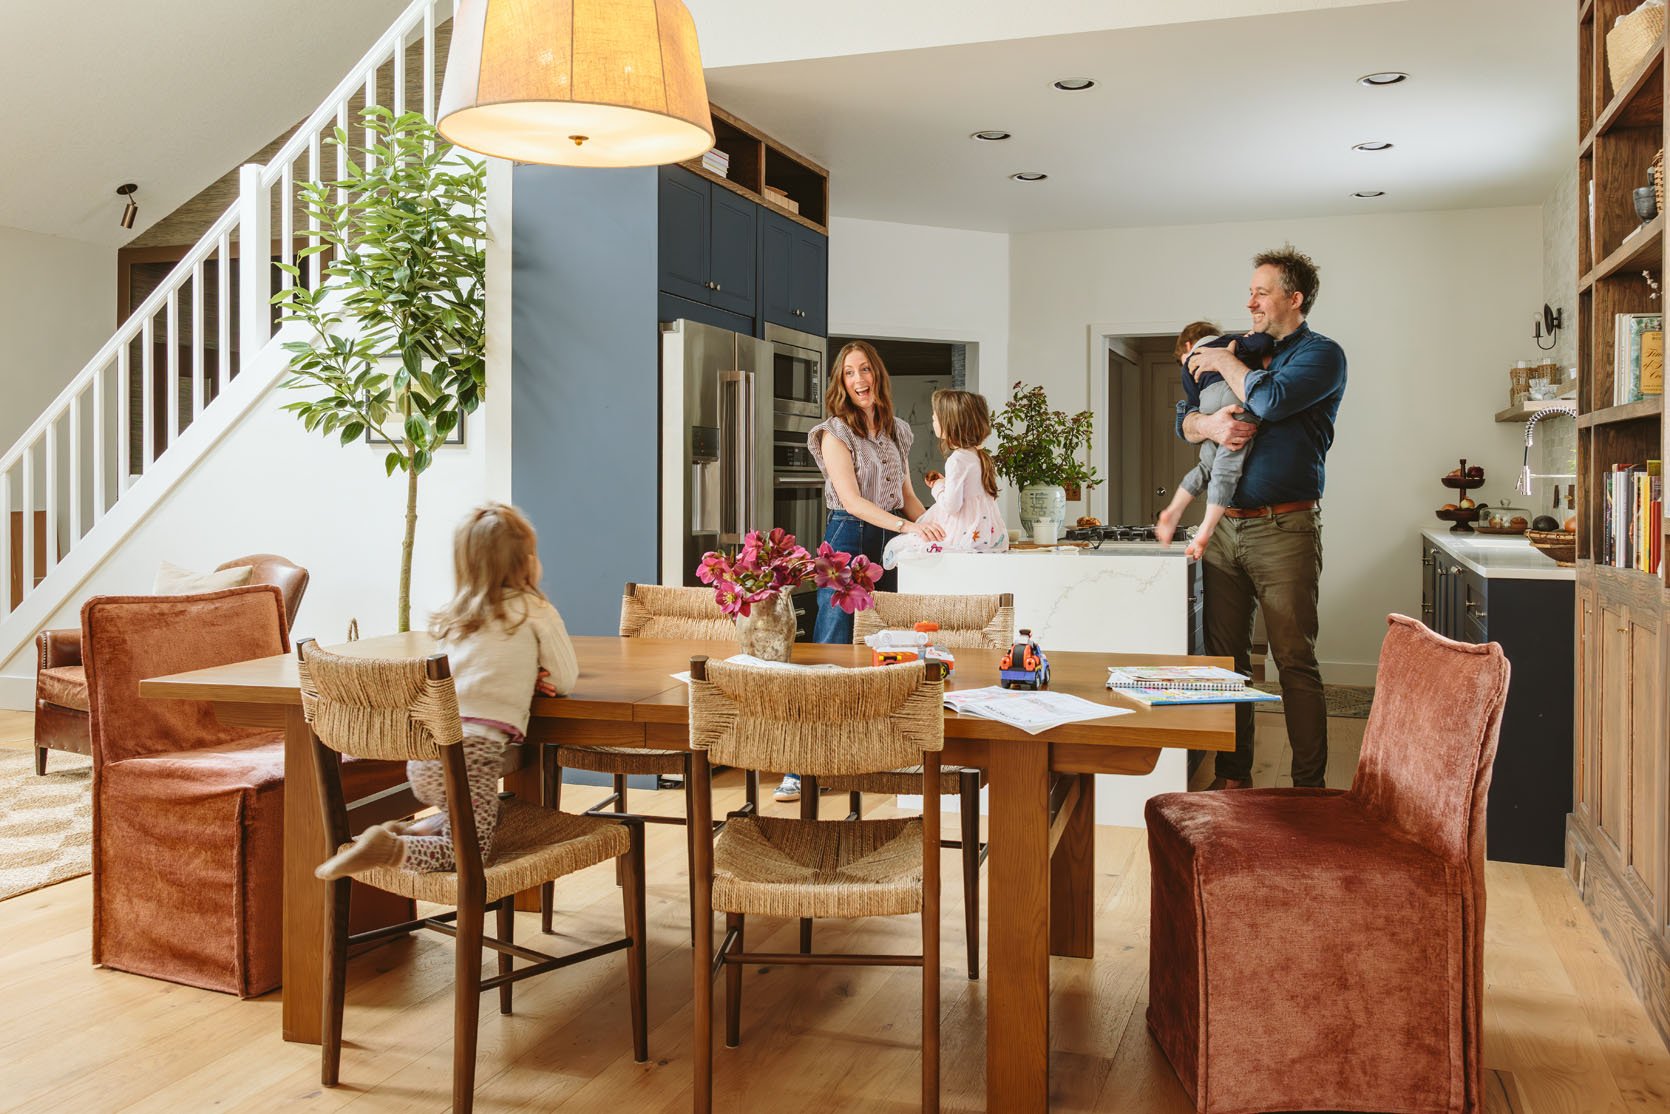
Dining Table | Woven Chairs | Captain Chairs
Any tips for the indecisive?
Definitely go into IKEA and look at everything. In the case of the cabinets we chose, they were much
nicer, elevated both in style and quality, than comparable cabinets on the market.
Your biggest takeaways?
The con of this project was that it was lots of work, of course, but the pro is that it is ours, and it has a real story behind it. It is something we made together, and that means something to us. It’s work to get the finished product, and requires design creativity for sure, but for us it was all worth it!
Would you ever tackle another IKEA kitchen?
Totally. We’re proud that it’s IKEA. Using the cabinets as our foundation, we’ve layered in all the rest of the design elements that make it our own.
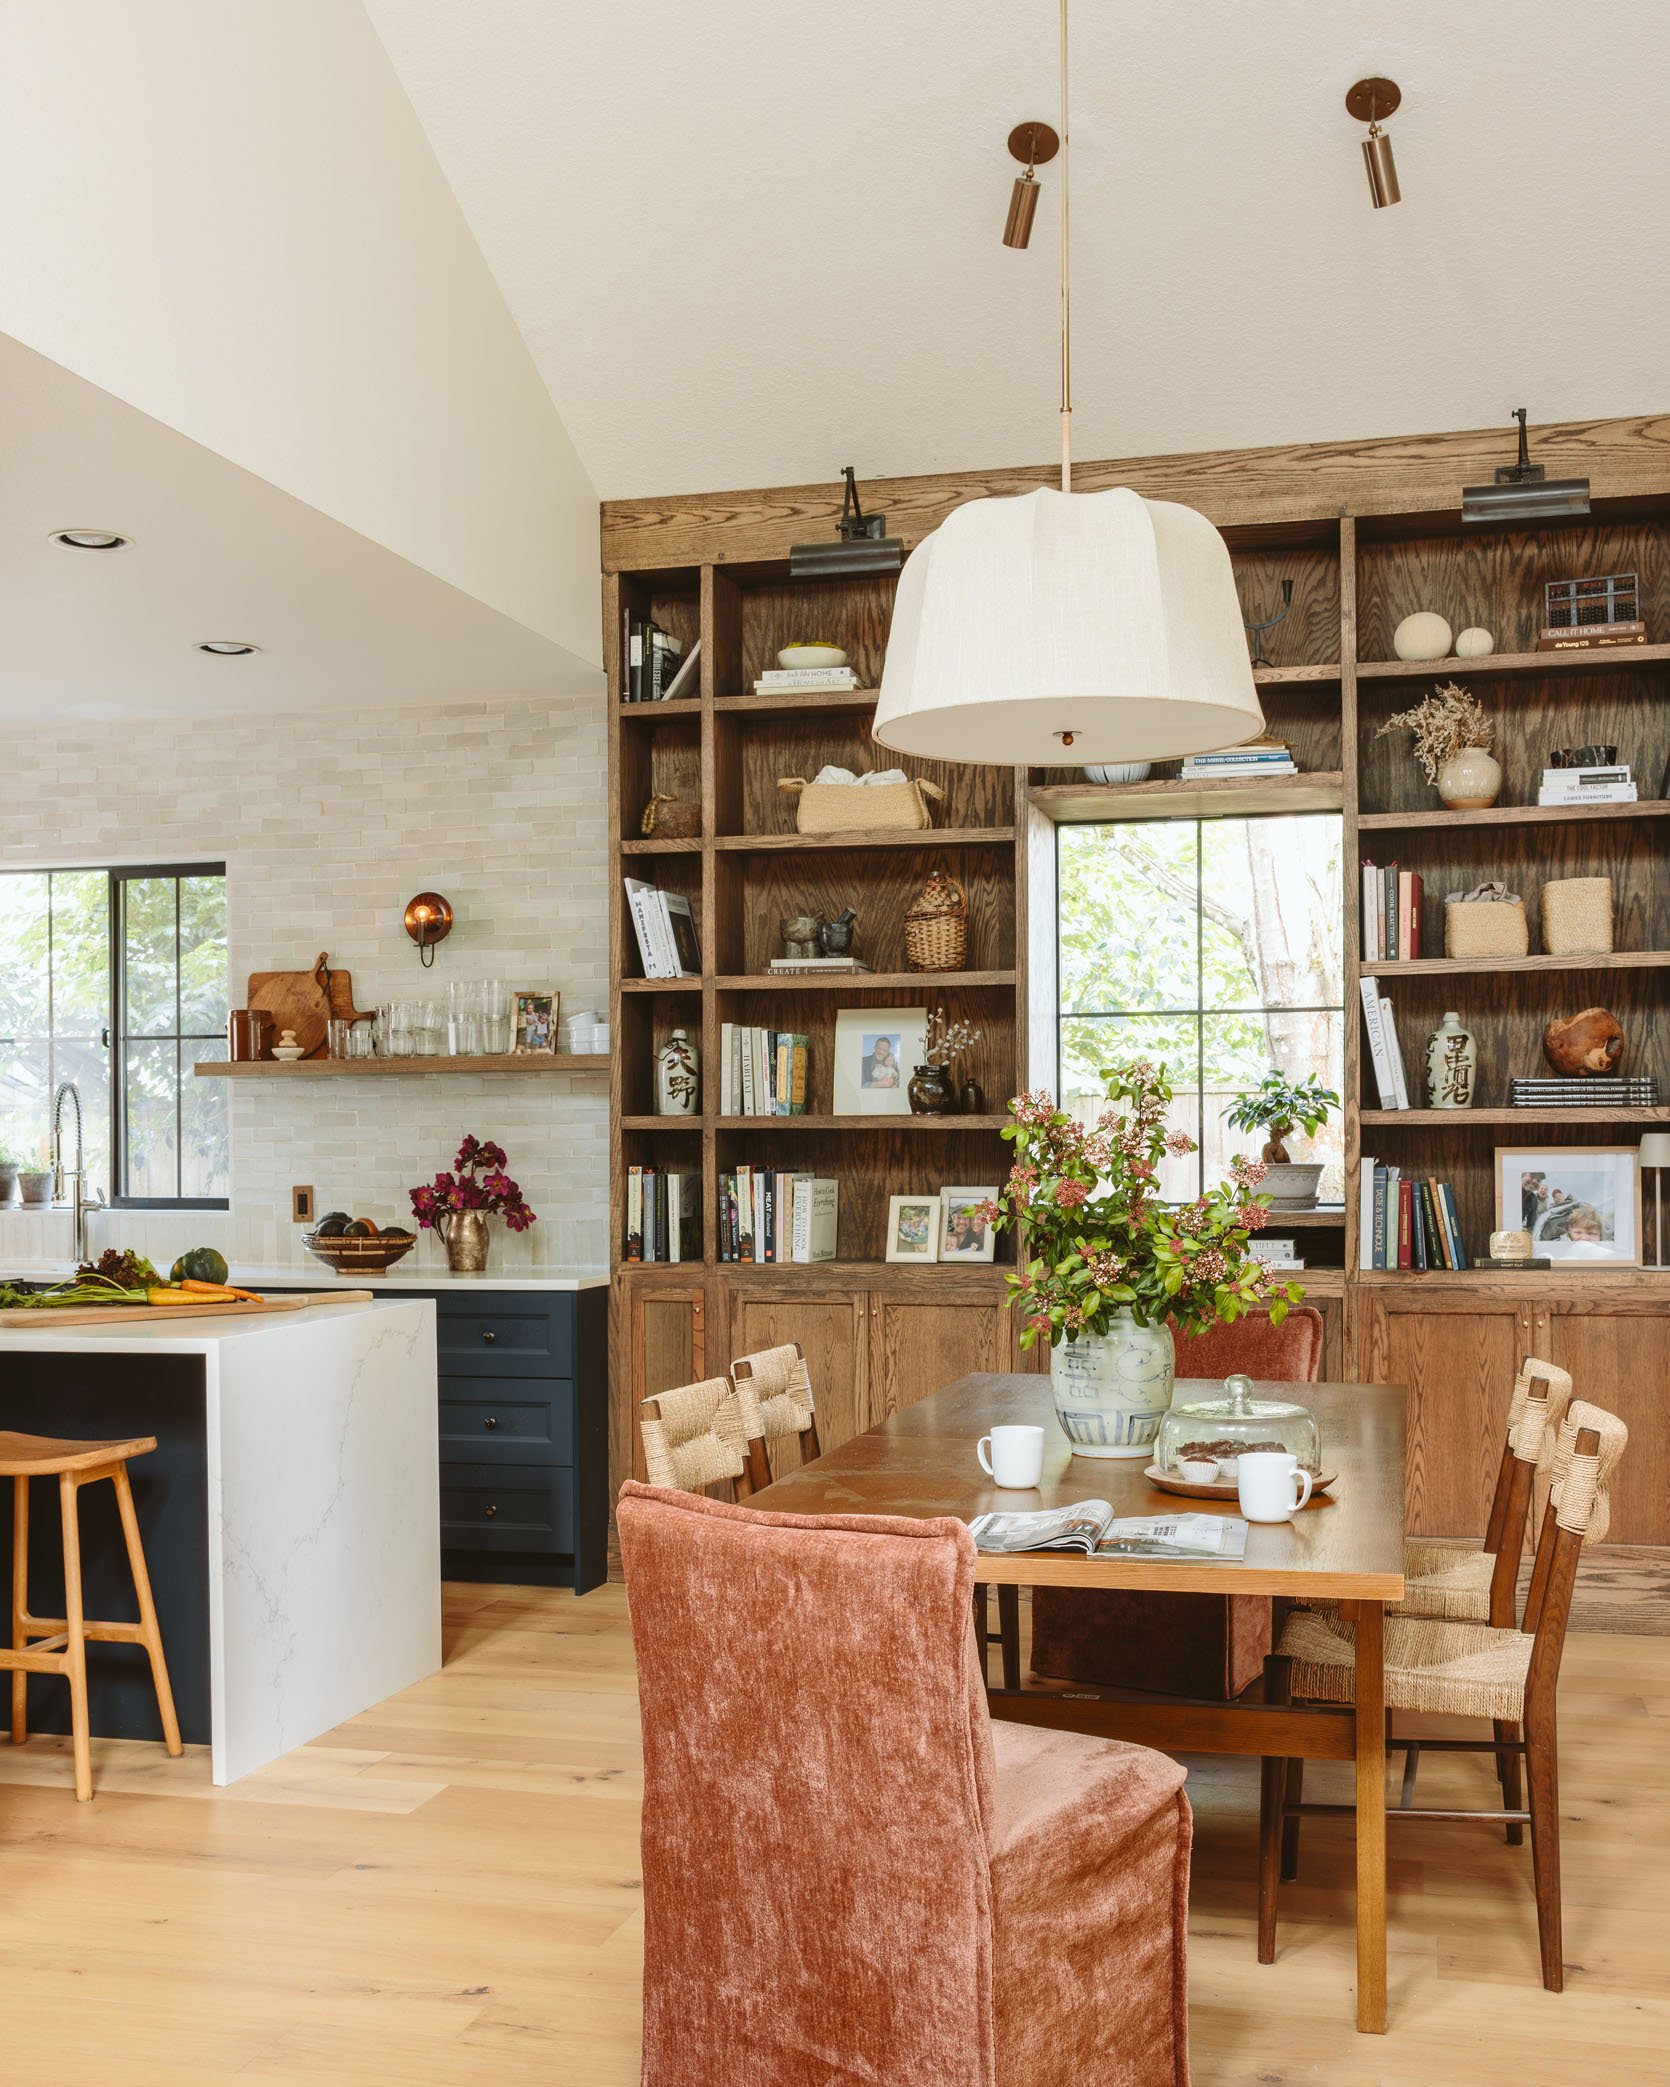
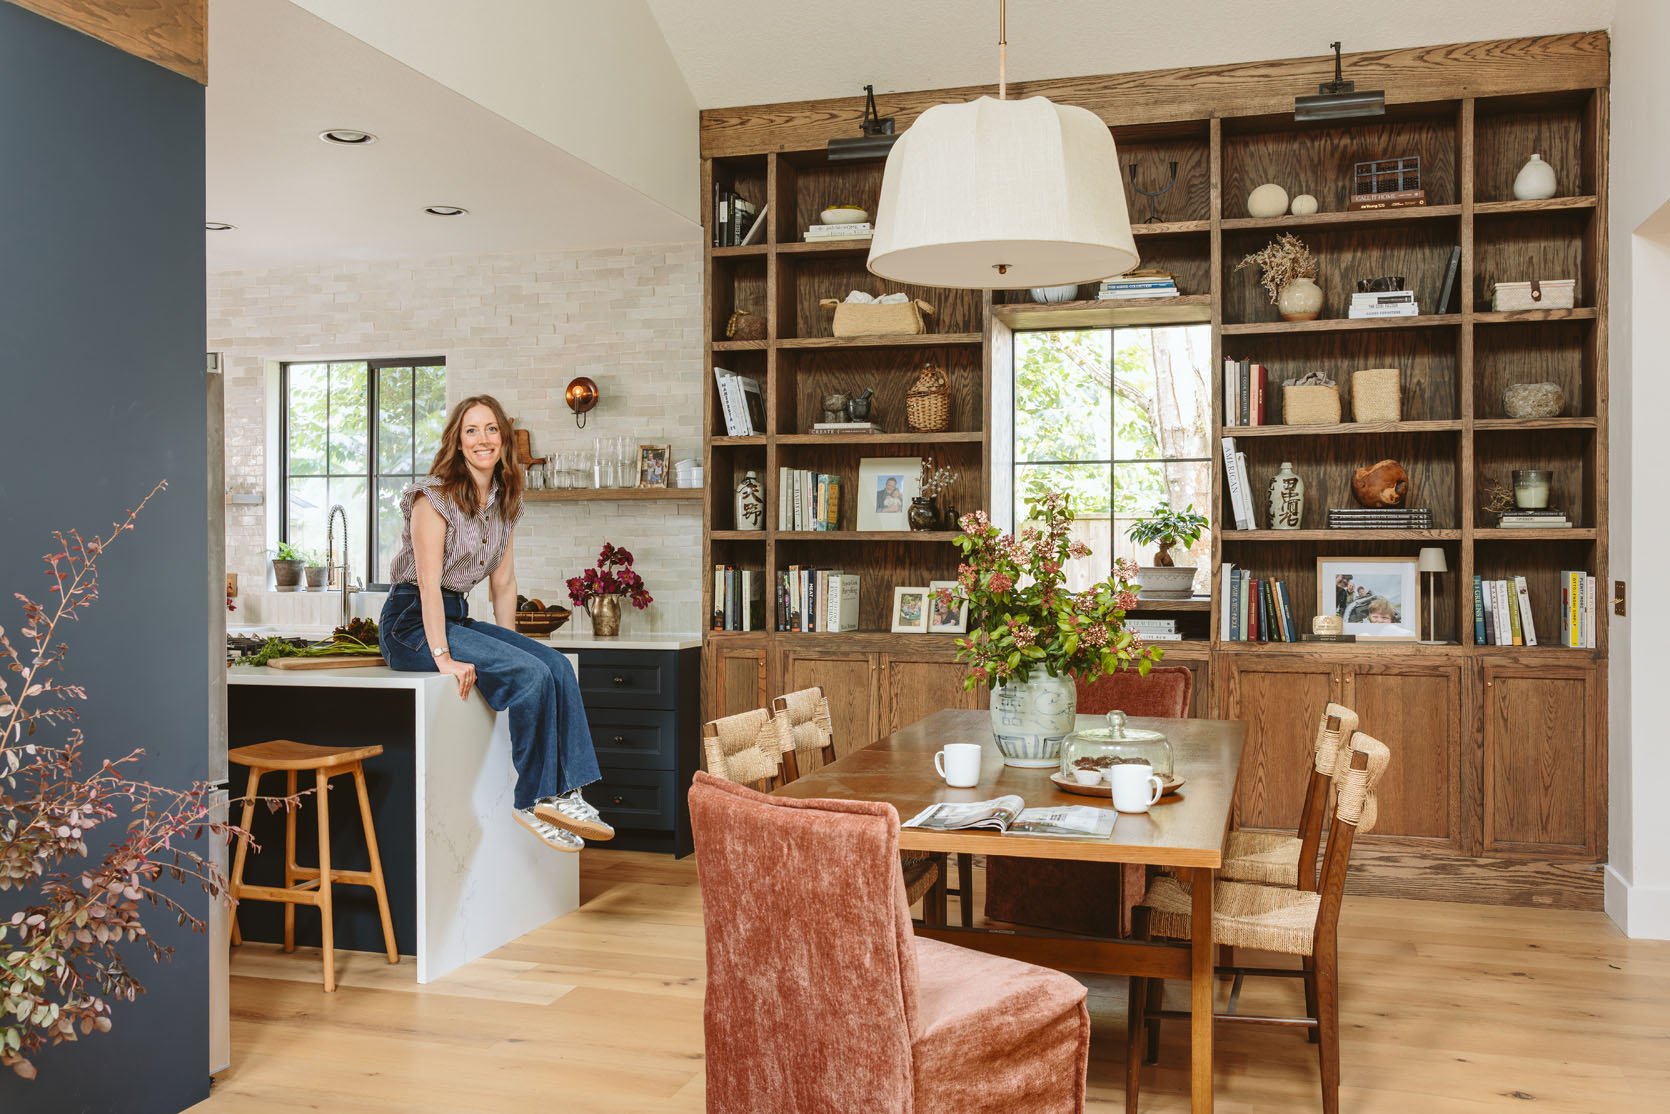
We are THOROUGHLY impressed with their IKEA kitchen transformation, and hope you are too! A huge thanks to Chrissy and Peter for sharing their beautiful space, words of wisdom, and excellent documentation along the way (check out their Instagram to see more behind the scenes). Now, you’re probably wondering why we hardly touched on the beautiful built-in bookcase or dining area right next door. More to come on that project next week! Yet another awesome element that they designed and built themselves. Adding all of these custom touches really took this IKEA kitchen to the next level. The incorporated wood tones, thoughtful layout, waterfall countertops, and navy cabinetry – we love it all. DIY for the win!
Kitchen Resources:
Cabinetry: IKEA
Cabinet Hardware: Restoration Hardware
Countertops: Casa Bella Granite
Faucet, Sink: Kohler
Appliances: IKEA
Windows: Milgard
Tile: Zia Tile
Switches/Outlets: Residence Supply
Wall Color: Sherwin Williams, “Aesthetic White”
Counter Stools: Article
Dining Table: Article
*Design and Build by Chrissy Cambor and Pete Cambor, @camborhouse
**Styled by Chrissy Cambor and Emily Henderson
***Photos by Kailtin Green


The kitchen is charming! I love the new sink window among the tile. Blue, rose & copper are a winning color combo everyday of the week.
Fantastic job! I love the mix of colors, materials, antiques and new finishes. Thanks for sharing.
I an in awe!
What a lovely kitchen – amazing job!
Beautiful!
What was the thought process behind putting the stove in the island? I’d be worried about the people sitting in the stools burning their hands! (Especially kids)
Hi E! This was where their stove was before and it’s position worked well for their family, plus the gas line was already there. What you don’t see in the pics is a periscoping vent fan that would likely act a bit as a safety partition when cooking is happening. I also grew up with a stove in our kitchen island and it was great, nice to face outward and chat with others while cooking 🙂
My stove is in the island and I ADORE it. It was like that when we moved in and I was nervous, but we decided to leave the entire perimeter and just redo the island when we renovated because we loved the perimeter (layout and quality) and it wasn’t worth redoing completely just to move the stove. I’m SO GLAD we didn’t move it. I LOVE being able to look out at the entire main area of my house while cooking, the kids can pull up their helper stool to help me cook, and it’s so convenient within the kitchen layout. I don’t think I can ever go back to facing a wall while I cook. We have a 4yo and 18mo and it’s not an issue. We didn’t even put in a vent and it’s been no biggie. We did spend a bunch of money to upgrade to an induction range for safety, but man I absolutely love it.
Love it!
IKEA kitchen cabinet owner here. We did not install ours but they are amazing. I love how durable IKEA cabinets are for everyday life. Literally everything just wipes up. We have custom wood cabinets at our small farmhouse and I have to be so gentle with them. I would 100% buy IKEA cabinets again if we ever move. This kitchen is so warm! I love it.
For those who have and love Ikea cabinets, is there a particular line or finish that is sturdy and durable? Or all they all winners? Thanks!
I love this reno. The bookshelves are fantastic. Great choices.
We love our Ikea kitchen too. It is now 20 years old and looks almost brand new. We got the old style white Abstrakt high gloss cabinet doors and drawers and they have held up so well even with our kids cooking and making messes in the kitchen. Highly recommend Ikea cabinets. I built them all myself and my husband installed. Will definitely do another Ikea kitchen if we ever move.
Same as to the style!
We have an IKEA kitchen, including appliances (gas range, microwave, oven) that was installed by the previous owners. It must be about 11 years old now and still going strong. I’m honestly not familiar with IKEA kitchen cabinet product lines but I think we have a combo of Sektion and Rubrik. The finishes are durable, modern, and overall everything looks pretty new and also have very usable features like soft-close drawers. While every single design choice wouldn’t have been my first choice, if we ever move and have to renovate the kitchen, I would definitely choose to do an IKEA kitchen.
Such a cool transformation and I love that they did it themselves! I can’t wait to see more from this series. DIYs are so inspiring!
Also, can Pete give us a tutorial on the floating shelves? I love them!
I’ll ask him! 🙂
Wow. I’d totally forgotten about this.
Kitchen looks great!!
I am swooning over the vintage sconces on the sink wall.
Also: big points for the consistency of the wood/finish between the dining room cabinetry and the niche above the appliance wall.
Right? I LOVE how the two rooms talk to each other and it makes the space feel huge!
Me too! That’s my favorite part.
Lovely work! I know homeowners might not want to divulge, but having an idea of the budget would be helpful.
Am I crazy or did they start this project with blueish gray tile on the wall? I thought I saw pics of the tiling already started on Instagram? I like this tile better!
Oops, I missed the post in July 2025 about the change. I was out of the country for the Fourth.
stylebyemilyhenderson.com/design-coaching-update-diy-tiling
Initially that’s where they were headed, but they really loved the lighter zelige and how it balanced the darker cabinetry in both kitchen and dining. If you saw pics, it was only early mockups 🙂 but yes, this tile is super pretty too!
Stunning and great work guys! My only thought was the Ikea appliances may not pass the test of time, but then again good appliances are getting impossible to find. Well done!
IKEA coworker here: IKEA appliances are either Electrolux or Whirlpool and have a 5 year warranty.
Their’s are electrolux sold through ikea and they said that so far they are super happy with them
I love this format for the interview!!! And the kitchen is sooooo dreamy. Love that this was a diy! I hope this type of makeover becomes a new feature here.
Beautiful results! So many great choices here! The wall at the left of the sink run is begging for some art fyi 😉 I’m glad they don’t think twice about the fridge placement. I confess it would have been a deal breaker for me – when I got to vacation at the Mountain House I was almost immediately exasperated by the placement of the fridge on the far side of the barrier island, very similar to this layout.
Can’t wait to hear more about the dining area – I think the limitations of the ceiling change steered you for a really awesome solution.
haha. yes they had been shopping for art for that wall and I almost brought a piece from my garage (I did, actually, and kept it in my car) but ultimately they have great taste and wanted more time to find a piece that they loved (not rushing for our shoot). We tried to fill that space with branches 🙂
So impressed that you were able to pull this off through DIY! It looks polished and beautiful. Random question, but do you keep your plates in the pantry? (Your open shelves look lovely, BTW.)
It turned out beautifully! Is there room to open the fridge or oven when people are sitting on the stools? I might have given up the counter seating to make the island narrower. But it sounds like the layout is working well for your family, which is what matters.
When we were there shooting the kitchen, the space between fridge and island did not feel crowded at all. When someone was at the open fridge, you could still pass behind them
Can’t recommend Restoration Hardware for kitchen use highly enough. It has endured lots of wear and has a nice feel in your hand.. Did you get your periscope vent from Ikea? We paid an arm and a leg for a name brand one and installation. We do like it and it was necessary because of the placement of the stovetop (not on an island). Trim was a little iffy.
We’ve had RH satin nickel classic pulls on our cabinets for 23 years, and they have held up well. And yes, they feel great. I did get serious sticker shock looking at current prices, though.
It’s always so fun to find out that my favorite part of a design wasn’t planned. Case in point, I ADORE the wood cubbies above the fridge and ovens (such a fun little extra splash of design), and turns out they were born out of the process. What a beautiful space ad amazing transformation. Congratulations!!
It looks fab! I’d be super interested in learning more about the wood built-ins that they did as well.
I love this so much!!! EHD – would love more of this type of content that feels so accessible/relatable.
Content request – for those of us who are less DIY-savvy, could EHD do a piece re: how one might find and work with a contractor to do an IKEA kitchen? Literally my dream and also the only way I would be able to afford a kitchen reno.
Hi! God, its so hard. Contractors generally won’t do ikea kitchens, but you can hire Ikea to (but they won’t do plumbing, gas, electrical, etc). Seems like a hole in the market for sure.
IKEA has a company that will do everything from design to installation. I’ve done 2 IKEA kitchens and worked with them for both the design and installation. The first one was quite straightforward, as I used both the boxes and doors from IKEA. The second kitchen was much larger and high end, so I purchased the doors and other trim pieces from Kokeena, because the doors were higher quality and I could have customized trim pieces. Not sure where you’re located, but in the NY/NJ area there are a number of companies that specialize in IKEA installs. I would check with your local IKEA and they should be able to help you.
I’m always looking for way to fill that top 12″ above the cabinets to the ceilings, and I love what they did with the wood cubbies above the fridge and appliances. Also, the dining bookshelf system is amazing. What a wonderful kitchen remodel, kuddos to you guys!
Well done!!! What a beautiful and functional space you made for yourself!!! Can’t wait to hear about the built in shelves….they’re gorgeous!!
This is gorgeous! Love the warm, lived-in feel. The stained wood elements and the zellige tile add so much richness and warmth to the space. Gorgeous.
Simply stunning, well done making an oddly-shaped space look elegant, open and welcoming. Profesh.
Could you share the details for the large wood wall shelf/cabinet thing? Is that from IKEA too, or a custom built in or antique? Thank you!
Last Paragraph- Now, you’re probably wondering why we hardly touched on the beautiful built-in bookcase or dining area right next door. More to come on that project next week! Yet another awesome element that they designed and built themselves.
This is so beautiful! What an amazing accomplishment. Usually we hear about people using Ikea cabinets with fronts from a separate company (which are more expensive), so it’s encouraging to see how gorgeous they made these all-Ikea cabinets look. I’d live in this kitchen in a heartbeat without changing a thing! And that’s saying something because I’m very picky. Lol
This turned out beautiful. I can also vouch for IKEA kitchens. We renovated our kitchen with IKEA about 8 years ago, and I had a very specific European sleek style in mind that was not available from other providers (no grips, smooth surface). I can highly recommend using IKEA, the quality is outstanding, and even the picky husband loves it. I spent a lot of time planning and “designing” and then went to IKEA. We had an IKEA person come and measure to make sure it all fits, and we had a contractor put the cabinets together and install them. He was a total pro, and it looks like a made to order kitchen now. I also have the double drawer with the spice drawer, as well as a pull-out pantry that is another great feature. I would choose IKEA any time again, I still absolutely love my kitchen.
I love a good before and after! What a beautiful transformation that’s even more impressive given they did it themselves. 💪🏼 I can’t wait to hear more about the bookshelves and dining area.
Two questions: