When it comes to choosing permanent materials, I take my risks carefully. I have to really love the style or visual aesthetics of something to sacrifice function. Our kitchen island is the perfect example – would a big “engineered stone topped newly made cabinet island” function “better” than our all wood vintage store counter turned island? What we did was far more expensive, complicated to design (we added the overhang and had it stained to match), and yeah, the drawers are heavier and kinda stick. But this island brings me joy every day, and I’m honestly never annoyed at the wear and tear or the stickiness – I bought into those years ago, mentally. But not everything needs to be “the moment,” and if I’m not super passionate about something aesthetically, I err on the side of function/durability, easy to clean, cheaper, or simply “the easiest thing to do” (yes, designers make that choice ALL the time, too). Take our painted stairs for instance – not stunning, but totally good enough and saved us thousands from having to patch, stain, and repair the OG wood stairs that were in terrible condition that you can’t even notice through the paint. This brings me to the reclaimed wood walls in the guest cottage…
The wood paneling in the cottage is one of the things that I’m willing to spend more on to keep or even add to. The living/kitchen shared space is such a pretty wood on the walls and ceiling, with a lot of imperfections (as you can see) that will be stripped and sanded to be uniform, then we’ll figure out about staining/sealing it. We aren’t considering painting it. WE LOVE IT. The rooms that are already painted (the old prop room and the stairway/upstairs) will get repaired and painted (not stripped and stained). We are still figuring out flooring, so stay tuned on that.
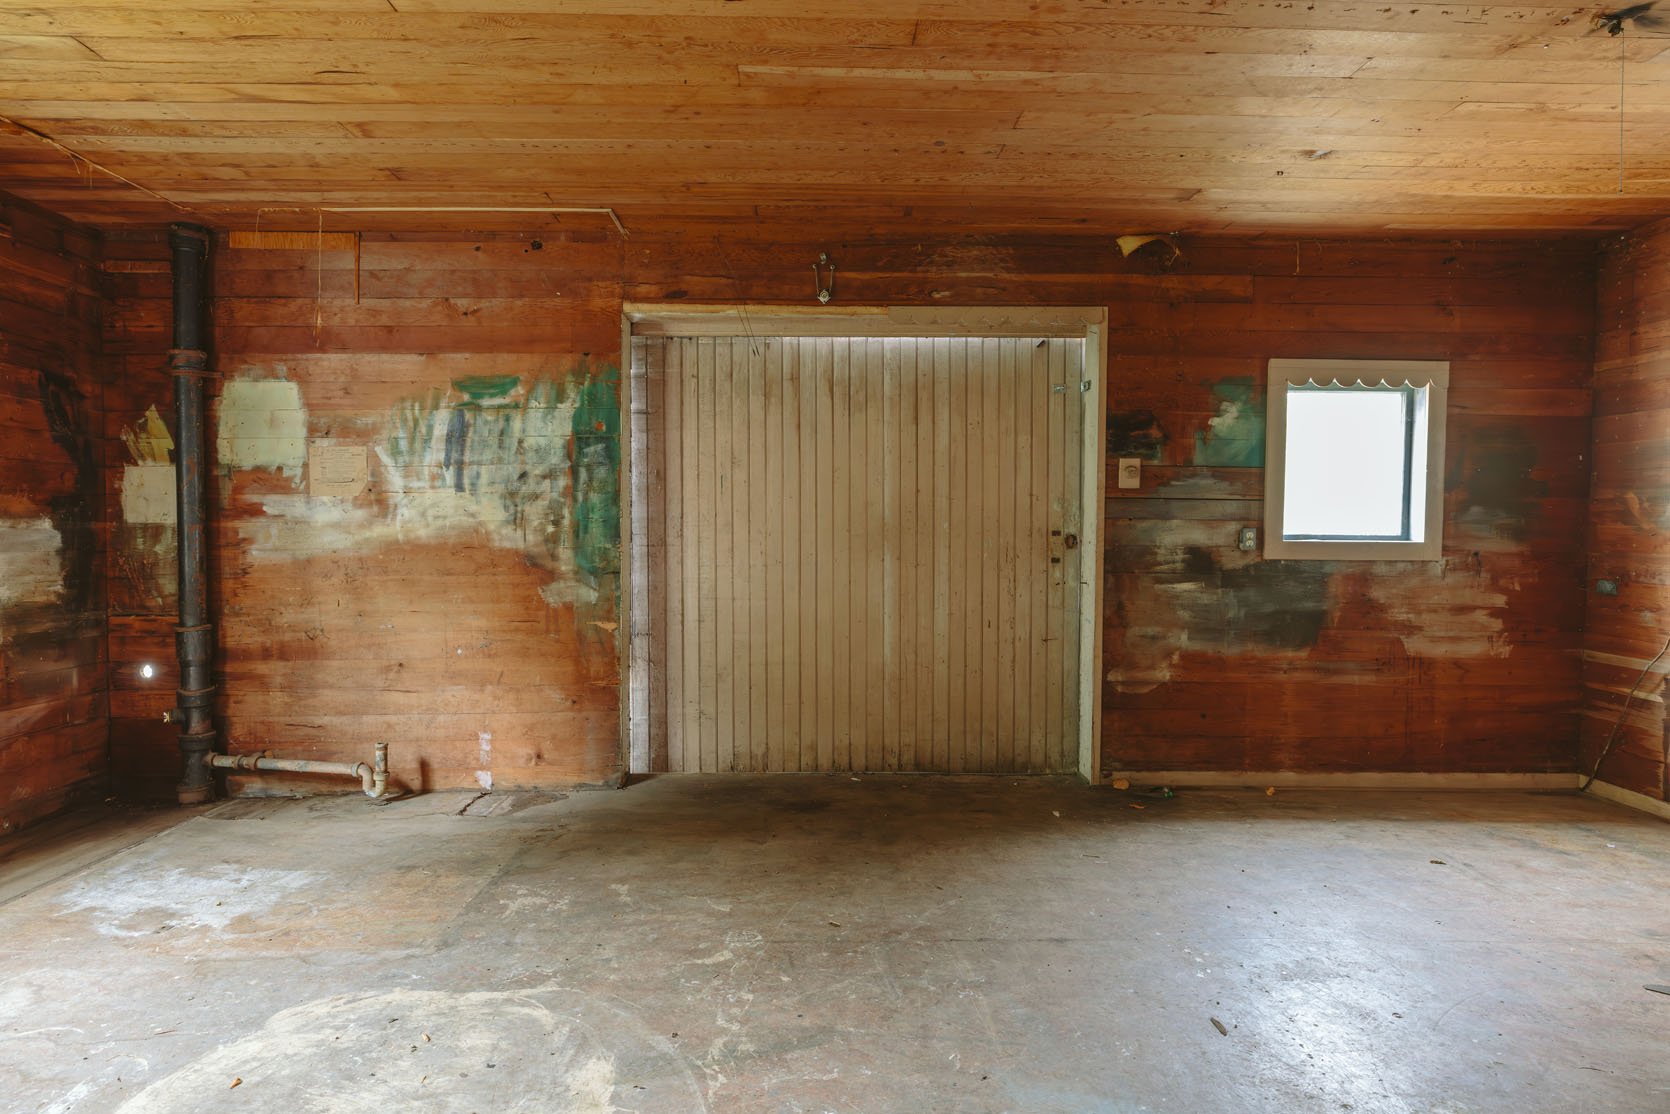
Today’s discussion is trying to get vintage or reclaimed wood to match the OG bathroom wall.
That wall is so dang pretty. It’s 5″ tongue and groove (likely old-growth fir or some other softwood species), and while it has a ton of variation, I think once it gets some TLC, it would look pretty uniform. It’s exactly what I want. But it’s the only finished wall. The other three walls are exposed and need insulation, electrical, etc and then would need to get fresh paneling – vintage or new.
So the question became: Is it possible to match the OG paneling on that wall for the other three walls and the ceiling? Or is this a fool’s errand? Will it cost way more than a new simple tongue and groove? Or should we partner with Stuga and put drift on the walls like we did in my favorite room at the river house? I want to do the more interesting thing (and admittedly, new wood would be far less charming), but I also don’t want to negate common sense in order to do it (and we’ll have a lot of other bigger moments in here anyway – i.e., the much-debated “outhouse” and handmade tile by yours truly).
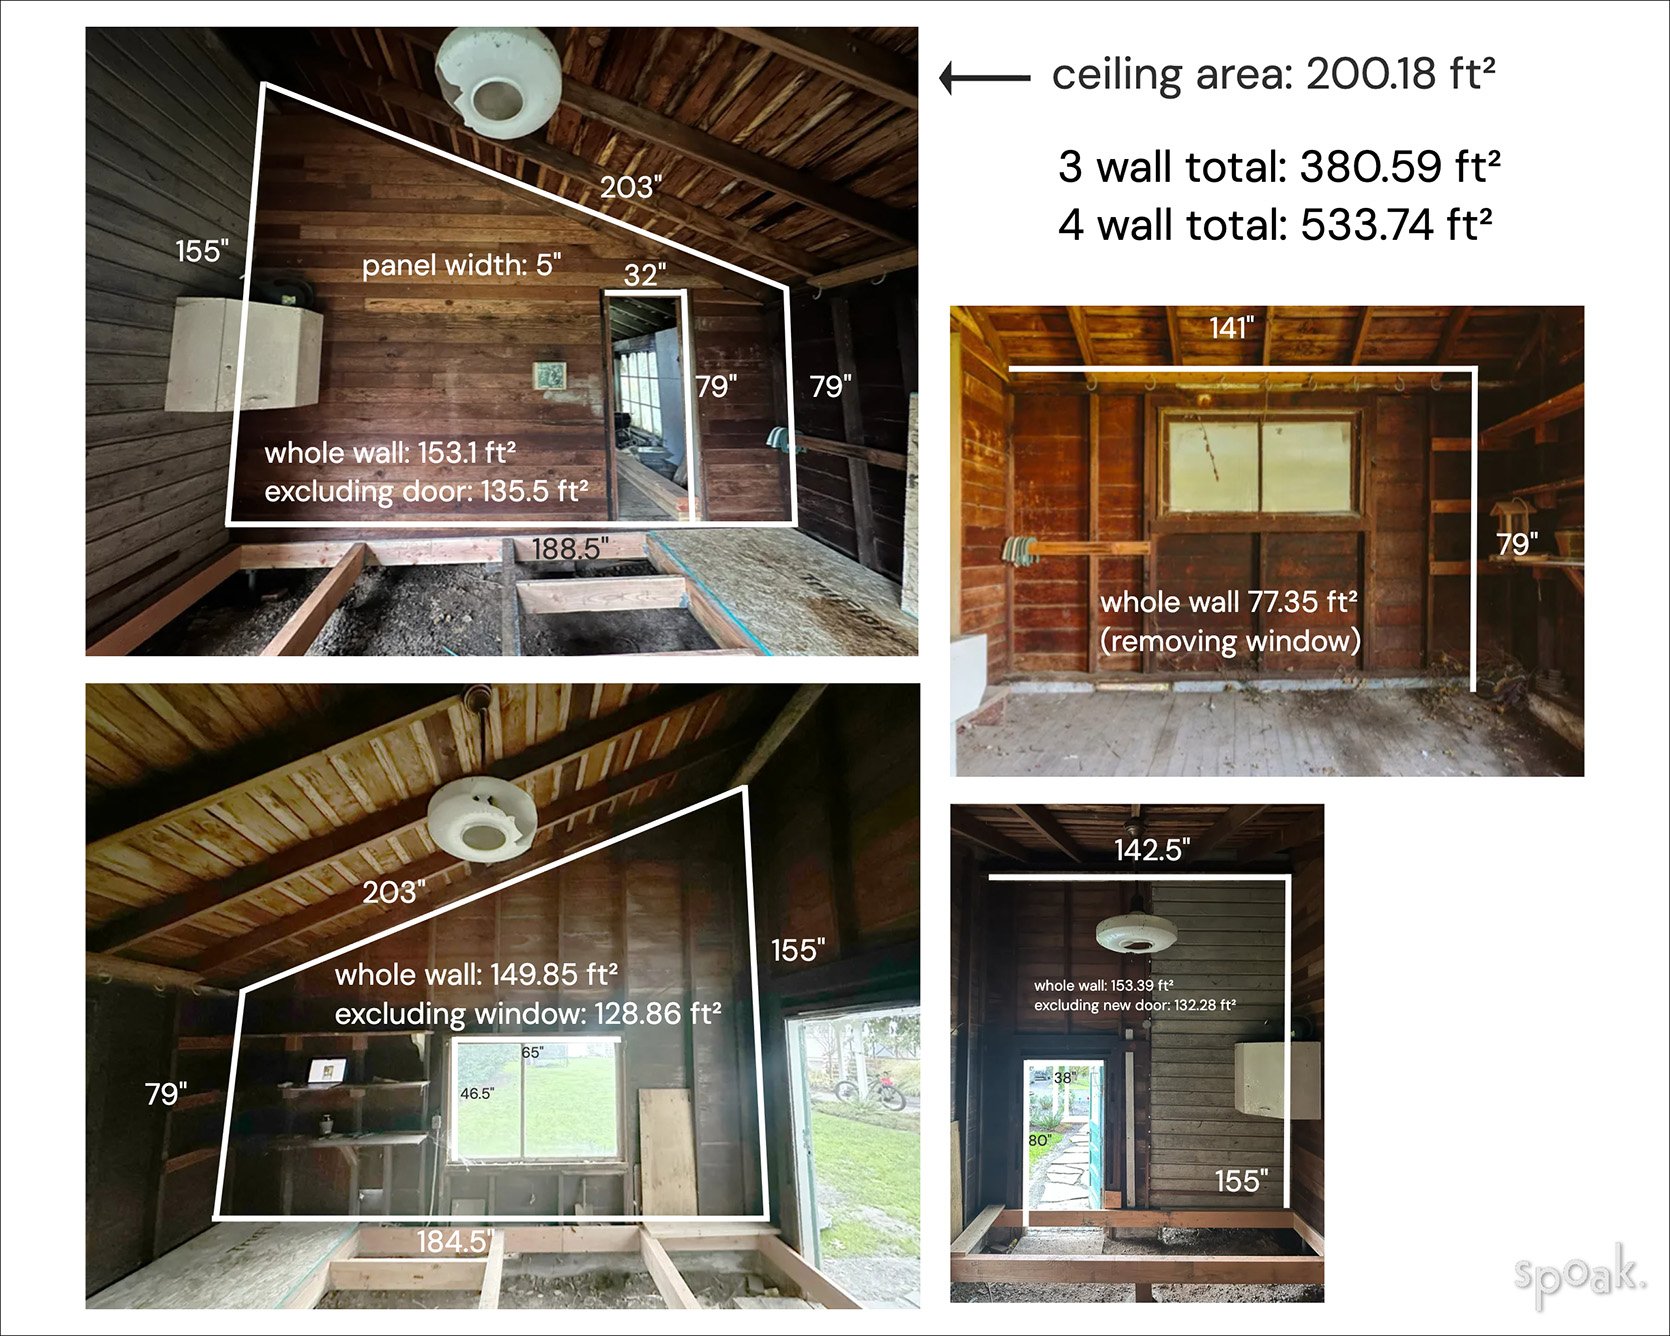
Let’s Talk Numbers: How Much Do We Really Need?
The existing paneled wall is about 153 ft² (minus the door, it’s about 135). If we’re able to match that wall and panel the remaining three sides, we’ll need about 380 ft² with overage. If we include the ceiling, we’ll need to add another 200 ft² to the order (plus a little overage). If we redo the entire room in inexpensive paneling or if we’re unable to match the existing and want to start over with all matching reclaimed, all in, we need roughly 735 ft² (so let’s call it 750ft²). So to recap, just the three walls and ceiling would be around 600ft², but the entire room and ceiling would be 750ft².
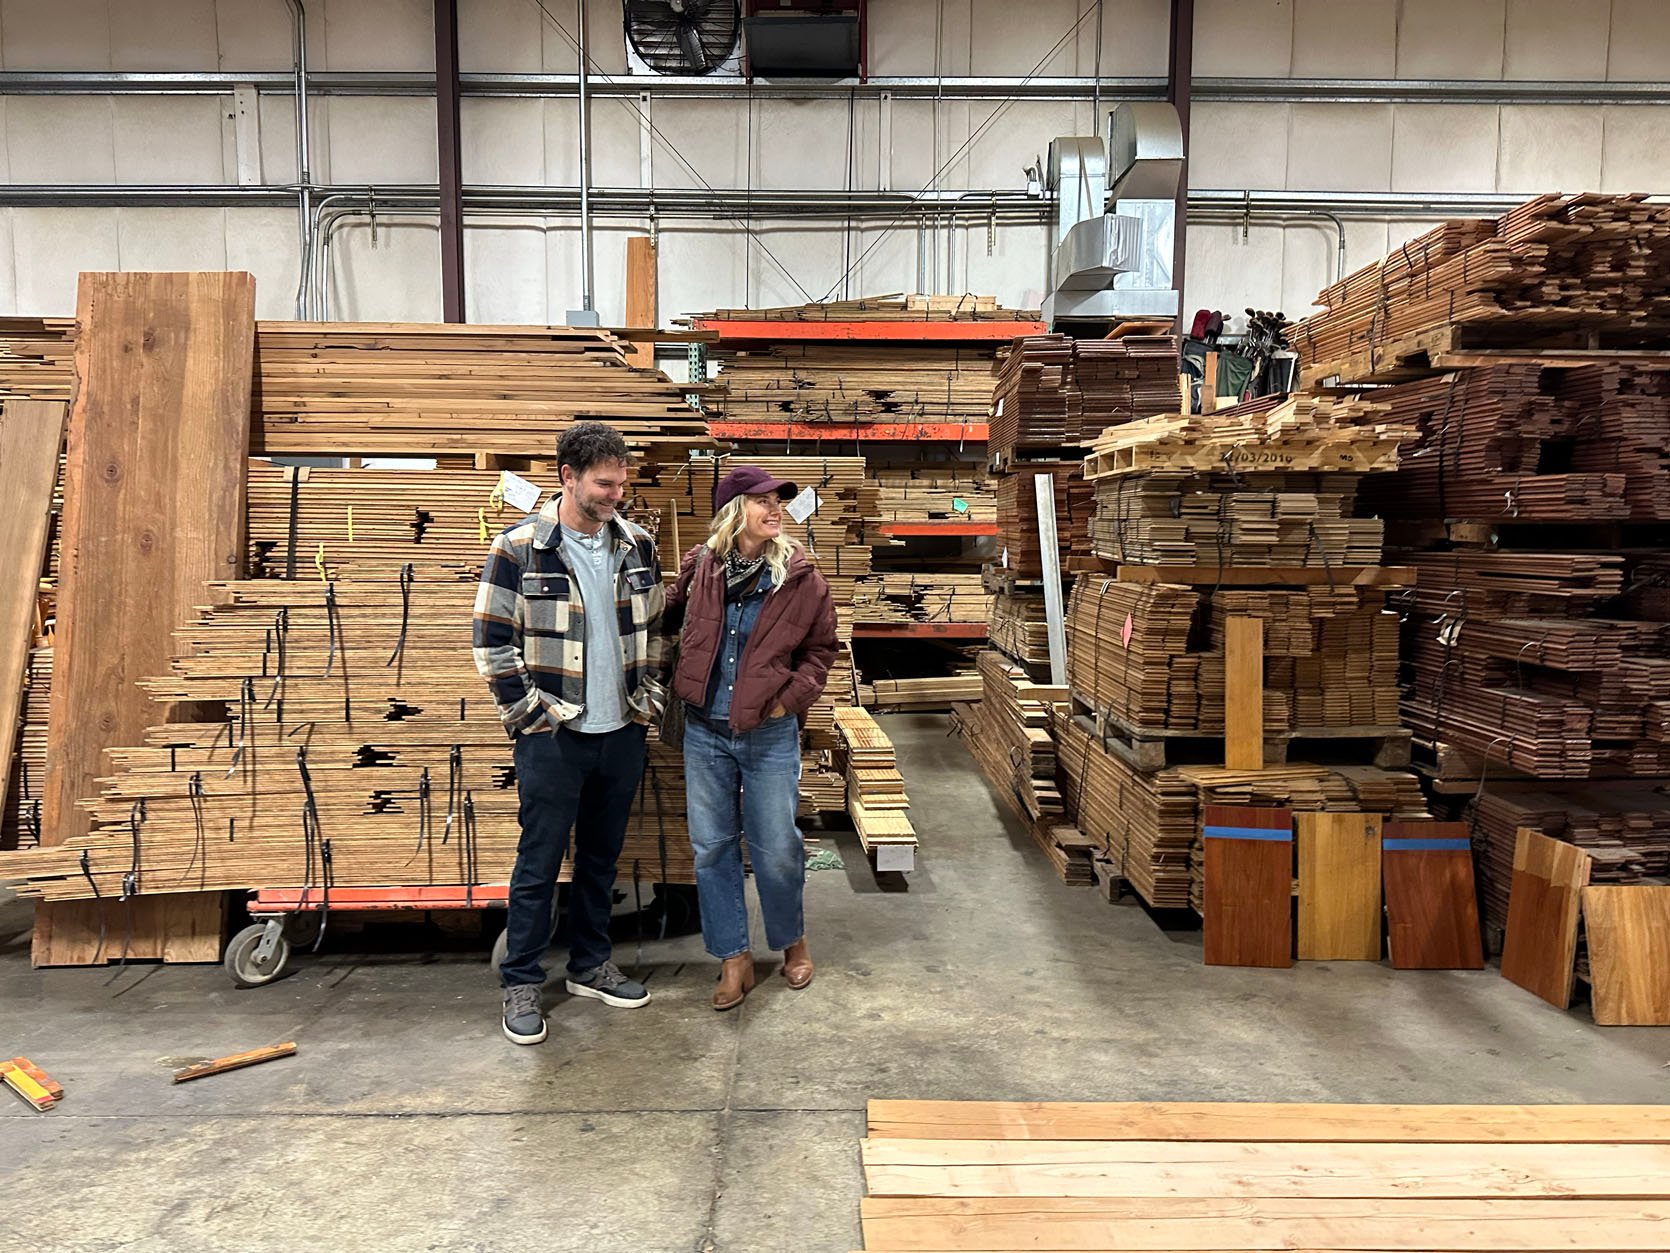
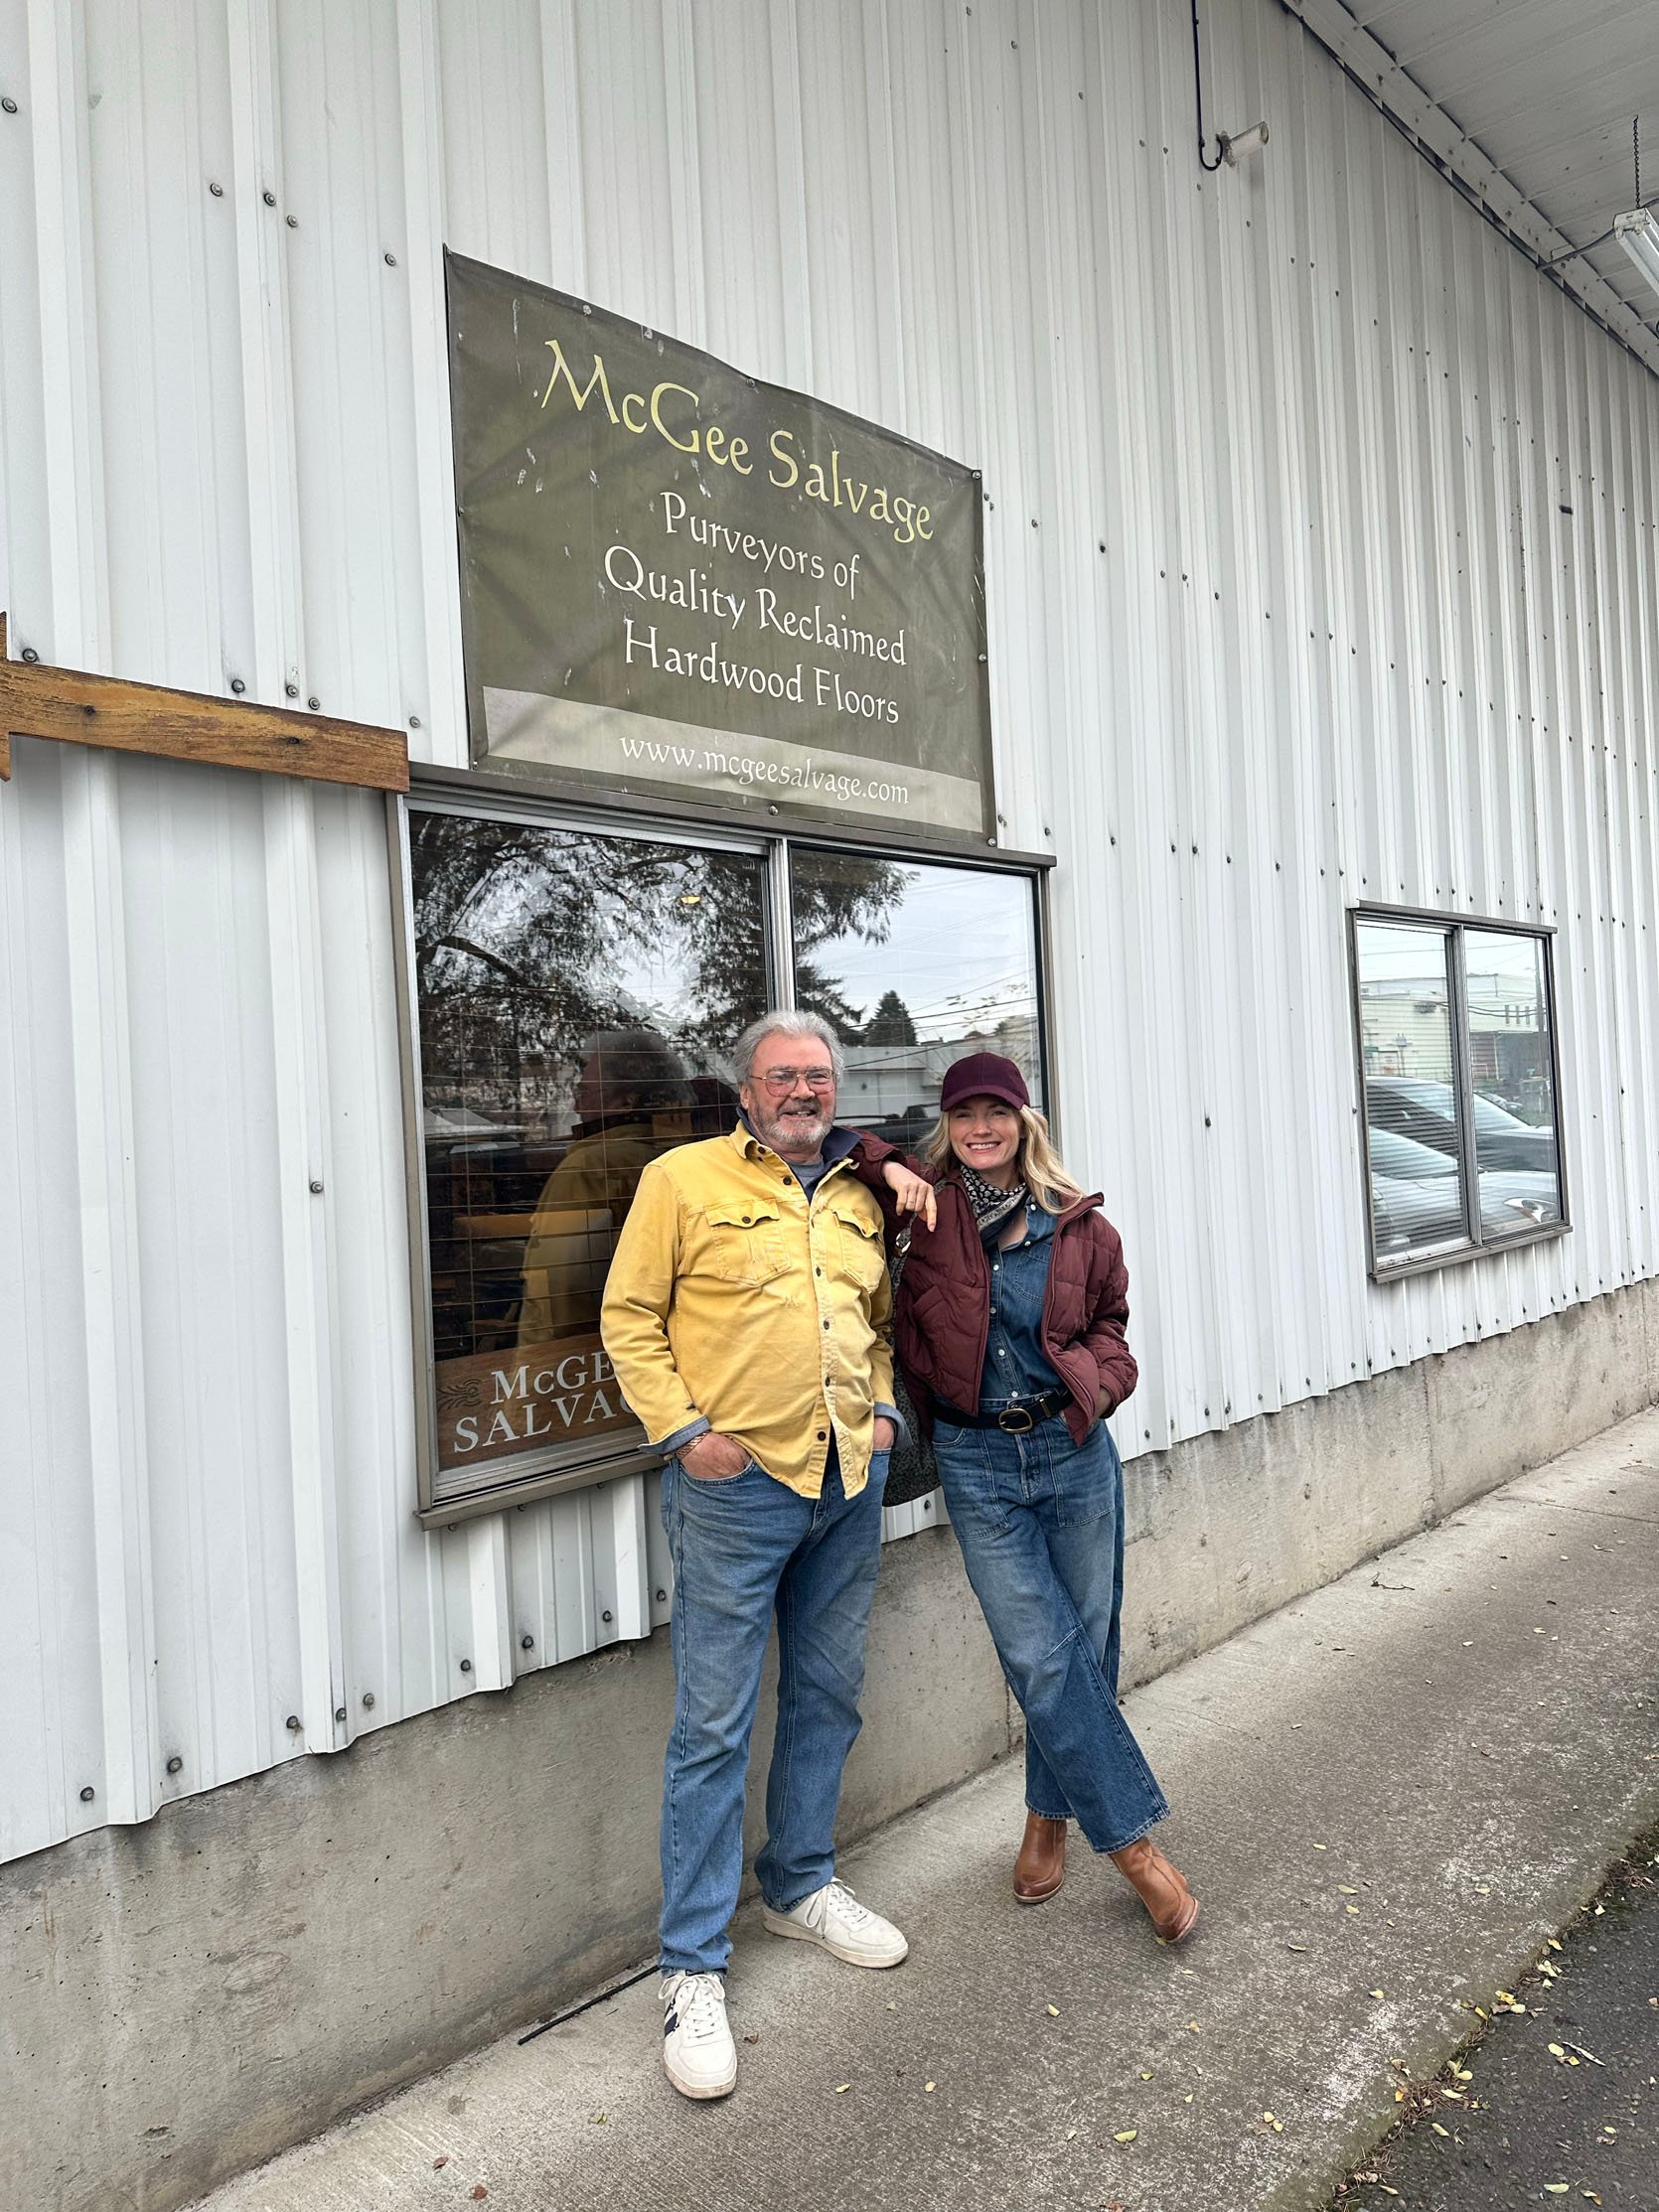
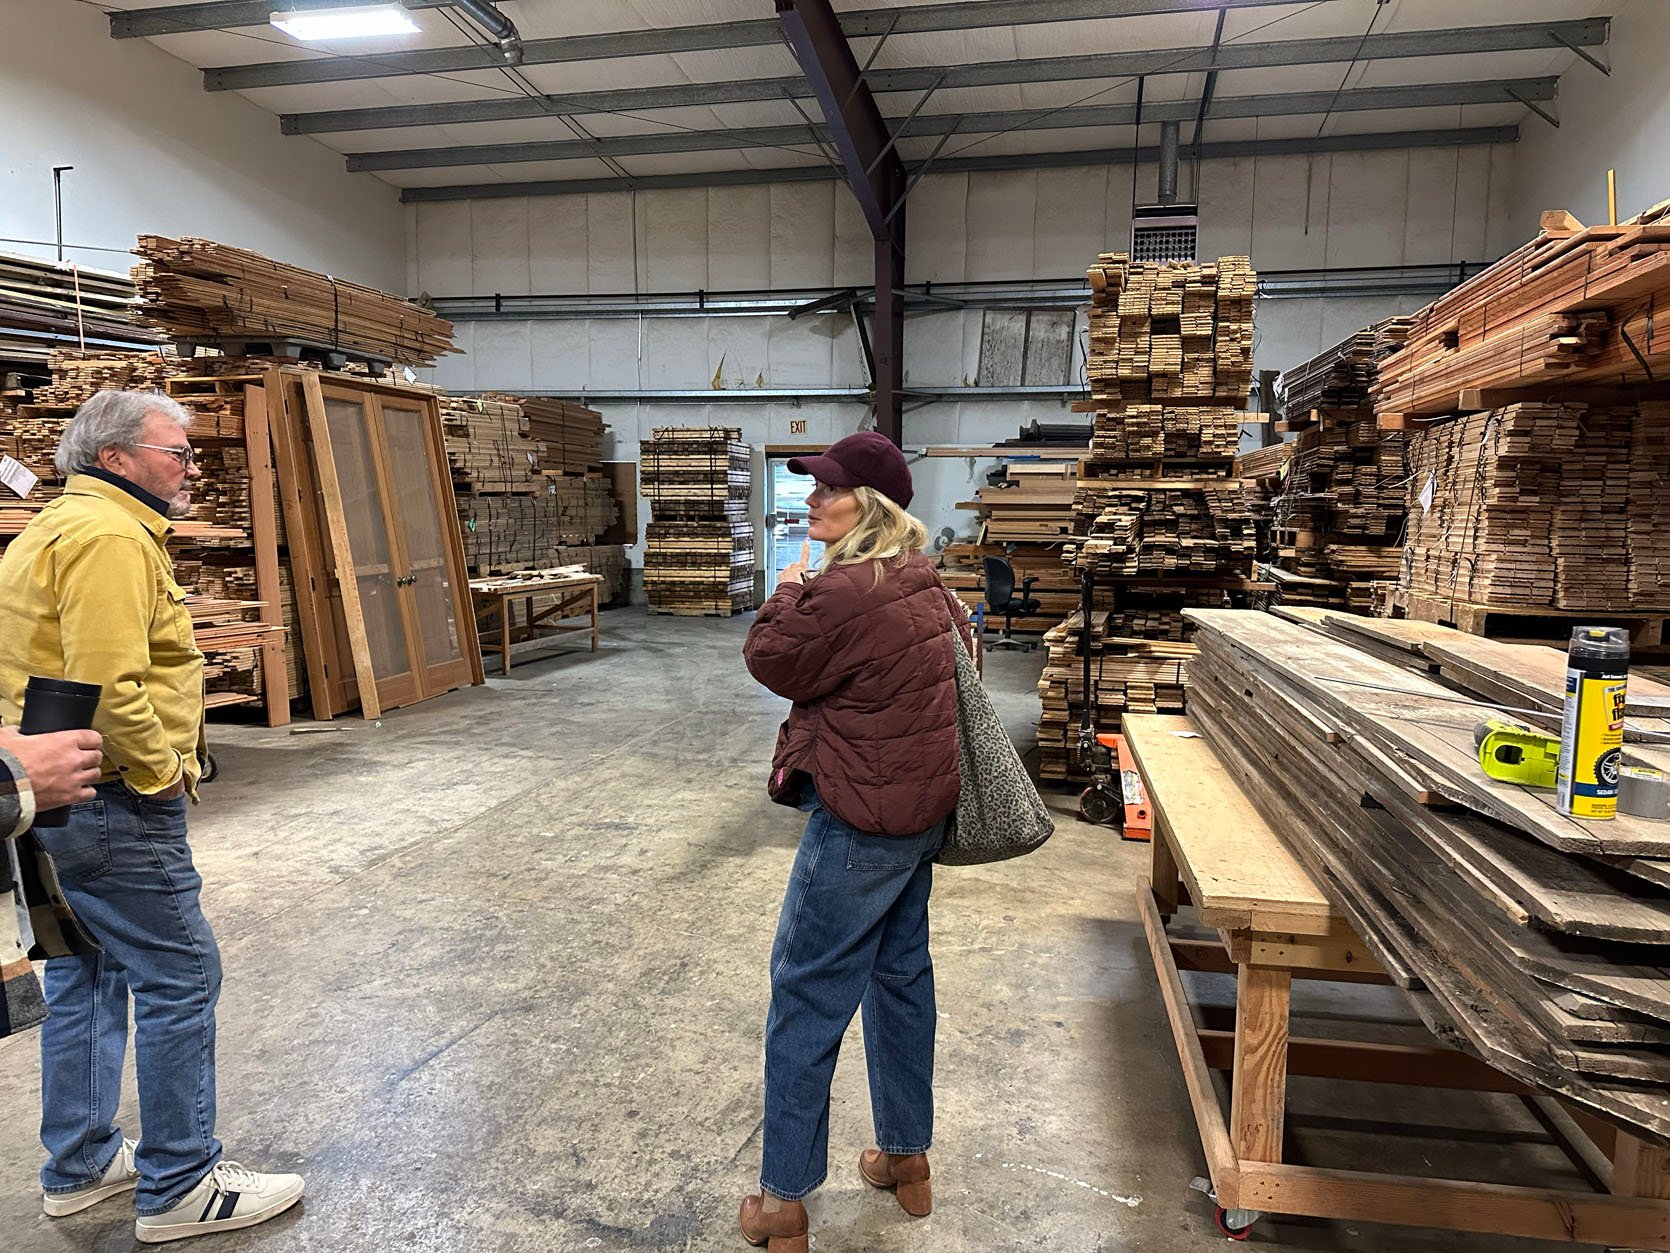
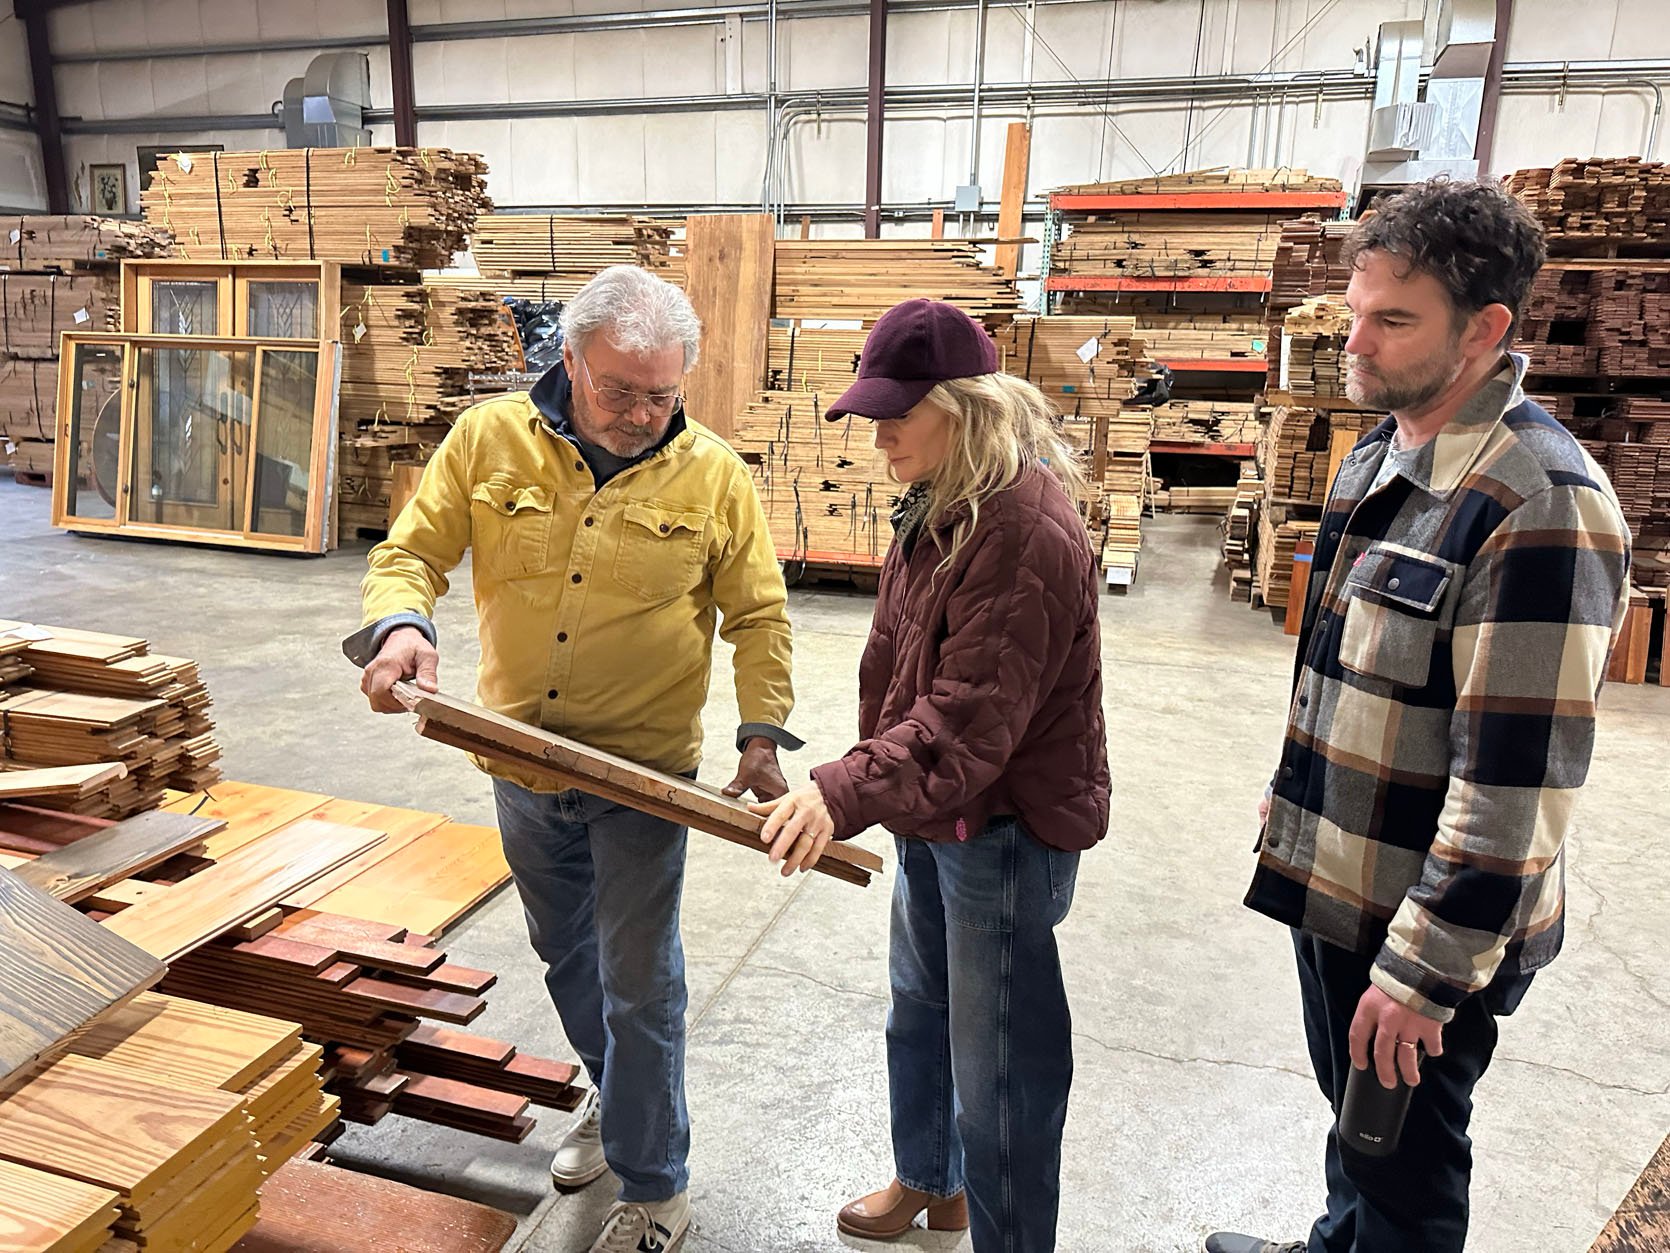
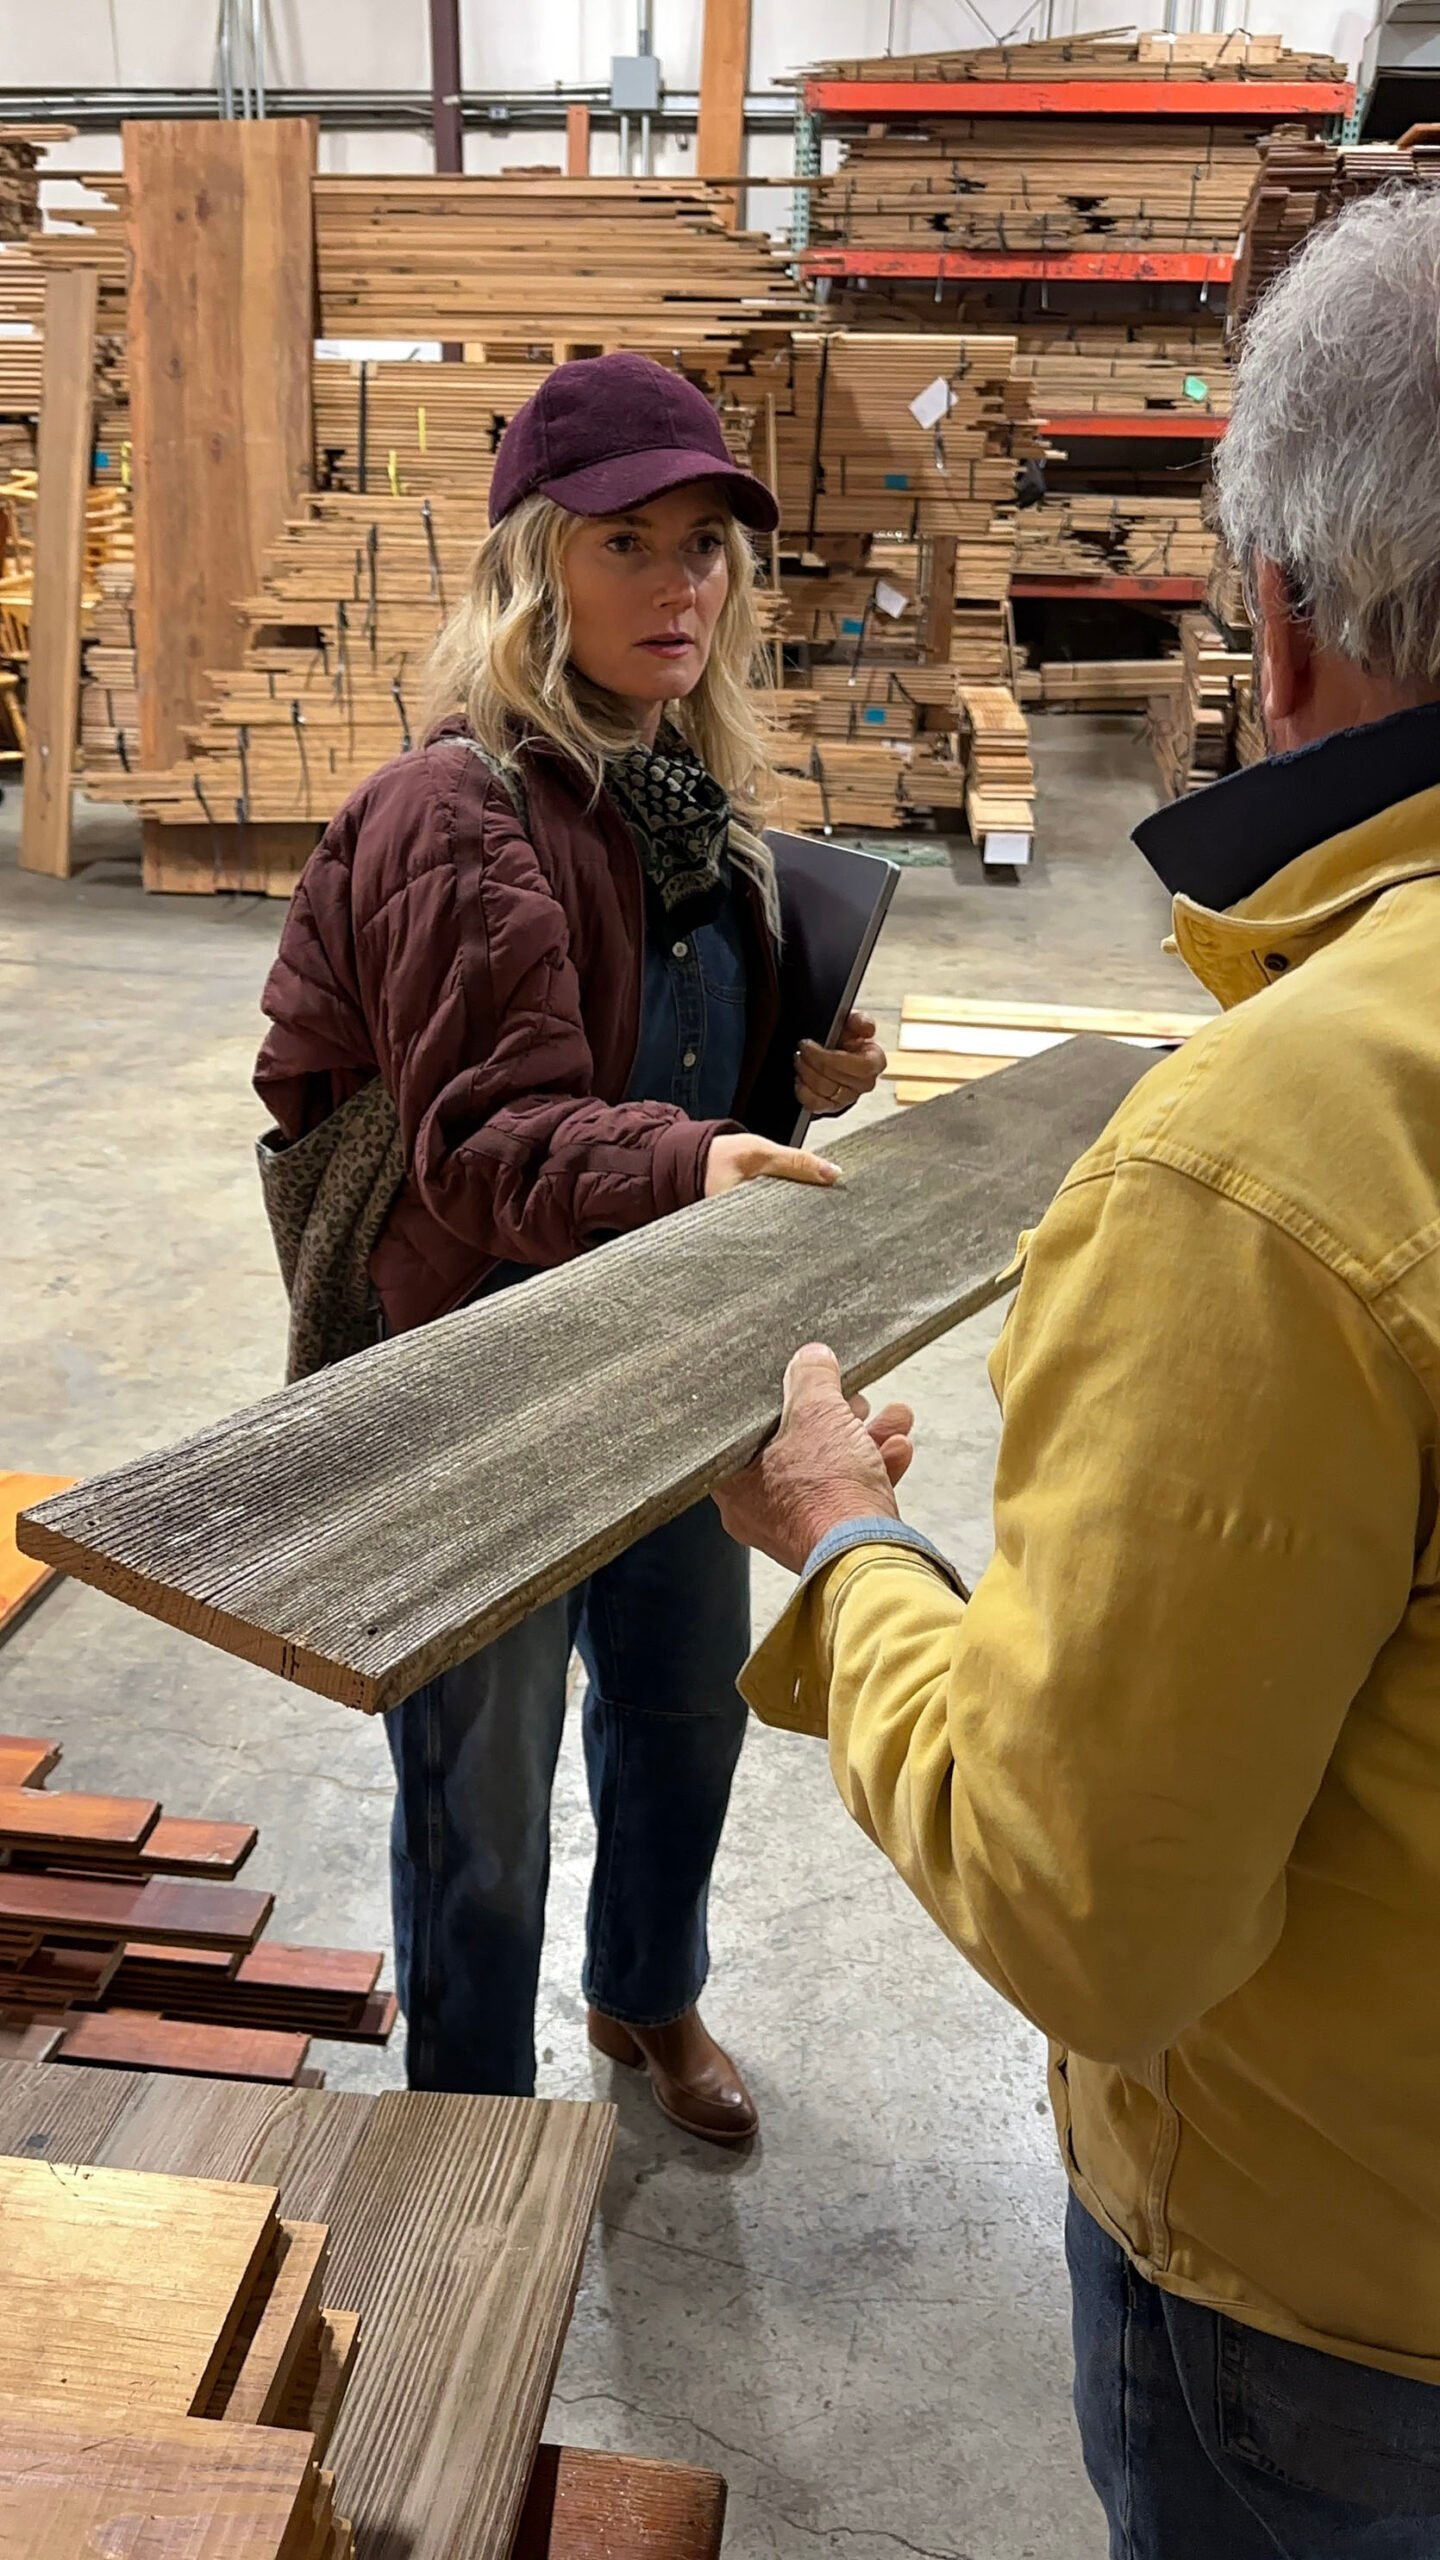
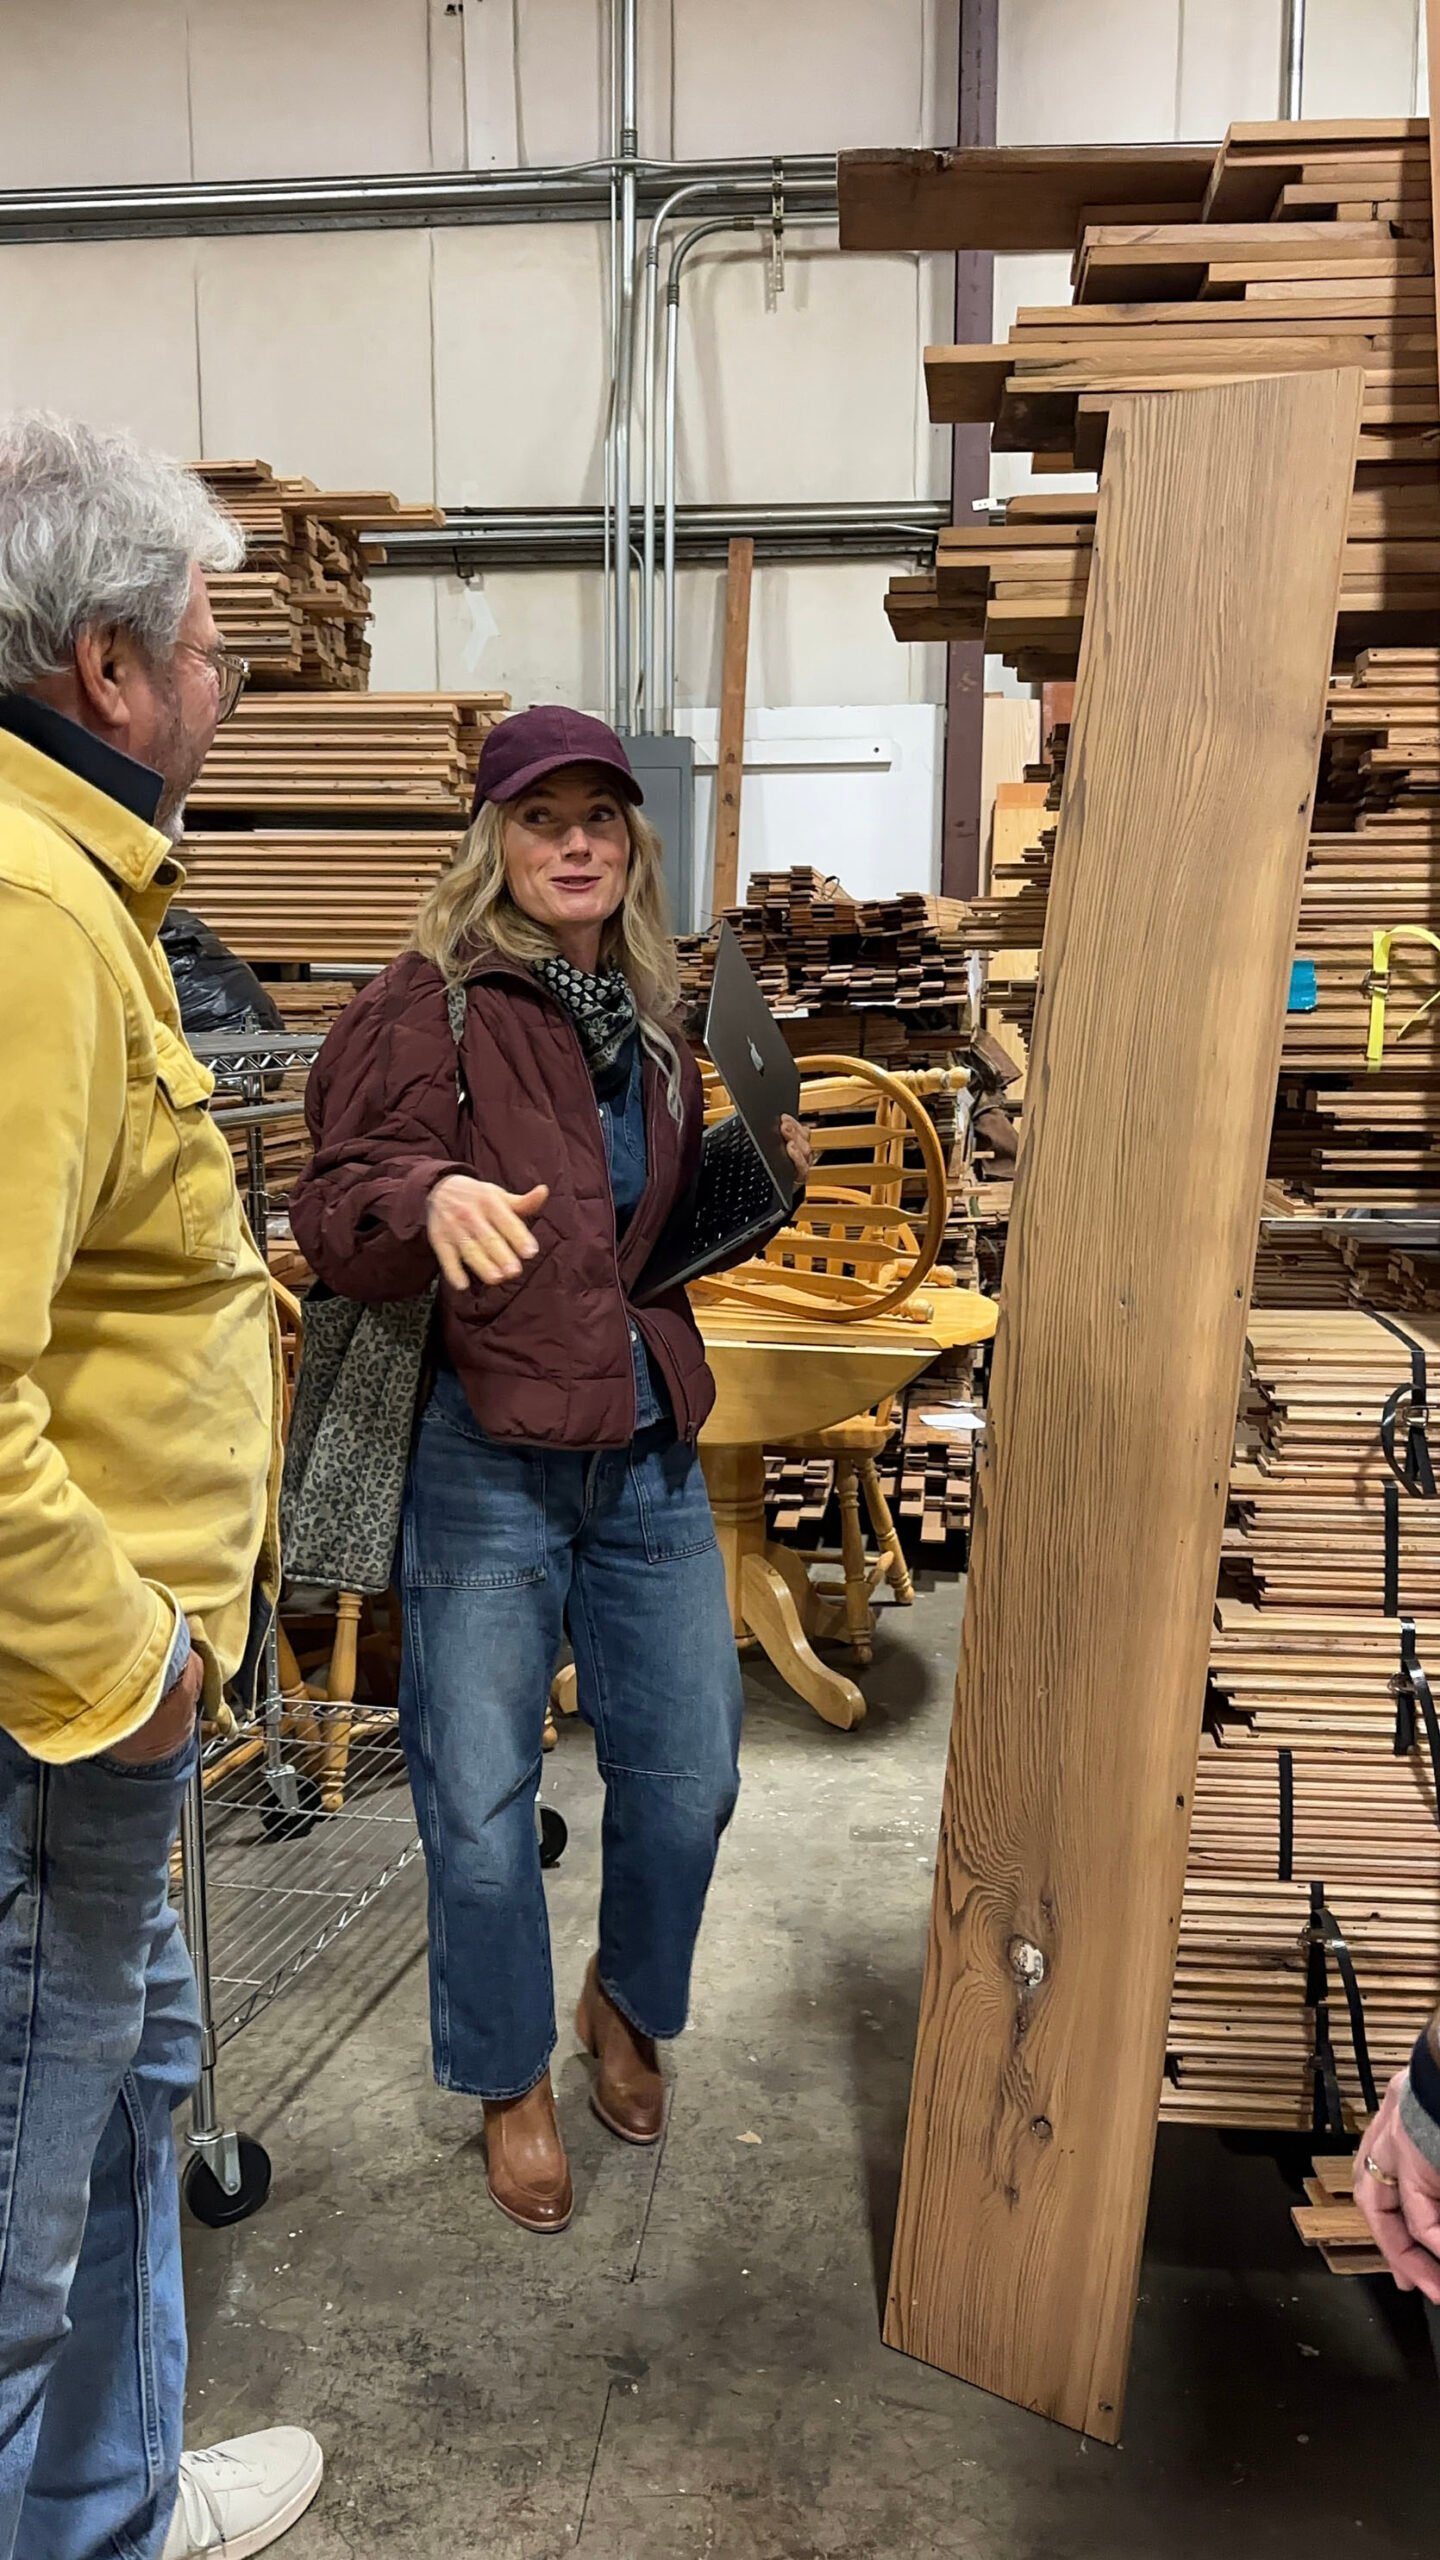
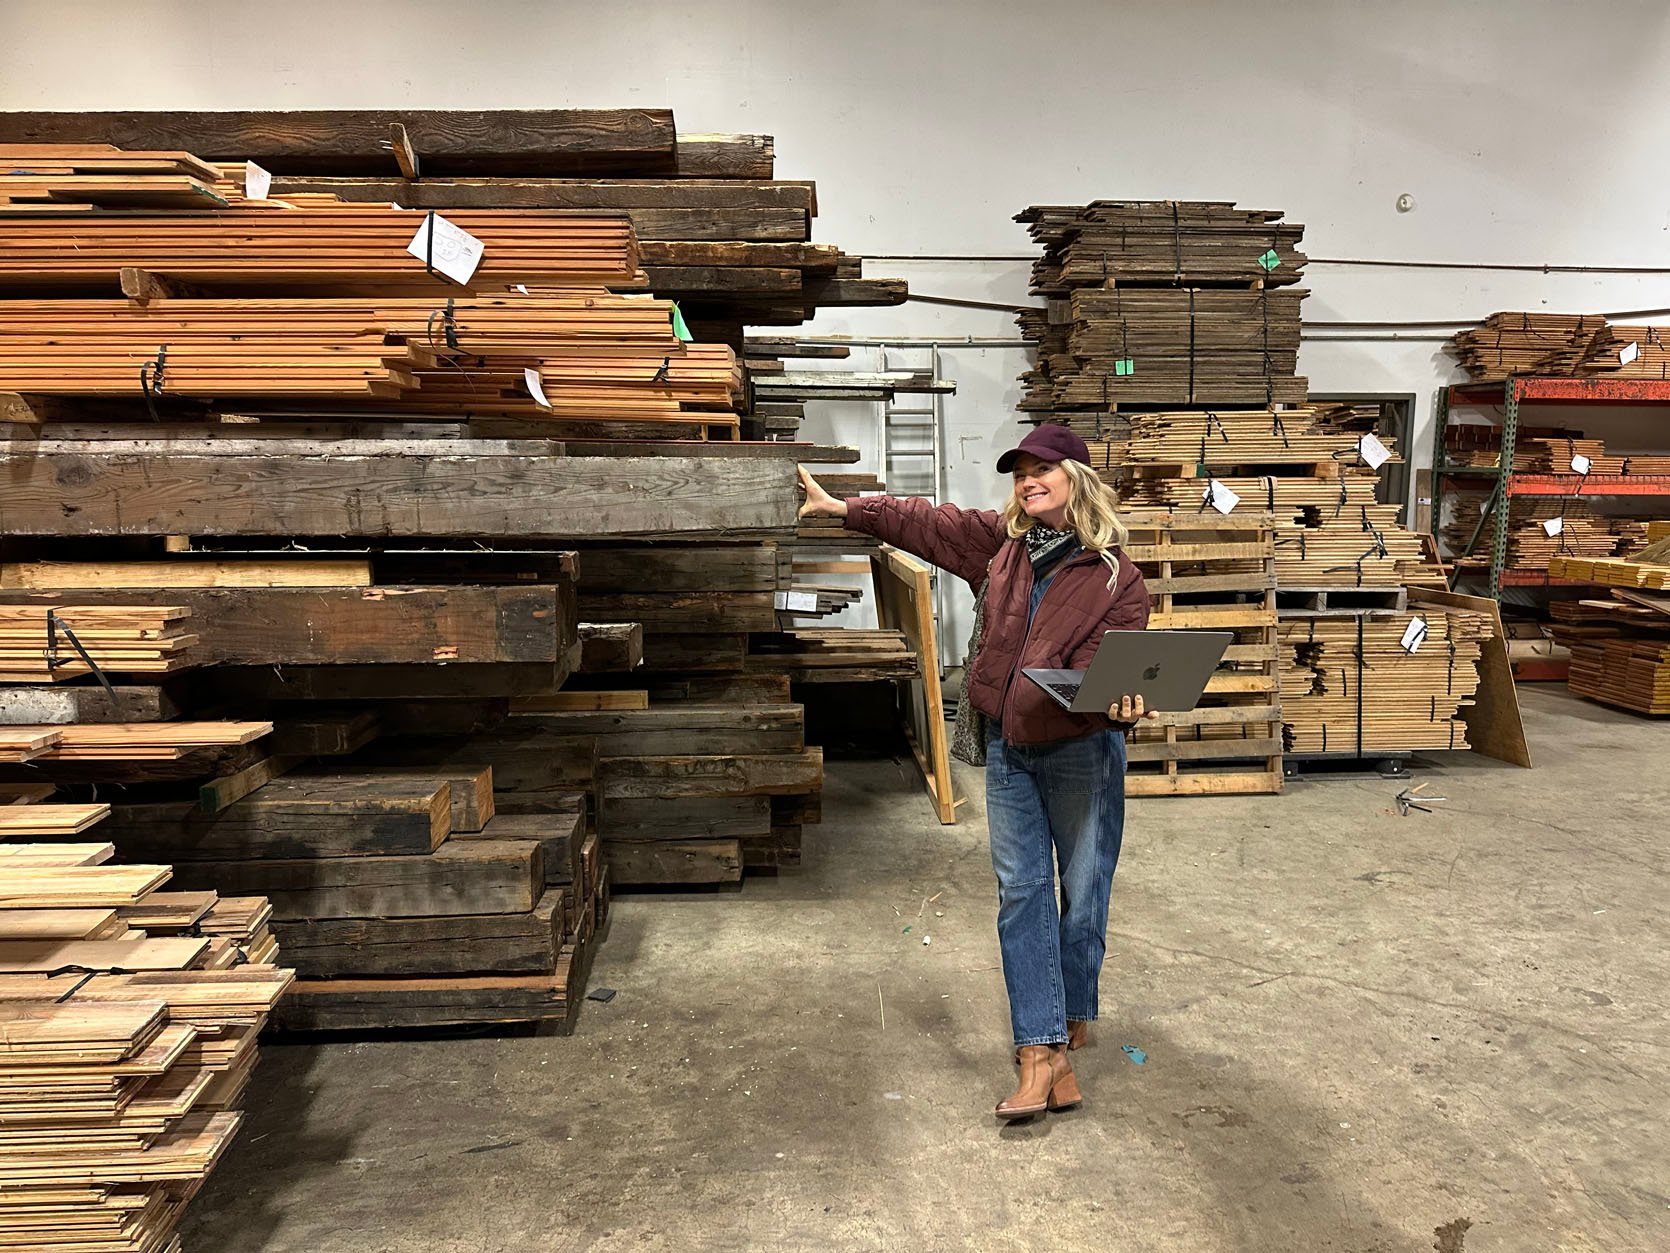
That’s a decent amount of square footage. We needed to do some research, so Brian and I went to McGee Salvage, which has the most in town. And the owner, Tobey, was WONDERFUL.
Tobey Parsons. I love nothing more than meeting people who have been specializing in something for decades and are simply a wealth of experience and knowledge. When we went, we were exploring reclaimed wood flooring for the entire downstairs. We honestly didn’t fine anything that made sense (yet) but still exploring it. We plan on painting the flooring a pattern (since the walls are all wood) so it stopped making sense for us to splurge on reclaimed wood flooring.
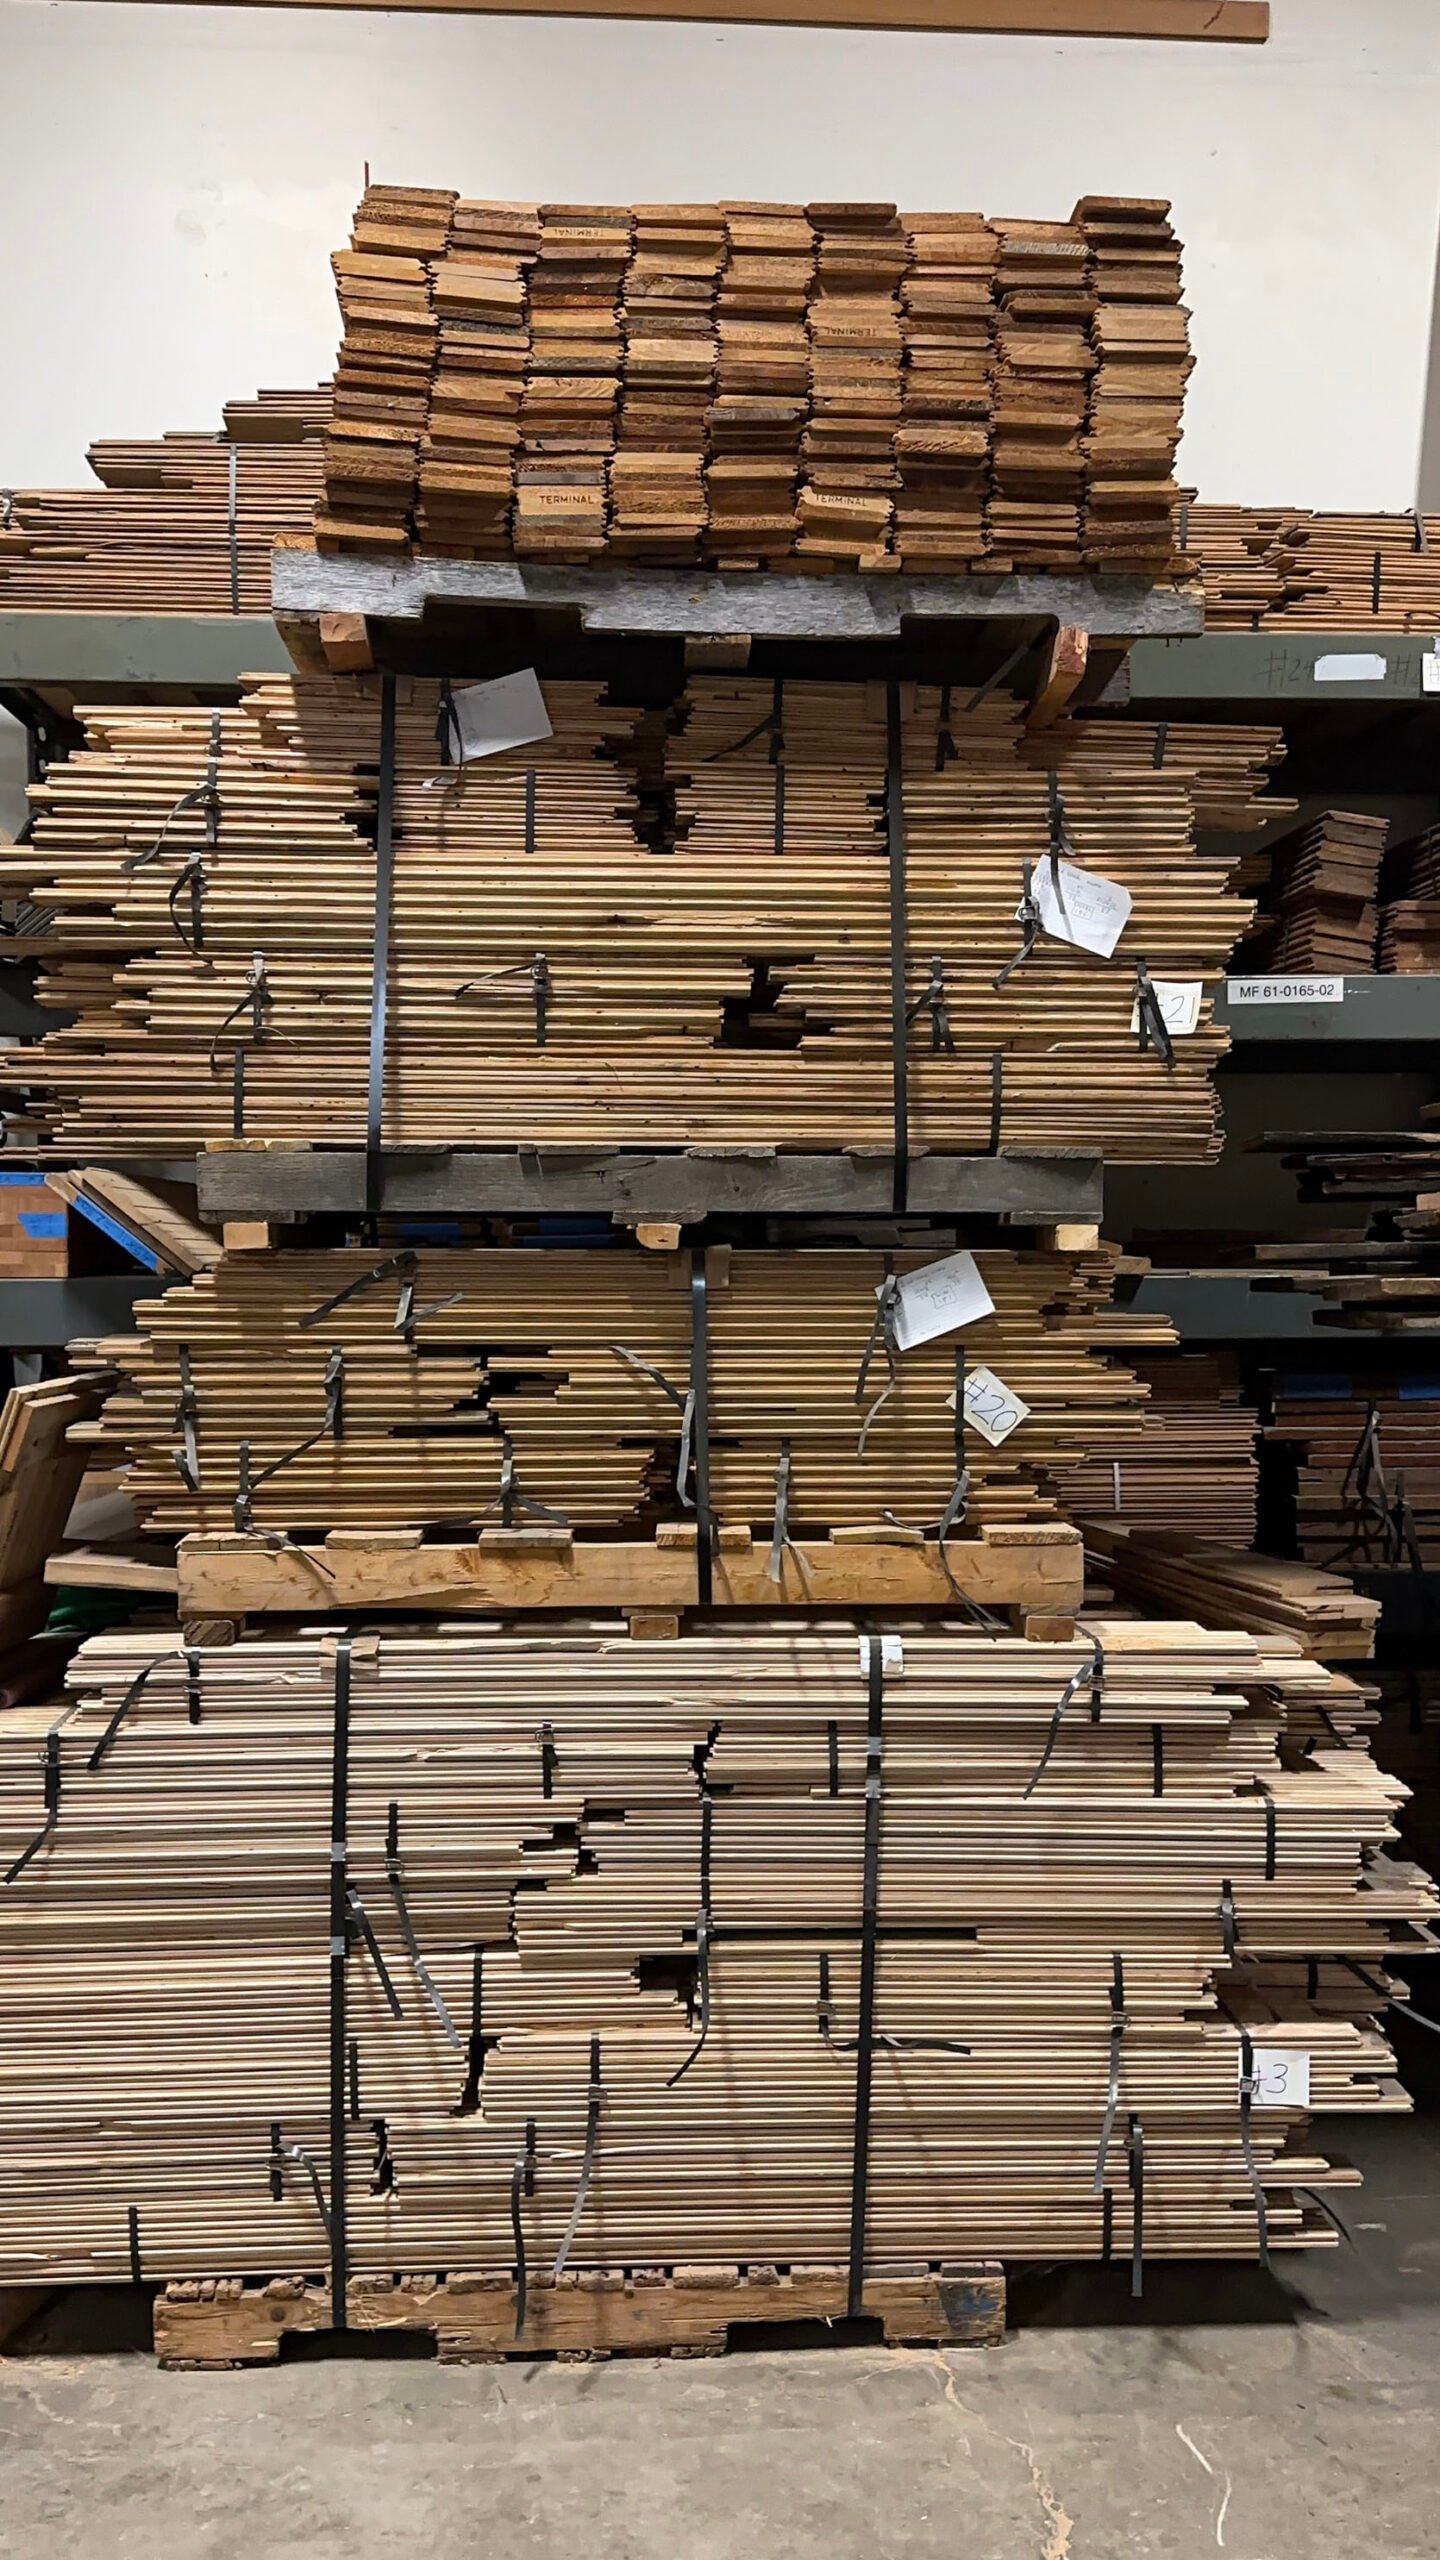
His inventory was vast and fairly intimidating, but so exciting. He had a lot, and everything had a story. But we weren’t sure if any would directly match the wall we wanted to keep.
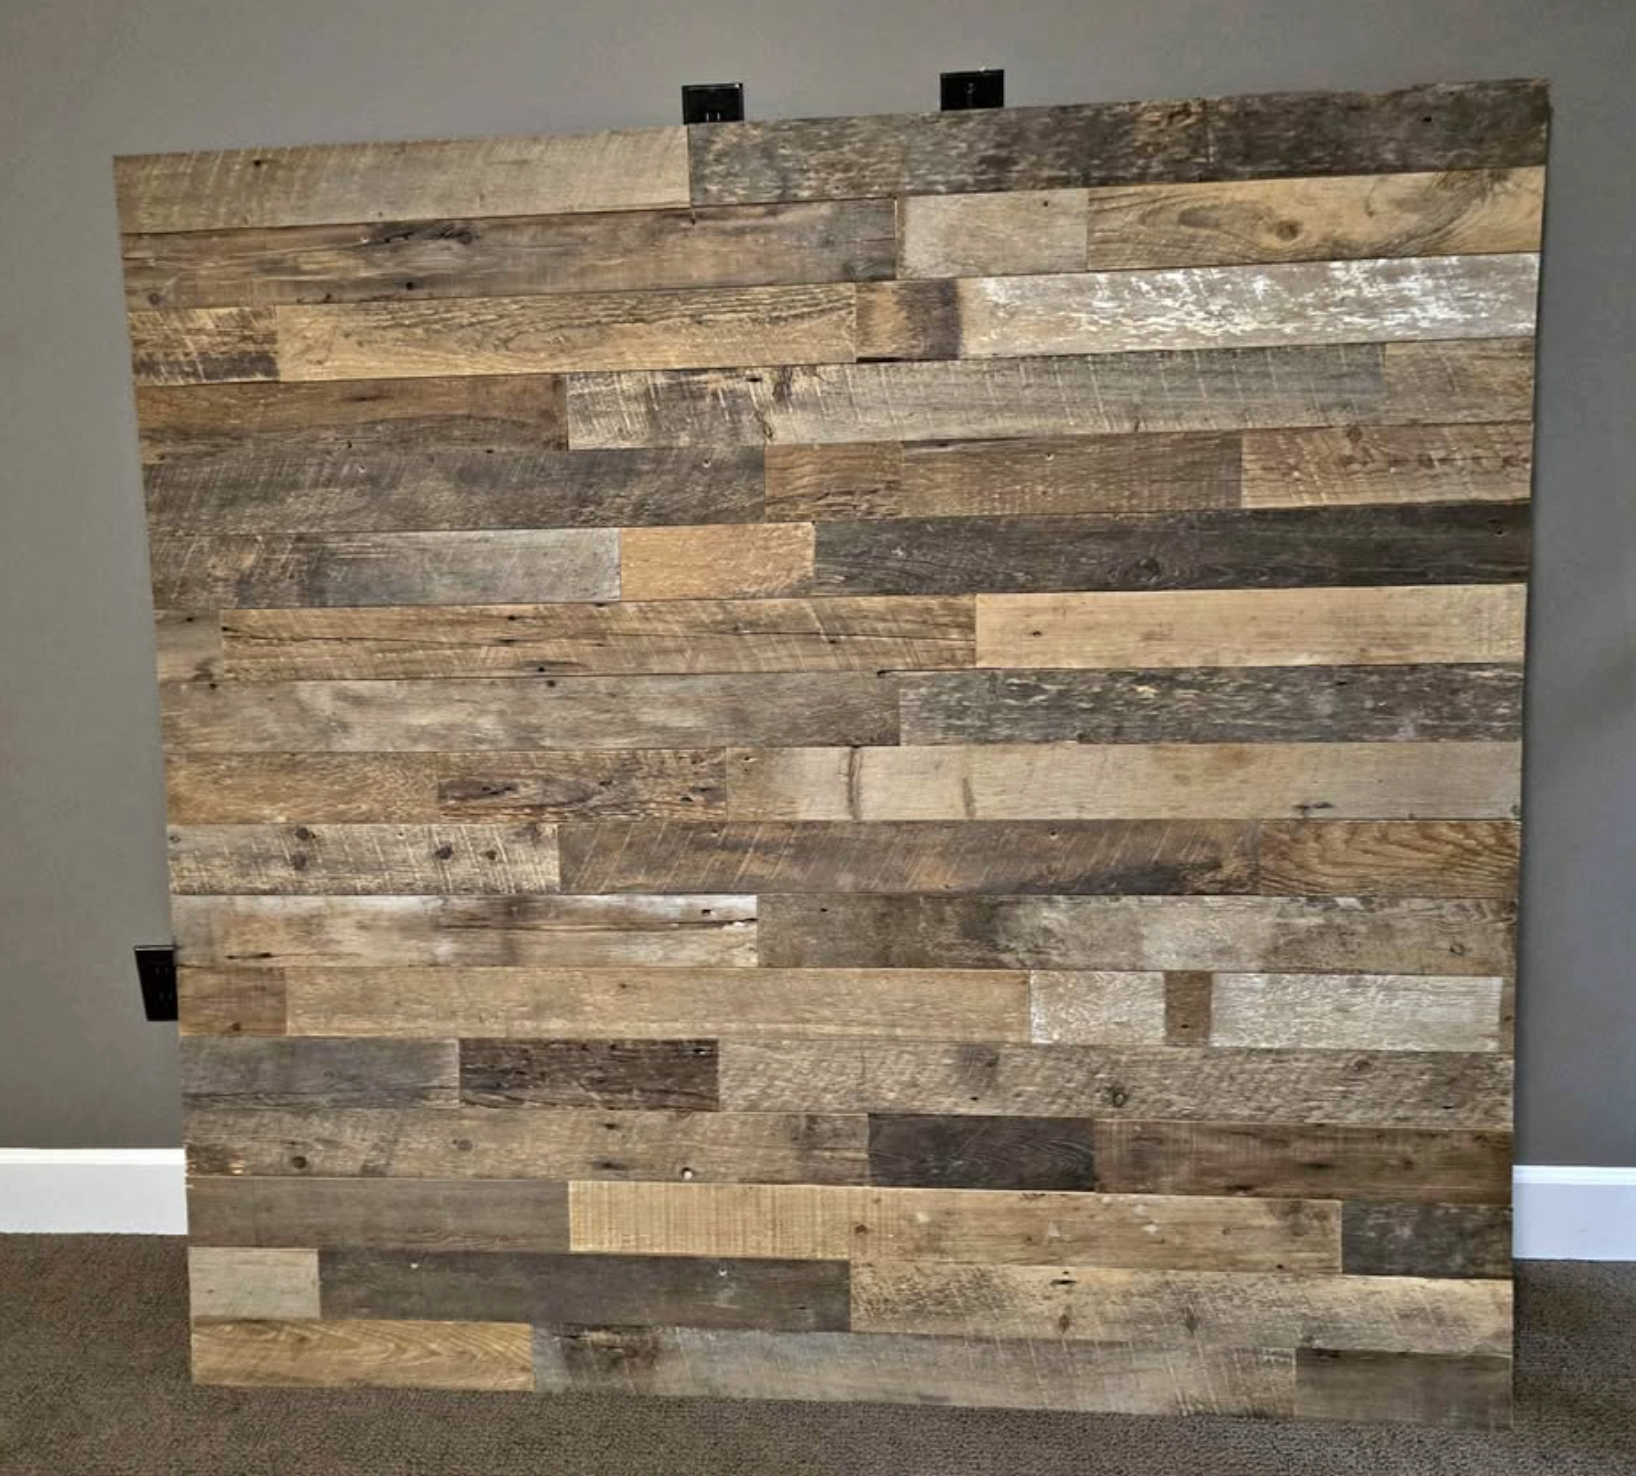
The thing is, I don’t want the “reclaimed wood” wall – you know what I’m talking about (see below). I want it to be uniform and have a pretty smooth grain. I want what is similar to the kitchen/living room in the cottage. I don’t want it to be a mix of different tones and grayed-out woods that look more cobbled together.
What I Don’t Want:
Now, it’s not that I don’t like that look ever, but it’s just not what I’m drawn to for this project. To be honest, I don’t even need reclaimed wood to get what I want (which is just a pretty wood-clad room), but I think it’s a nice way to use what we have, and then yes, use what the earth already made. Reclaimed wood inherently has more character (especially old growth that has such pretty grains and ring patterns). Not to mention the good energy – if you are into that sort of thing (which I am). I want wood that has lived a happy life – either happily in a forest treated with love or a former barn where life was lived (which is why I bought all my wood flooring for our house from Zena Forest Products – which, wait, I just realized I should probably consider for this project!). That’s not to say that I won’t use new wood from Lowe’s where it makes sense (that’s what we did in the Art Barn and the garage), but I love anything that holds a story more, which should surprise no one. I’m not super freaky about it, don’t worry, but I’m telling you it makes a difference in how your home feels to have vintage or storied pieces and finishes. Ok, enough of the woo woo stuff!!! Back to wood!
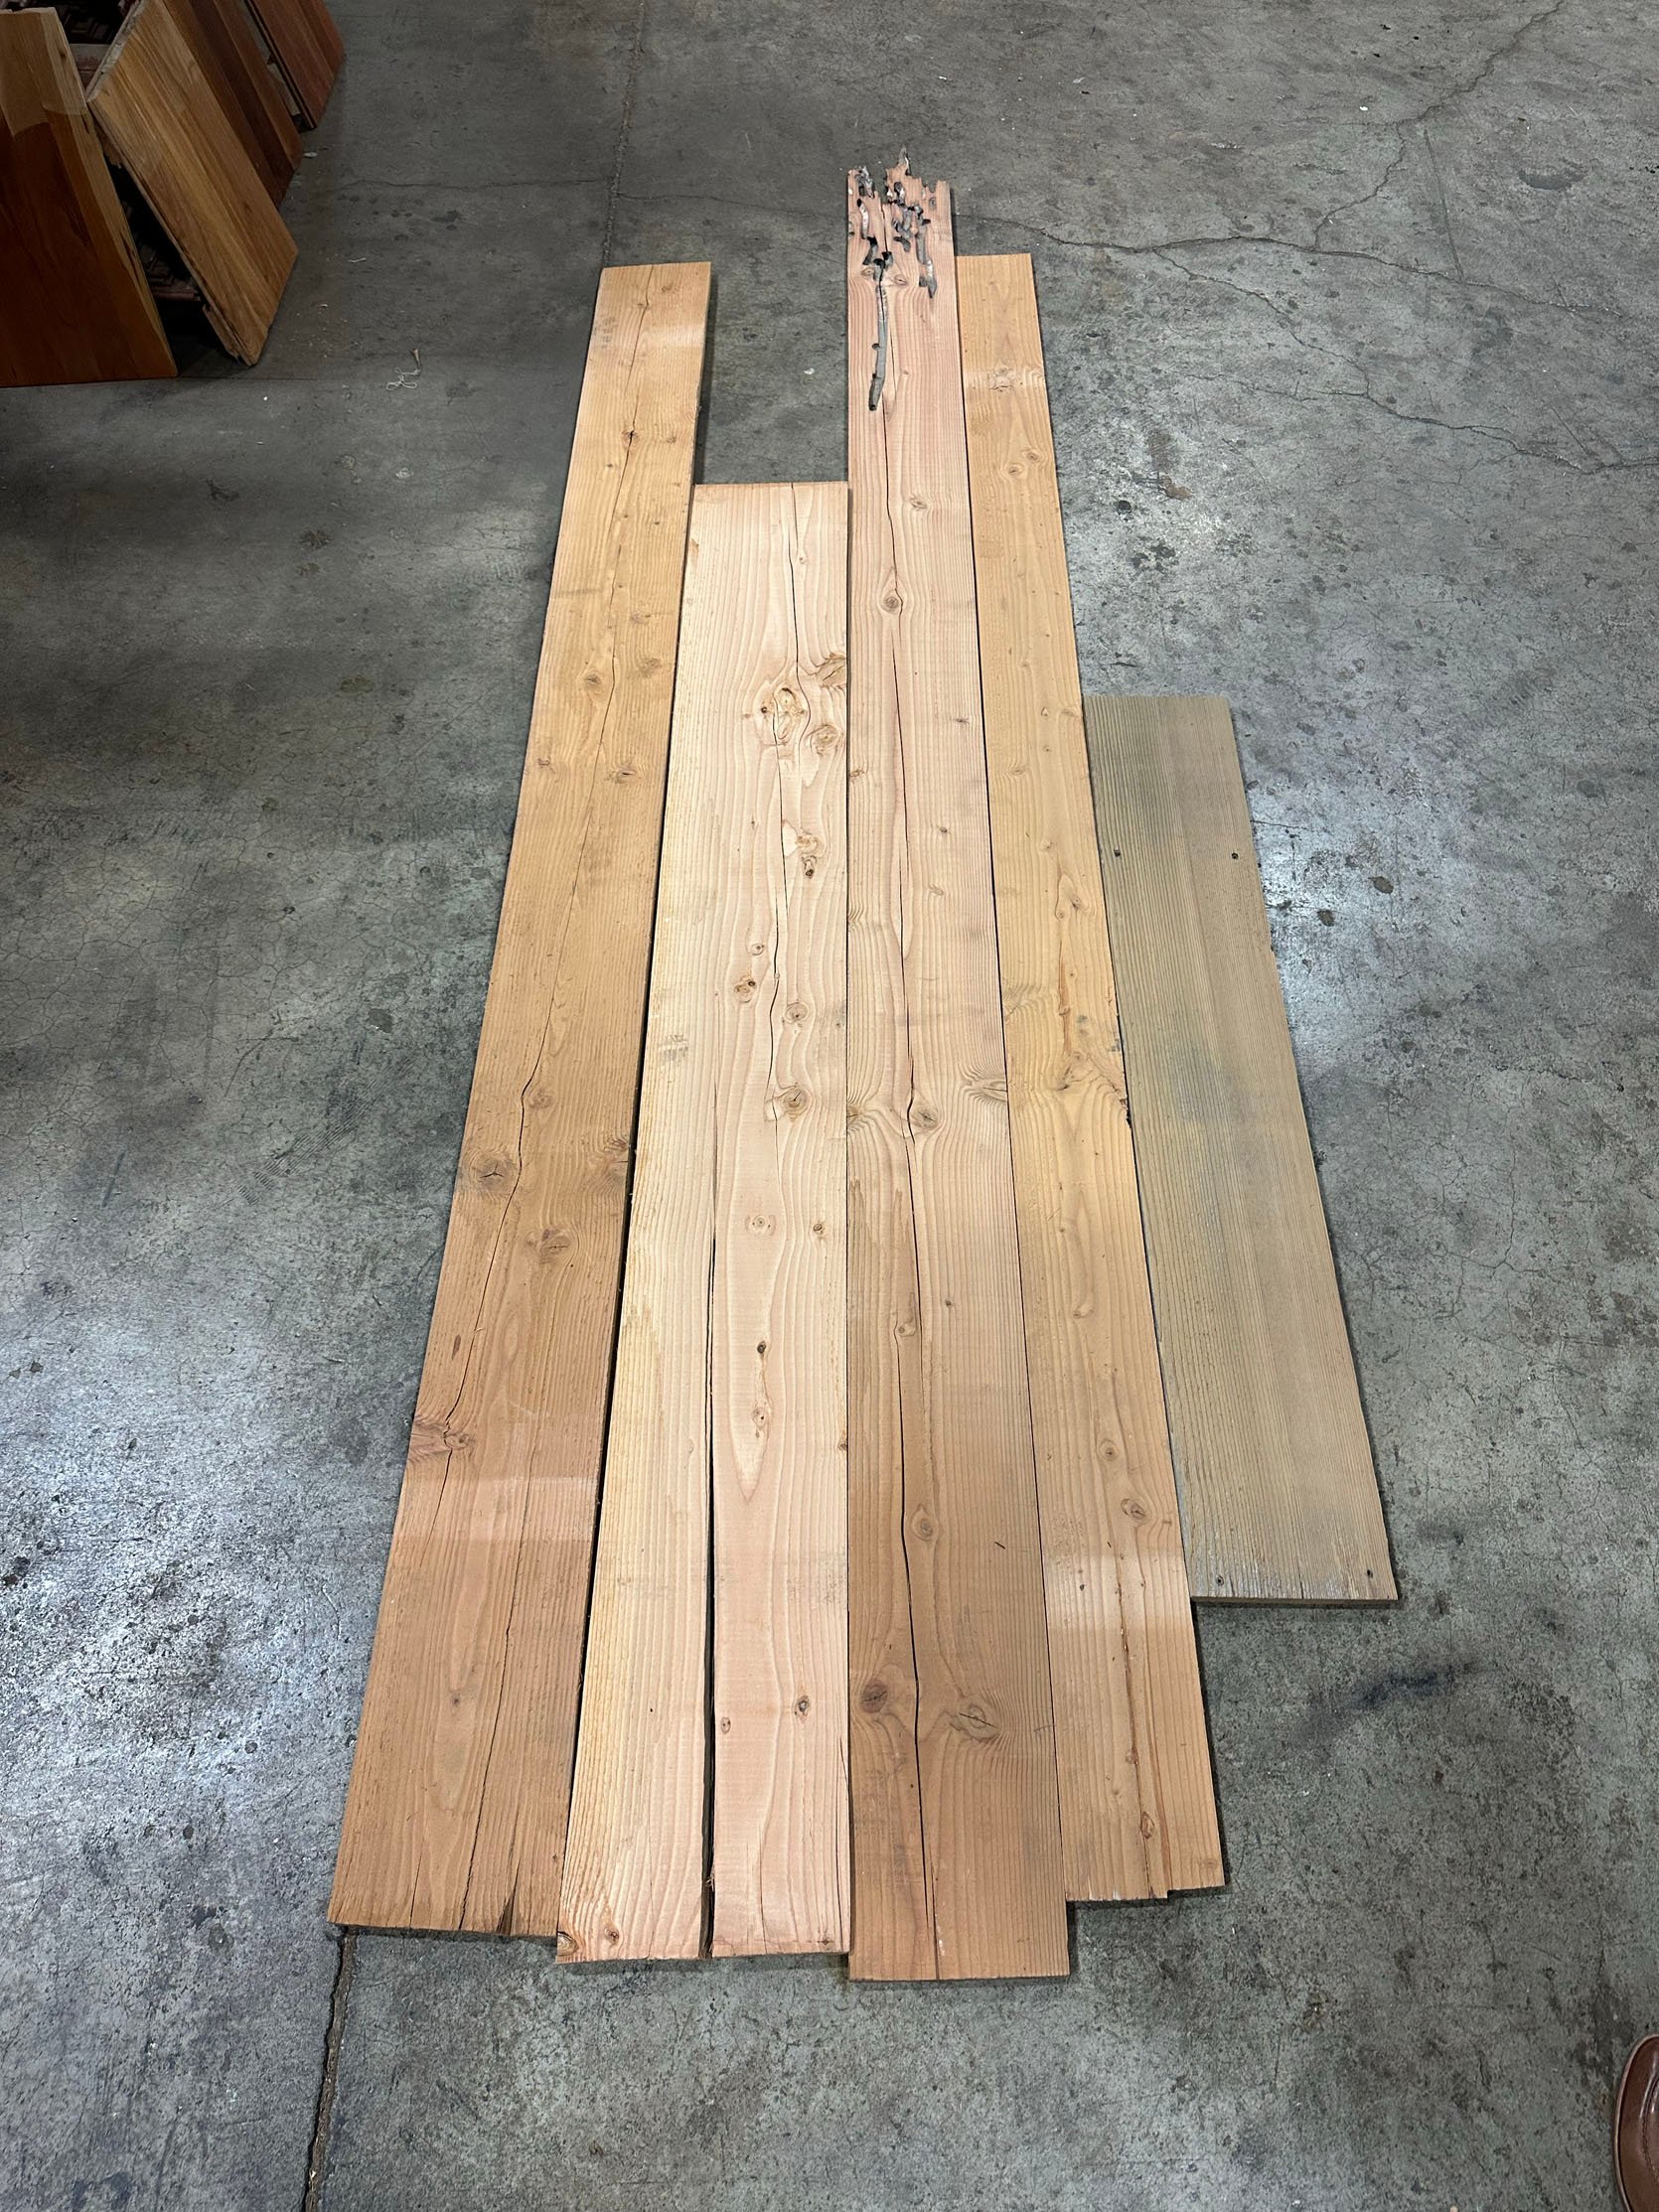
There was some wood that I totally fell in love with, but not enough square footage to meet our needs (the one on the right was so pretty though!). Other wood we liked would need to be sanded and planed, which is something we are considering, but it adds to the cost. When we first went, we didn’t know that we needed either 600 or 750 square feet, so it was more of an information-gathering session.
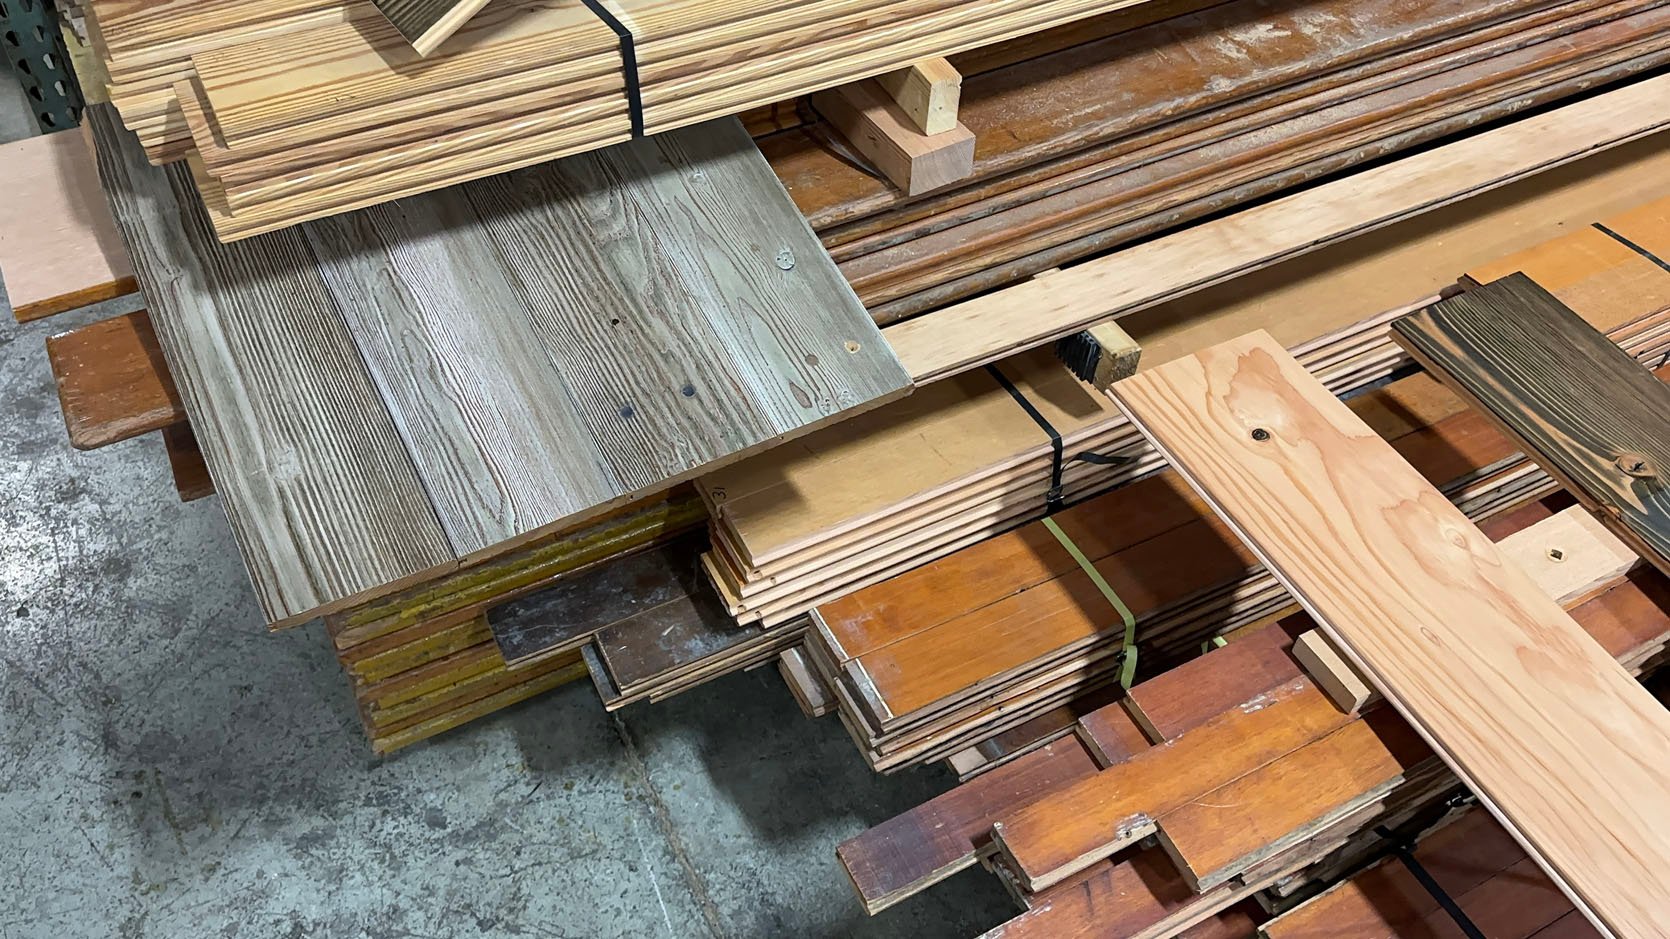
We pulled together all of these boards, which we thought maybe we could clad and then stain the same, so they had a bit of uniformity (the grain was really pretty), and it’s still something we are considering.
In general, like everything in life, the stuff that I was more drawn to was the most expensive ($8-$10 per linear foot), which will certainly add up. But listen, drywall isn’t on the table here, so it’s either reclaimed or new wood, and no, I’d much rather this room be all wood than paneled and painted (which would be cheaper). I’m open to also just doing what we did in the garage and art barn (just pine tongue and groove), but that seems like the less interesting choice.
I’ve given Tobey (McGee Salvage) our quantities now and am hoping that he can sort through what he has and give us some options. And then I hope those options make sense financially. I’m open to splurging on the wood if it’s stunning, but not if it’s just “good”. One benefit of doing reclaimed is that I think that Brian and I could potentially clad it ourselves since reclaimed is more forgiving than newer paneling – it tends to already have awkward cuts and lots of nail/screw holes, so mistakes are easily camouflaged (I would imagine that Brian and I would specialize in those).
So as of now, I don’t have the exact options for you, but I am also curious if any of you had experience in this or sources that might have the uniform quantity that we want (that makes sense on the walls – not 2″ reclaimed old gym flooring). I just want to be inspired by the beauty of the wood, not “ok great, yeah we can see if we can make this work”. So while the uniform quantity is important, the richness of the grain and the tone of the wood are really important to me. Any insight or ideas are much appreciated.
Want to make your house look better?
WE GOT YOU
You're In!
CHECK YOUR INBOX.
20 Comments
Oldest
NewestMost Voted
Elizabeth
5 months ago
Hi! Blue Ox Reclaimed Lumber (MS) was posting on his IG that he had an entire warehouse of reclaimed wood and was really stumped on moving forward with using all of it. Just another lumber provider like you have there, but may have the qty you are looking for at a better price than the coasts.
Leigh H
5 months ago
Off topic 😉 but…. where are your jeans from? They look super cute.
I’m going to guess Madewell’s Darted Barrel Leg Jeans. The jacket is maybe FP Movement’s Pippa Packable Puffer, and the boots look like Kork-Ease’s Sioux in Terra.
I came to the comments to ask the same question 😆 Would love links to what you’re wearing!
Erin Dae
5 months ago
I don’t have anything valuable to add that addresses your question, but just wanted to say that I love the rhythm of these Thursday cottage posts!
Summer
5 months ago
Not sure if they would have the quantity you’re looking for, but Reclaim NW has excellent architectural salvage and might have some interesting options.
Gwyneth
5 months ago
Reclaim NW on SE Foster is another great Portland salvage store that might be worth checking out! They always have lots of reclaimed lumber (though maybe not in the quantity you need). It’s also just a really fun place to dig around.
Vany
5 months ago
I’m sure you removed and brought a piece of the cottage bathroom paneling with you for your search. What additional info could they tell from looking at it? Which piece of wood is it in the pics?
Sarah
5 months ago
You should definitely check out Lovett Salvage Shop. They have vast quantities of reclaimed lumber and materials and it’s a wonderful locally owned company dedicated to diverting construction materials from the waste stream.
kiki
5 months ago
Could you just finish the other walls with plaster? Something with a bit of texture / interest? Not just plain drywall…but painted the right color I think it could go really nicely with the wood. Or, even if you did a 3/4 height “pony” wall and keep the top “exposed” with reclaimed wood that matches the original. Like a loft or gallery space? but instead of brick, it’s the wood?
Tadelakt would be a very cool DIY skill to learn and is waterproof for a shower wall.
Emily
5 months ago
Just curious: Why is drywall not an option? All the walls in my 1880s were drywalled before we bought it and it’s honestly fine. The moulding, original wood windows and other architectural details contribute plenty of charm. You could do Venetian or clay plaster or lime wash or some other finish if you want more texture. And of course, tile is the obvious answer for bathroom walls.
Do you even need to finish the other walls at all? The exposed walls look pretty cute in my opinion. Very rustic and might get a bit cold in winter, but with ‘little rooms’ for the toilet, shower etc, then you only need to worry about the warmth in those rooms. Just a thought….
Donna
5 months ago
I don’t understand the appeal of uniformly stained reclaimed wood. It seems like an oxymoron. And honestly, other than deep cleaning and possibly sealing the wood that is already there, I wouldn’t touch it. The beauty of the aging is so authentic and stunning on its own, and representative of the history of the room. I say leave it and plaster any other walls that are not clad.
Stacy
5 months ago
I am delighted that you’re showcasing how to work with salvaged materials! Even if you don’t choose it, thanks for highlighting it as an option. The wood in old PNW buildings is so gorgeous and often from trees that were 800-1000 years old when they were cut down, so showcasing them feels like the best way to honor them to me =).
I have the same question as another commenter and am wondering if you really need to insulate that room if it’s going to have mini-rooms within? You could keep more of a campy vibe and just have the original walls with exposed electrical tubing against it. (Not sure if that’s the right word here. Wires would be securely in a tube, but you see them against the wall.)
Either way, love the cottage posts!
Lin
5 months ago
This bathroom will have to have such a unique answer to “how is this room supposed to function/need does it meet?” It is really going to need to be two bathrooms in one. You’ve got the “public facing” as it were, part of it–the beloved urinal, and toilet, that your outside guests will use when you generously offer the house up for big school parties. These folks might be new to you/strangers etc., that you may not want wandering through the whole guest cottage (just being real). They are just there for the quick potty visit, hand wash, etc. and back to the party. Then, you have your true house guests, that will be using the shower, relaxing, and ideally enjoying the beautiful quirky space. My point is, I’d love to see your layout ideas, because I am wondering whether it makes sense to base a separation of the big room on these two concepts–Is there a role for an indoor door/curtain/etc to separate, when needed, the “public” part of the bathroom that exits to the yard, from the “private” part of the bathroom that your houseguests will use? (Also making sure that folks can’t randomly wander through your office… Read more »
Unah
5 months ago
You should look at pics of the La Charpenterie restaurant (Av. du Prariond, 73150 Val-d’Isère, France). It is more of a 70s vibe, but they have half old wood paneling and half white walls. It’s a great look. It sounds like you are now leaning towards ripping out al the old paneling and replacing it, but maybe you can do something similar to what they did.
Unah
5 months ago
We have a “pool bathroom” that has double entrance doors. The door on one end opens into our house and the door on the other end opens to the exterior/pool area. It’s a pain to use. You (and your guests) have to remember to lock/unlock BOTH doors when using it. Inevitably someone leaves one door locked and people are stranded until someone goes around and unlocks the offending door. Or worse, someone using it doesn’t lock BOTH doors, leading to an awkward walk-in, yikes. It’s kind of like having the Jack and Jill bath between two kids rooms where they are always “accidentally” locking out the other kid. Anyone have any ideas on how to address/prevent that from happening? We haven’t solved the problem yet.
Nicolette
5 months ago
I was too late to comment on the bathroom layout post so I’m leaving my thoughts here. I personally am very grossed out when I have to sit on a toilet next to a urinal. I like the room within a room idea but what if you add a divider or even two doors so guests don’t have to sit next to a urinal when using the facilities 🙃


Hi! Blue Ox Reclaimed Lumber (MS) was posting on his IG that he had an entire warehouse of reclaimed wood and was really stumped on moving forward with using all of it. Just another lumber provider like you have there, but may have the qty you are looking for at a better price than the coasts.
Off topic 😉 but…. where are your jeans from? They look super cute.
I’m going to guess Madewell’s Darted Barrel Leg Jeans. The jacket is maybe FP Movement’s Pippa Packable Puffer, and the boots look like Kork-Ease’s Sioux in Terra.
I have those jeans. Kut from the Kloth Ashton barrel.
I came to the comments to ask the same question 😆 Would love links to what you’re wearing!
I don’t have anything valuable to add that addresses your question, but just wanted to say that I love the rhythm of these Thursday cottage posts!
Not sure if they would have the quantity you’re looking for, but Reclaim NW has excellent architectural salvage and might have some interesting options.
Reclaim NW on SE Foster is another great Portland salvage store that might be worth checking out! They always have lots of reclaimed lumber (though maybe not in the quantity you need). It’s also just a really fun place to dig around.
I’m sure you removed and brought a piece of the cottage bathroom paneling with you for your search. What additional info could they tell from looking at it? Which piece of wood is it in the pics?
You should definitely check out Lovett Salvage Shop. They have vast quantities of reclaimed lumber and materials and it’s a wonderful locally owned company dedicated to diverting construction materials from the waste stream.
Could you just finish the other walls with plaster? Something with a bit of texture / interest? Not just plain drywall…but painted the right color I think it could go really nicely with the wood. Or, even if you did a 3/4 height “pony” wall and keep the top “exposed” with reclaimed wood that matches the original. Like a loft or gallery space? but instead of brick, it’s the wood?
Tadelakt would be a very cool DIY skill to learn and is waterproof for a shower wall.
Just curious: Why is drywall not an option? All the walls in my 1880s were drywalled before we bought it and it’s honestly fine. The moulding, original wood windows and other architectural details contribute plenty of charm. You could do Venetian or clay plaster or lime wash or some other finish if you want more texture. And of course, tile is the obvious answer for bathroom walls.
Do you even need to finish the other walls at all? The exposed walls look pretty cute in my opinion. Very rustic and might get a bit cold in winter, but with ‘little rooms’ for the toilet, shower etc, then you only need to worry about the warmth in those rooms. Just a thought….
I don’t understand the appeal of uniformly stained reclaimed wood. It seems like an oxymoron. And honestly, other than deep cleaning and possibly sealing the wood that is already there, I wouldn’t touch it. The beauty of the aging is so authentic and stunning on its own, and representative of the history of the room. I say leave it and plaster any other walls that are not clad.
I am delighted that you’re showcasing how to work with salvaged materials! Even if you don’t choose it, thanks for highlighting it as an option. The wood in old PNW buildings is so gorgeous and often from trees that were 800-1000 years old when they were cut down, so showcasing them feels like the best way to honor them to me =).
I have the same question as another commenter and am wondering if you really need to insulate that room if it’s going to have mini-rooms within? You could keep more of a campy vibe and just have the original walls with exposed electrical tubing against it. (Not sure if that’s the right word here. Wires would be securely in a tube, but you see them against the wall.)
Either way, love the cottage posts!
This bathroom will have to have such a unique answer to “how is this room supposed to function/need does it meet?” It is really going to need to be two bathrooms in one. You’ve got the “public facing” as it were, part of it–the beloved urinal, and toilet, that your outside guests will use when you generously offer the house up for big school parties. These folks might be new to you/strangers etc., that you may not want wandering through the whole guest cottage (just being real). They are just there for the quick potty visit, hand wash, etc. and back to the party. Then, you have your true house guests, that will be using the shower, relaxing, and ideally enjoying the beautiful quirky space. My point is, I’d love to see your layout ideas, because I am wondering whether it makes sense to base a separation of the big room on these two concepts–Is there a role for an indoor door/curtain/etc to separate, when needed, the “public” part of the bathroom that exits to the yard, from the “private” part of the bathroom that your houseguests will use? (Also making sure that folks can’t randomly wander through your office… Read more »
You should look at pics of the La Charpenterie restaurant (Av. du Prariond, 73150 Val-d’Isère, France). It is more of a 70s vibe, but they have half old wood paneling and half white walls. It’s a great look. It sounds like you are now leaning towards ripping out al the old paneling and replacing it, but maybe you can do something similar to what they did.
We have a “pool bathroom” that has double entrance doors. The door on one end opens into our house and the door on the other end opens to the exterior/pool area. It’s a pain to use. You (and your guests) have to remember to lock/unlock BOTH doors when using it. Inevitably someone leaves one door locked and people are stranded until someone goes around and unlocks the offending door. Or worse, someone using it doesn’t lock BOTH doors, leading to an awkward walk-in, yikes. It’s kind of like having the Jack and Jill bath between two kids rooms where they are always “accidentally” locking out the other kid. Anyone have any ideas on how to address/prevent that from happening? We haven’t solved the problem yet.
I was too late to comment on the bathroom layout post so I’m leaving my thoughts here. I personally am very grossed out when I have to sit on a toilet next to a urinal. I like the room within a room idea but what if you add a divider or even two doors so guests don’t have to sit next to a urinal when using the facilities 🙃