
Design
New Year, Old (& Unfinished) Project: It’s Time to Tackle What You’ve Put Off Too Long + 4 Easy Steps To Get It Done…FINALLY
There’s something about taking down all your holiday decorations that puts a magnifying glass against all the things in your home you forgot you have been ignoring. Wreaths get pulled off windows, doors, and mirrors; garland is stripped from staircases, doorways, and mantels. After the sigh of relief that it’s all put away, and you have your house back, it’s common to look around and really *see* your house. The uneven curtain panels in your living room, you swore were only temporary…three years ago. The cluttered bar cabinet you keep meaning to reorganize and style. The half-finished DIY sconces with the shade you never got around to wrapping in that cool fabric that’s still shoved in your closet.
All the things above I mentioned are actually my personal home project shortcomings—and then some. Running my own freelance business and raising an inquisitive toddler who only goes to school half a day leaves me with little time to prioritize things like finally fixing the cafe curtains I made for my dining room over two years ago that bum me out every time I walk by them (that would be many times a day, FYI).
But given that it is that time of year for leaving all your failures in the past and laying out intentions you really hope you can keep past January 15, I’ve decided that I’m resolving myself to stop being blind to the spots in my home I’m less than pleased with and laying out a plan for what and how to tackle them.
First up: Those dining room curtains.
Wait, But How Should I Decide Where to Start?
I want to quickly lay out a few notes that might help you decide on which project should take priority, because if you’re anything like me, the idea of starting and the laundry list of tasks is overwhelming enough to freeze you in your tracks.
Step #1: Start with the most visible (but least daunting) project. The more you see it, the more likely you are to be blind to it (until you have guests and start panicking over it because your everyday house goggles come off and you start seeing things like you think a new person will see it…hint: they don’t). Plus, nothing boosts your confidence and drive more than finally locking in and improving a spot in your home you interact with daily. For me, my dining room curtains are visible almost immediately upon moving through my home, but also from the street. Now for the “least daunting” part of this step. In reality, my living room curtains are more problematic to me than my dining room window coverings. They’re uneven, poorly placed, and look like a sloppy afterthought. But I know that replacing six to eight curtain panels of over 100 inches in addition to a massive curtain rod is going to be massively expensive. My dining room window, though? A far more approachable problem to tackle and check something off my list.
Step #2: Figure out how much money you’re willing to throw at it before starting. Settling on a budget is not a groundbreaking rule for home projects, obviously. But I find it’s often skipped for smaller things with the thought that it just won’t be that expensive…haha try again. Even if it’ll run you a few hundred bucks, as opposed to thousands, it’s important to outline how much you have to spend before running through your options and pricing them out. It might just make your decision that much easier if your choices vary widely in cost.
Step #3: Set a realistic deadline for yourself. “Oh, it won’t take much time at all” you said…two years ago. SET THAT DEADLINE, or else you’ll be adding this same project to your 2027 resolutions list yet again. My advice? Set it around some sort of milestone or landmark so it higher risk if you miss the mark. Meaning, do you have family coming in March to visit for spring break? Do you have a big birthday dinner party on the books for February or April? Give yourself a little buffer of about two weeks prior to allow for troubleshooting or moments of #lifehappens, and work backward from there.
Step #4: DO NOT START ANYTHING NEW BEFORE FINISHING! I capitalize this for dramatic emphasis due to the fact that I wish someone would scream this at me daily upon walking down the stairs to get my morning coffee. Stay focused, finish up, and *then* move on to the next thing. One finished project is worth 10 times what five unfinished projects are. Trust me.
Okay, now that that is sorted, let’s dive into my first project of the year.
An Intro To Arlyn’s Dining Room Curtain Predicament
For reference, here’s what my dining room looked like before we fully moved in. We have these giant windows in nearly every room of our home, and while I first really appreciated them, I quickly learned how tricky they would be to cover in the way I wanted. We inherited mostly broken vertical blinds that all had to come down ASAP for my mental health.
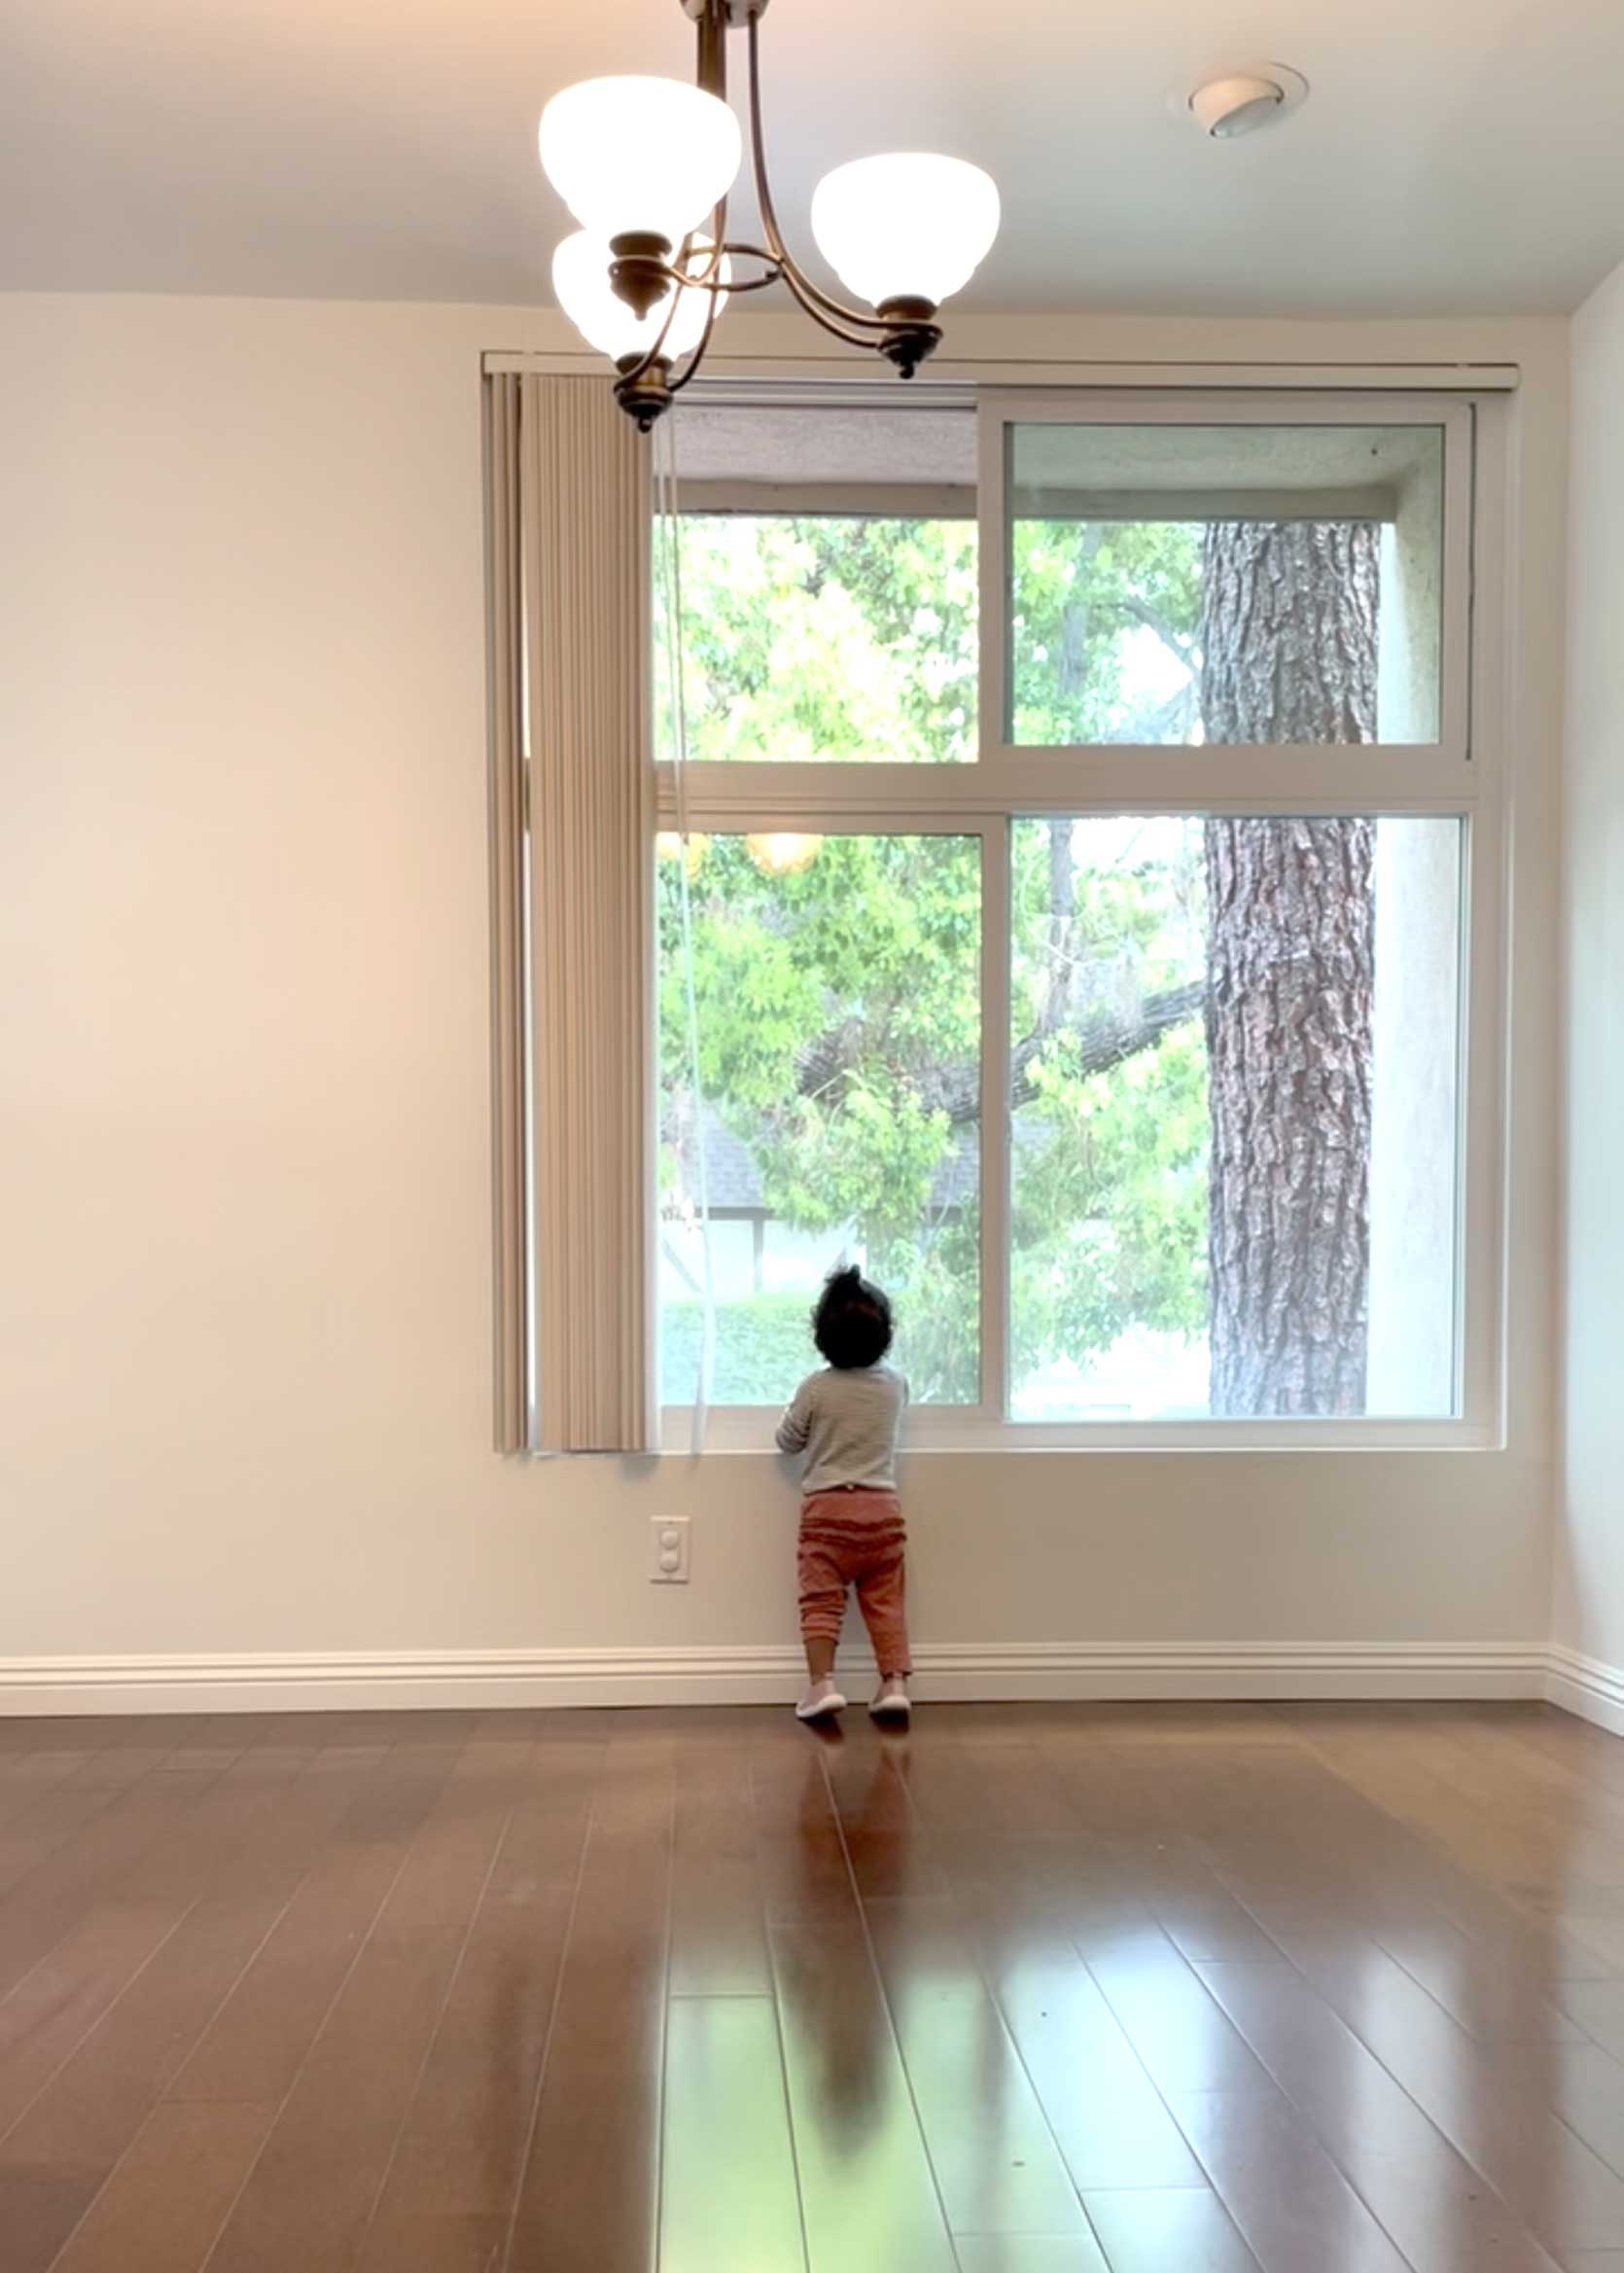
And above is where we are now. As in today, because I just took these photos. Looking at the photos of these cafe curtains, they honestly don’t look *that* bad, but in real life, they don’t work nearly as well as I had imagined they would.
Before settling on this design years ago, I contemplated doing curtain panels, but I really wanted to try something different. Not to mention the ceiling height in my dining room is fairly low, and I thought long drapes would overpower the space that already had a ton of large-scale furniture in it. That, and our home’s perimeter consists of at least a dozen old-growth camphor and pine trees, which means that even though our windows are gargantuan, they do not let in much light. Blocking any of that sunlight, especially from the top part of the window, felt criminal.
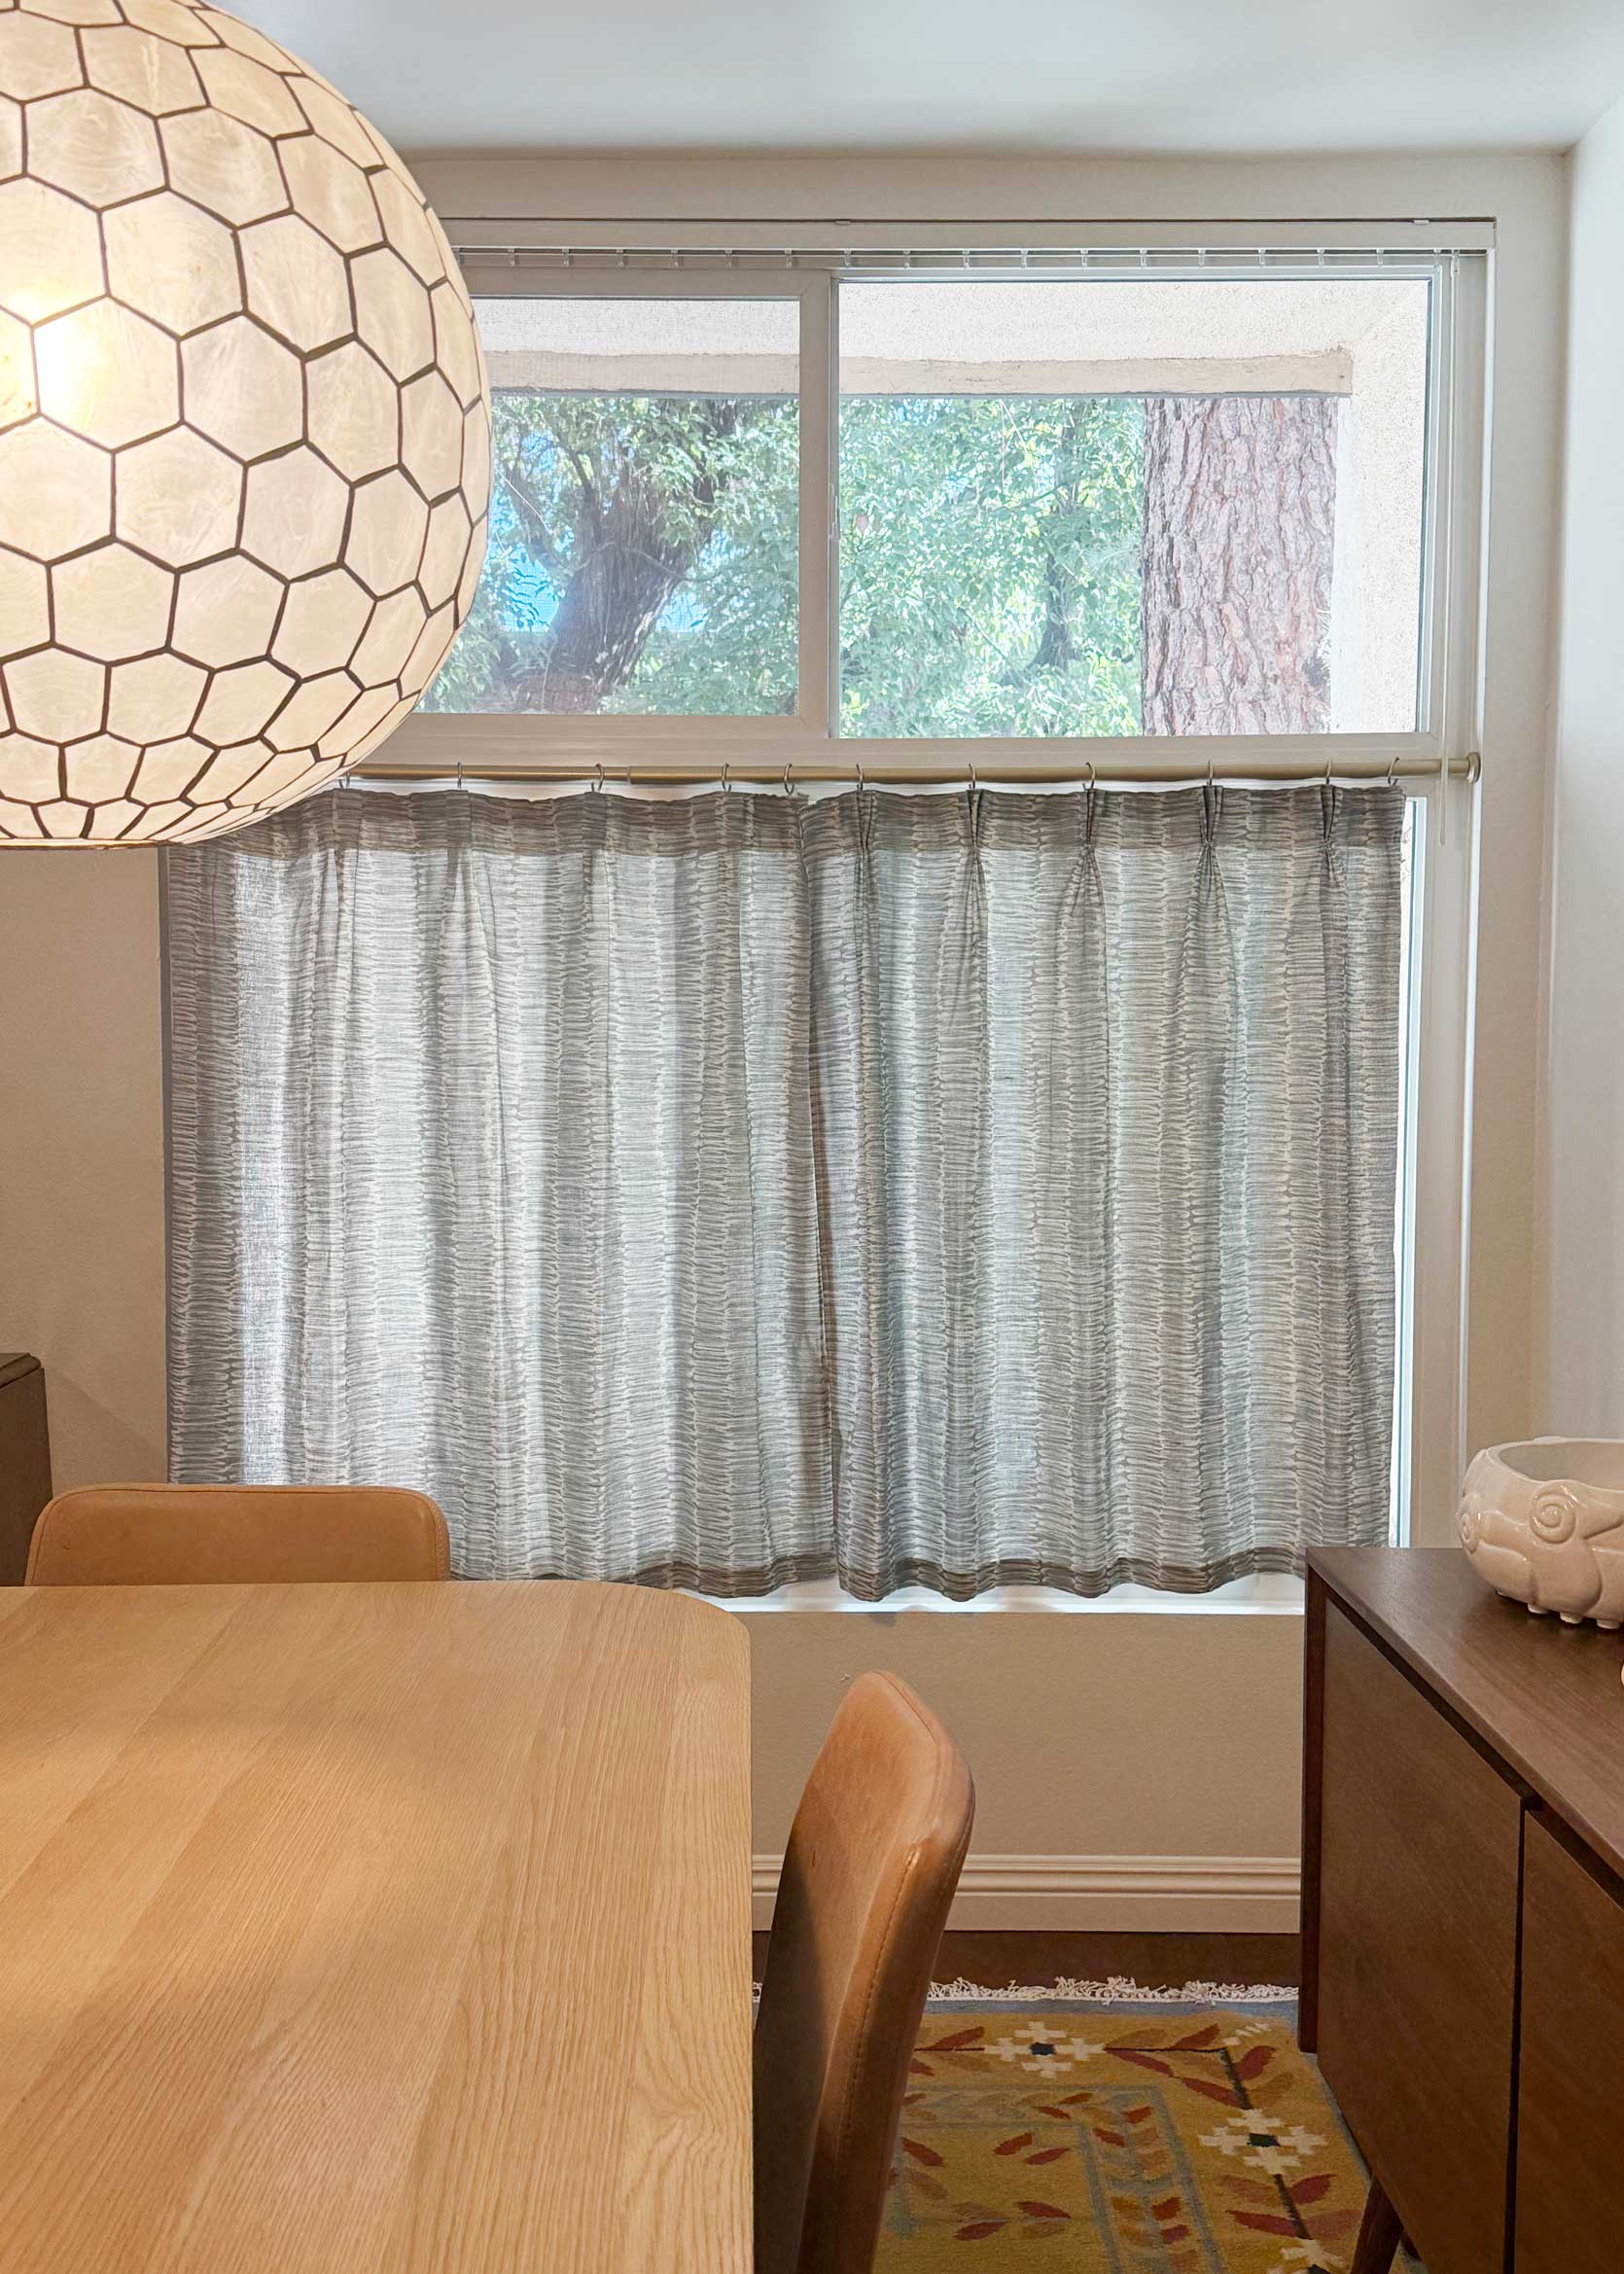
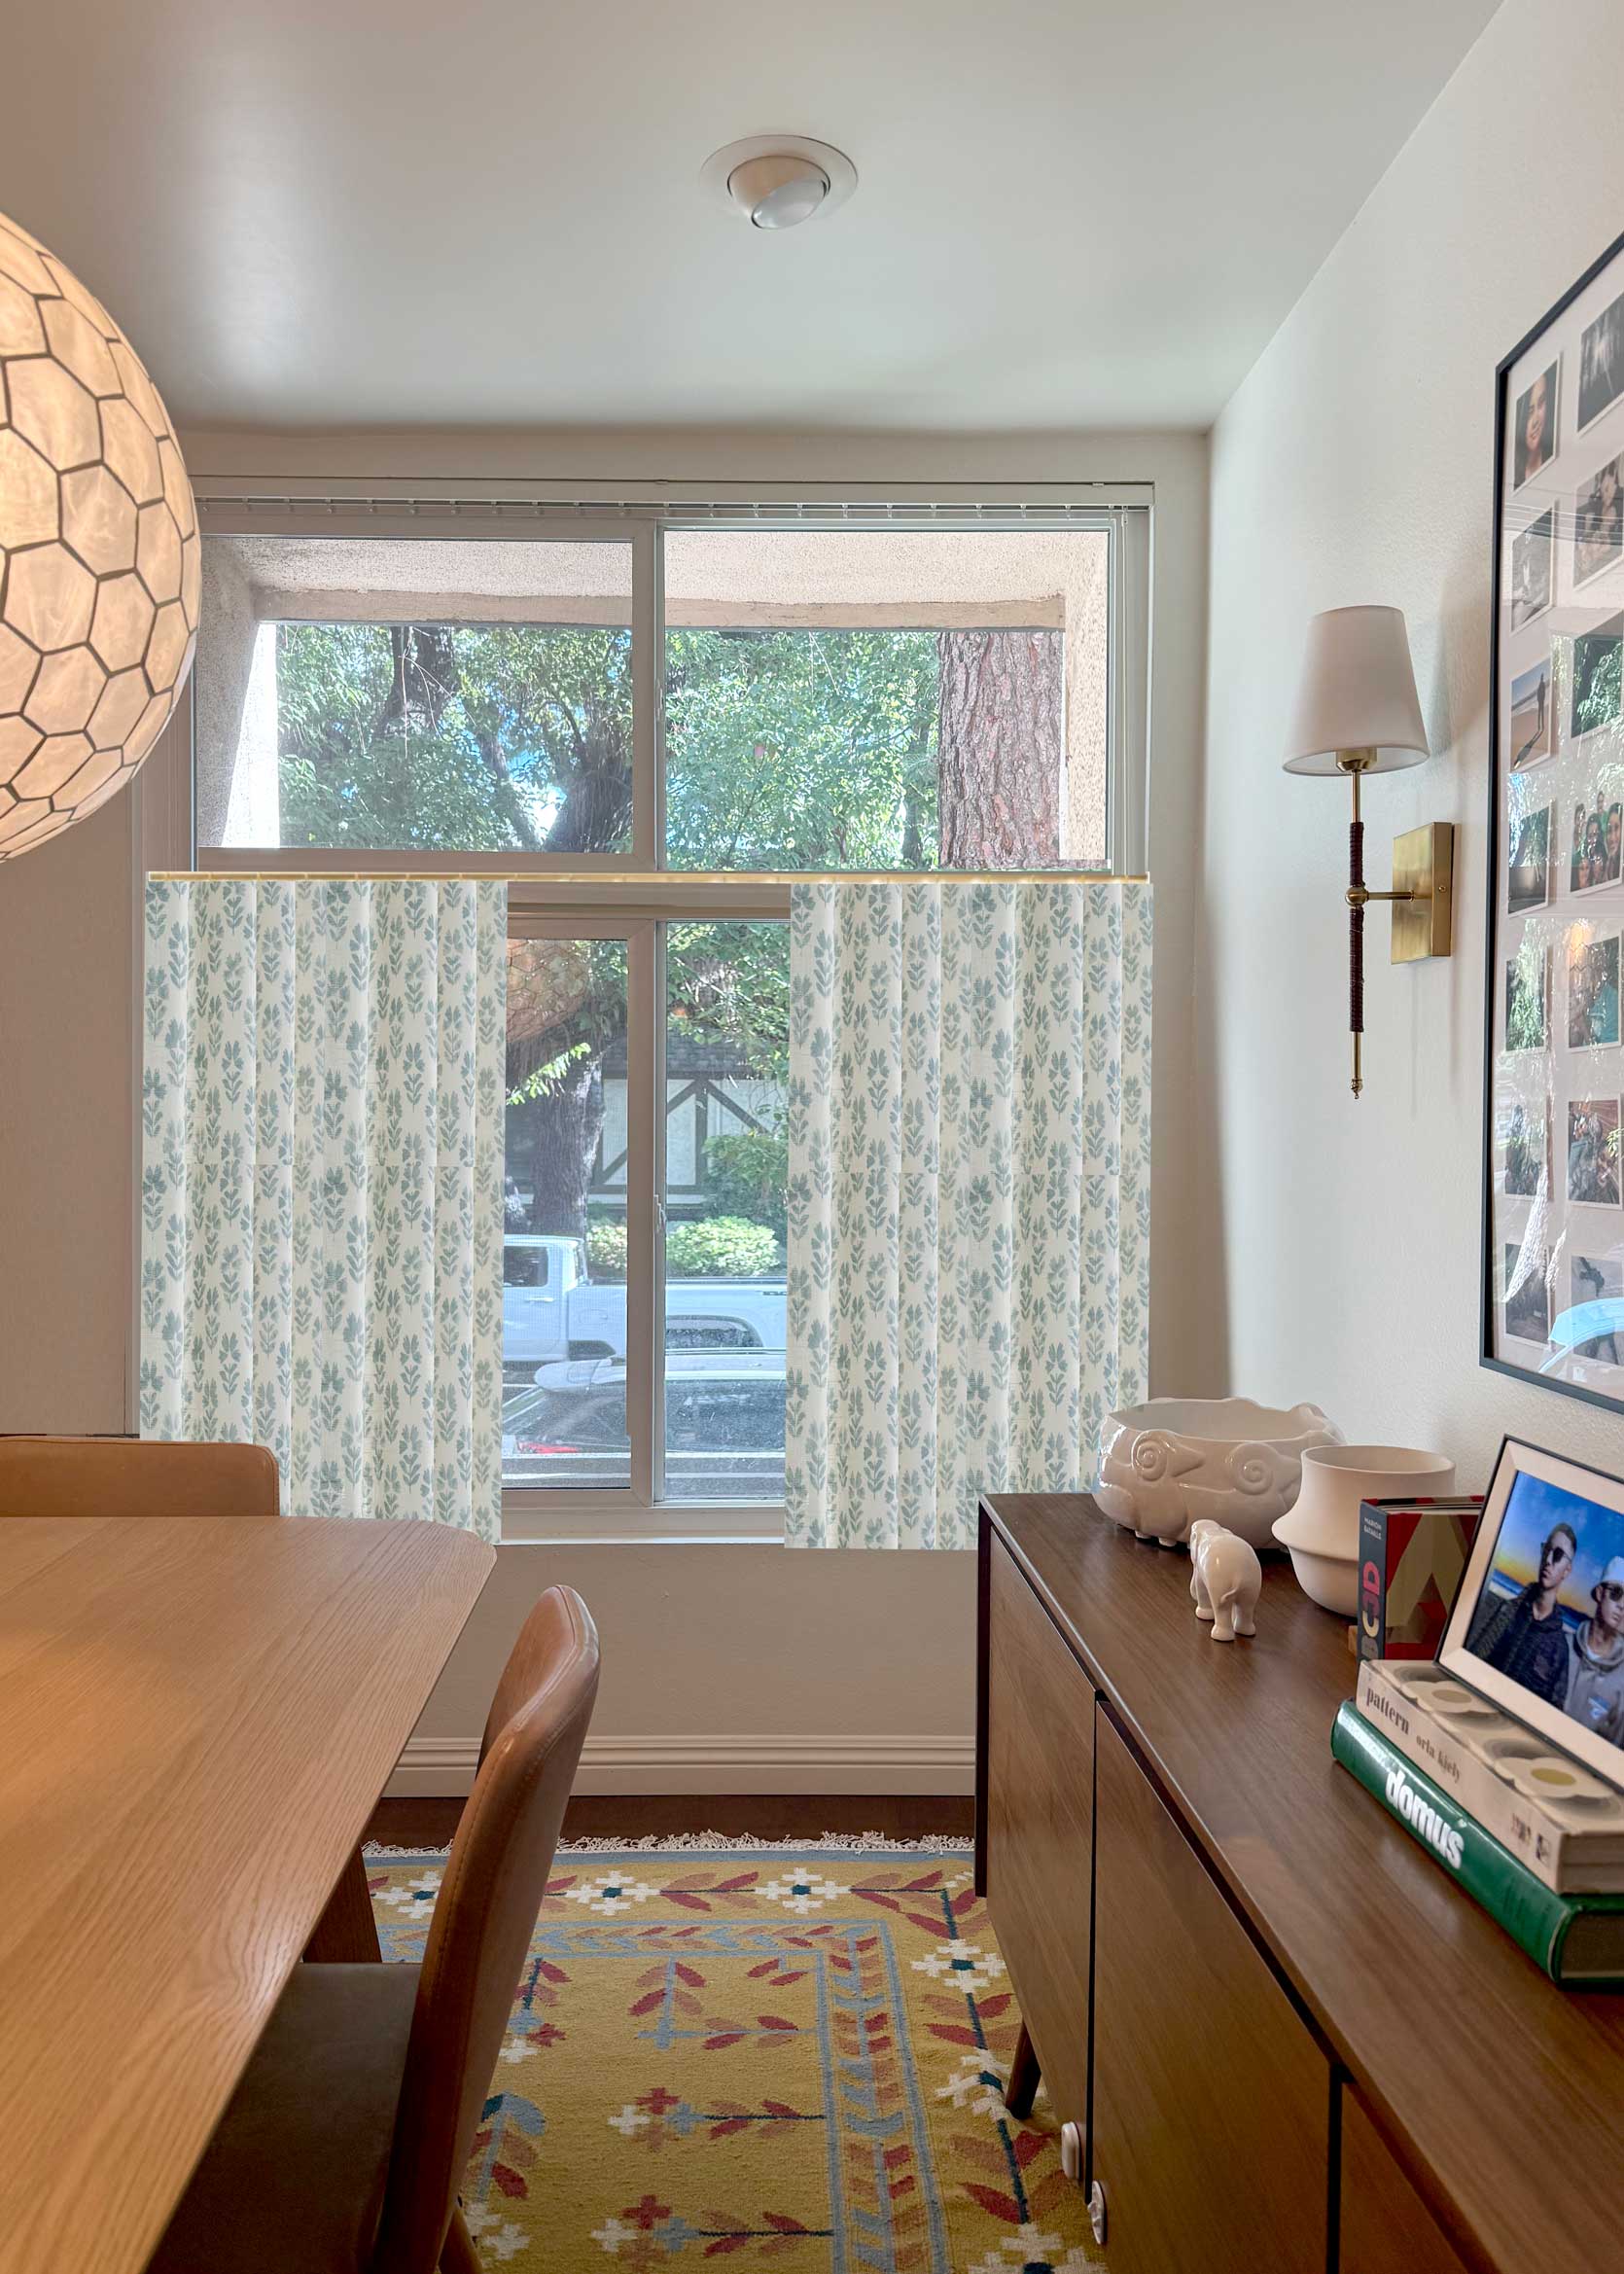
Except that I overlooked that cafe curtains work best on small windows, or at the very least, windows with somewhere to secure a center support. Finding a metal rod strong enough to hold up the weight of curtains and rings across a 75-inch span is near impossible. Because trust me, I tried. There’s a graveyard of bad choices in my garage from this very project. The only thing that ended up working (and I use that term loosely) was a 1-inch diameter tension rod. The result was always something I didn’t love, partly due to the fact that it has a plastic ring at eye level where the rod extends, but also because the inset of the window is barely any deeper, so the curtains puff out weirdly without room to move.
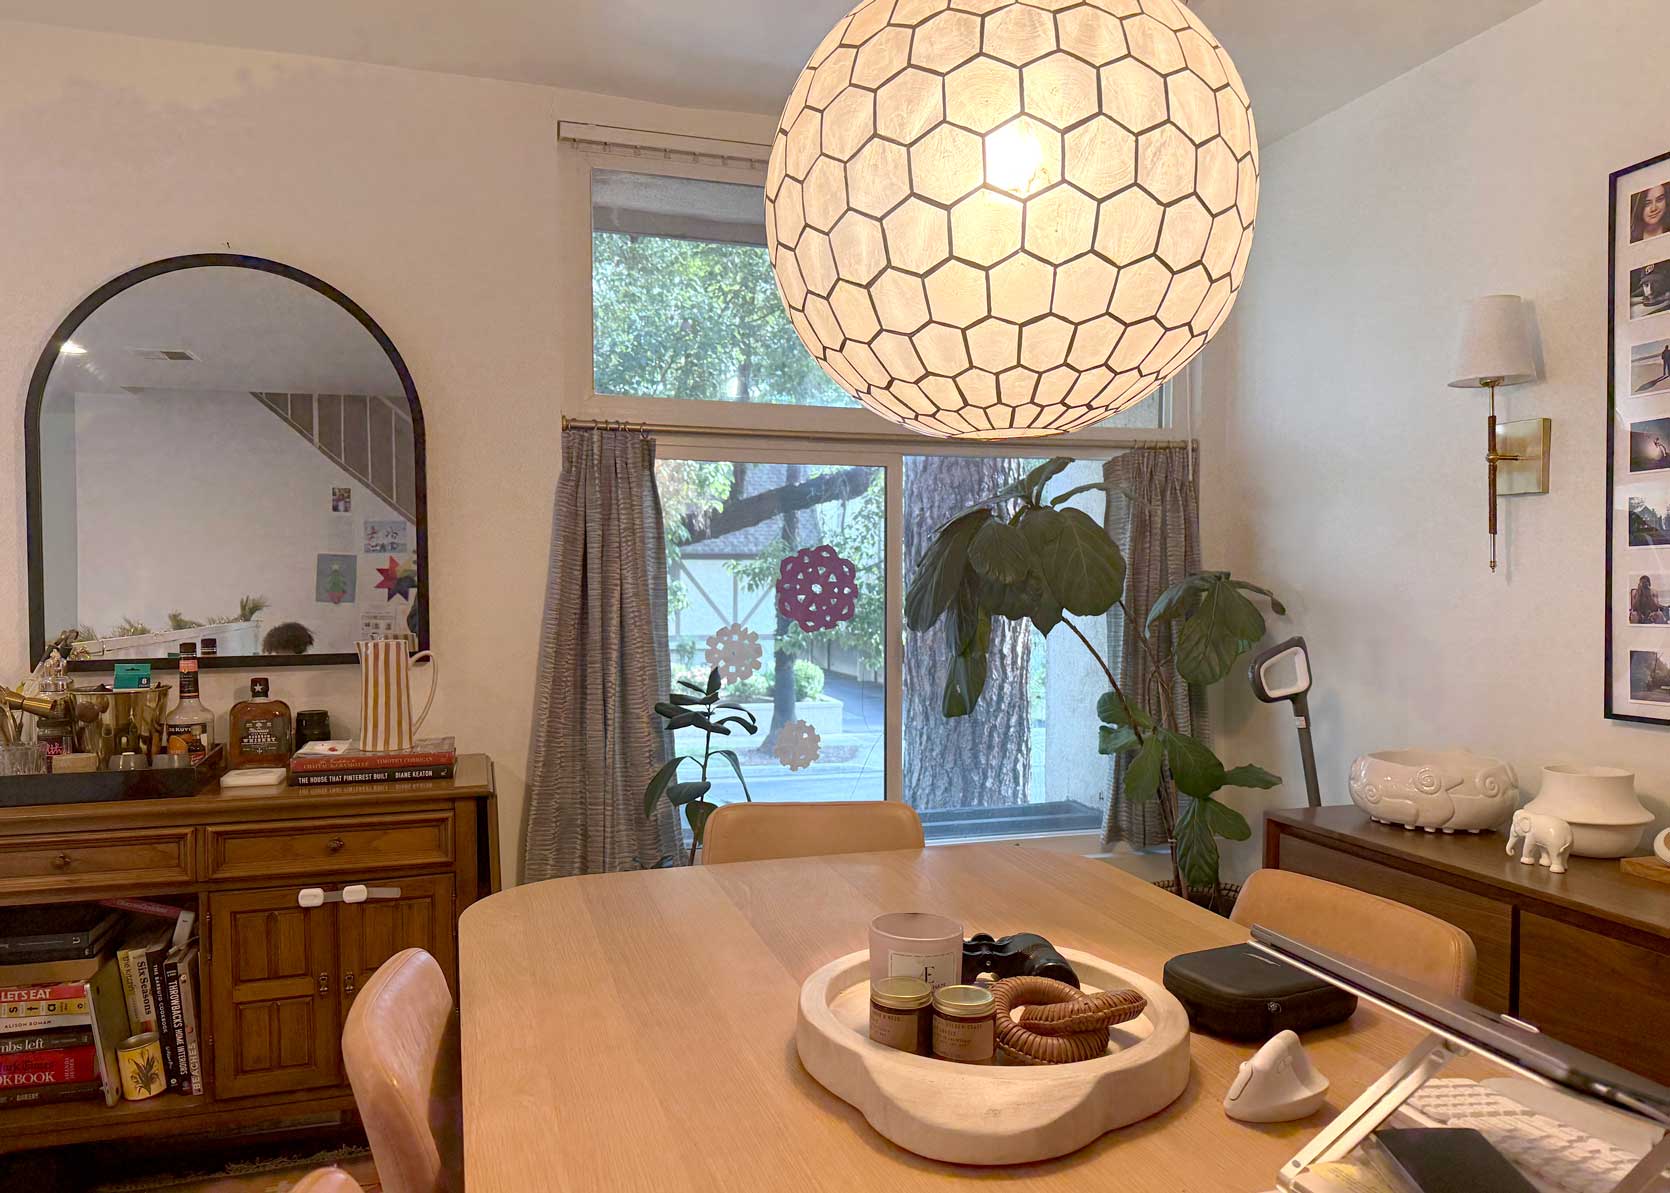
You can see the flaring of the curtains here better, which frankly is mostly due to the fact that I fell in love with this Rebecca Atwood fabric but failed to ask them if it worked well for drapery. This is much better suited for upholstery and pillows as it doesn’t hang very well—something I only came to realize after spending the time to sew the panels. I can still remember the night I put them up, and immediately felt my excitement tank, only to be replaced with regret and disappointment.
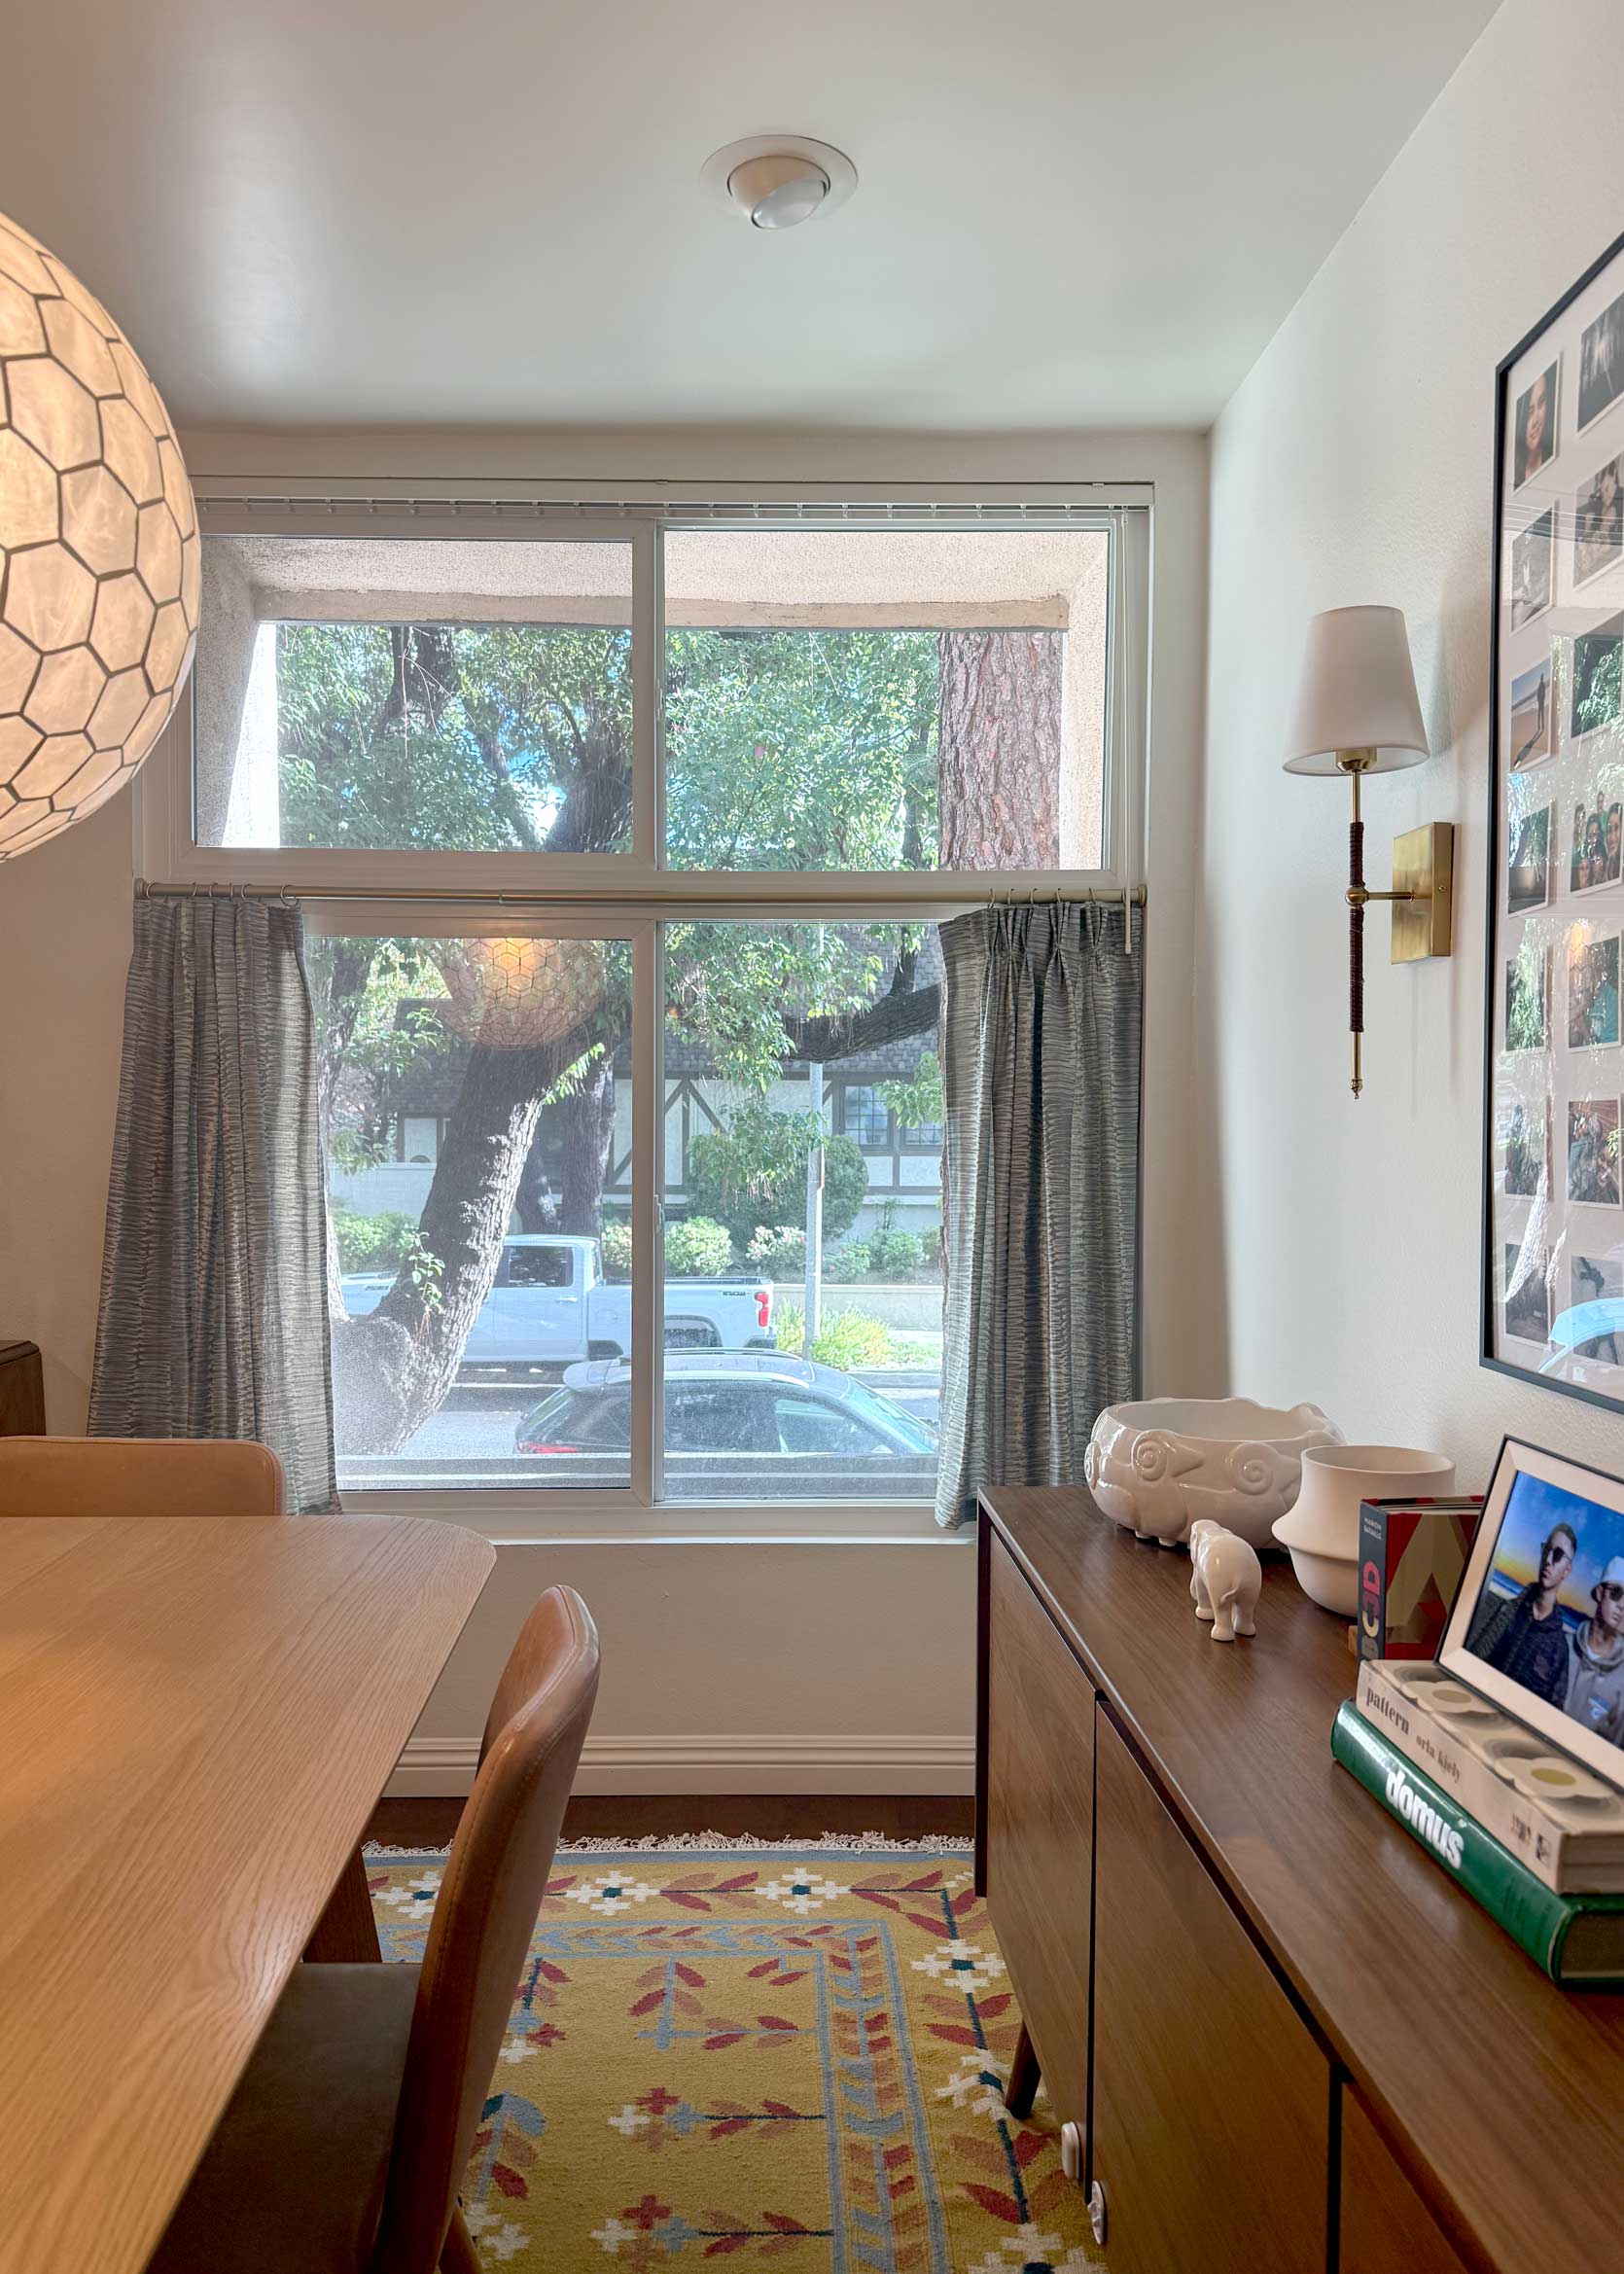
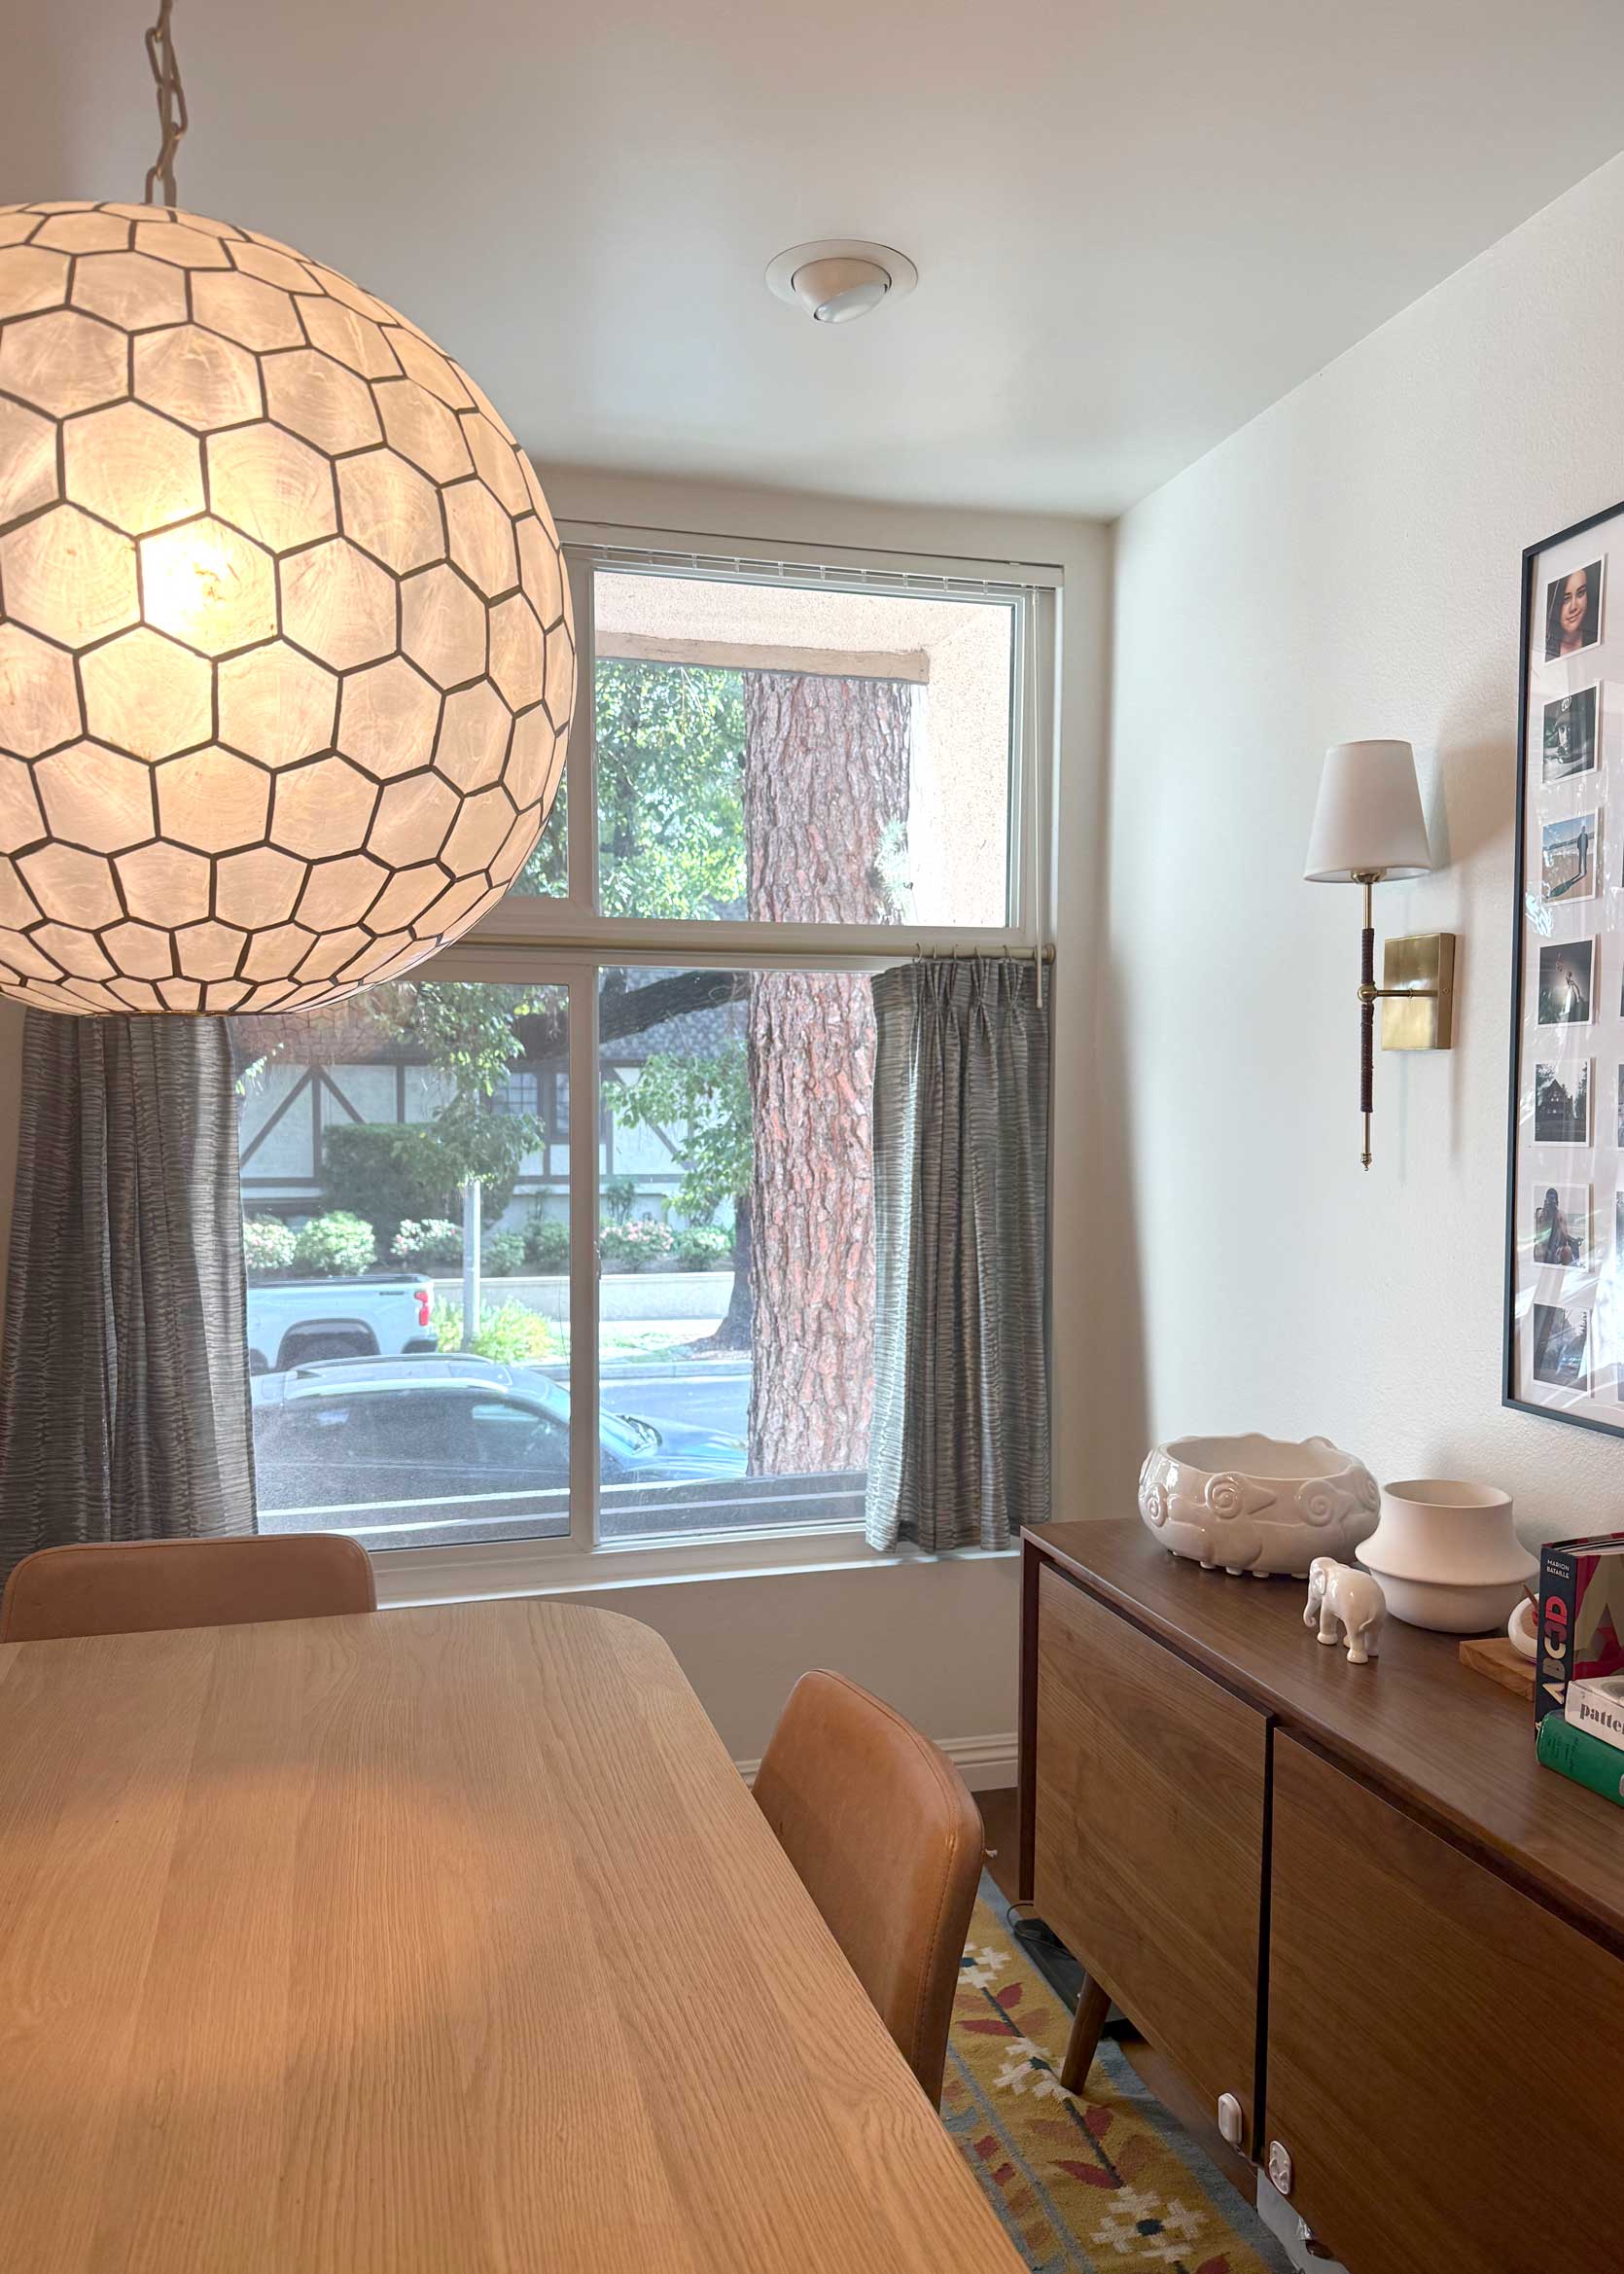
Unrelated, this is a good photo to see the space a bit better and how it typically looks. The bar is cluttered, my workspace takes up one side of the dining table, the corner is the only place we can plug in our Tineco wet mop, and there are a few plants by that window holding on for dear life. It feels busy, overly tight, but also somehow kind of boring.
How I Can Make It Work
There’s a world where I lean in and just make this work. We won’t be living here forever (or possibly even much longer than this year), so why spend the mental/creative energy and money on doing too much to change it if it’s a short-term solution? I’ve lived with it this long; I can surely keep living with it with a few tweaks. I outlined a few make-it-work options below.
Make-It-Work Option #1: Add an interesting border to the sides and bottom of existing curtains.
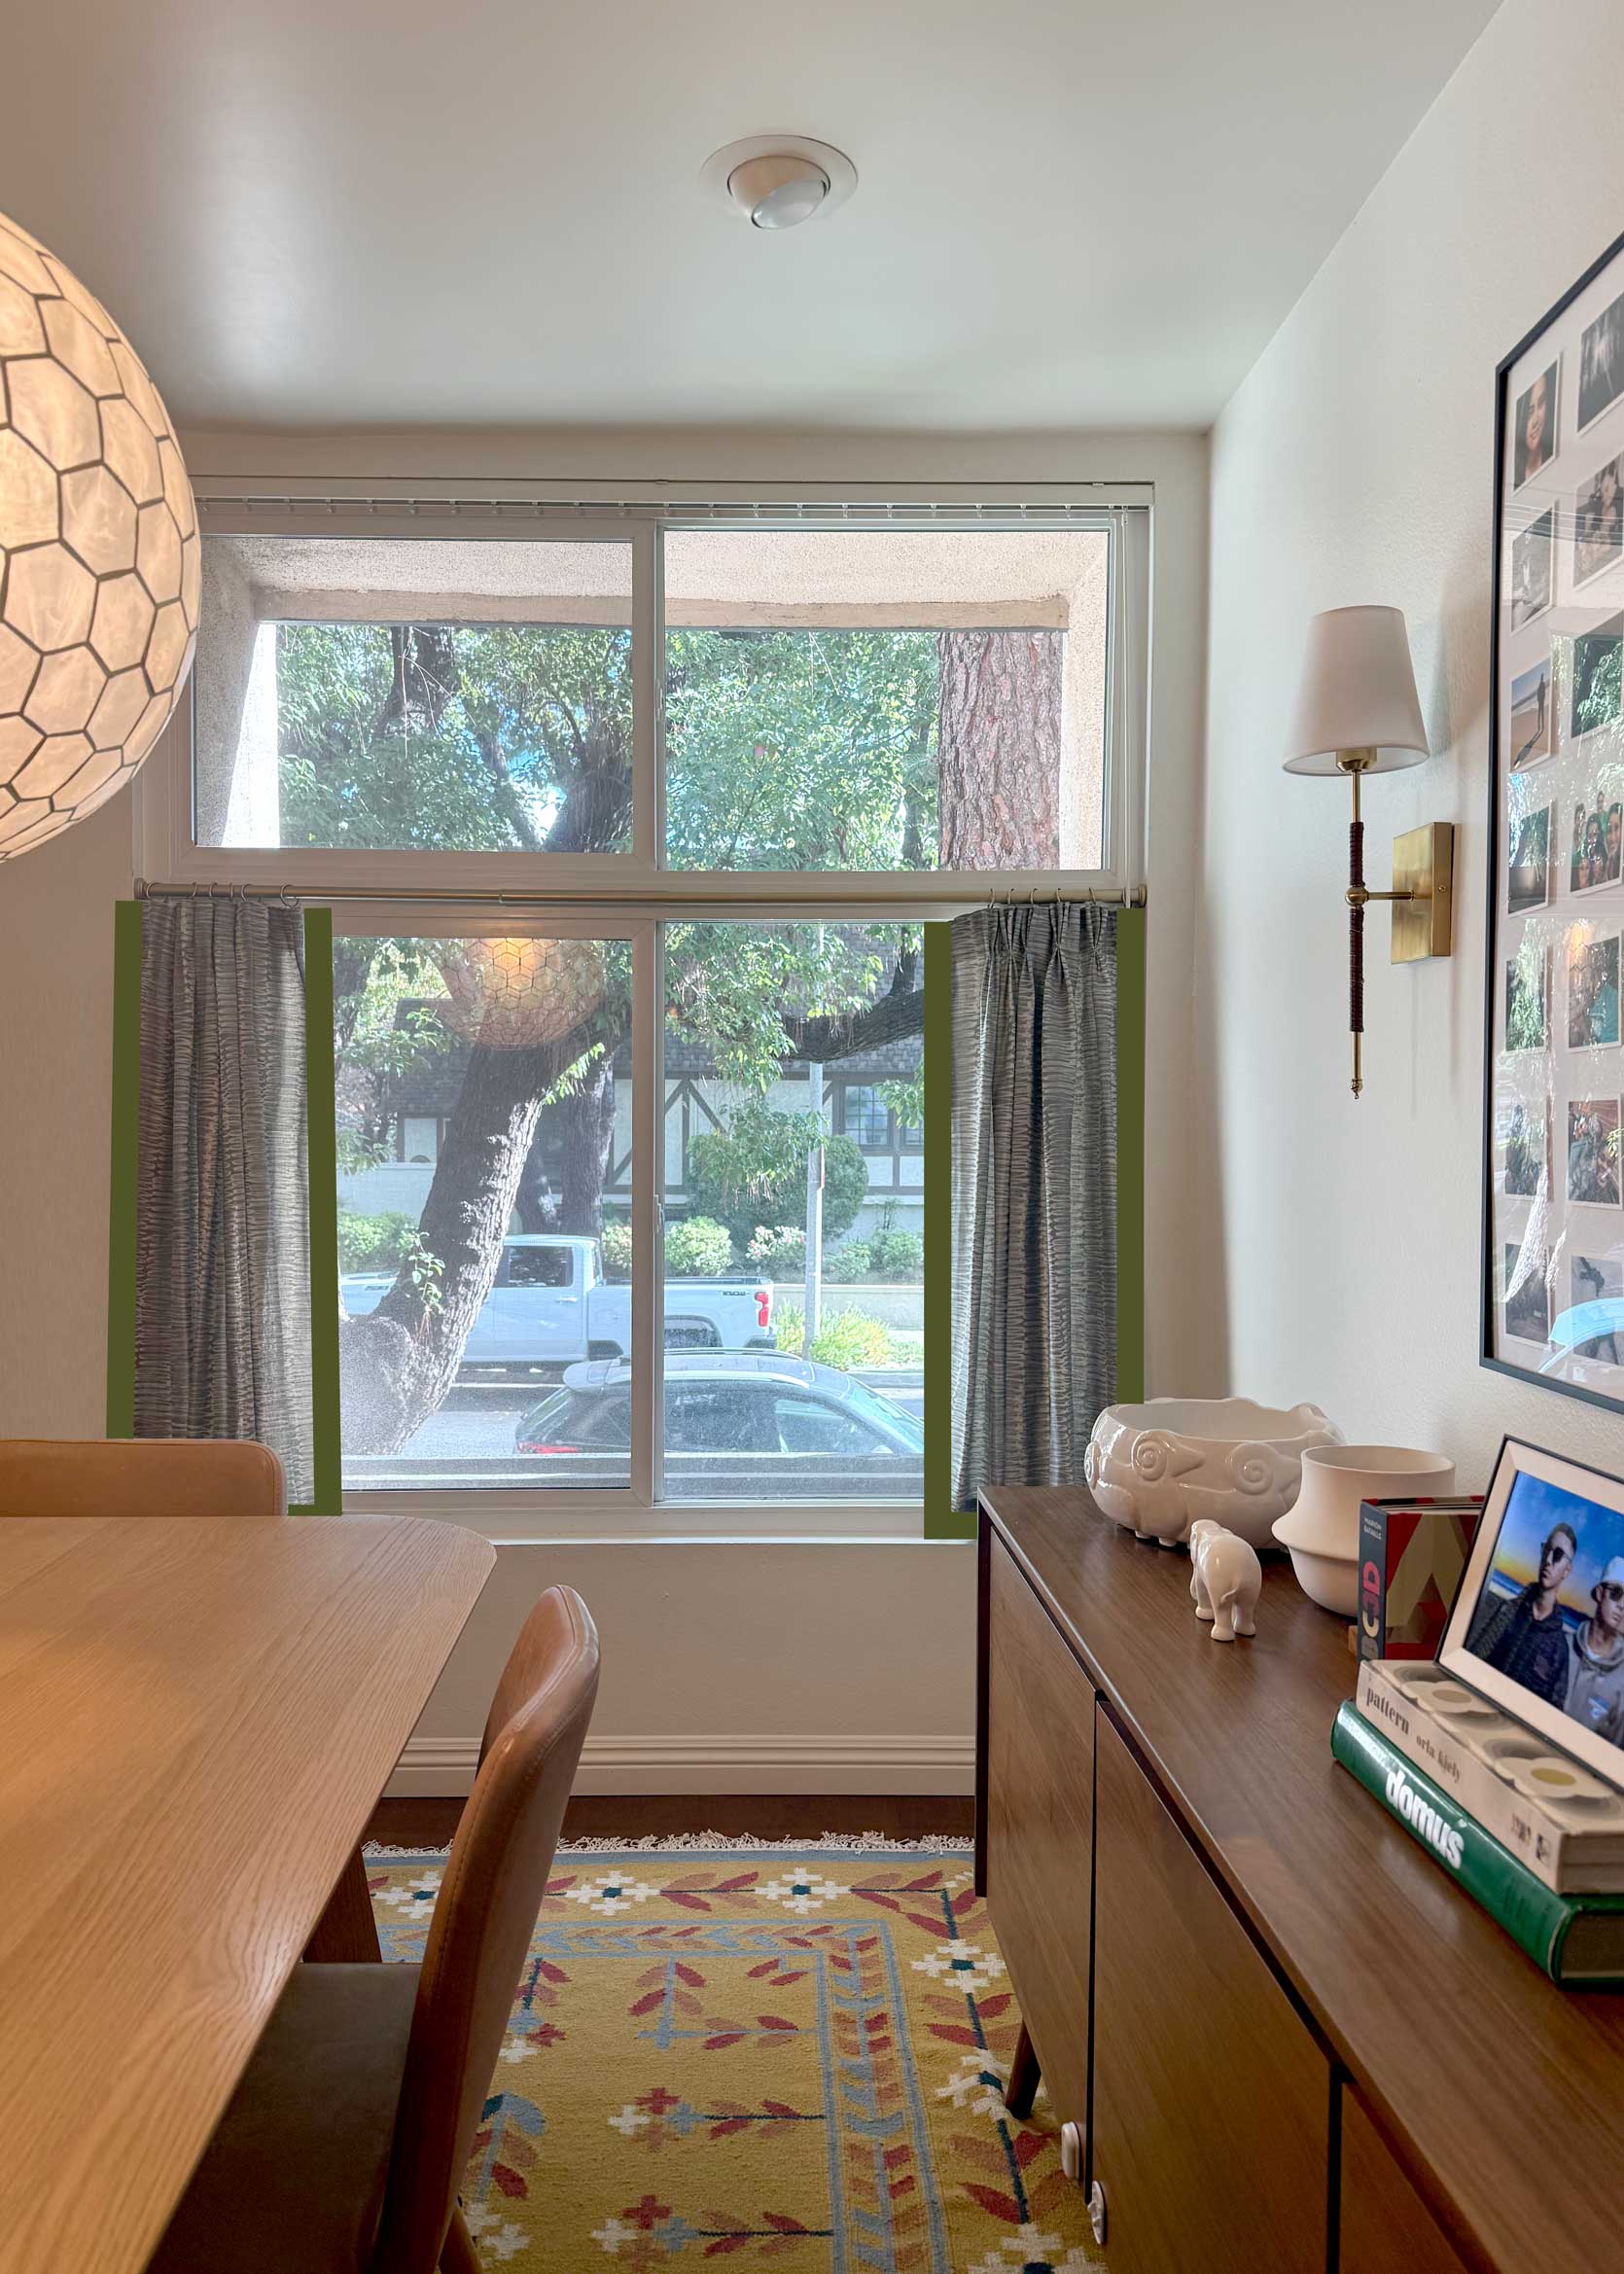
Something that isn’t super obvious in my photos is that the curtains are too small. I sewed them and slightly undershot their length and very much underestimated their width after pleating. In order to close them, you have to place them *just so* so you can’t see in from the street. And I let go of some of the bottom hem to lengthen them, but they are still hovering over an inch above the windowsill.
A way to fix that, I thought, was to simply add to the finished curtain, either pleated or unpleated. I actually let the pleat out on the left panel to see how that would look. Spoiler: I didn’t love it, but I left it that way so that we could actually close the curtains at night. And then I forgot I did that and never went back to deal with the other panel, so now I have one pleated and one non-pleated curtain. Cool.
However, I could go back, pleat the left panel, then add two-inch ribbon all along the sides and bottom. I think this would be better in theory than in practice, given the thickness of the fabric and how flimsy a ribbon may look when affixed to it. This, however, would not improve the look of the tension rod.
Make-It-Work Option #2: Remake curtains with a different fabric and dimensions.
I decided to mock up what some lighter linen or cotton would look like. Maybe the issue isn’t the idea of the cafe curtains but rather the curtain I made itself. A wispy semi-sheer fabric would drape much better, still let in some light, and not be as heavy if I figure out a different rod.
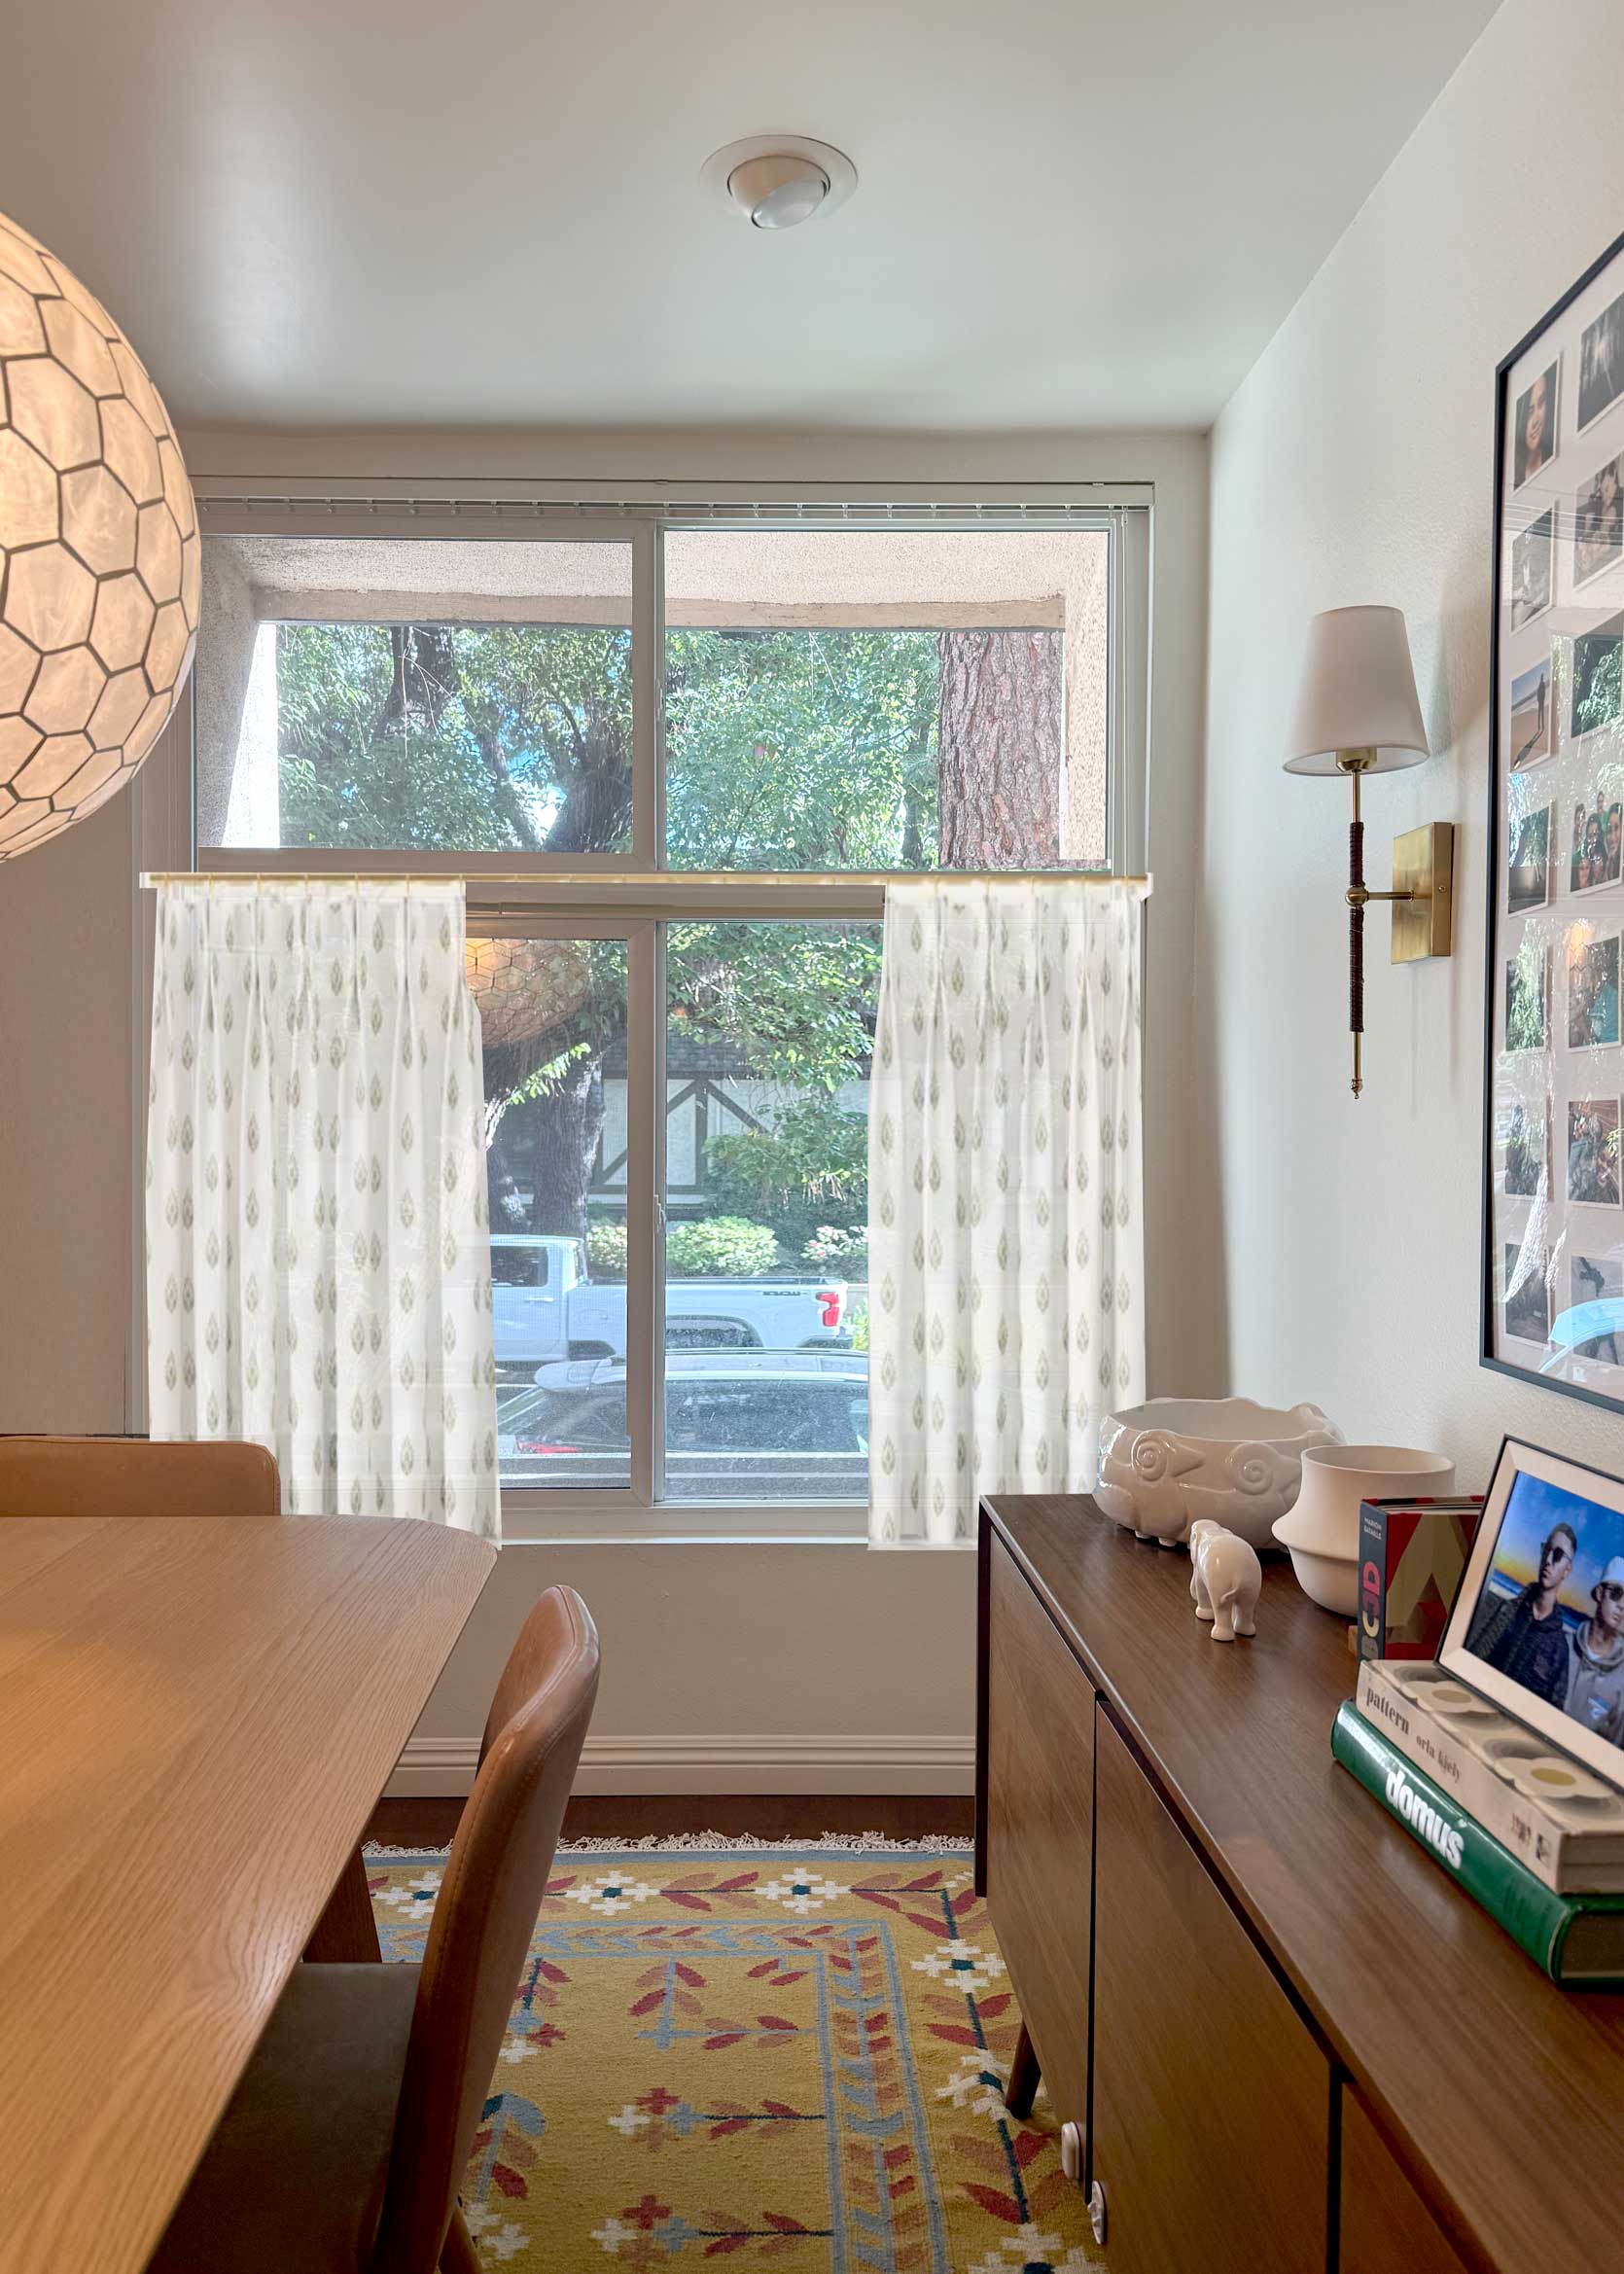
I know the colors here would look better IRL, but I’m not that into this. (Also, it is just now that I’m realizing the vertical blinds track is STILL on the top of this window…) Possibly a different fabric would be better, but meh.
I do like this more than the first option, but I’m starting to think not all windows can make cafe curtains work.
Other Options If I Move On
Maybe I should cut my losses and try something else. Though I originally didn’t want curtain panels here, I’m softening to the idea. As long as I simplify the styling on all my surfaces and pare back the plants, it may not be as visually overwhelming as I thought it would be. Let’s see how this option fares in Photoshop.
Move On Option #1: Install curtain panels.
As I mentioned, I was hesitant from the get-go to do curtains here, but I acknowledge that they are the most versatile choice for the future. Whenever we decide to move, we could take these with us and reuse them (as long as the height works). I went ahead and mocked up a neutral option and a colorful one.
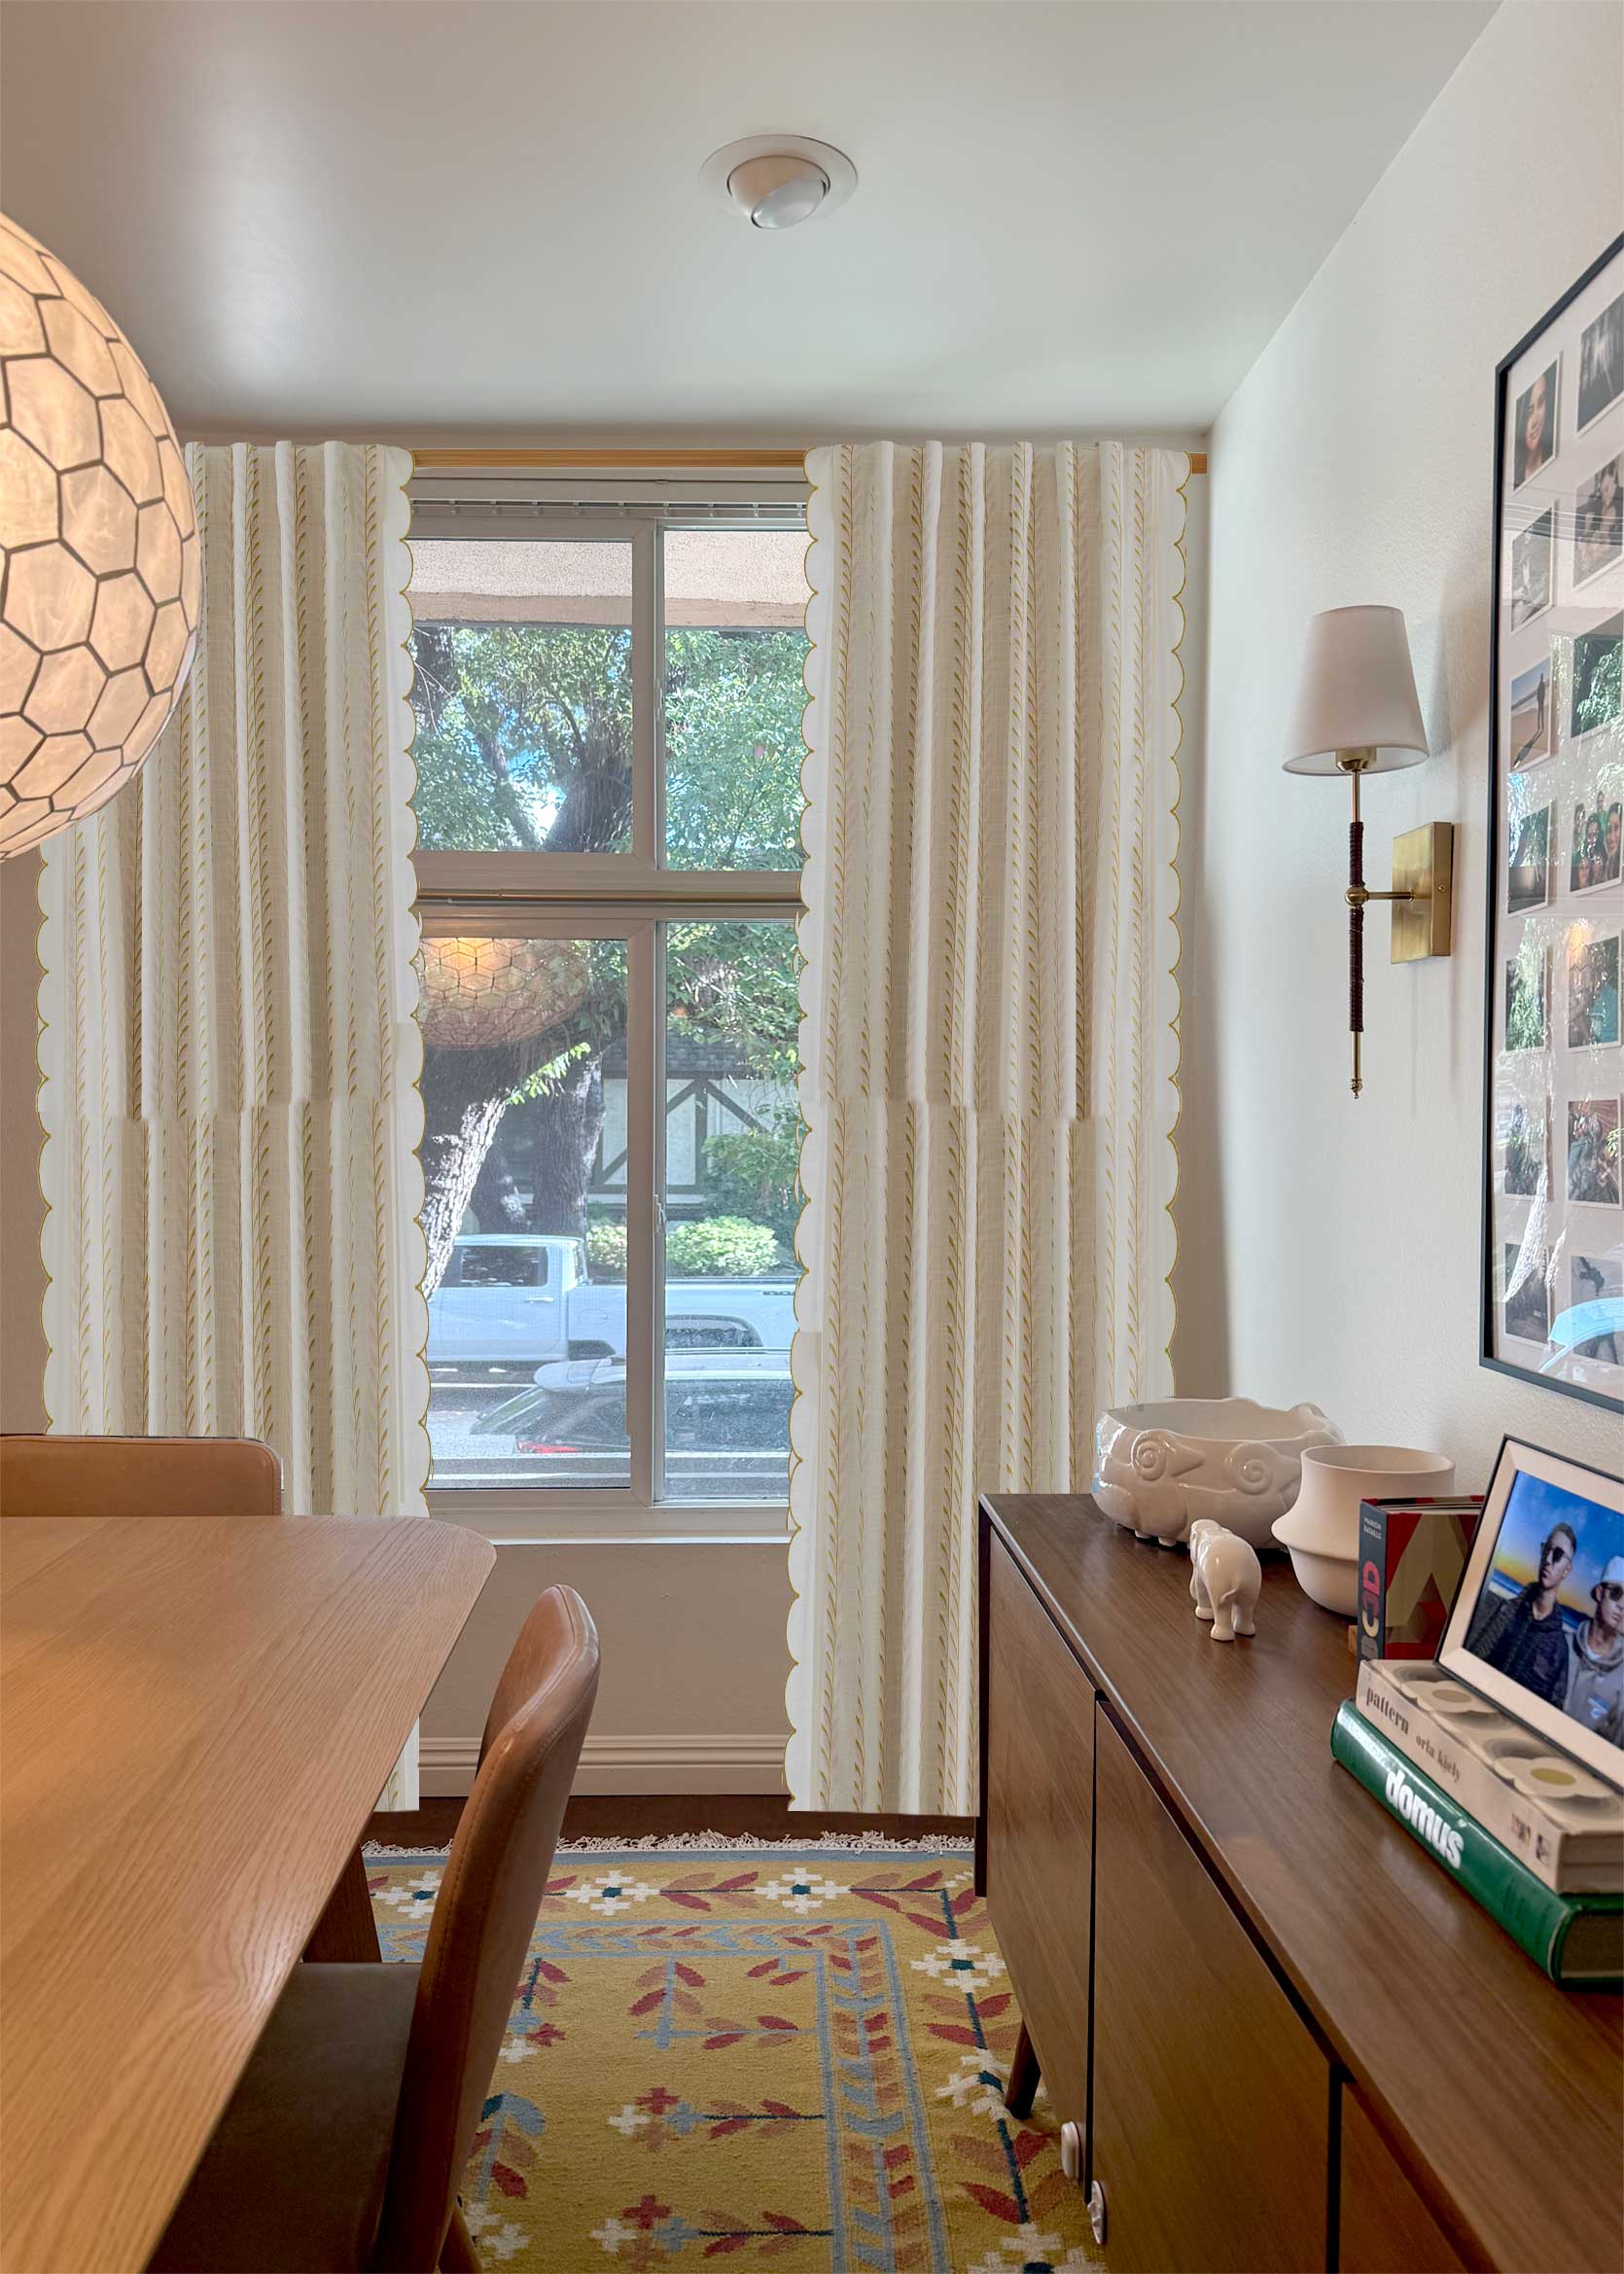
Okay! Wait…I like this. Pay no mind to the quick Photoshop job of extending the panels. West Elm’s product page only shows a tiny bit of the top, so this is the best I could do without bringing in AI (no thanks). This feels lovely and light, but still interesting thanks to the subtle pattern and scalloped edges.

I am surprised by how much I love this. I do worry that it’ll come off heavier in person, but the mauve-y hue helps to bridge the gap between the wood tones in the room and the rug (the Danish Floral Flat-Weave Wool Rug from Garnet Hill, which adds some nice pattern to this otherwise simple space).
Move On Option #2: Install Roman shades.
Now, I wanted to explore some Roman shades here, as I think that will be a cleaner, more tailored look for the small space. Truthfully, though, the investment is too much for this window size to justify how long we’ll be here. Maybe if I had done this three years ago, but I can’t spend this much for something that would be custom-sized for this specific window and can’t come with us.
But by looks alone, I can see that it’s a top contender.
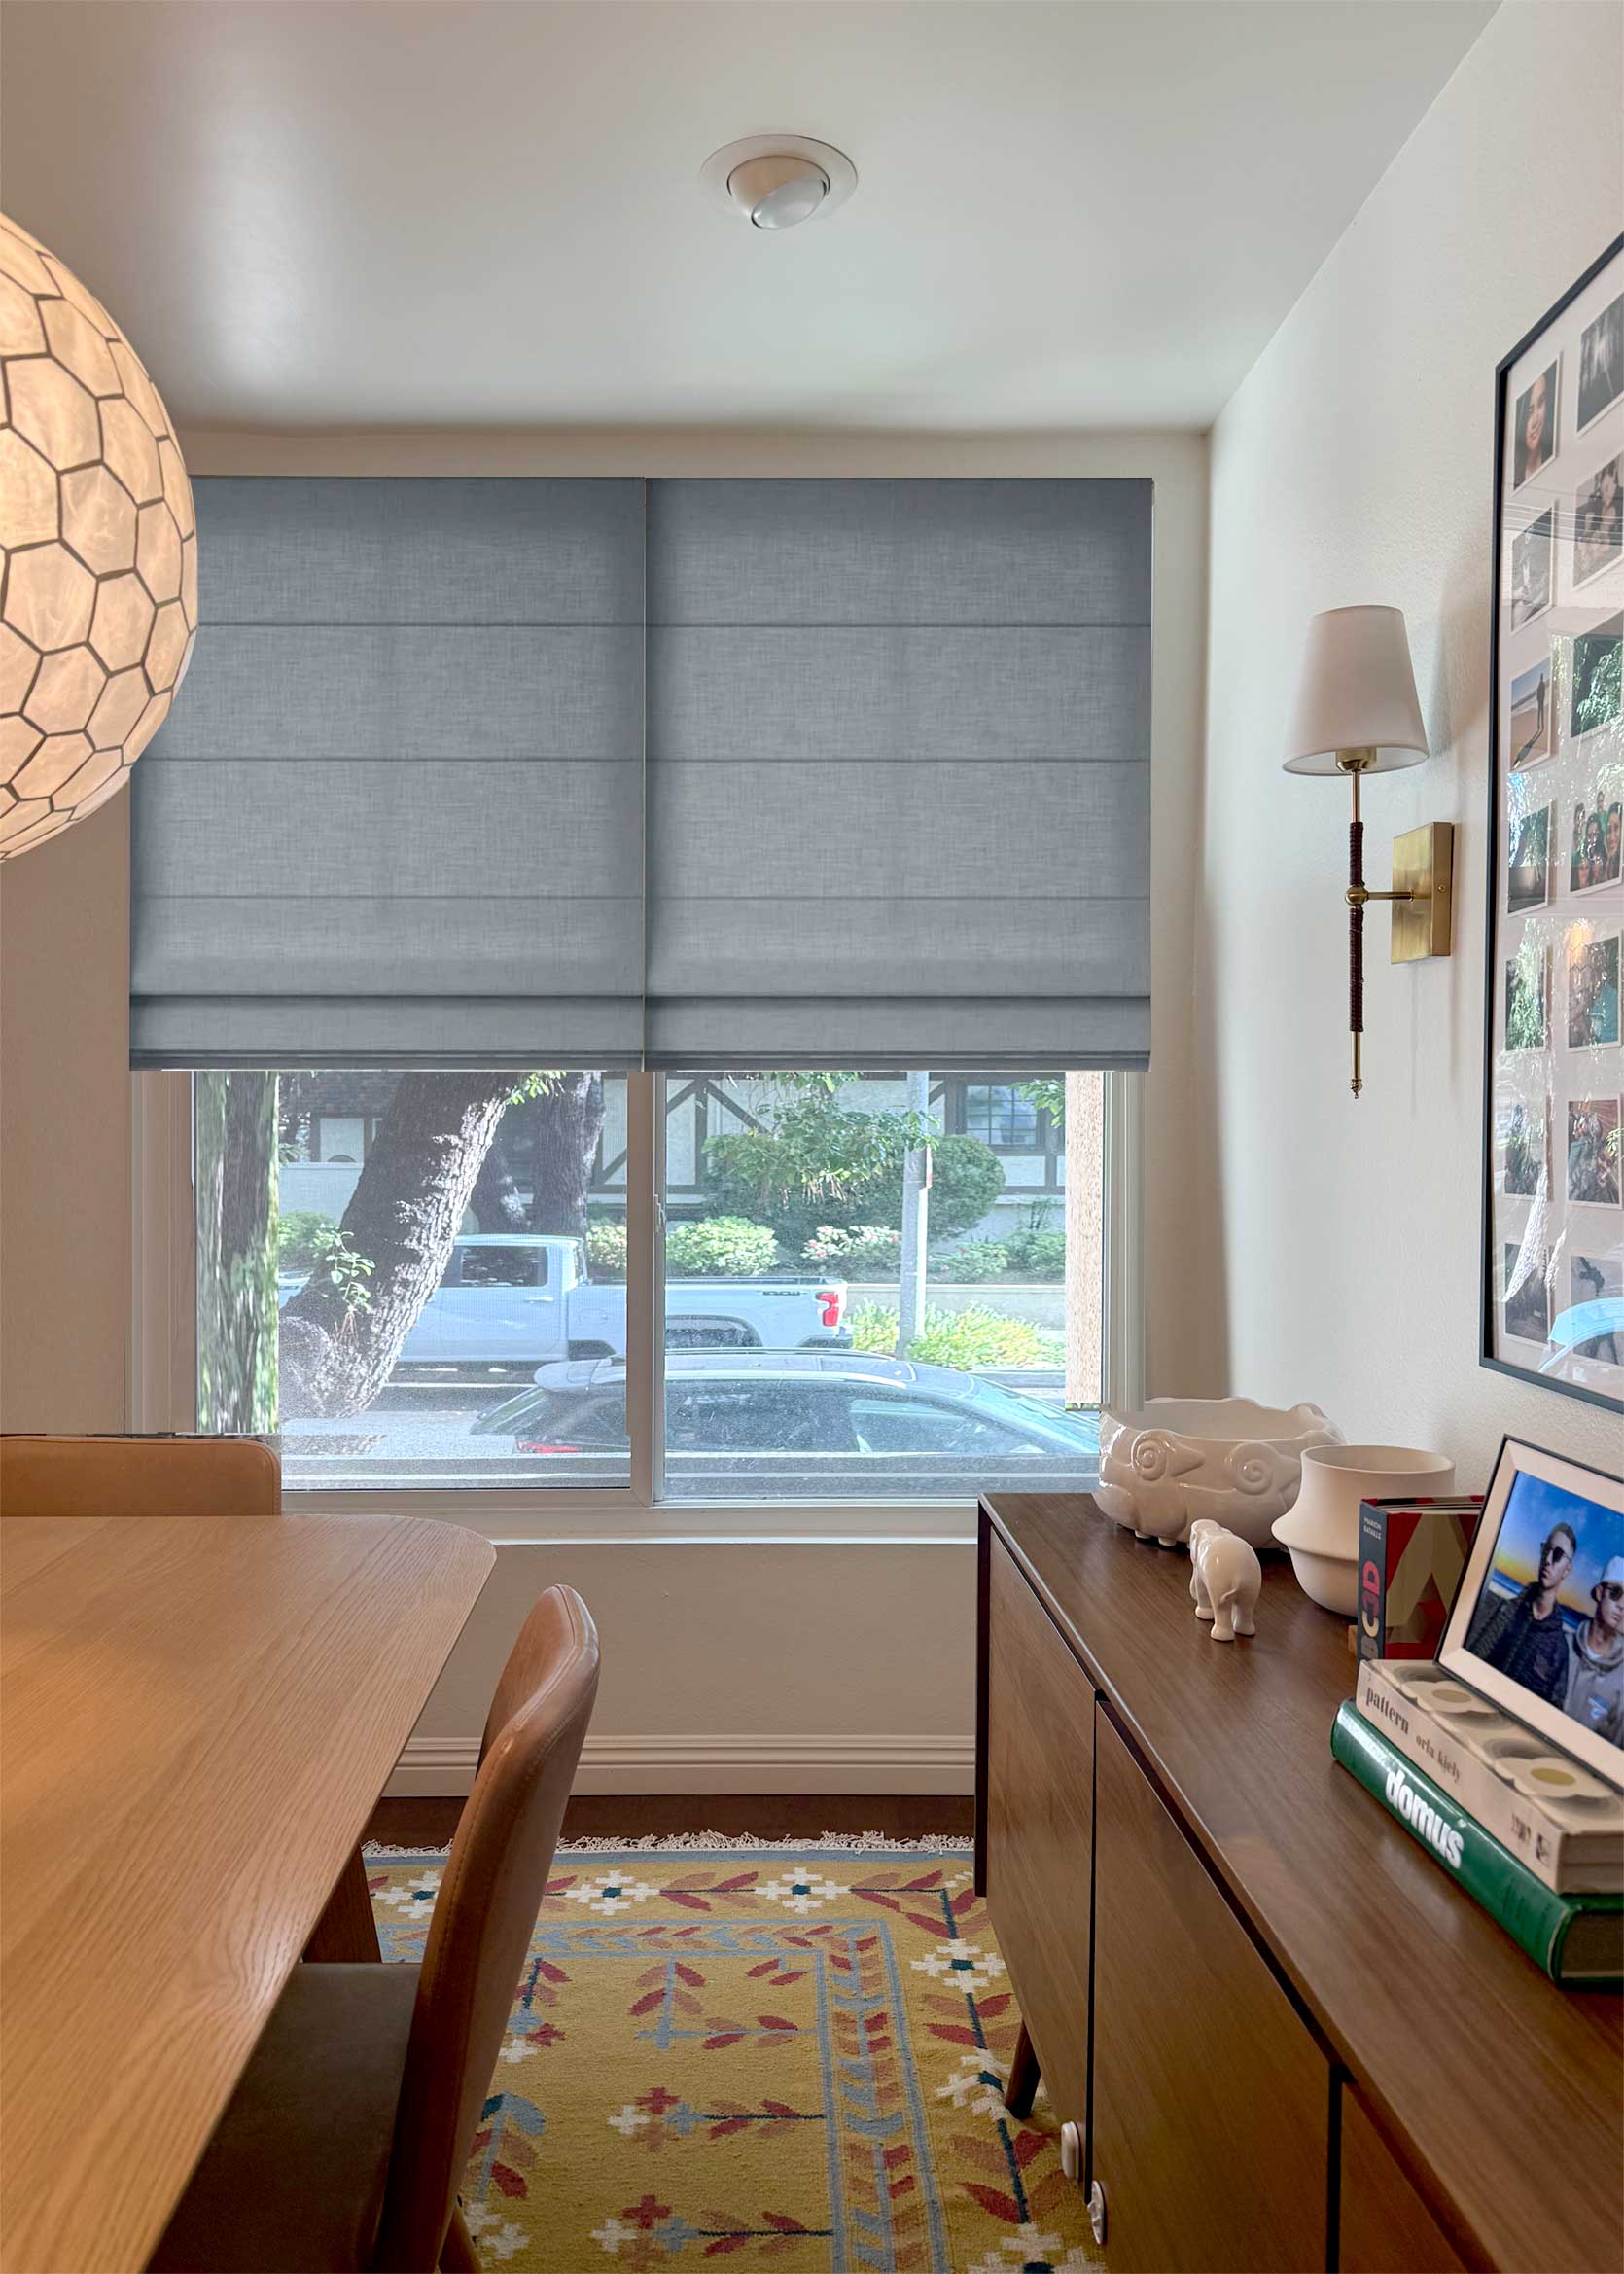
The streamlined look of a Roman shade is exactly what this room needs, TBH. A shade leaves the valuable floor space open, I can better control the light during the day, and they don’t overwhelm the low ceilings. A blue pulls in the palette from the rug and adds some interest to the landlord white walls.
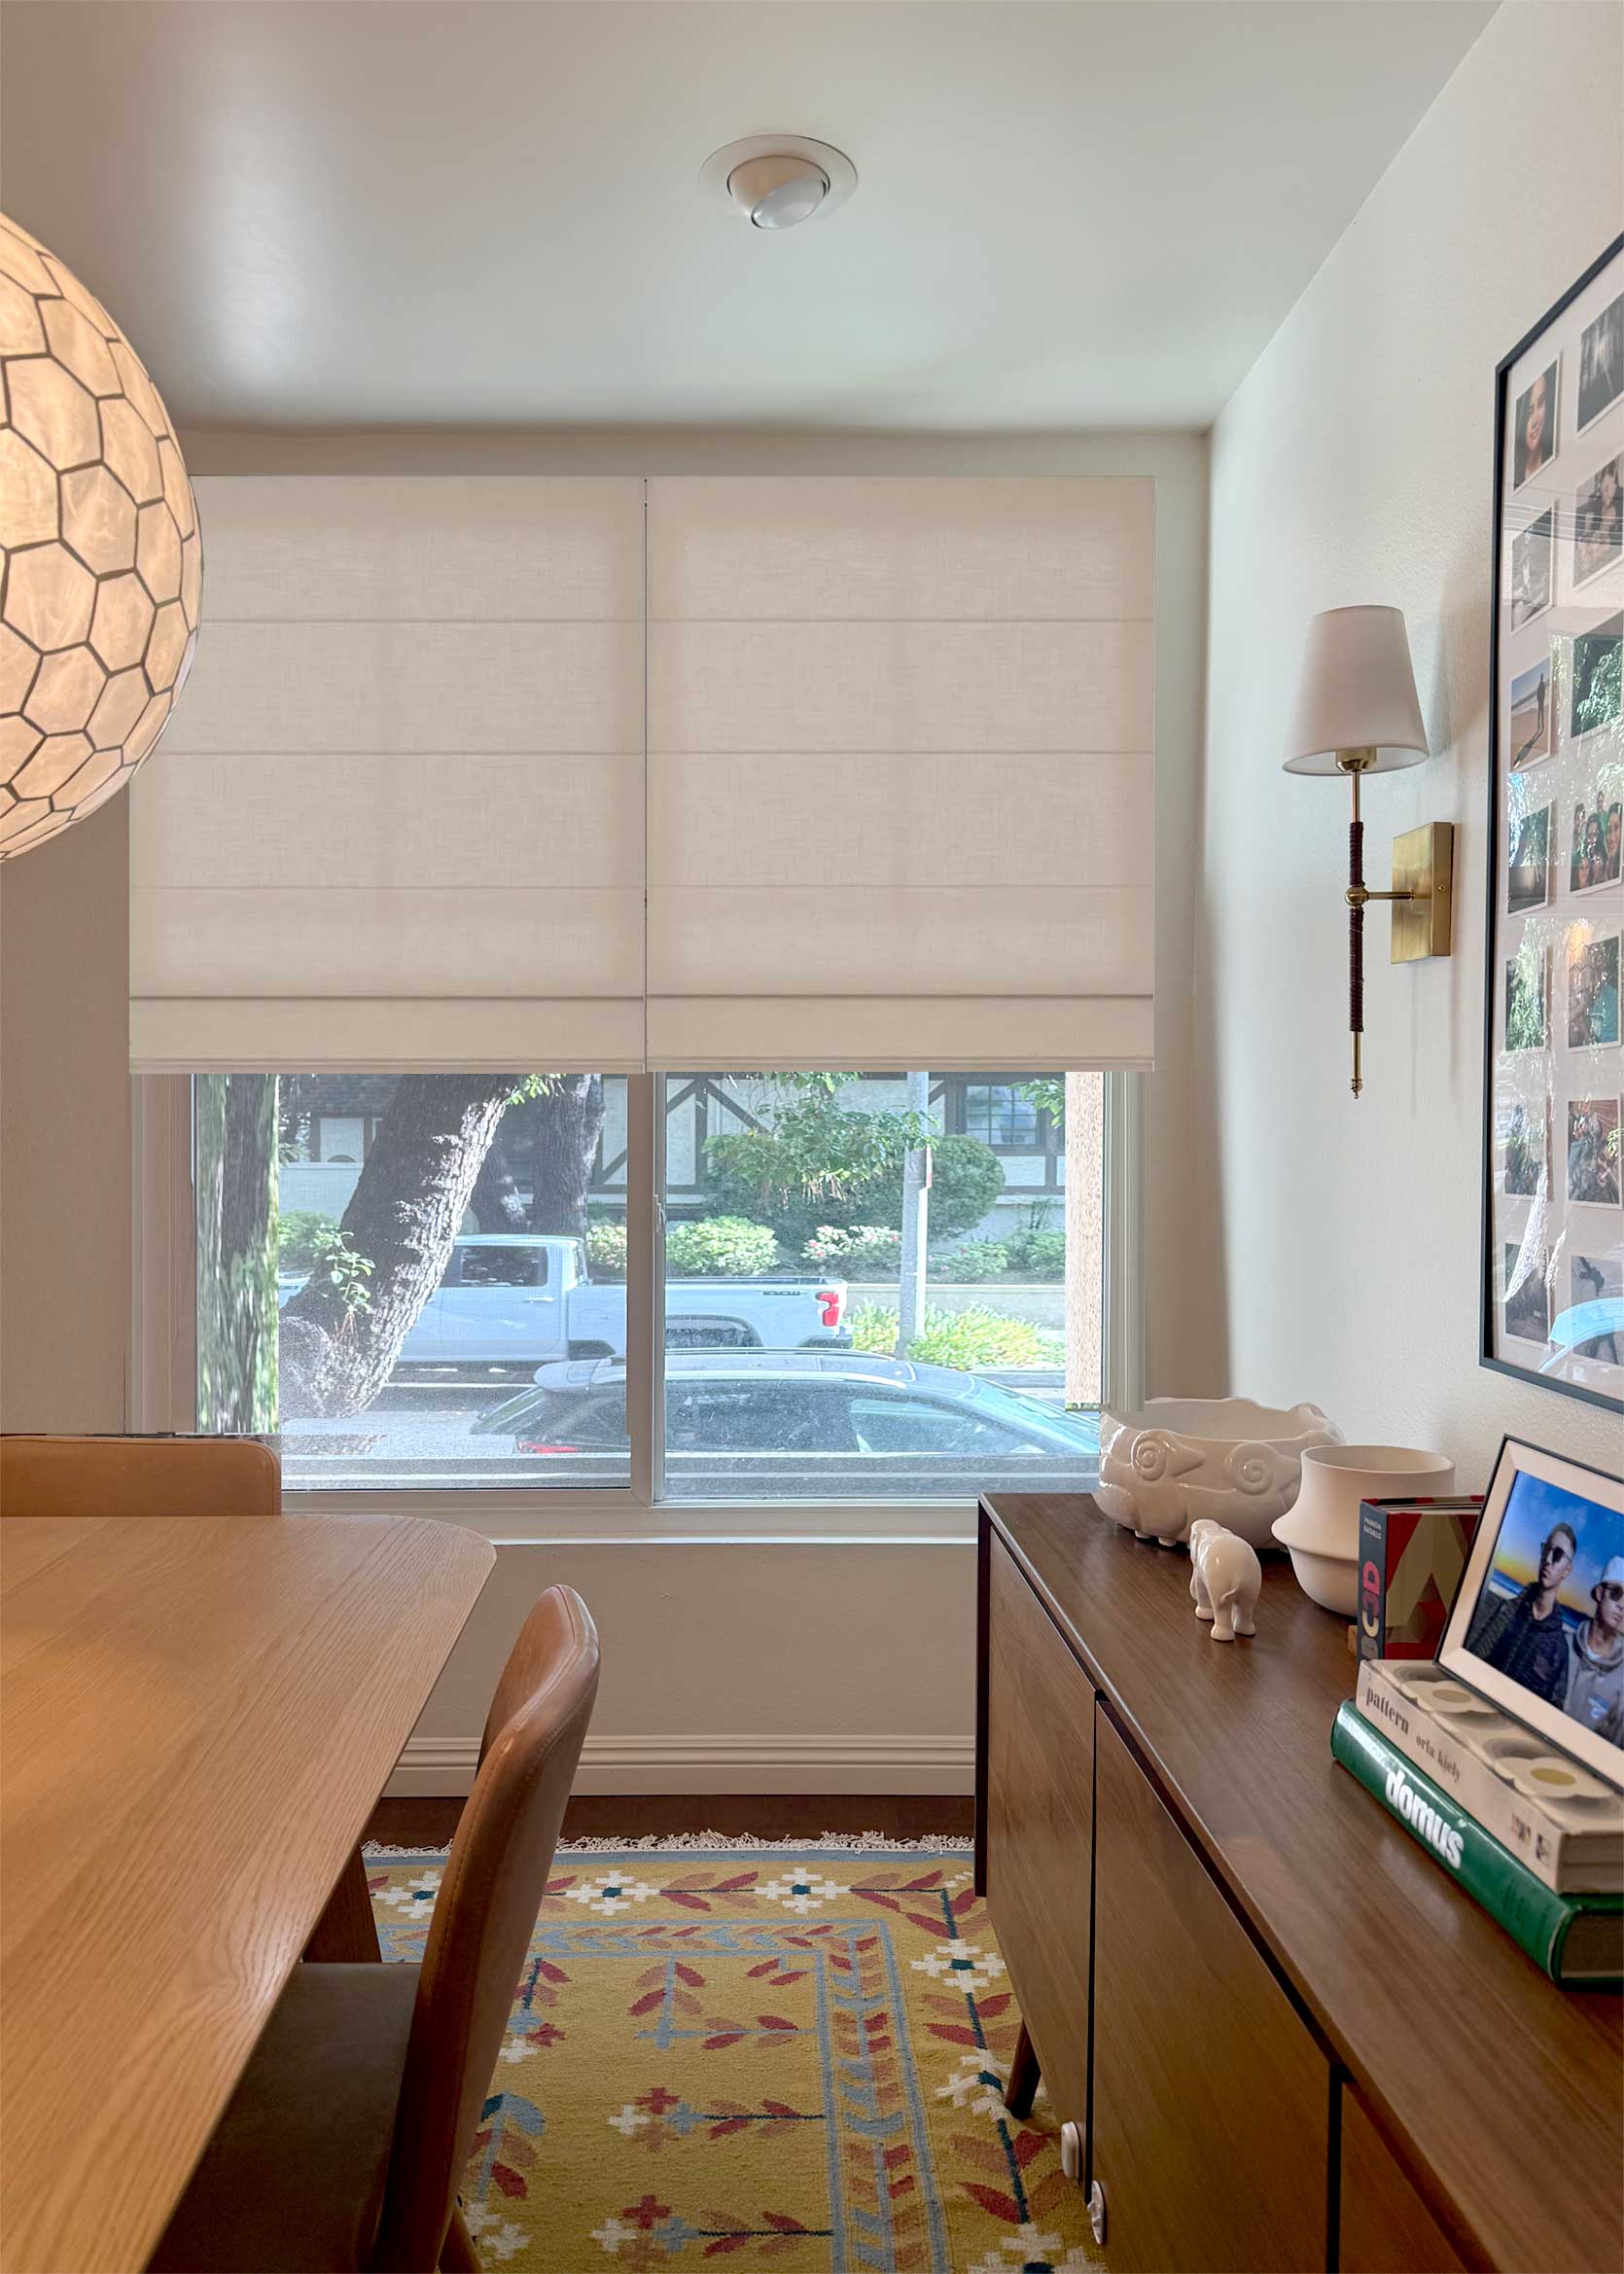
To scratch the neutral itch I sometimes have due to internet overload, here’s a mock-up of a neutral beige Roman shade. I like it enough as a rest for the eyes, but it doesn’t do much for me. This would be better for me if there were a subtle pinstripe or pattern.
So…What’s The Solution?
Good question! Scrolling back through the images I Photoshopped, I keep going back to those earthy mauve curtains. I would have never guessed that’s what I’d like the most had I not mocked them up. I was convinced a Roman shade would look best, and while it suits the space well, the colored curtain better suits my personal tastes. Given that two of those panels will run me nearly $350, I had a bonus idea: Take two white curtain panels I already have in storage, try to dye them a similar color, and hang those on a pretty brass curtain rod that was meant for my bedroom, I never hung because I didn’t end up having the wall clearance for it. That way, my only expense is the dye and the time it takes me to work through the project.
If it ends up being ugly, then I’ve lost almost nothing and am no worse off. But if it’s pretty good, I can always upgrade to the real deal if it feels like we’ll be here longer than anticipated.
I’m pretty excited, tbh. My deadline? The end of the month. I’ll be sure to share an update when I make some moves. Stay tuned until next time, friends.
I love this pesky, relatable problem! Here are a few more possible solutions, in case you want more options to ponder.
You can get a curtain rod in the correct width, as opposed to the adjustable one you’re using. That would be more expensive but a cleaner look. [I’m thinking it may also be possible to make your own out of hardware store supplies.]
You could try washing your café curtains to see if the fabric will soften and hang better. This is a risk, as the fabric could shrink on you, resulting in puckered seams and even shorter panels. Hand-wash with fabric softener?
The border could be ribbon, curtain trim, fringe, or even a narrow panel in another fabric. It could just go on the bottom, if you want. There are multiple options that could potentially match the way your current fabric drapes.
Lastly, if you’re open to Roman shades or something along those lines, you could install from the bottom to give yourself privacy while retaining as much sunlight as possible.
I love that you’re giving yourself a tight deadline. Keep us posted on your progress!
I’ll definitely keep you all posted!
The mauve curtains look best imo. But my second choice would be remaking the cafe curtains, except with a heavier/opaque and deeper-coloured fabric. I know that’s not among the options you’re considering, but I really think that pulling one of the deeper colours from the rug (perhaps that navy?) would balance it out visually. Also, is that the vertical blinds’ rail at the top? Removing that ASAP will immediately make the area look better.
Haha yes it is. I called it out near the end of the post.
THANK YOU! You’re inspiring me to finish cleaning out and organizing our tiny, musty basement storage.
You’ve got this!!!
Thanks for another wonderful article. Also in the photo that you said looks “cluttered but boring” still looks amazing! I’m really excited for this reduce waste and reuse what you already have project, thanks for letting us tag along. Also, when you’re done you can upholster something or make pillows with the curtain fabric. 😉
Yeah I definitely want to reuse the fabric already on these cafe panels into pillows or the like. It’s so beautiful (not to mention $$$$).
Have you considered making Roman shades yourself? There are a ton of tutorials that give step by step instructions. BTW this is a great article. Can’t wait to see what you do.
I have made them for my breakfast nook in my kitchen! I loved the look but they quickly fell apart. I haven’t opened the shades on that window in maybe a year because they no longer work. 🙁
It is unclear whether you require privacy or if there are more or less just a decorative touch. If privacy is a concern, then bottom up shades (mentioned in an earlier comment) would seem to be the practical answer as they would provide privacy but still allow light and a view of the lovely trees in the neighborhood.
Another option would be to treat the large window like a sliding door and add a curtain to only one side. This would allow for privacy when needed, if enough fabric is used to cover whole window, but would not overwhelm the space and/or block as much light as panels on both sides might.
I agree on the bottom-up shades – we have them in our house and being able to have natural light come into spaces all the time without having to sacrifice privacy is awesome. I rarely even move ours all the way up. One thing I thought of when you mentioned the track from the vertical blinds still being there is that you can actually get vertical blinds that look like curtains. This links to Laura’s idea here of having a curtain only on one side. Check Hunter Douglas for examples of this. Might be too plain, and definitely goes against the “use what you have” aspect.
Sounds like you’re going mauve (which is beautiful!) but wanted to callout for anyone else who is considering blue shades in a shaded room- our house also has lots of tree coverage which casts a cool tone light. Learned the hard way that blue window dressing amplifies that a lot and really throws off the rest of the room’s palette if it doesn’t support cool tones
Ohh yes thank you for this. I wouldn’t have thought about that.
As a person who variously had blankets and sheets up in my early renting years I relate to this. I definitely like curtains the best although the whole tie dyeing thing sounds like a recipe for disappointment (I’m reflecting on your DIY honesty post). There are cheaper options than West Elm (although I like their curtains and have the linen ones). I can’t talk much to American retailers but IKEA have some pretty good curtain options, as one example. Cathy Nordstrom started as an IKEA textile designer! (I’ve also had IKEA curtains!).
For a completely different idea, look at the UK House and Garden Design Notes video of Virginia White’s Hampstead Heath flat and what she used in her bathroom.
Excited to see how your dye project comes out! Best of luck!
“It feels busy, overly tight, but also somehow kind of boring.” Oh, how I relate to this for so many spaces in my house, and maybe in my life! But I disagree, I think your corner is cute. Thanks for the great article!
Really appreciate you sharing this journey with us! I’ve similarly been pricing Roman shades for my decidedly “not-forever” home, and though I think it’d probably be the best option visually, I just can’t justify the cost. I really like your full-length curtain mockups– both the lighter and the more colorful one! Especially from the perspective of you being able to reuse the curtains in other spaces down the line… Very curious to see updates on this process (especially if you go the dying route… cool!).
hear me out…. the mauve curtains (YES) but wider and not meant to close and then a roller shade from the bottom that is more of a privacy screen. which speaking of… i have some “reeded” glass window cling on my front door thats original to my 1912 house and truly i forget that that’s not how the door is supposed to look. something to noodle on!
An easy way to cheat curtain panel length is with longer curtain rings. Maybe the Rod Desyne 1-3/8” Pivot Rings with Clips?
Ah yes, good point!
Heres my take…you need top down bamboo shades, the kind that can be lowered from the top when you want and you can do light filtering or black out depending on your needs. Are these cheap? Sadly, no, but they would look great. Meanwhile I dont think the roman shades look bad and honestly if youre moving anyway just leave them girl.
I love the idea of bamboo shades, Mindy! Romans would also look great, but sadly they’d be crazy expensive because they have to be custom fit. Arlyn would be looking at probably around $700 to $1,000 for a window this size–way too much for a solution she can’t reuse in a future home.
Such a relatable post, Arlyn, thanks! I actually love both of the curtain mockups. Mauve would add some lovely color to the space. Sending you good luck DIY vibes!
I would 100% do top-down shades if this was our permanent home, but just not worth the expense for how much time we likely have left here. That’s why I’m inclined to do the almost free option of dying some curtains I already have with a rod I already have and seeing how that works out!
I definitely agree that the linen mauve curtain panels look best. I think dying existing curtain panels is a great idea, but make sure to check IKEA’s linen curtain panels. While they are not lined, that might be just the thing to add color and lightness to the room.
Hi Suzanne! I actually have IKEA curtains (cotton, not linen) that I’m not using and plan on trying to dye for this project. I’ve always been a big fan of their curtains, FYI!
I would do a bamboo blind. they’re inexpensive, and the colors would tie in both woods I see in the furniture (table and sideboard). plus, they let a ton of light stream through. I have switched to cordless bamboo blinds throughout my house and in the bedrooms, I used opaque window clings on the bottom half of the windows for privacy.
if you keep the cafe curtains, you could wrap the rod or even paint a lightweight tube (cardboard? pipe?) black or brass, then insert the tension rod in it. stuff like the adjustable part that you mentioned drives me nuts too, but trust me, no one else notices it.
I hadn’t thought of doing bamboo shades. They are certainly more affordable than traditional Roman shades. If it wasn’t on a window that faced the street where I want more privacy at night, they would certainly work. I hear you on the window clings (I’ve used them on another project for my parents and they were great), but we all like being able to see out this window during the day so it’s a bit of a catch 22 with that!
I gotcha! Maybe lined bamboo, or top down like others suggested? I had fancy Roman shades from Pottery Barn that I replaced with bamboo, and I really prefer the texture plus organic nature of the bamboo over fabric, which was a dust-catcher.
I like the mauve curtains best too! There are for sure cheaper options than West Elm, I would think a few minutes of research to find affordable curtains in that color family might help you hit the jackpot of look and price.
Oh for sure!
First, thank you for not using AI to mock up your images!
Second, I think you’ve made the right choice. The maroon panels look great.
I figured what I did was good enough and not worth the AI toll, for sure!
This is a super inspiring post for the new year — thanks! I am trying to decide which of my VERY VISIBLE, very pesky half-finished projects I should tackle first!
Thank you for not using AI to make the mock ups!!!
This x 1000000!!
and immediately felt my excitement tank, only to be replaced with regret and disappointment. Oh Yes, been there! For future reference, there use to be these things called curtain weights that you sewed into the hem of the curtains to weigh them down and help them hang better. I don’t know if they are still available, but I have used coins for the same purpose.
I would go for one of the following in order of preference:
1 Sheer, neutral cafe curtains. The problem with your current setup is the fabric, not the idea, imo. I would want to block out the cars, but not the trees, as well as preserve as much light as possible.
2 Neutral shades that pull up from the bottom, for same reasons as above. (The examples you have that block the trees and light while showcasing the cars are a big no for me).
3 Other distracting items at the car level. E.g. a shelf for plants or other items at the sill level, something hanging low in window like old stained glass windows, a Piet Mondrian or midcentury inspired design with stick on colored film, antique folding shutters, screens or trays.
4 Full length drapes in a neutral tone, letting the trees take the focus.
Roller Shades are usually at least 1/2 the price of Romans and would give you the same clean look. I could see a beautiful woven or rattan looking very nice in here.
If you ever go back to cafe curtains, then Clarke and Clarke Midori is a brilliant fabric for these and comes in lots of colours.
The cafe curtain keeps privacy and looks great. I liked the border added. The cafe curtains allow for sunshine and privacy, a good solution!
Yeah that’s what I liked about them tbh, but the proportions are way off (it’s much more obvious in person than in the photos).
Creative, almost free options are the best! And just another hint – not sure which IKEA curtains you are dyeing but if they are lightweight ones and you want them to hang a little better, consider adding weighted curtain tape at the bottom – it’s quite affordable.
I recently purchased full-length curtains from pepper-home.com (my comment doesn’t allow me to hyperlink). Our guest room had no closet doors when we moved in so we hung some sad beige curtains as a temporary fix. And then several years went by, lol. I resolved to finally replace them. I researched a lot of different brands and patterns, and came across Pepper Home. I do not work for them but had to share that I’m so impressed with their product. They offer pretty great customization options, from various curtain widths, construction type (rod pocket, grommet, etc.), with trim/without, AND you can specify a custom length. With a Black Friday discount, my total came to around $500 which is worth it for the quality (imho much higher quality than West Elm, Anthropologie, cb2 or IKEA) and much less expensive than fully custom. They’re made in the USA, and even with the holiday sales rush I received the curtains in two weeks. They also offer cafe curtains. Photo attached (ours are the Louise Sage pattern–cabana stripes!)
Hi Arlyn! I too was wooed by the Mulberry name and color as displayed on the West Elm website for those pleated panels and looooooved how they looked in my mock-up. However, when I received them, they were less mauve/mulberry than I had hoped. I don’t dislike them, and I still haven’t hung them, so I might like them more when they are hung. Just wanted to let you know that they are not mauve in real life and have more of a red undertone than purple for sure. That said, they are still my favorite option of all of your mock-ups, and I can’t wait to see how it all turns out!
Thanks for that info CSW!
I love the mauve curtains and really like the idea of dying them yourself. Selfishly I have some curtains I’d like to dye so I’d love to hear about how you go about it!
So inspired by this post and rooting wholeheartedly for your window dilemma busting, Arlyn!
Love the light scalloped curtains. Not to heavy on the wall, still lets some light through. Would you try hanging your existing curtains before dying them to see if you’ll like them?
Yeah that’s actually a very good idea!
I think we have very different tastes, but I would do soft fold (the kind that droop in the middle) roman shades in a cream linen (maybe washed several times?) and hang them over the lower windows only. That way you would have all the light coming in from the upper window and privacy from people looking in through the lower window. Instead of standing out, they would not be a statement piece, but would allow the pretty rug and furniture to take center stage.
I’m of the boat, if you are likely leaving soon do the cheapest option. You won’t know if the Roman blinds work in the next space, an unless your landlord will reimburse you, why waste the funds?