
All Things Renovation
Our Go-To Cabinet Hardware Placement + 60 Of Our Shoppable Favorites
Imagine this, you’ve just spent the last year or so working on your home renovation, putting in countless hours and (more importantly) money into the project. You’re in the final stages of the project which should be the easy part. Just needing to complete the finishing touches like installing your light fixtures, figuring out furniture placement, and placing your cabinetry hardware. Then you go to actually install said hardware and you think, but wait where should it go?? Emily always refers to hardware as the “jewelry” of the home, like the cherry on top of an ice cream sundae. Basically it should be fun, not stress-inducing. But this simple task can even make a pro stop and question themselves. So today we are here to give you all the rules on where to place your cabinet hardware, let you in on some tips and tricks, and tell when to throw all those rules out your kitchen window (and of course a roundup of all our go-to favorites).
For all you renters, or those who are just looking to update your kitchen without having to go into full-on demo mode, one of the easiest, cheapest, and most rewarding hacks is to simply swap out that dated hardware for something shiny and new (aka not from the 90s). Choosing the right style of hardware can truly transform the space. However is you are in a full-on reno, you have to ALSO think about things like placement because if it isn’t quite right something will inevitably feel a bit off.
There are some overall general rules to help get you started and avoid that “off feeling”. What are they you ask? It’s pretty simple, put knobs on your cabinet doors and pulls on your drawers. Done! Post over, you are all dismissed. But really, every kitchen and bathroom vanity is different so sometimes you need to set the rules aside and learn when and where to break them which I’ll show you plenty of past project examples below. An easy example is if you have a drawer with a smaller face (the width of the drawer front) then opt for a knob instead of a drawer pull so it doesn’t take up the entire width making it look crowded.
In the end, the following are just guidelines to make the process as stress-free as possible but if you have an idea you love it’s your kitchen/bathroom after all, so do what makes you happy!
The 3 Most Common Styles of Placement for Your Knobs
Traditional Placement

First up, the ‘Traditional Placement” which is actually one that EHD hasn’t really implemented a ton in past projects. BUT luckily Velinda showed us a great example of it in her tiny kitchen makeover. The trick is to completely center your knob vertically and horizontally to the face frame of your shaker style cabinet. This placement is great to use in a house that leans very traditional. However, as you can see by pairing this placement with a cleaner more modern micro knob like Velinda did it instantly makes the combo more modern. Very clever!
[HOT_TIP title=”Hot Tip” content=”Consider the diameter for your parameter: If you have a shaker style cabinet door, make sure to measure the width of the face frame (the vertical piece that sticks out from the rest of the door) to pick out the right diameter knob. Ideally, the knob’s diameter is small enough so that you can see some of the frame on either side so the knob.”]

Now although this example above may not technically fall within the “traditional placement guidelines,” it shows the same idea if your face frame is much more narrow in its width. Placing them approximately 1″ inward and down from the frame will give more of a traditional feel.
Classic Placement

The more “Classic Placement” is to center the middle of the knob to the edge of the face frame. If you choose to have your kitchen cabinet doors be a partial or full overlay like the example above rather than inset into the cabinet frame (see Velinda’s cabinets above) than this is a great choice since the hardware will be lower on the door face giving your eye some breathing room.

In Emily’s powder bath they choose a pendant drop pull (yes, yes technically not a knob) which if it was placed centered horizontally as well would’ve lined up awkwardly. So instead, she used the classic placement which looks great and speaks to the metal grate on the door face. Perfect!
Modern Placement

Last up, The “Modern Placement” which has been heavily used throughout our EHD projects. With this, you align the bottom (on upper cabinets) or the top (on base cabinets) to the edge of the face frame. This is one that you will want to measure more than twice before drilling a hole through your probably expensive cabinet door since the exact placement will be determined by your knob diameter instead of measuring (read: eyeballing) it on the face frame. A foolproof solution is to either make a cardboard template or you can get a cheap standard template since the hole is determined by your knob diameter. I also love this full tutorial by our friends over at Young House Love.

Looking back to the master bath in the Portland House, I think that since the knobs were small in size it could’ve also looked great in the Traditional style as well but then again I wasn’t there when they were deciding on the placement so maybe it visually felt too far away from the pulls. This is why it’s a good idea to employ a friend to hold your hardware in different locations so you can step back and see how it looks overall. Just remember to buy them a drink after or they have to be a really good friend.
And if you still don’t see the subtle difference between the three, here is a full infographic to give you more of a visual aid and maybe save it for later a date (ahem, Pinterest, ahem)…

You might be thinking by now (or earlier) these rules all sound great but what if I don’t have shaker cabinets and instead just a flat panel, what then?? Well, in the Mountain House Kitchen we decided to place them about 1.5″ from the top of the door and 1″ inward. This is a bit closer than the 2-3″ standard recommendation because we took a few things into consideration. The knobs that we choose were micro which was more modern with a lower profile. Also, the cabinets were inset meaning the door faces were a bit lower than average so you could visually get away with them being a 1/2″ higher up.

While we are already on the subject another design dilemma that we ran into in the Mountain House was where to align hardware of different sizes on the same wall. As you can see above there are 2 different size handles on our cabinets so we started with the pulls on the glass cabinets which were placed 8″ from the bottom of the door to the bottom of the hardware. Then we aligned the rest and centered the larger fridge appliance pull since it was a couple of inches longer.

Latches are like the cousin to the knob. You may not see them often but when you do then the whole family is back together again. For the Portland kitchen, we decided to place them 4 – 5″ from the bottom of the face frame, there is some wiggle room with these as they work better higher up than a knob.
Now Where to Place Your Drawer Pulls

The placement of your drawer pull all really depends on the style of the pull itself. There are many options to choose from but the most popular are: bar pulls, bin pulls, finger pulls, ring or drop-handle pulls & recessed pulls. The example above used bin or sometimes referred to as cup pulls, typically you will want to center them vertically and horizontally to a drawer face.

If you have a drawer that is 24″ or wider you can split the drawer into thirds and double up on your hardware centering them in the left and right portions of the drawer. Orlando has a great example of this in his parent’s kitchen renovation, he already had a few styles of hardware mixed throughout so instead of adding another size he kept it streamlined and doubled up on the wider drawers.

Although, this more traditional approach can mean that you are now spending twice the amount of your hardware budget. For a more modern and hopefully budget-friendly approach you can find wider pulls like the ones we used in the Portland Kitchen.

Or use a longer finger pull instead and center it along the top of your drawer. Do note that sometimes with finger pulls you may need to have your contractor make a divot along the top so the drawer sits flush to your hardware like we did above. Otherwise, your drawer won’t shut:) Thanks again to our patient GC, Jeff Malcolm.

When it comes to integrated (panel-ready) appliances don’t forget about the all-important appliance pulls. You could probably get away with a regular pull on some appliances like we did with the ice machine but ones that are heavier like the fridge drawers require hardware that is very strong and made to last.
If you are one to skip over all my jibber jabber (I don’t blame you) to get on with your morning and just want the spark notes version of the post then we have all the info below, enjoy!

Some Rule Exceptions
I have to admit that I love when designers take a risk and break all the rules like the kitchen below and it just WORKS.

It seems so simple to use the same exact style and size hardware throughout but this had to have taken some forethought to make sure it would not only work functionally but visually as well for each cabinet. Bravo! To be fair this is the kitchen of Schoolhouse Electric owner, Brian Faherty so he knows what he’s doing:)
Other Exceptions (Bathroom Edition)

I think you can generally follow the rules above when it comes to bathroom vanities but sometimes they just need to be adjusted and end up looking really good. Or you might buy a vanity that has pre-drilled holes for your hardware so the decision will be made for you. Above, Emily B. opted for two knobs instead of pulls which was the right call in her tiny main bath, saving on space and a little money.

In the upstairs guest bath of the Mountain house we decided that two micro knobs was the right choice instead of mixing up styles. But as you can see neither are in their “correct” location. Why? Well, it would’ve looked a bit strange had we not aligned them to one another since they are on the same unit.

For the kid’s bath in the Mountain House, the wood hardware was such a contrast to the white and those square knobs would’ve looked too crowded higher up so instead we again opted to align them to the drawer pulls.
Ok now that we have ALL of that covered, let’s shop a little huh?

1. Rectangular Cast Brass | 2. Brushed Brass | 3. Brunswick | 4. Classic Hardware 6″ | 5. ENERYDA | 6. The “Morrison” | 7. Massey | 8. Larkin | 9. Luna | 10. Mission | 11. Wood Drawer | 12. Card File

1. Brass Center to Center Finger Pull | 2. Ledge | 3. Martin 5″ Center to Center Finger Pull | 4. Damon Edge Black Finger Pull | 5. Large Drawer Edge Pull | 6. Dina

1. BAGGANÄS | 2. Knurled | 3. Link | 4. BORGHAMN | 5. Black Beech | 6. Elroy | 7. Becket Drawer Pull | 8. Mission | 9. Modern Solid Brass Gold | 10. NYDALA | 11. Brass Backplate | 12. Beckett | 13. Walnut Beech/Brass | 14. Brass & Marble Drawer Pull | 15. Large Massey
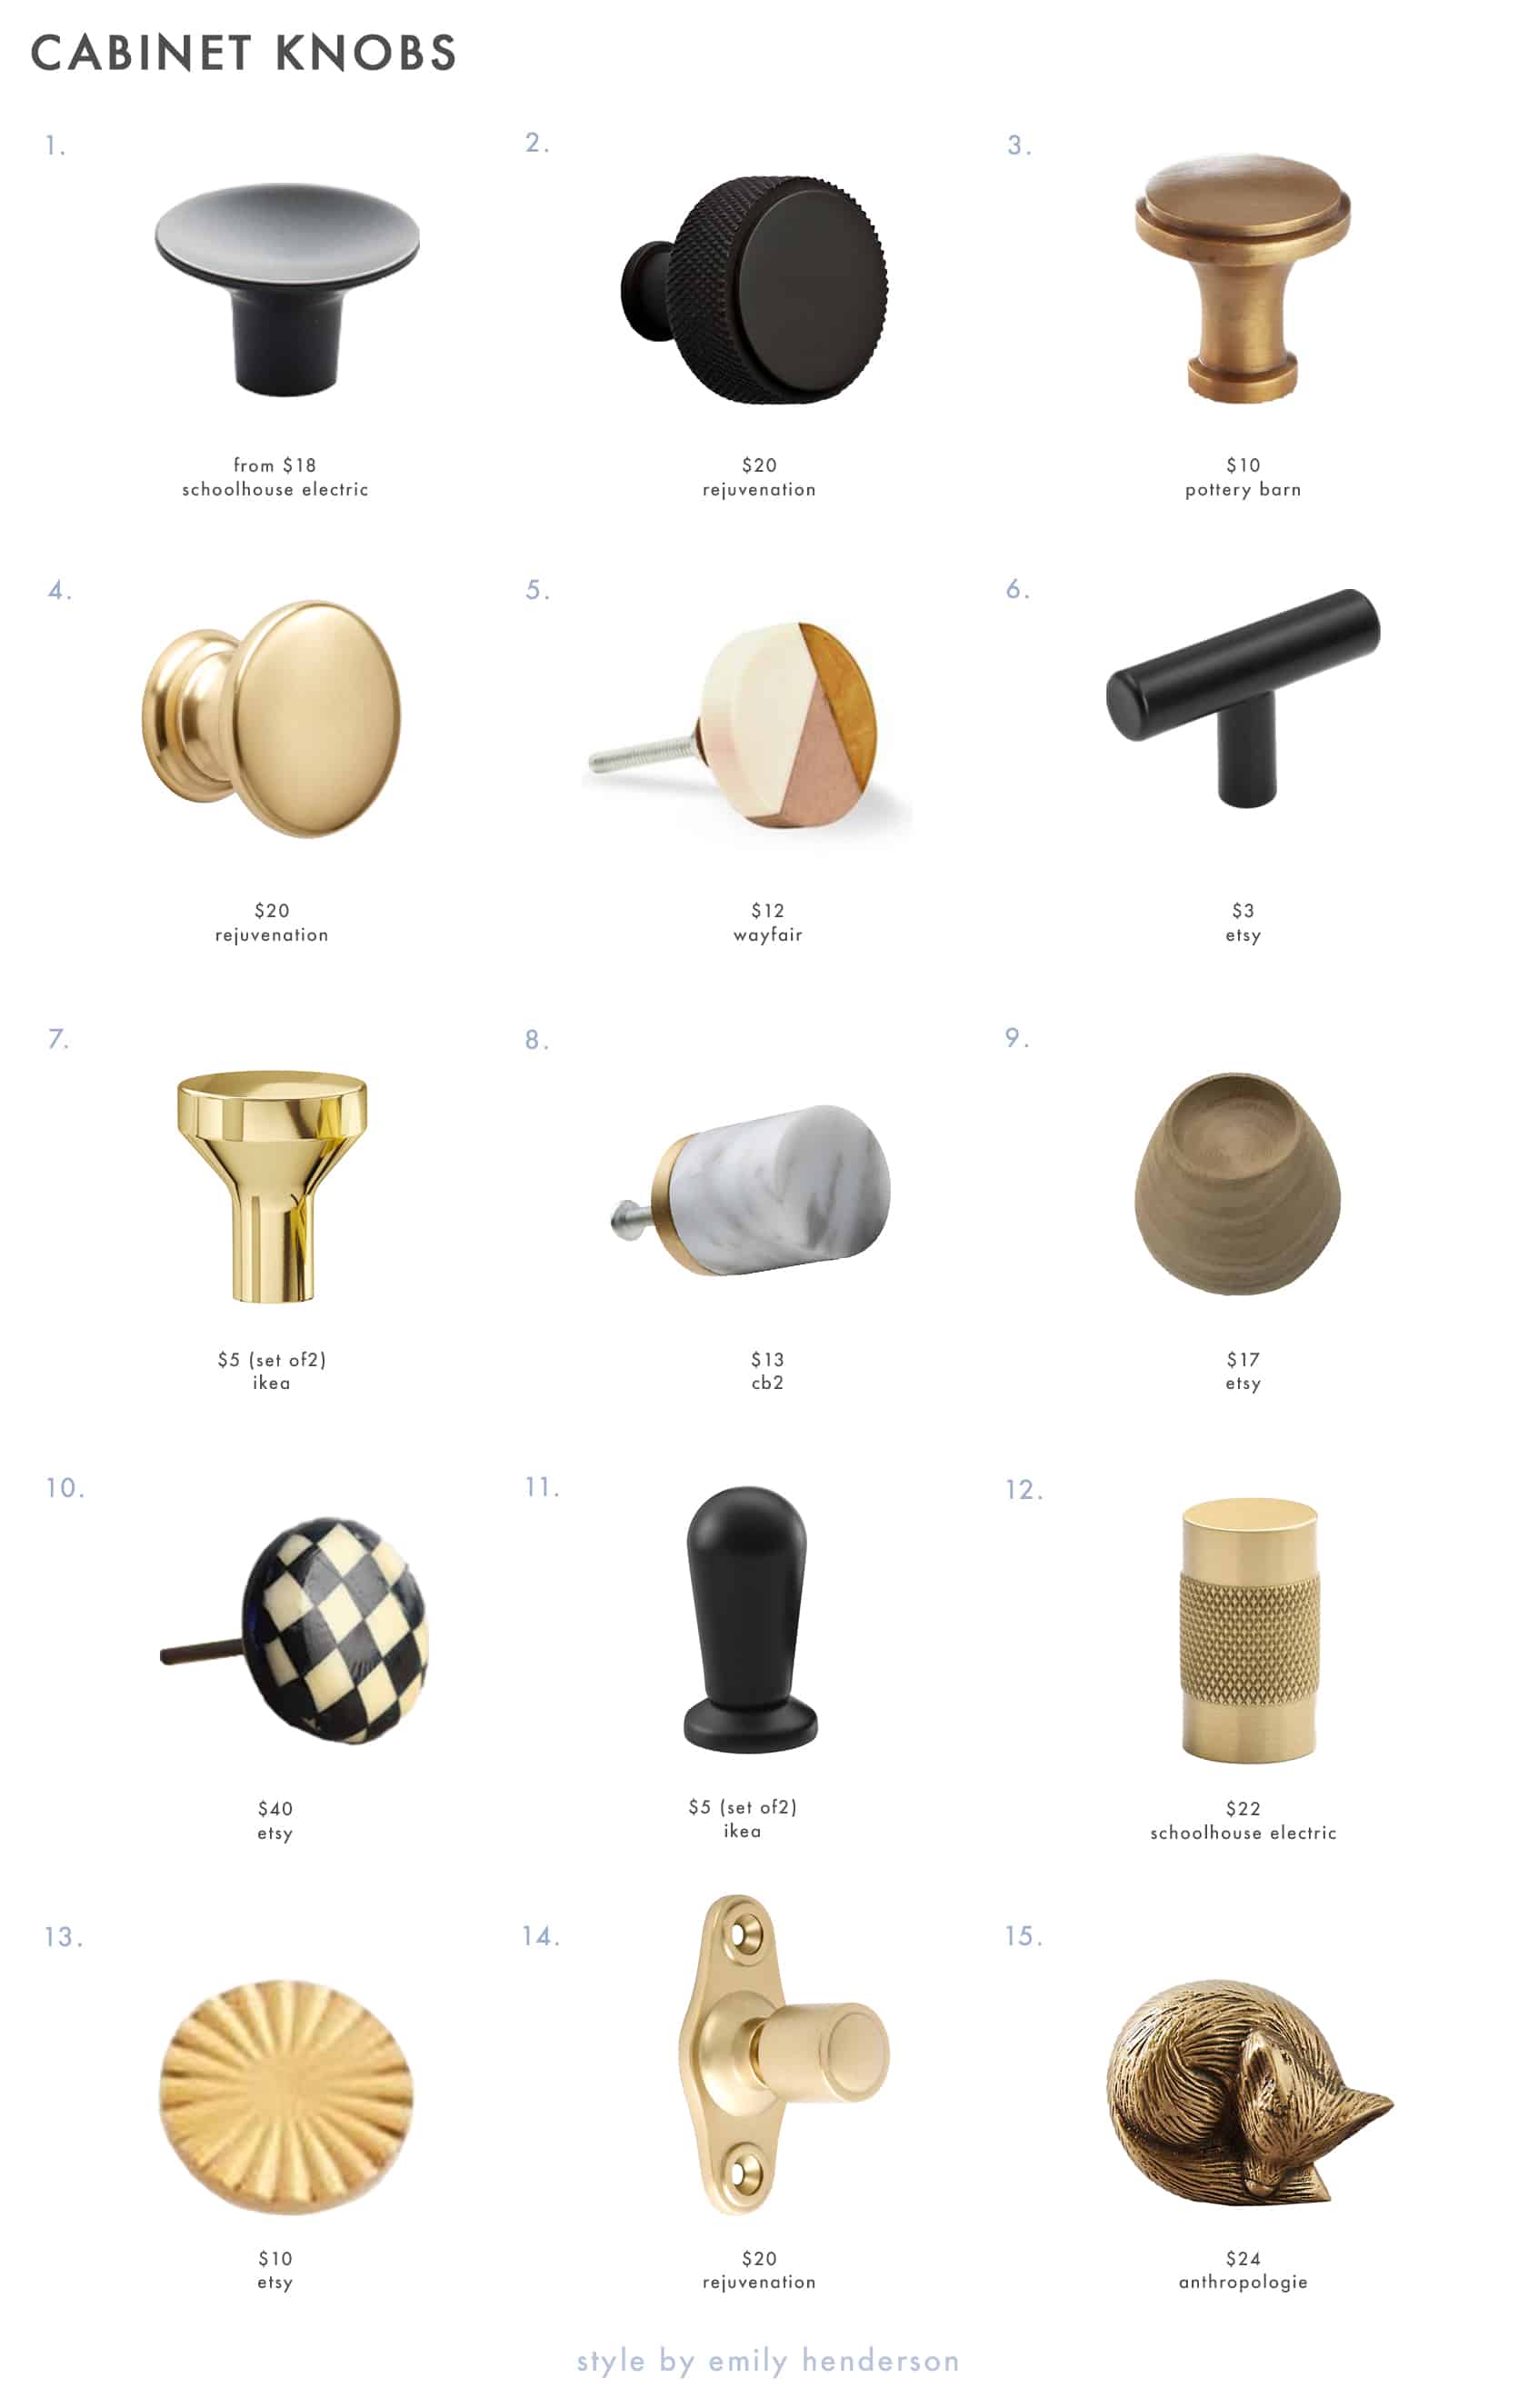
1. Dish | 2. Trask | 3. Boulevard | 4. Vernon Mushroom | 5. 1 1/2″ Diameter Round Knob | 6. T-Bar | 7. Brass BAGGANÄS | 8. White Marble Notched Cylinder | 9. Mid-century Modern Cabinet Wood | 10. Black and White Checkered Cabinet Bone Knob | 11. Black BAGGANÄS | 12. Knurled | 13. Solid Brass Round | 14. Tolson | 15. Sleeping Fox Knobs

1. Center Pull in Antique Light Brass | 2. Newbury 18 Inch Center to Center Appliance Pull | 3. Avignon Solid Pull | 4. Brushed Brass Pull | 7. West Slope | 8. Kane | 9. Brixton | 10. Matte Black Bar and Satin Brass Stems | 11. Kennaston Appliance Pull 12. Victoria Falls
If you still have questions about where to place your hardware in your own home that is completely understandable. This is meant to act as a guide but not the end all be all rule. Do what you think will work best visually (and functionally). If you are still stumped then come on over and join our EHD Insider Community and share your own space, there are plenty of people (including the EHD team) that will be more than happy to give our two cents about your conundrum. See you over there or I’ll talk all things hardware with you in the comments below!
Opening Photo Credits: Photo by Sara Ligorria-Tramp | From: All the What’s, Why’s & How Much’s of the Portland Kitchen (+ Big Reveal)


Please, show us an update of the mountain house kids bathroom! How does it work and look in real life? A sneak view in stories or your insta feed would be highly appreciated. Here it looks soo luxurious for kids´purposes.
I think that is such a fun idea! It looked exactly the same the last time I was up there but that was almost a year ago this August so I would love to see it as well. 🙂
We pared the knurled brass Schoolhouse Electric knobs with the knurled brass Restoration Hardware pulls in our kitchen and they match perfectly. But between the two, and a medium to largish size kitchen, it was about $1500 for everything. Those little suckers really add up!
I notice you never pull RH items. I think their furniture can be sketchy in terms of quality/comfort, but there kitchen and bath hardware are really solid. And if you have an RH Outlet store near you, it’s worth checking before ordering. All our curtains (And curtain hardware) in the renovated house are from there at a fraction of the cost.
Paired, not pared. Ugh.
That is such a great trick thank you for letting us know!
I moved into a house with a natural cherry kitchen that looked tons better once I swapped out brushed chrome curvy pulls with squared-off oil-rubbed bronze ones.
But they had drilled pull holes in all the cabinets, no knobs, and I wish I could use knobs, but I’m afraid filling the holes will be too obvious on natural wood cabs. Any opinion on kitchens that are all-drawer pull, even for cabinets?
My kitchen has simple pulls on the cabinets (mounted vertically) as well as the drawers (mounted horizontally.) I like the clean look of a single type of hardware.
Same here! I’ve lived in houses where the kitchen had no hardware, all knobs, and all pulls but I’ve never actually lived in a house where the kitchen had both so it always looks a little busy to me. When we did our kitchen renovation we went with pulls because I think they’re prettier and more functional.
I have the exact same question! How can I change the hardware on the cabinets without repainting all the cabinets? I currently have 31/2 in pulls but would prefer a long pull on my drawer fronts and knobs on the upper.
I think it might be tedious but I believe you can use wood filler to patch some holes but that might mean you need to paint them after filling them in. Here is a link to a tutorial:
You could also consider swapping out the doors and drawers but that might be costly as well. Sorry that I am not able to give you a more promising answer!
I think it can definitely work especially when the hardware leans on the slimmer and less ornate side, again these are just general rules. 🙂
This is so perfect, thank you! I just bought new hardware during Rejuvenation’s weekend sale. Our dated yet new to us kitchen needed a phase one makeover to hold us over. Any thoughts on sizing of pulls for smaller drawers?
Typically, you will want the drawer pull to be about 1/3 the width of the drawer face but that is just a general rule. If you can I’d suggest to place a piece of painters tape the size of the hardware you are considering to the drawer front and see how it looks. Hope that helps!
That is exactly what I did, thank you! I ended ip going with 4” for bigger drawers and 3” for smaller drawers. It was that or knobs, but knobs felt a little too traditional and the 4” felt too big. ?
$300+ for an appliance pull? No thank you. Glad there are more reasonable options provided.
Yes, while on the expensive side if you are already making the investment in a panel-ready fridge it is better to have hardware that will last and not opt for something that might ruin the custom panel therefore end up costing more down the road. But yes, we always try to do our best to provide options at different price points. 🙂
Should the knobs match the finish of my faucet? For example, would brass knobs (like #4) clash with a chrome faucet? I’m curious!
Hey Martine! I think it depends, if you are able to mix up enough brass throughout the rest of the space (like the light fixtures, door handles, towel bar, etc) then it will look more intentional then an afterthought. 🙂 We mixed metals in the Portland kitchen and it was great to take a small risk!
Love, love, love the colours!
Mariya |
We recently had our cabinets refinished by N-Hance of Greenville, and they redid the knobs as well. We opted to use a finger pull option, but now we are wondering about childproofing. We are expecting our first kid in December and would appreciate any help to make sure our cabinets are safe for them as they grow. Thank you!
Honestly, as the parent of two young children, we took the stance that we would lock up (or move) anything dangerous but leave everything else. We used some child proofing elements under the sink where the cleaning products are, and on a few cabinets with really heavy or breakable items. We used some plastic ones from Lowe’s with two plastic loops that could be tightened kind of like zip ties ( because we have weird knobs in our kitchen, but there are a lot of different types you can find online and in stores. We left the rest of the cabinets and drawers unsecured. When our girls were younger they tried to open them a lot but we would redirect them to other things. Now they’re preschoolers and don’t really mess with anything and like being “big girls” by grabbing their own cups and plates and napkins when we have meals 🙂
To the extent you can, move everything truly dangerous (cleaning chemicals, soaps, alcohol, knives, etc) out of reach. For anything you can’t move, you can lock the cabinets with magnetic locks that affix to the interior of the cabinets. We have finger pulls in our bathroom and the magnet work great.
My only addition is to not do finger pulls on bottom cabinets where you will be leaning against the counter a lot (like for cabinets under the sink). We had them in our last apartment and I can’t count the number of times my sweaters or shirts or even pants drawstrings caught under the finger pulls as I walked away. Maybe I was just the exactly wrong height but it was a pain in the butt!
On the wide drawers in my kitchen, we used two knobs, but rather than dividing the drawer front into thirds, my dad (happens to be a surgeon) suggested that we place the knobs using the golden ratio. I think our knob placement looks very pleasing to the eye.
What are the dimensional recommendations for a drawer pull on a flat panel?
We are renovating and installing new kitchen. One side of the room will have black slim shaker cabs and the island will be the same. The other side of the room will have a wall of pantry cabs in rift sawn oak. I would like all brass pulls on the black side and black on the oak side. Is it weird to have two different finishes in the same kitchen? I really don’t like brass on the wood.
That sounds beautiful, go for it!
I’ve never imagined that there was so many different options for hardware ! Let alone that there was name for each styles ! Fun discovery, and quite inspiring !
Devol, Plain English, Humphrey Munson and other Anglo-style cabinet makers often place the knobs a few to several inches from the edge of the face frame. We did that in our homage-to-Devol custom kitchen and love how it looks — it provides a very vintage, furniture-y feel. I don’t know how to add photos in the comments but the sink cabinets in Peckham Rye Kitchen on the Devol website are a good example. Yes, I know that is painfully specific!
My old kitcgen was brand new in ….1950!!! ?? I’d love a simple shaker-style IKEA kitcgen, but, not on my budget radar. I’m just so happy to gave my al ost 1pp year old house!
The original kitchen sink cupbiard us now the shed work bench. Soeone painted it “mission brown” in the 80s. I dry-brushed it acid-turquoise!
The original kitcgen cupboards that remain (uppers) have little, round, push-in button handles. The built-in original pantry and bathroom medicine cabinet have pendant drop pulls….so sweet (same on the workbench and I’m tempted to remove them clean ’em up and re-use somewhere else).
I recently bought a handful of handpainted, china decorative knobs at a clearance sale. They’re unique and special and add some whimsy to anything!!?
Gah! Dodgy fingers, sorry.?