
Red Book DIY – Garment Rack
Is it just me or are our closets getting smaller and smaller? There are two ways to combat this problem – get rid of some clothes (which we know is not going to happen), or figure out a way to store more clothes. This is where our ladder DIY may save your clothes, and your sanity (more likely your clothes, but lets just throw in sanity for good measure). They don’t call it retail therapy for nothing. Now lets get into this easy DIY.
Here’s what you need:
Ladder: Our ladder was vintage, but you can also source a new one to use, just make sure that both sides have ladder rugs at the same height all the way up. A standard 6′ ladder will work just fine.
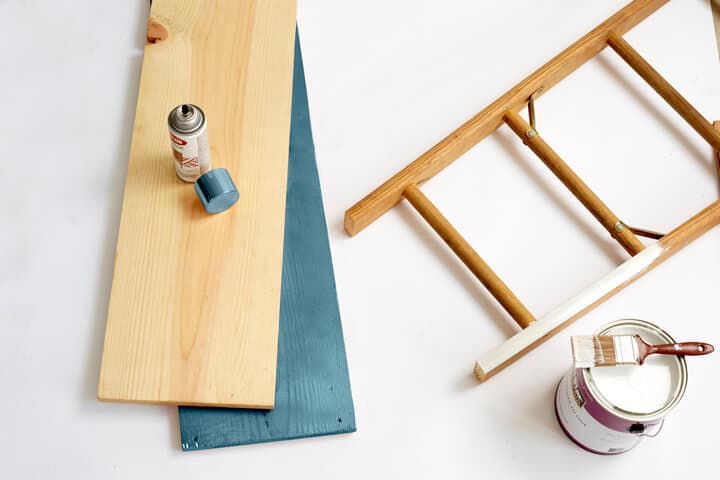
Wood Planks: Ours were from Home Depot and 12″ wide. We had them cut down to 4.5′ long and 4.75′ long.
Paint: We used spray paint to paint our shelves, and standard white paint to paint our ladder out.
Pipe Brackets: These should be the same size as your wooden dowel. Ours were 1″ pipe brackets.
Wooden Dowel: We sourced ours from Home Depot and had it cut it down to 4′ long.
Self Drilling Screws: These speed the process up a little bit when attaching everything together.
Let’s get into the process:
Step 1: Disassemble your ladder.
You’ll want to start by taking your ladder apart. Depending on how the ladder is made you will need to remove either a few bolts or screws which hold the ladder together. It’s not rocket science, but it will take a little bit of patience.
Step 2: Paint it out
Paint out your wood planks, ladder, and wooden dowel whatever color you would like.

Step 3: Screw it all together
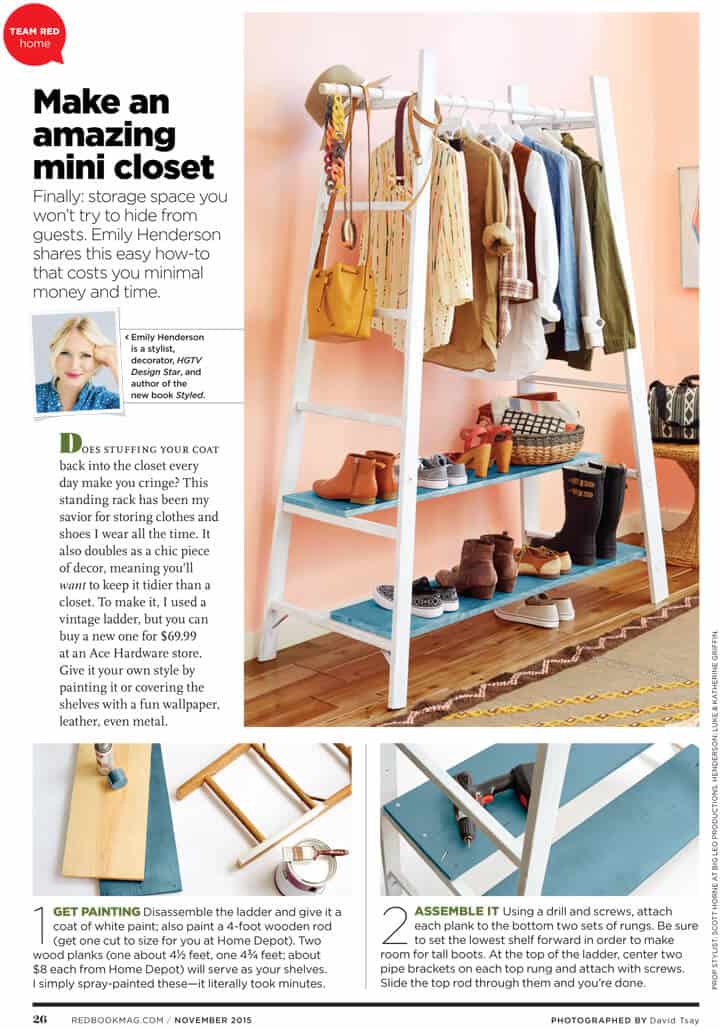
You may need an extra set of hands for this process. Using a drill and your screws attach each of the planks to the bottom two rungs of the ladder. You will want to attach the longer plank to the bottom rung and then the slightly shorter plank to the second rung up. Make sure to alternate where you attach your bottom shelves to make room for tall boots
Step 4: Attach your wooden rod
Using your pipe brackets and a few screws, attach your wooden dowel to the top rung of the ladder. Center the two pipe brackets on the top rungs and screw into place. Then slide your wooden down through and you are all done!
Now comes the hard part of deciding which clothes to hang on your new wardrobe.

And, in case you missed it in this month’s issue of Redbook, check it out below.
You didn’t think that we could do a post without a GIF did you? This one is especially fun to see as you can try and catch all the things that changed from our original project to when it was published. Here is a few that we caught:
They changed the color of the shelves from copper to blue, the rug got an extra stripe of yellow and black, they photoshopped out the tassel in the middle of the rug, the wood floors were darkened and the walls were brightened. They also photoshopped out the little knob in the corner of our studio that we still aren’t quite aren’t what actually does.

*Photography by David Tsay, styled by Scott Horne, DIY projects produced by Brady Tolbert for EHD (art directed by me).
Want more DIYs? Check out our other recent Redbook projects: 1 Lamp 3 Ways | DIY Upholstered Headboard | DIY Wooden Dowel Coat Rack | DIY Mod Podge Chair | DIY Side Table Ikea Hack | 1 Curtain 3 Ways
Ooh, ooh, did someone leave their car keys on the floor by the rug? This game is fun!
I think I prefer the copper shelves. But the extra stripe does help the rug!
Ah! So chic and simple. What a perfect way to display your favourite pieces.
Is the rug vintage?
I really like your DIYs. And I like that you compare them to the Redbook article. I have a bathroom with no storage and no racks. I’m thinking I could make this work for stacking/hanging towels, maybe add a pretty basket to stash toiletries………
Ahh, love this idea!!
Abbie E.
This project looks very similar to one done by Geneva Vanderzeil. I wonder if Brady was inspired by her ladder wardrobe?
This is interesting and inspiring post. I really need those garment rack right away. Thanks for the good post.