
Design 101
We Discovered the Easiest Way to Mock-Up a Room Design Plan (It’s Not Photoshop)
When I was 16 I decided I wanted to start learning about interior design for the same reason everyone wants start to learning about interior design: my room was ugly and I wanted to redecorate. So I bought two interior design books: Domino’s Book of Decorating and Elements of Style (obviously because Emily’s book wasn’t out yet, okay???) and googled “what computer program do professional interior designers use?” The Google led me straight to a program called AutoCAD so I immediately downloaded the free trial. My thought process was: if I could teach myself photoshop, so how hard could it be to teach myself this? Well, after watching hours of free tutorials online and playing around with it, I realized it was VERY HARD, so I used an old fashioned sketchbook to draw out my room design. Flash forward 6 years later, I landed a job working for an interior design blog –– nay –– THE INTERIOR DESIGN BLOG –– and I have a confession to make: I walked into the EHD office STILL not knowing what computer programs interior designers actually use.
So I’ll start by answering that million dollar question: what program do interior designers actually use?? Here at EHD, we use a bunch of different programs. Julie (who went to real interior design school) uses SketchUp and AutoCAD, but the vast majority of us use Photoshop and Google Slides. I’ll say that one more time in terms that are more relevant for this post. The EHD team uses 3 professional programs that cost money AND GOOGLE SLIDES. I couldn’t believe this news. This is a FREE program most people already have on their computers and know how to use. If you don’t know how to use it, it works the same way as PowerPoint or Keynote, and IT’S VERY EASY TO LEARN. So, when it came to designing my studio apartment, I revved up my Google Slides skills and got going. Here’s what I ended up with:
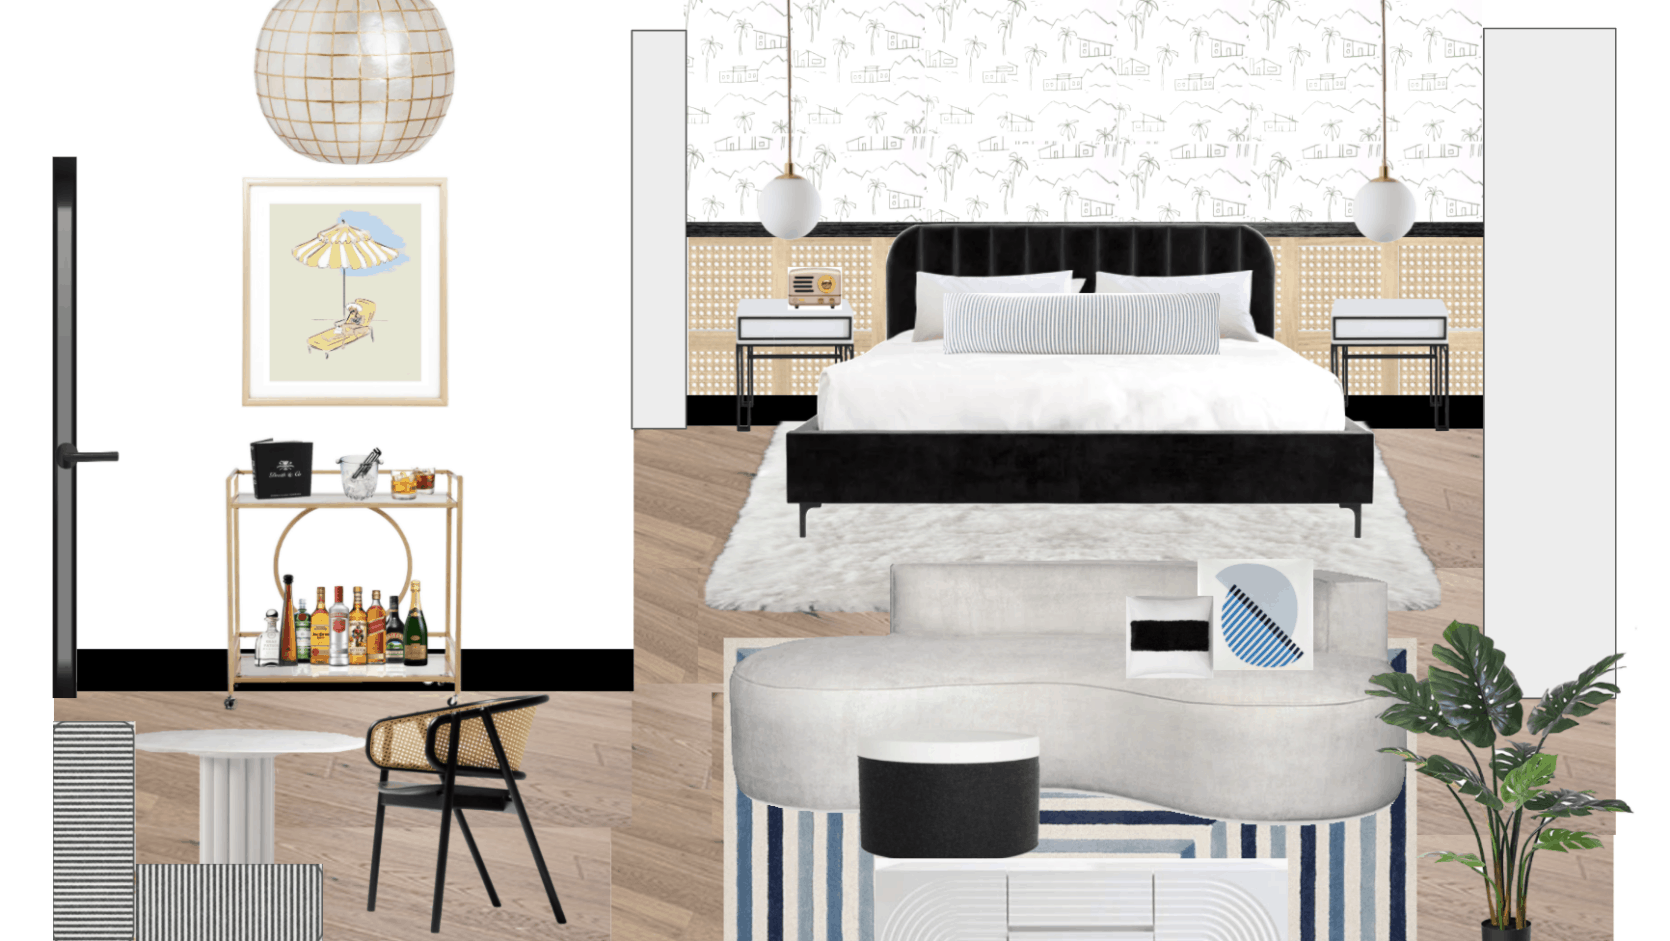
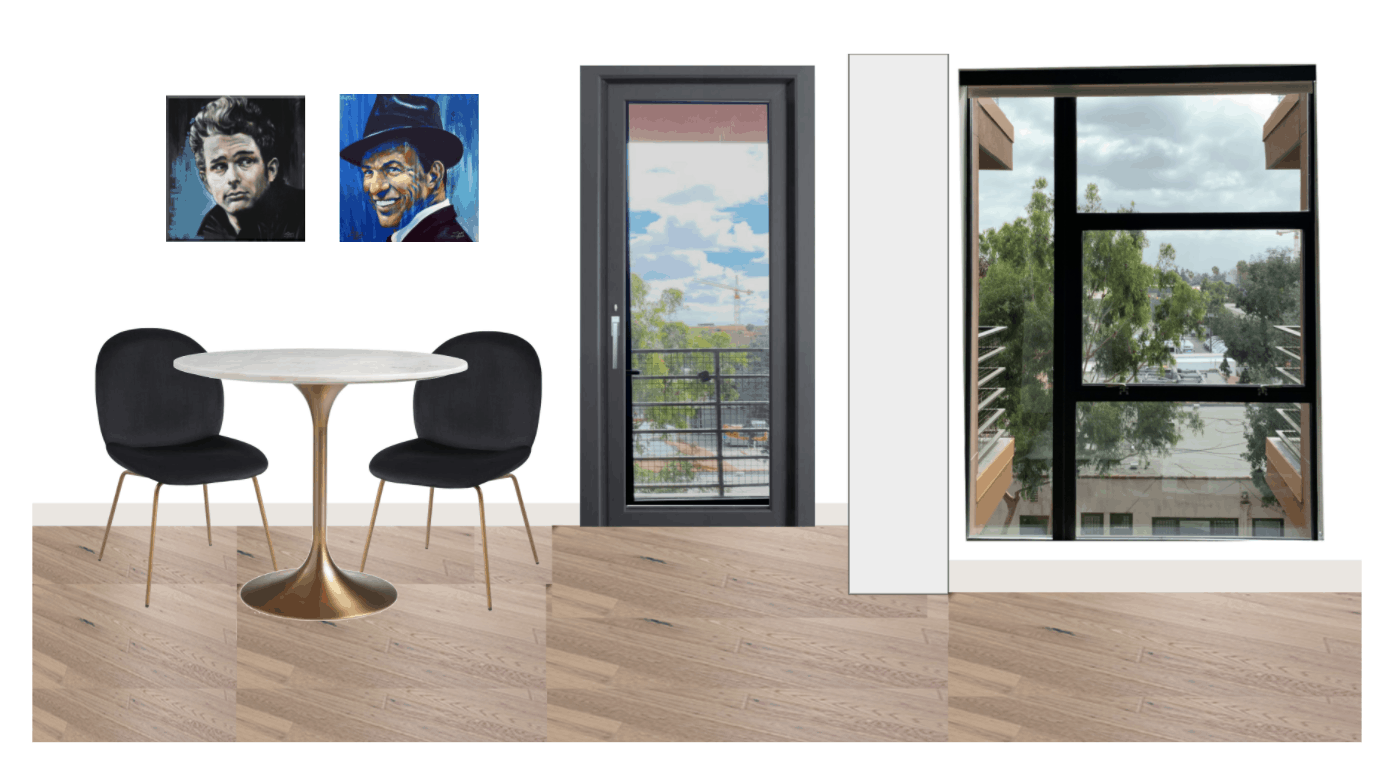
Now I have a couple of things to say here. First off, if you’ve been following my studio apartment saga at all, you may have noticed that this mood board looks completely different from the two versions I’ve shown you before. That’s because I’ve designed and redesigned this mood board probably 300 times. I know I just said “probably” but 300 is actually not an exaggeration. But THAT’S one of the main benefits to doing something like this on Google Slides, it makes switching around furniture pieces SO easy and it allows you to see the entire evolution of a room, so if you want to go back to where you started you can. I’ll get more into the details in a bit, but how we typically layout a room with Photoshop and Google Slides is by “wall” or “perspective” since these aren’t 3-D renderings. As you can see above that’s my bedroom wall or the perspective from the living room. Now let me show you another wall in my apartment where I took it from real life to a real design plan:
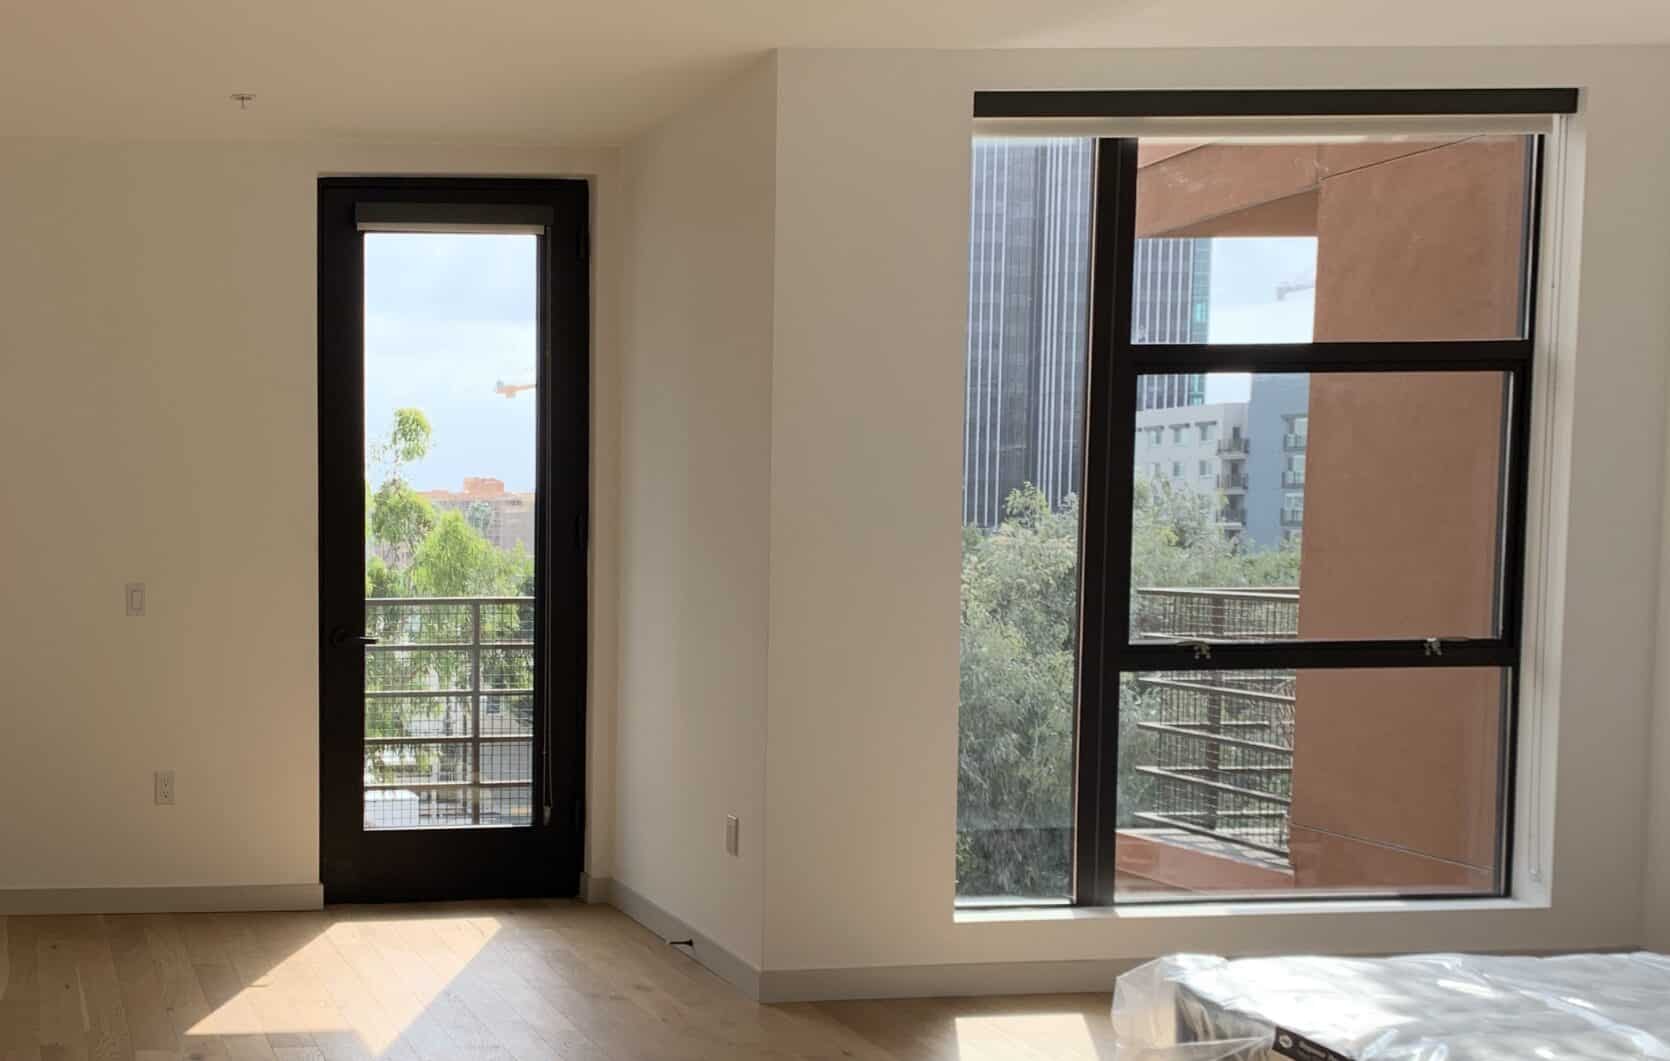
REAL LIFE ROOM:
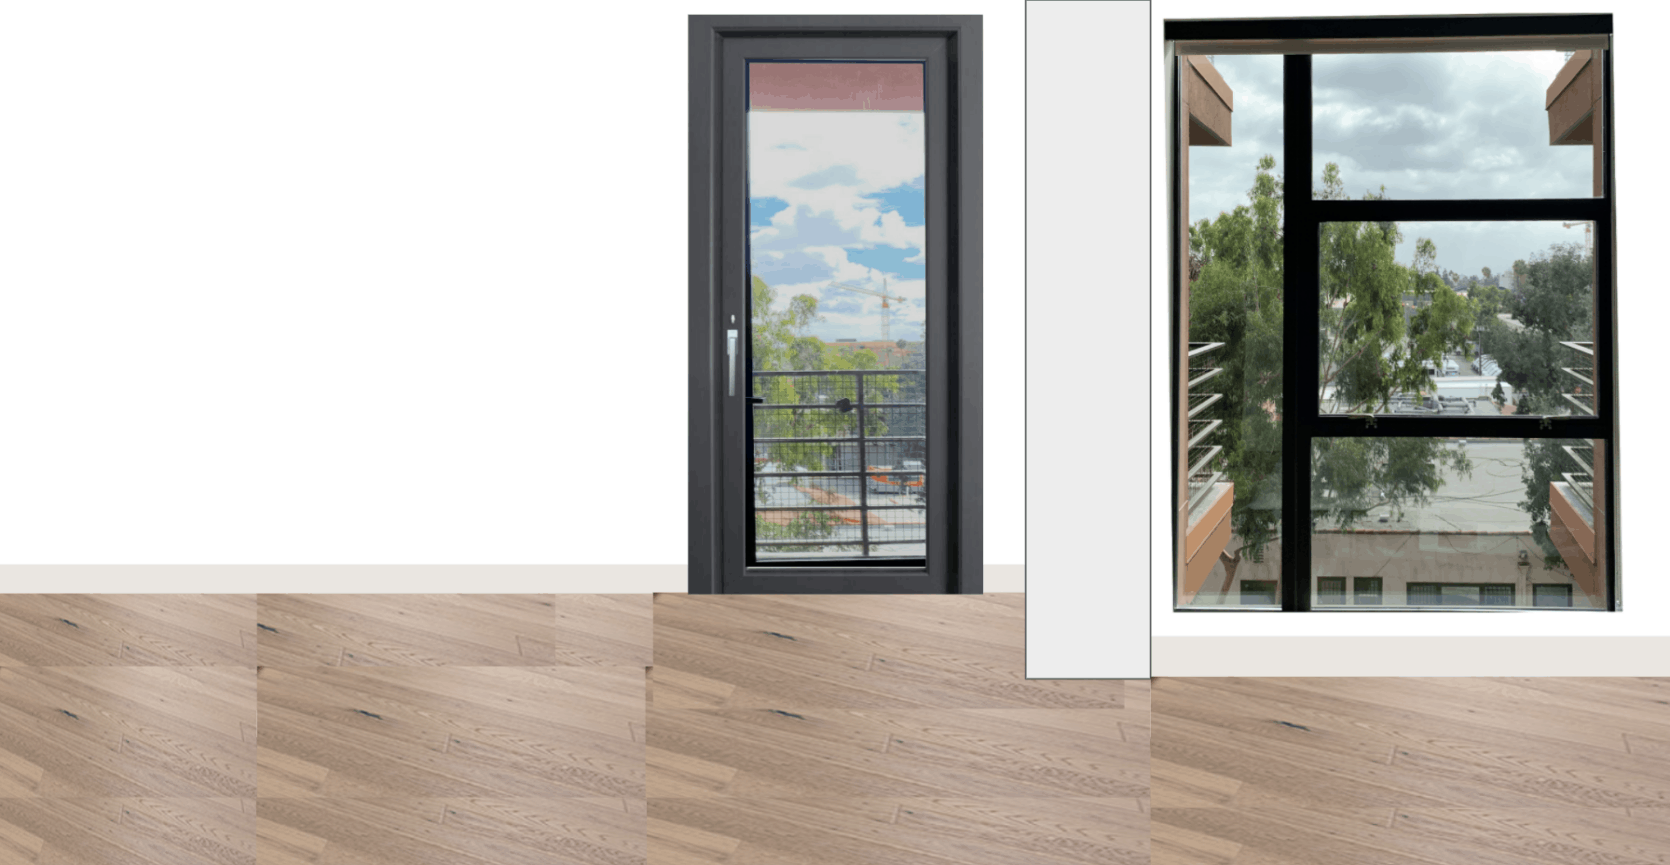
DESIGN PLAN MOCKUP:

I’m sure you get it at this point, but you can make as many of these as you want. I have almost every wall from every angle, but that’s just because I’m very visual and I want to see every detail laid out before I make any big design calls. So, now that you understand what it is exactly that I’m going to teach you how to do, it’s time to actually show you! I made a video tutorial if you’re into that sort of thing (note: it will play after the ad) but if not then, just skip it because I’m going to outline it all too.
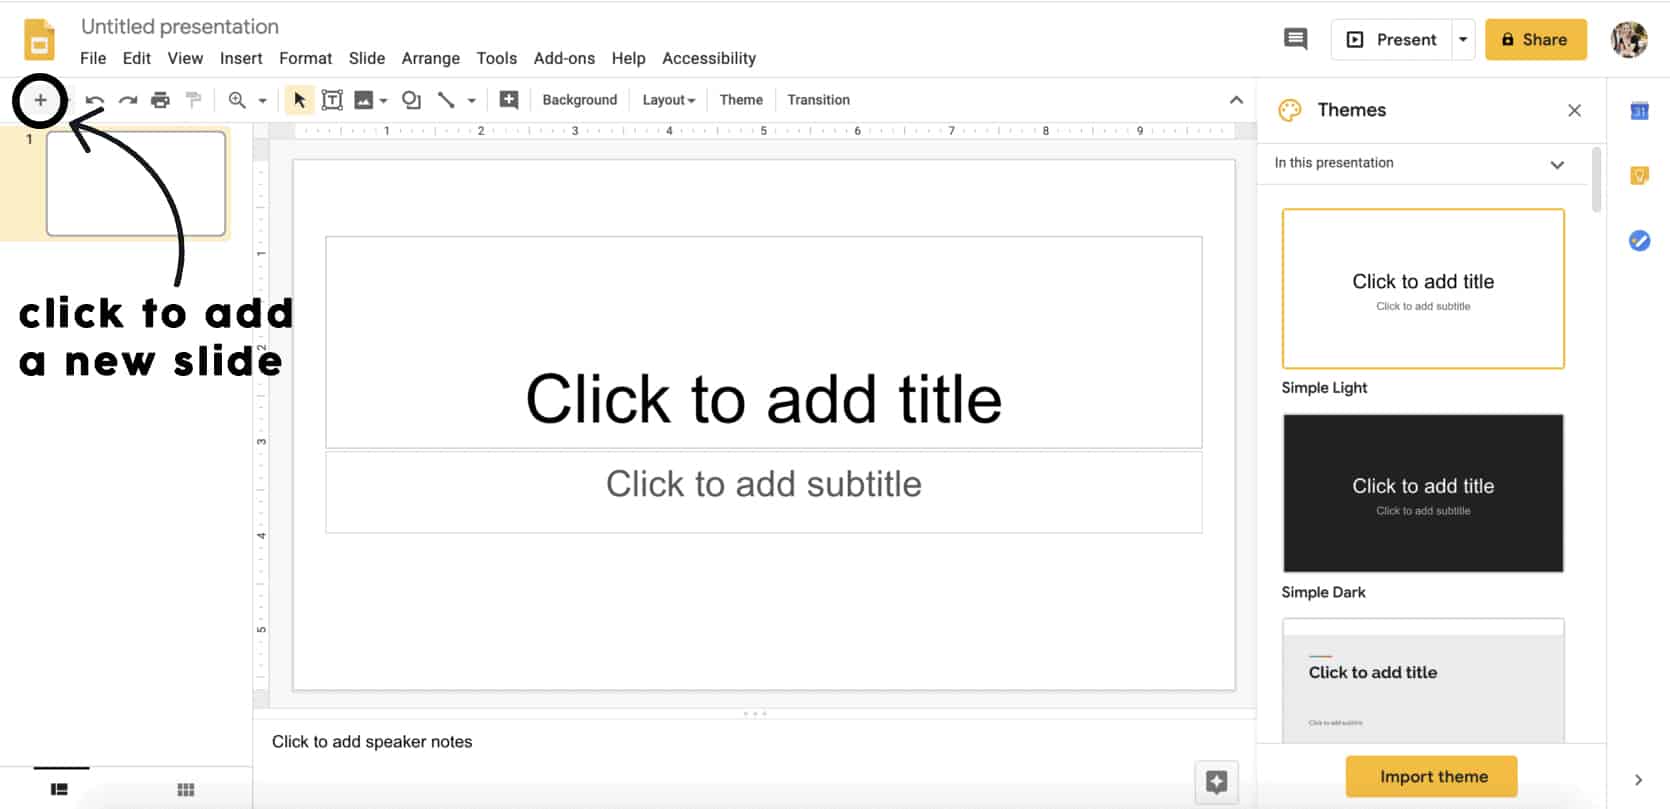
START A NEW GOOGLE SLIDE PRESENTATION
Google Slides is free and easy to use. Like I said, it’s basically PowerPoint or Keynote (which you could use instead if you’d rather), but Google Slides is a little easier to share with others and have them edit (which is especially helpful if you’re designing with roommates or a significant other that cares). So, the first thing you need to do is start a new presentation –– it should look something like this when you begin:

I like to give it a title and a title page, but obviously, you don’t have to. Click the little plus sign in the top left corner and make a new blank slide (not text boxes), then you’re pretty much set up to start adding in the goods (yup, it’s that easy).
START BUILDING YOUR SPACE
The next step is to start creating your space from the ground up (literally) so start with the floor. Take a photo of your apartment, OR…
[HOT_TIP title=”Hot Tip” content=”If your house or apartment or whatever you’re designing has EVER been listed online, just google it, and find those professional real estate photos to pull from.”]
So, I found a professional picture of my apartment listing and took a screenshot of the floor. If you can only screenshot one small section of the floor because of furniture and what not in the photo, don’t worry. Just screenshot as much as you can, then drag that jpeg into your google slide presentation, and then copy and paste your image a bunch of times (like I did below) until you create the whole floor. This will apply to a lot of things once you start adding in furniture pieces (like wallpaper, tile, etc), so just remember that it’s more important to get the scale of your floor (or wallpaper, tile, etc) right than to stretch and morph your photo to try to make it fit across your screen.
If you don’t know how to take a screenshot on your computer, here you go (this is important). If you’re on a mac, press ‘SHIFT’ ‘COMMAND’ and ‘4’ all at the same time, then drag and select the area you want to screenshot. If you’re using a PC or iPad or something else, here’s an article that teaches you how to screenshot on any device, or you can just search for a YouTube tutorial for your specific device. Once you’ve taken a screenshot, it will usually automatically end up on the desktop of your computer and you can access it there.
So once you know how to screenshot (and where to find your screenshot), you can do the same thing you did with the floors with the walls (my walls are white, so I just left the background blank). Then, the next thing to do is to add any architectural features into the space. So, for example, if you have a window, take a photo of the window, (or again, screenshot your apartment/house’s online listing photo), upload it to your computer, then drag it into your google slide presentation, crop, and adjust the size to scale it to the room. You can also use the “shapes” tool on Google Slides to add in any walls, poles, smoke detectors, trim (don’t forget your trim), etc. Then once you have that basis, it should look something like this (but obviously, it will look more like your space, not mine):
Now you have the foundation, so you can fill your room with WHATEVER YOUR LITTLE HEART DESIRES. Sounds easier than it is – trust me, I get it – and I’m going to give you some VERY helpful tips for how to do this (and make it look good). We made it to the fun part, guys!
SCREENSHOT ONLINE FURNITURE PIECES
First, I’d recommend starting with the furniture you already have/want to still use in your space, which, you can either take photos of your items in your apartment, OR if you have anything that’s sold online, you can screenshot the furniture pieces there (the second option will look cleaner and better). For example, we have 2 pieces of art and a World Market dining set that we got off Craigslist, but luckily they were all still being sold online, so I just took screenshots of each item from their respective online stores. Here’s what our current dining chairs look like online (ooh, by the way, they’re on SALE if you’re into them. They’re very comfortable and I highly recommend). Then I’ll ONLY screenshot the chair on the grey background (not the whole page):

[HOT_TIP title=”Hot Tip” content=”I HIGHLY recommend finding pictures that have the most MINIMAL background possible, before you take your screenshot (like this plain grey background in the above photo). This will make the next step MUCH MUCH easier.”]
So now you should have a screenshot of your furniture item on the desktop of your computer, but it’s not quite ready to go into your Google Slides presentation just yet, here’s what you have to do next…
MAKE THE BACKGROUND TRANSPARENT
“How do you take the backgrounds out of the screenshots?” That is yet another million dollar question, people. You may be shocked to find out the answer is NOT Photoshop (although you can use photoshop to take out a background –– and I often do), this option I’m about to show you is actually EASIER and FREE. These are the instructions for mac users, but if you have a PC, you can follow this video to achieve the same thing 🙂
Step One: Screenshot your item by holding down [SHIFT] [COMMAND] [4] at the same time
Step Two: Go to your “Finder,” and it will appear in your “Desktop Folder”
Step Three: Double click the photo and it will automatically open in an app called, “Preview”
Step Four: Click the “Toolbar” button, and then select the magic wand looking tool (I circled them below)


Step Five: Highlight the background (It will turn red) and then it will become a “selection”


Step Six: Hit “Delete” and the selected background will be deleted
Step Seven: GO TO “FILE” and “SAVE.” There’s no need to rename the photo, if you hit “save” it will save your original screenshot as a .png with no background


Step Eight: Drag and drop your photo into Google Slides and VOILA! No background!
START FILLING IN YOUR SPACE
Remember, I recommend starting with what’s already in your space, especially if you’re going to keep things, that way you can get a sense of what you have and you can start playing around with it from there. So this is how my space looks now…
This is our first apartment, so we don’t have much furniture to add in, clearly. So at this point, your space might look A LOT fuller. If you’re starting from scratch completely or getting rid of every item in your home, obviously you don’t have to do this step, but I found that if you’re planning on keeping some of what you already have, this step will come in handy later.
DUPLICATE YOUR SLIDE AND PLAY AROUND
Now you’re finally ready to design and redesign and redesign again! Once you have your first slide finished and your room virtually mocked-up, you can duplicate your slide and start playing around with it.
[HOT_TIP title=”Hot Tip” content=”Be sure to duplicate your slide every time you add in something new or switch something around.”]
This is why Google Slides is the best program to use. Here’s what my dining nook area looks like after designing and then redesigning it:
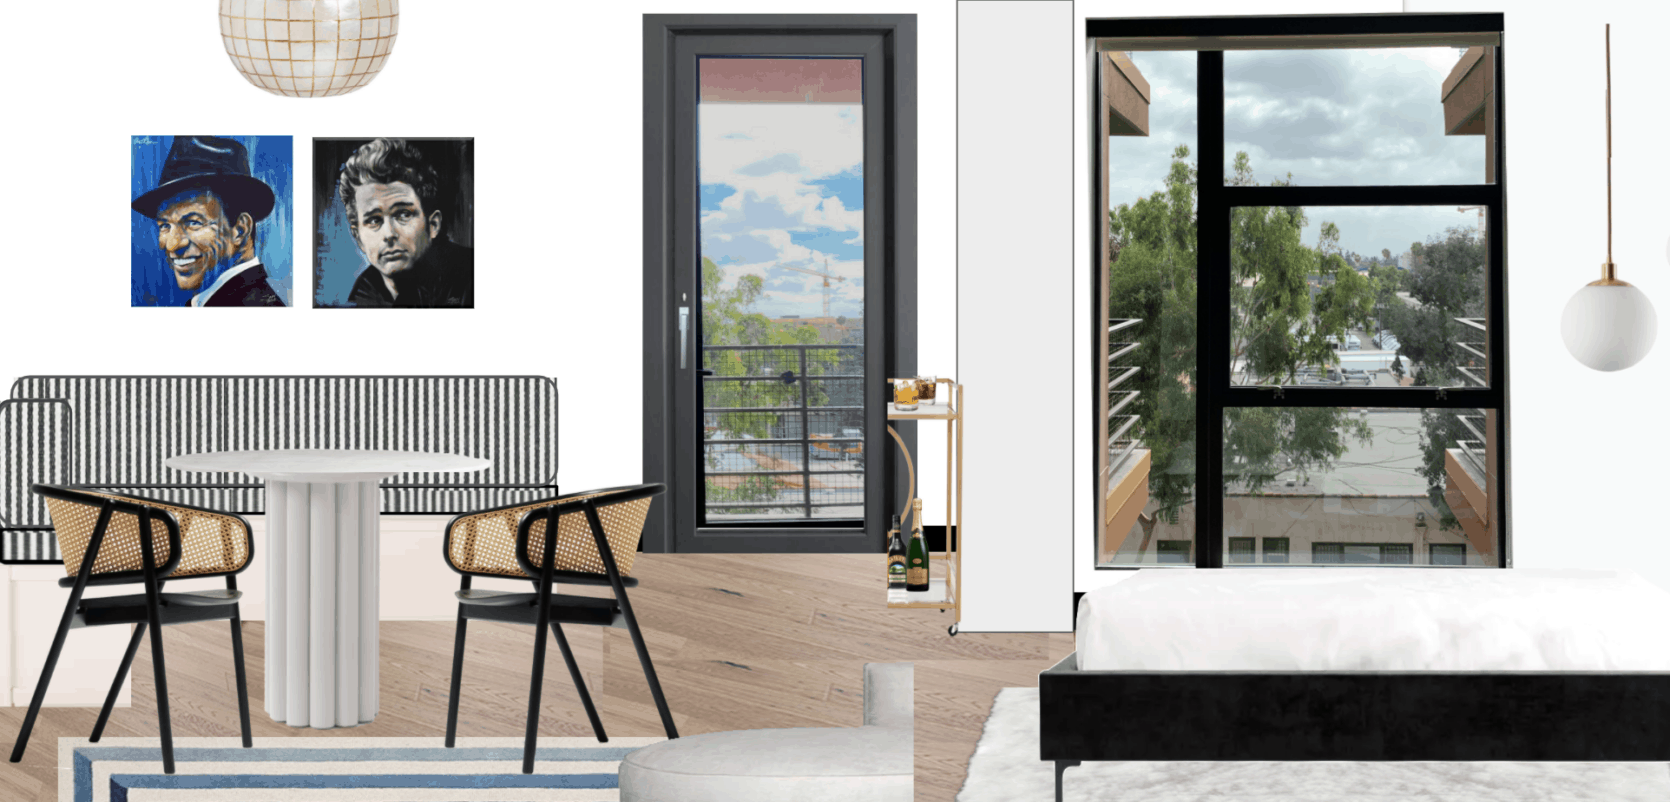
It’s pretty fun to use, and I’m basically addicted to going onto my computer and playing around with the space. It’s like rearranging furniture without lifting a finger. Plus, you can see every single version of your design plan and that way, you can compare and see what works best for you (and the design). Like I said, my apartment mockup has about 300 different versions of every single wall in every single version imaginable. But it’s really fun to see where you started and where you end up. Here’s the first slide in my apartment design to prove to you that it’s fun to keep every single version (even if the design you start with is just flat out not good)…
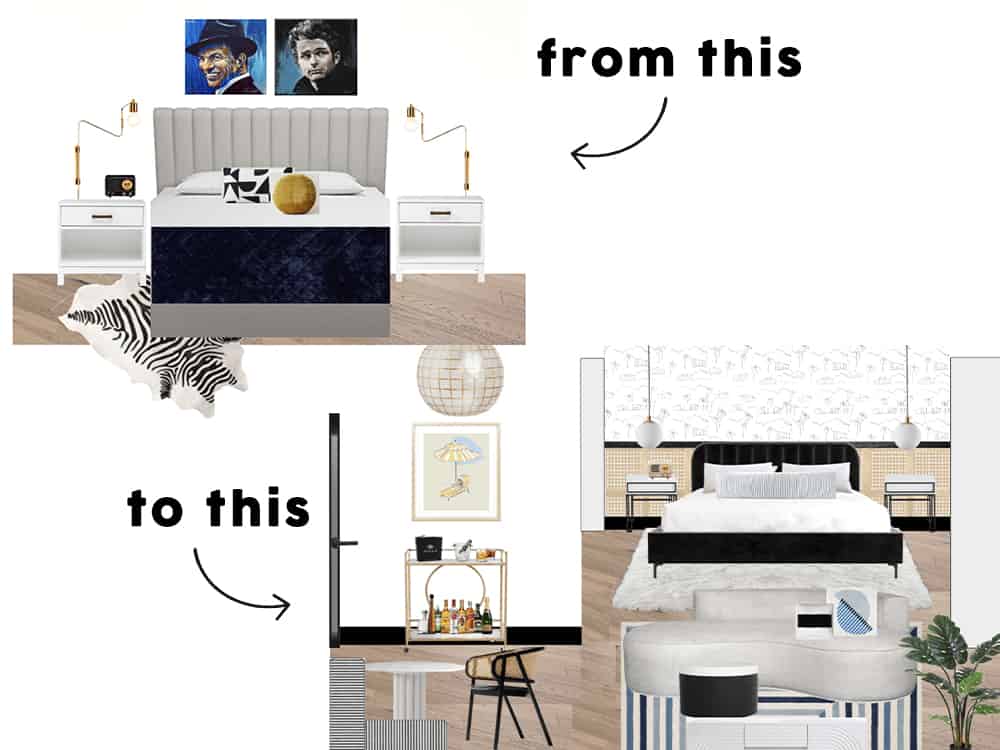
HAHA LOOK AT THAT FIRST DESIGN. This is bananas. I can’t believe I even put that together, but you gotta start somewhere right? Could you imagine if I had just started doing things to my apartment? I could’ve had a zebra rug I wouldn’t know what to do with. Although the zebra rug could come back at any moment –– what do I know? But that’s the joy of Google Slides. You can see THE ENTIRE DESIGN PROCESS ON YOUR COMPUTER SCREEN FROM START TO FINISH.
Let me know if you have any questions on this Google Slides design process! But if you want to know how to start planning your initial design check out Emily’s How to Design a Room post🙂 Xx


This was so cool!! Also, your space moodboards are looking so beautiful Mallory!! Love the dining area. Cannot wait to see ur reveal! Wow, enough exclamation points?!
I just need to figure out the remove background thing on my non apple laptop. Btw, I think you might have meant “nay” as in “no”, not “neigh” like a horse.
Thanks so much Sahaja! AND HA that’s hilarious – just fixed the neigh 🙂
That background-deleting tip is amazing! I’ve only ever used preview to make pictures small enough to upload. I was already planning to try Google Slides to design my living room, but I’ve been inspired to give it a try for our rooftop, too. <3
Also, I love how your design is coming along! So excited you mocked up my idea of cane & wallpaper a la Pink Cabana! I think it looks great, so I stand by my suggestion hahaha. The current iteration is very monochromatic, which I love, but I'm a bit surprised it doesn't have more color since your inspo photos are very very colorful.
Are you going to be able to do the install once you've picked a design or will you be waiting until this whole quarantine and social distancing thing has mostly settled down?
Yes!! Thank you so much for the suggestion, we LOVE this wall so much more. Re color, we really went for a colorful fun bathroom in our design plan, so we’re starting with that but will slowly start to add more color where it makes sense once we see it in person. That being said, I think the install will hopefully happen sooner rather than later, but the quarantine is definitely slowing things down a bit. We’ll hopefully start to be able to tackle some of our DIY projects soon though!
Oh. My. Lord. Mallory, THANK YOU, THANK YOU, THANK YOU.
I’ve been using Google Slides to create mood boards for our future house, and I had no idea I can use Preview to delete the background of the furniture!! This has been bugging me for so long and now I feel like I’m reborn. 🙂
Yay! I’m SO glad it helped!!
Oh my goodness, such a good tutorial! I use AutoCAD/Revit all day long but man, I had no idea about the magic wand in the preview screen to delete a background. Mind. Blown.
I know I found it out recently and I couldn’t believe that it was EASIER than using photoshop! I had to share. Thanks for reading 🙂
I have been doing this for YEARS and I can’t tell you how helpful it is. I recently moved and wanted a new rug, so I took a picture of my room with the furniture pieces that would be anchoring it either in the photo with the full room background (e.g., sofa) or on their own with background removed like you did in the post (e.g., coffee able, side chair) then layered the pieces on top of my rug options with backgrounds removed. It was so helpful to visualize them in the space, and also when I look back on the rug options now that I’ve actually purchased one (well, two to try out) I can’t even tell which images are fake and which are real.
That’s so awesome!! Yeah this was a total game changer for me, too. It’s so nice being able to visually see things before you buy
This is SO helpful! Thank you! Really appreciate the step-by-steps and keyboard shortcuts.
Such awesome tips! I’m feeling very inspired to go mockup a few spaces that I am noodling on in my own home. Maybe I missed it in my haste to read between work meetings, but what is the best way to ensure you are keeping everything to scale when you drop in new furniture, etc? Resizing the screenshots is the part I am feeling unsure about.
Honestly Erin I just eyeball it (which sometimes goes horribly wrong) but you could definitely take a photo of your room (with furniture in it) and put it into google slides for scale! That way when you add furniture pieces you can reference what the size would be relative to other pieces in your room
This was a great tutorial! I have been using PowerPoint for the last few years and it is almost an identical process! One thing I can’t do, and didn’t see on your tutorial is if there is a way to get a side angle of something to appear flat (ex: how your door looks in the last board) or how your fuzzy rug appears to be going back with the bed instead of just a square like the one under the sofa?
Shayla! I did that pretty much just by warping the images. I just flattened my door image vertically and then for the rug, I basically stretched it horizontally 🙂
I’d love to add that if you *do* want to get into the nitty gritty, SketchUp has a free version and is pretty easy to learn. It’s really helpful if you want to be able to visualize the scale of things, figure out space planning, see if that amazing couch will fit in your living room, etc.
Hi Ellen, great to know! I’m going to try it out! Learning SketchUp is definitely my next project. Thank you for sharing xx
This is awesome! Thank you for sharing. I can’t wait to play around with it.
Mallory … this is soooo user-friendly!! Your step by step walk through the process is superhelpful. I don’t have any use for it at the moment, but man! So inspiring!
I hafta say … your eyes are fabulously beautiful!
Thank you so much Rusty!
Brilliant post! Thank you very much!
I am backing up your “very hard” skill to get competent at fast at CAD.
Yes, I thought I would tackle learning CAD, if I took a month full time into intensive training, rather than waiting for my team for small revisions…….nah….when you think about it most architects don’t come out of a 5 year degree that capable in it. I believe 1500 commands is the level of commands you learn after a year, and the cad operators I have seen really capable on it have closer to 3000 commands.
So reinforcing Mallorys “very easy” google slides, is that, HUGE bang for a 4 step process.
The transparent background was also new to me, great tip!, any more of those tips would also be greatly appreciated.
Thanks
Gabrielle
this is great! Can you add how you do the scale of things? How do you make the wall space and then the bed or other pieces of furniture be realistically the right scale? Is there a way to say how long and high the wall is? or windows and doors?
I second this request!
I really just eyeballed the scale of everything for this, BUT you could always take a photo of your room and drop it into google slides for reference. If you have something specific you want to measure, try taking a photo of a measuring tape stretched out to your desired length and then dragging and dropping that photo in for reference. Otherwise, you could try other programs that are better at measuring scale…I will admit this is where google slides lacks. For general design, however, it works great! Best of luck xx
Thank you for this!!! Wow! You just blew me away with deleting the background in preview!!! Literal game changer!
This post has great info! One comment… it seems a little strange to me that EHD would continue to randomly use the photo of the room designed for the lady who died… it seems disrespectful somehow to put it up without any acknowledgement of the loss. What if her partner is still an EHD follower? I imagine seeing their shared bedroom at the top of a post like this would feel like a gut-punch.
So cool! Can’t wait to play around with this.
Awesome! I have and use Photoshop, InDesign, AutoCAD and SketchUp, but this seems like a very quick, easy, and cheap way to quickly see your ideas! I love that the sellers’ websites contain product images that are easy to use in this way, and that Google put in the magic wand tool. This reminds me of when I was a kid, clipping furniture and curtains photos from catalogs and pasting them together! Only so much better! Thanks for sharing!
Oops- I guess that magic wand is not in Google, but an Apple feature. I will try to figure out how to do that on a pc. Thanks.
I’m a designer and use designfiles.co to make my boards, literally so easy and such a time saver vs photoshop. It’s if pinterest and pshop had a baby – it links back to all the selections and I don’t have to save anything on my computer. I think they have a free trial so if you wanted to use it for personal use.
ooh very cool! I’ll have to check it out!
OhMyGoodness! I cannot tell you how timely your article is! I am a teacher, and right now my team (and teachers all over!)has been using Google slides to set up virtual classrooms for our Kinders to navigate (we put links to videos and lessons on objects they can click on in the room). We’re trying to create rooms/scenes that look engaging and realistic, and it’s been impossible to find decent photos of the classroom items we want to include. Our budget for next year has been slashed, so even IF we’re all back in the real classroom next year there’s no money for paper/copies- we’ll still be using the virtual classroom & lessons. Your article will help us put in exactly what we want; no more compromising on random clip art! You’ve just upped our Google Slide skills x100! I’m sending this article to everyone I work with, thank you, thank you!!
Wow thank YOU for reading! So glad that I could help!!
Hi Cari, just wanted to say I have a kindergartener (soon to be first grader) and your idea to put links on objects in the room is awesome!! I think he would love that.
This is so awesome! And thank you for the tip on how to get the toolbar in Preview. I knew it existed, but it’s always hiding!
I know!! Who knew, right?!
I love this idea! Thanks for the great instructions. One tip to add: if you have PowerPoint, there is a built-in function called “remove background.” You don’t have to go through the separate step of saving the picture and copying it. Can’t wait to try your process!
Oooh AWESOME! Thank you for sharing 🙂
I’m moving into my first house (rented but still!) and I feel like I’m taking a graduate course in EH interior design. Thank you so much for these posts – I’d be honestly so lost without them
This may be my fave EHD post ever. I am so happy I can remove backgrounds for free sans photoshop! Thank you Mallory!!
AW thank you Jennifer!
“remove.bg” is hands down one of the BEST free websites that removes backgrounds for you. You can literally just copy and paste your image right on the website without having to click anywhere. I love using this tool too!
Great post! Can you post the source for that dining table (looks like the Hera accent table from West Elm)?
yes!!! this may be my favorite post ever
Thanks! This is cool and helpful. I read it and Emily’s article about how to design a room and as I get ready to purchase the things in my mood board, I have one question:
How accurate are these types of boards in your team’s experience? Does the mood and vibe most often translate to the space? I’m worried I’ll be let down if the space doesn’t look as good as it does on paper….
Could be cool to see a post of several ehd mood boards and the actual rooms that came about / what needed to change in person.
ooh LOVE! A lot of times things can shift around quite a bit given that a moodboard like this isn’t accurate to scale. Generally, things are a little more precise when using a program like sketchup or autocad that has the ability to see dimensions. I’ll alert the team about this post idea, I think it would be so fun to see 🙂
This is AMAZING and total game changer – thank you!!!!!
Happy to help!
I owned a small window treatment store in Dubai. I’ve been using Google Slides for two years to create mood boards for our client house design, and I think now I had very little idea about all these interesting pieces of stuff you have described so easily. It will definitely help us to grow our business and most of all client satisfaction. Thank you for sharing your knowledge with us. Loved it. Peace
That’s so great to hear!! Happy to help xx
Thanks so much, this was so helpful! I learnt a great skill unexpectedly while drinking my morning coffee. Great start to the day ?
This looks great…and simple. My only question is where do you keep the information/links to the items you put in each slide? I’m thinking I would forget where I found them if I didn’t document the website/store.
Such a useful tool and free to boot especially for us amateurs. I want to confess that I am a developer but I have had much trouble understanding how photoshop works. I find it taxing to my brain cells. This really helps for noobs everywhere. 🙂
I am going to try my Google slides skills right away.
Well this is awesome! thanks for sharing the step by step details!