
Budget Ideas
Jess’ DIY Bench 2.0 – Her Solution To Her Ugly Electronics (Plus An Ask The Audience)
Les and Jess are at it again. For those who don’t know, Les is my dad and the carpenter hero to 99% of my room designs (the bench here, the banquette and counter here, and peg rail here). We’ve been building things together for as long as I can remember, and while it’s not always smooth sailing (you could say the apple doesn’t fall far from the stubborn tree), they are by far some of my favorite memories. ANYWAY, when I was starting to design my current living room, I knew there had to be a custom “Bunge Bench TM”. It’s the law. Again if you are newish here, this is the wrap-around bench I designed for my last apartment that was perfectly built by DIY DAD, Lester Bunge.

Not only did I love it with all my heart, but y’all were also pretty into it too which made it even more special. Unfortunately, there wasn’t a spot for it in my new place so it now lives at my dad’s which feels right given that he built it. So aside from the fact that it wouldn’t have fit, I also needed a bench that was more of a cabinet and here’s why…

AHHHHH. MY EYES. I get extremely bummed out when I have to see lots of electronics and cords. I know I’m not alone in this so I wanted to come up with a pretty way to only see them when necessary. Is a cabinet bench a new idea? No. But finding one that met all of my measurement, style, and potential financial limitations was going to be ummm…impossible? I should also mention that my living has only two outlets meaning I had only two spots where these technological terrors could live. One being on the wall you see above and the other on the wall under my non-turret window which you will see in a sec. A cabinet bench just made the most sense.

Now, let’s revisit my “office” for a minute. I am so happy with how it turned out. I think it balances bold and soft, earthy and luxe, and classic and modern. Those were my main goals and my biggest stresses:) I want to continue that through the space, bringing in rich colors, patterns, and materials.

So here is where this “cool” electronics storage cabinet bench will live. I love the idea of some extra seating (I need to get a cushion made so that will be new for me), I love that the outlet will be covered, and of course, I love that my electronics will be tucked away nicely. But what will it look like???
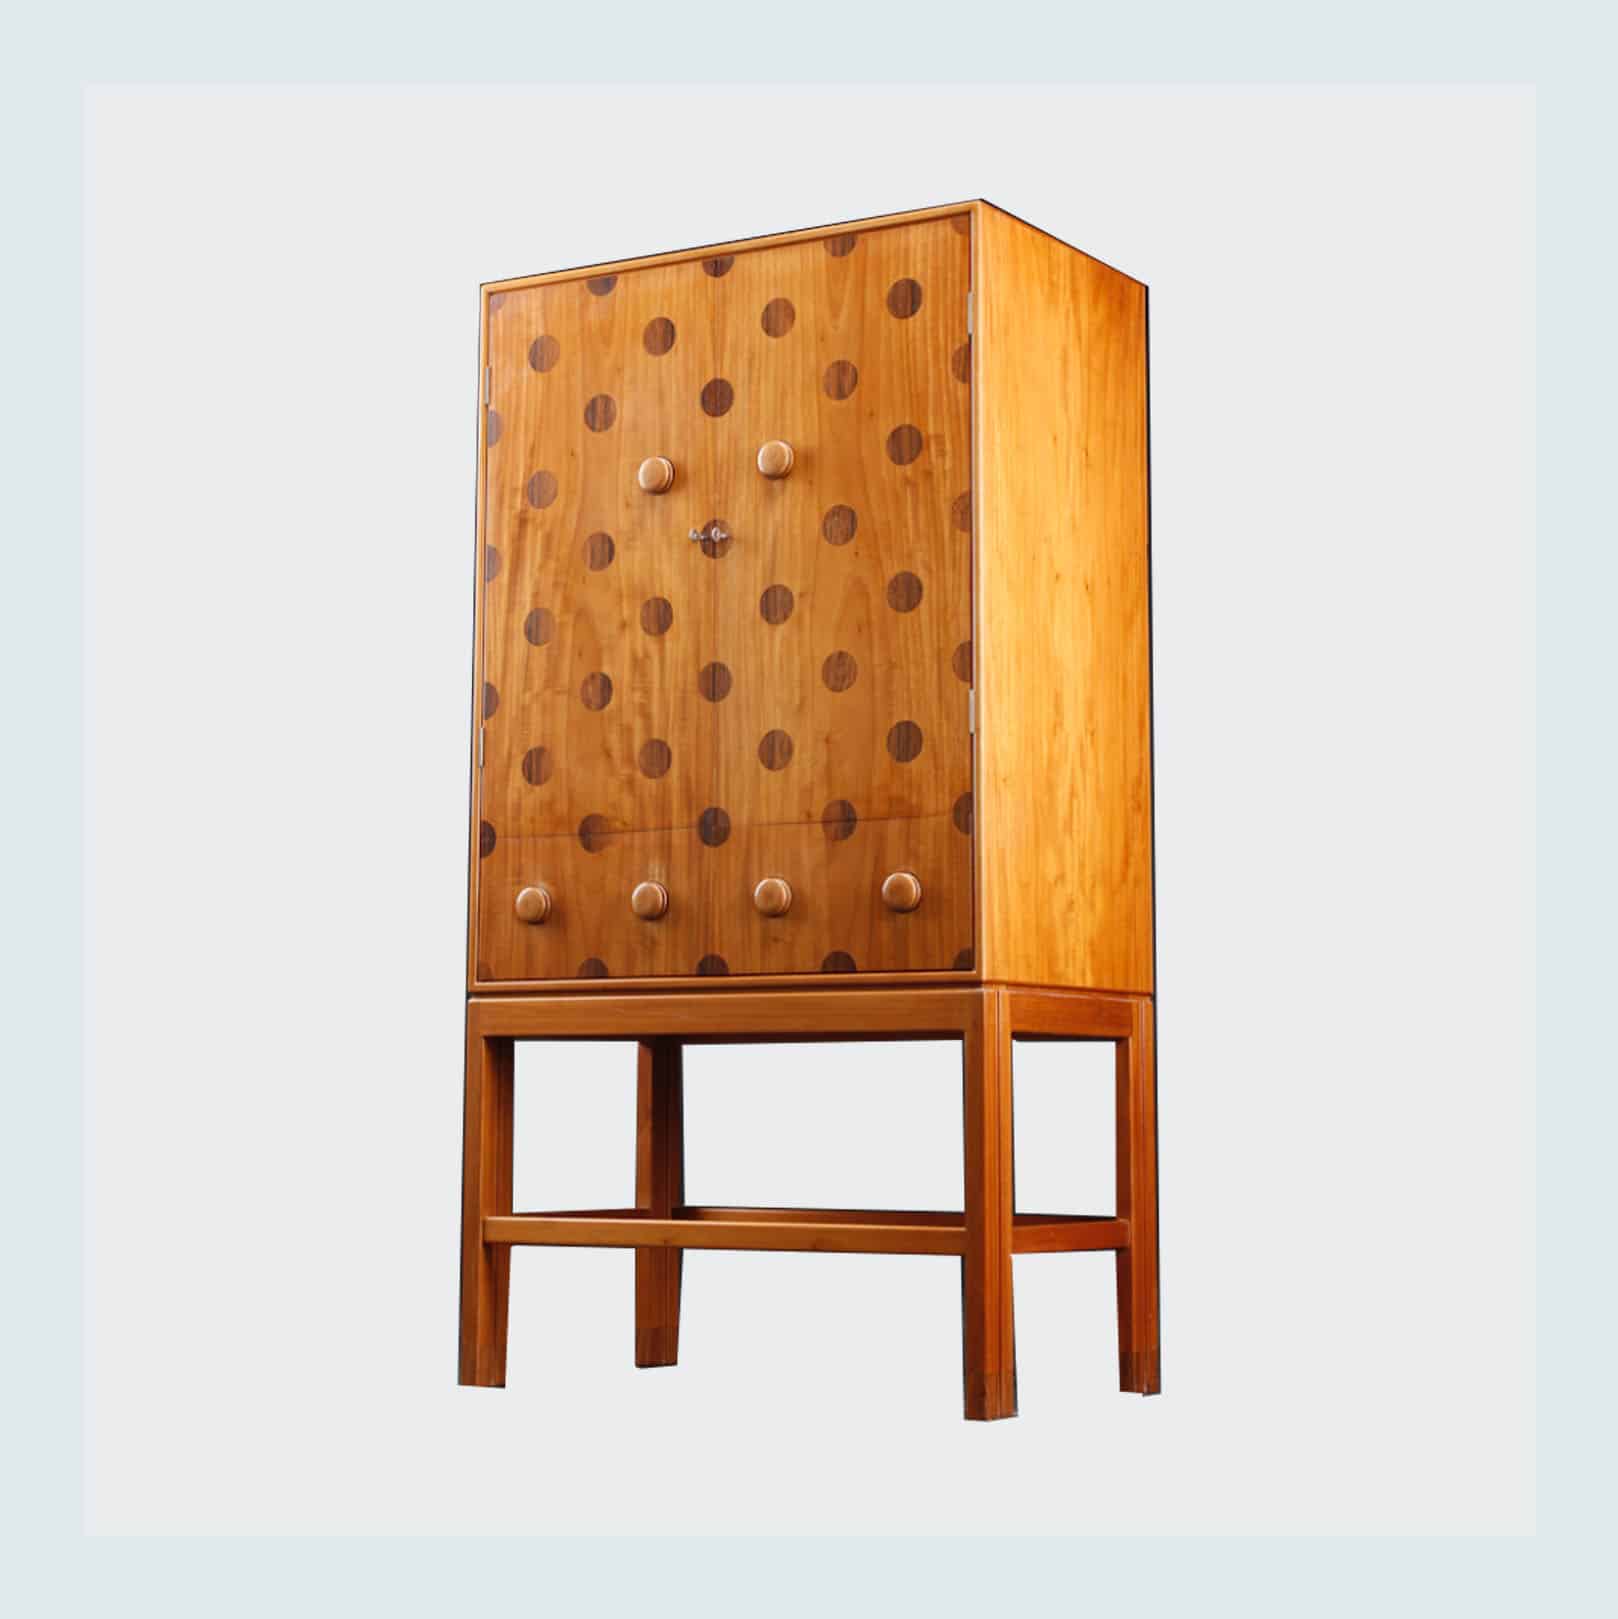
If you read this post about what we would buy if money were no object then you know this $52,000 Gustav BertelsenIf cabinet made in 1946 is at the top of my list. Y’all, there are only two known to have been made. I’ve never really been a polka dot gal but I do love circles so this speaks to the deepest parts of my design-loving soul. What I decided I am going to do (or try to do) is make my own highly-inspired version since I’m short about $52,000. And when I say “I make” I mean “me and my dad make”. I called him up, sent him a VERY basic drawing, the requested measurements, and we were off.

I would like to mention now that this is very much a process post as this is as far as we’ve gotten. My dad built the frame, leaving me to cut the doors, and finish sanding everything…about two months ago. Between being nervous I would mess it up (wood still isn’t cheap) and laziness, I did not do what he asked. Luckily, I conned him into visiting me two weeks ago where we finally did those things.

This notch is for the power strip to my computer and lamp. That was my dad’s idea which is why we make a great team. I’m more form and he’s more function.
But now let’s talk stains and how I plan to make those perfect circles…

This was the stain I picked that I thought looked closet to the original cabinet…Varathane in Colonial-Maple. I think it’s too orange. Since the original wood was mahogany maybe their Golden Mahogany color will look better?? Any thoughts? I want it to be warm-toned to bring more warmth into the room but this doesn’t feel right yet. Also, I am planning on adding a sheen so that might change the look a little as well. Then we have the circles…
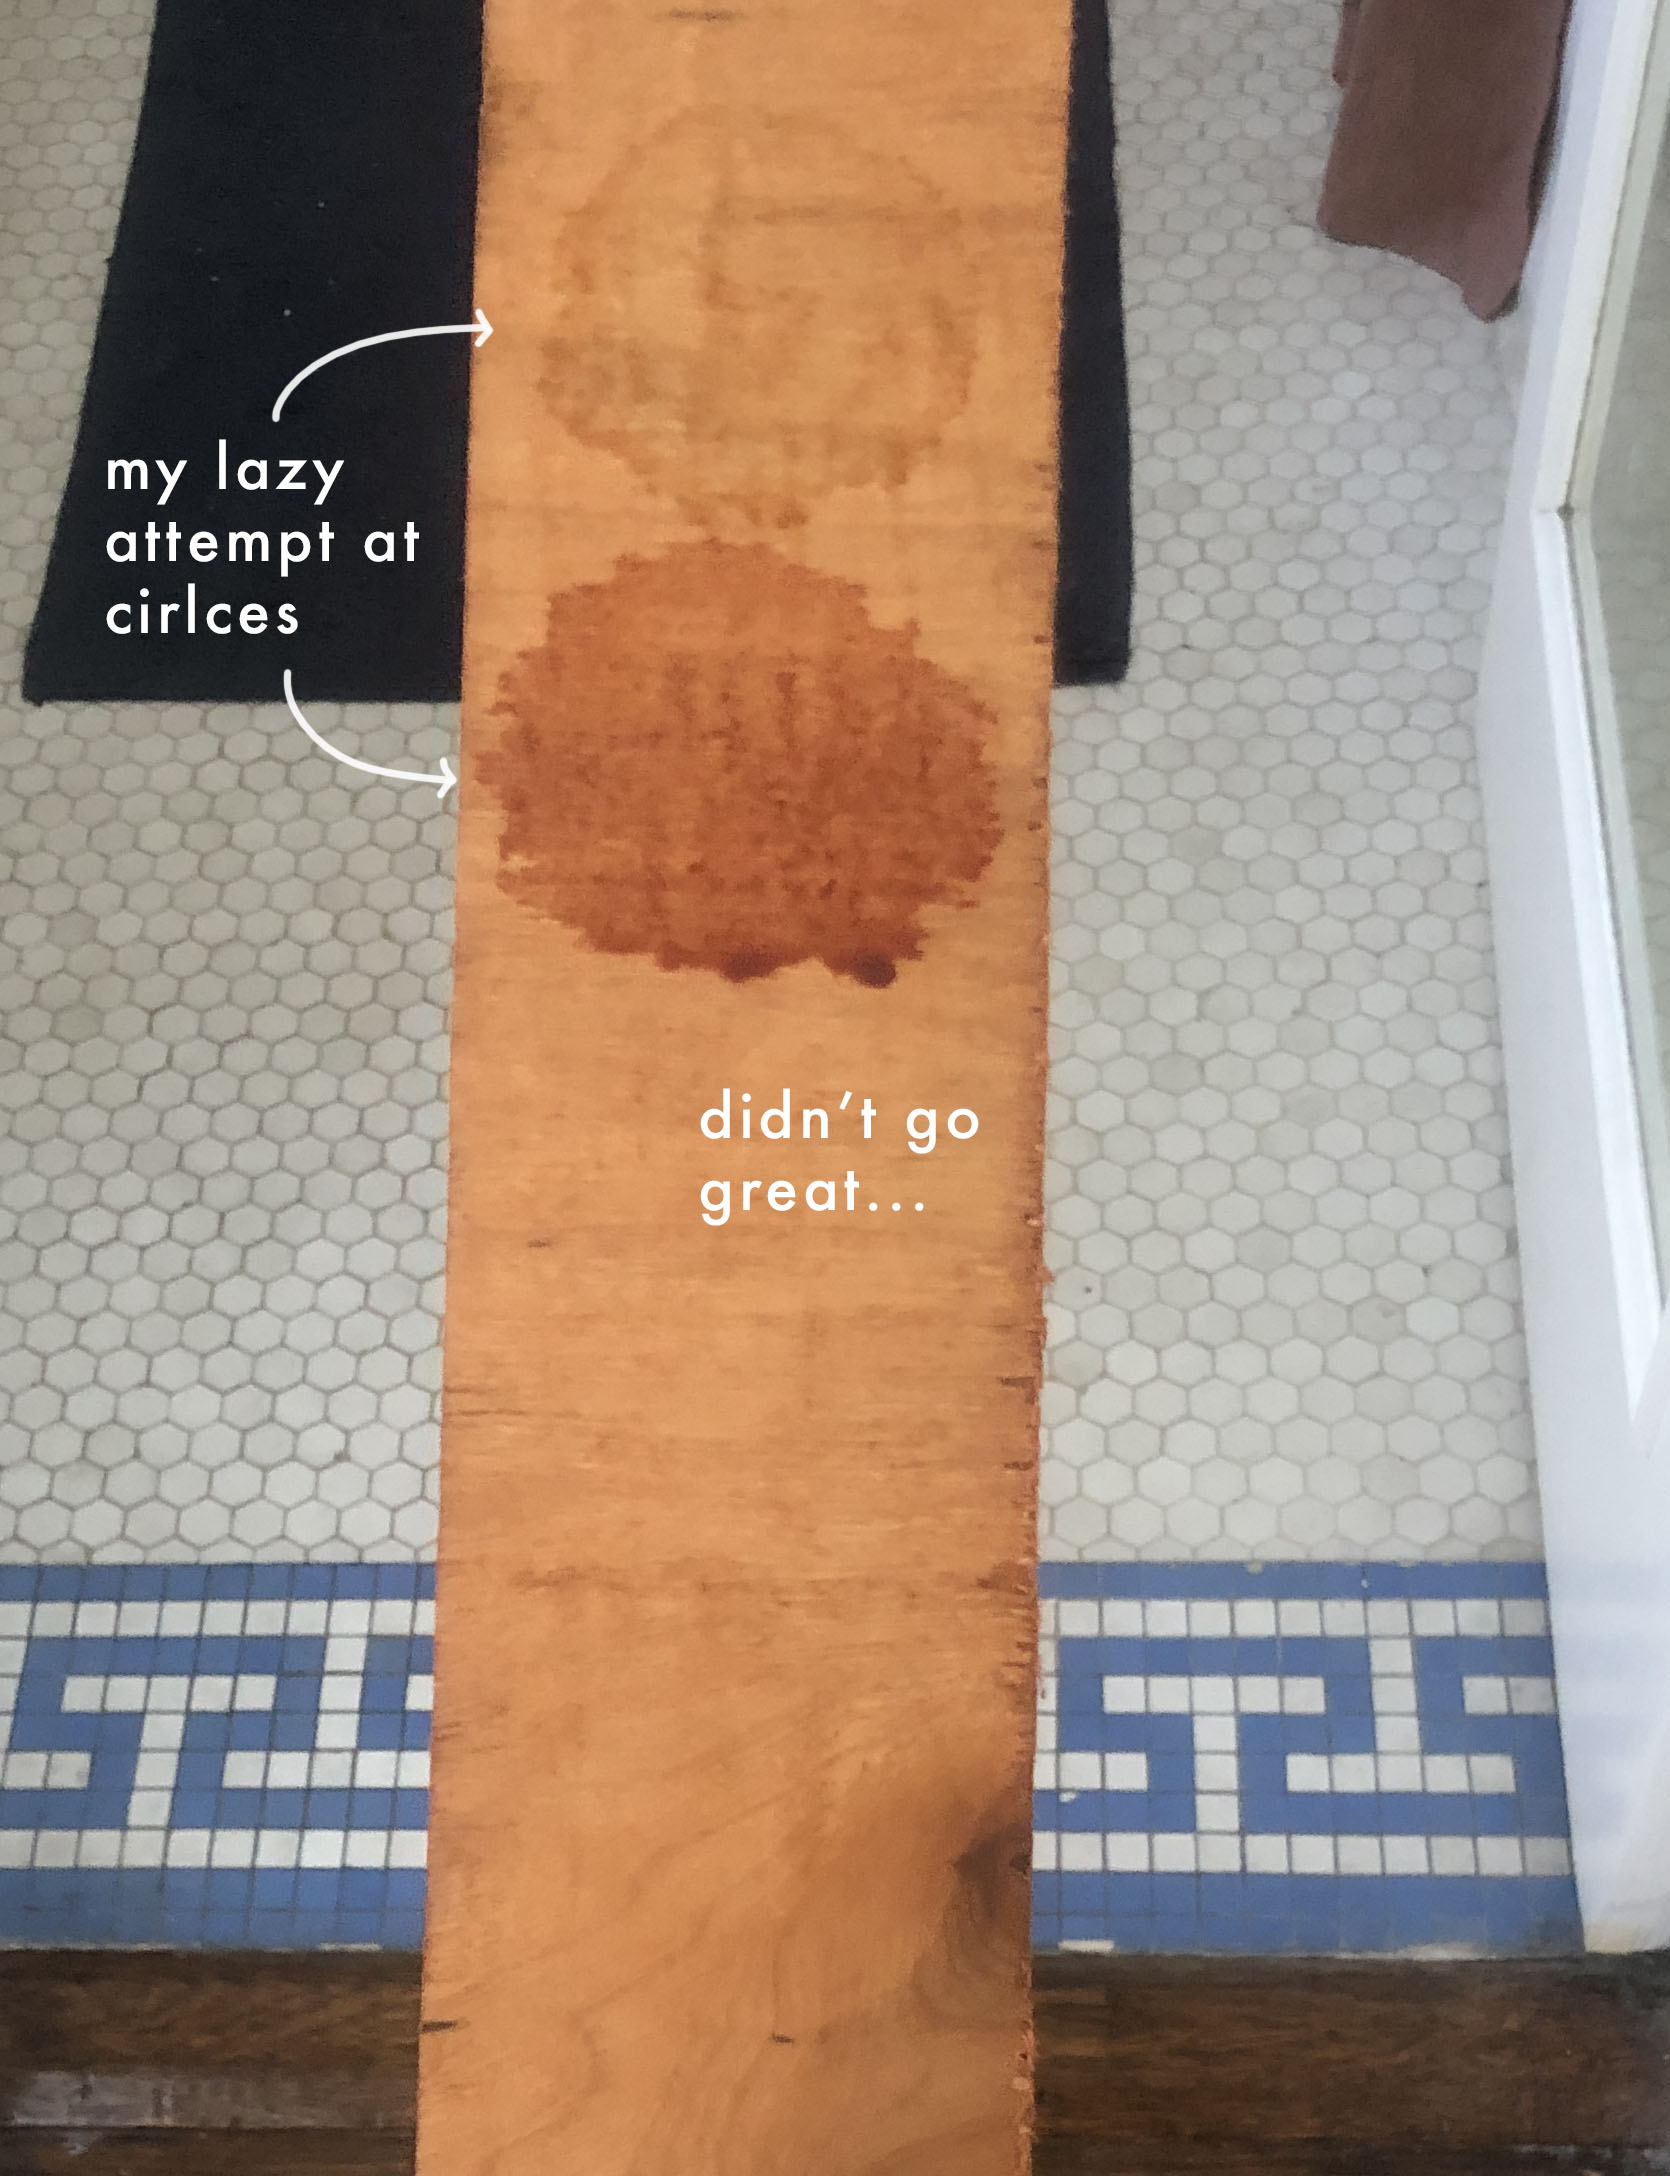
Hahahah. First off, the base stain was mostly dry but not 100%. Second, I haphazardly used a sponge brush to make those “circles”. The original plan, that my dad came up with and got made, was to use a custom vinyl stencil that had circle cutouts. Unfortunately, the circles were way too spaced out and the type of vinyl the company chose was waaaay too sticky. I was afraid it was going to mess up the wood. Dad agreed. Then as we were troubleshooting ideas I had a potentially great one. I could get a custom iron brand made! That way the circles would be perfect, dark, and I could even stain them if need be with a far less chance of any bleeding outside of the circle, right? Etsy has a ton of affordable iron brands so I don’t think it’s going to be too expensive to get made…I hope.
But PLEASE! If you have any ideas, experience, and/or tips for any part of the staining and potential branding process I am all ears! This is my first time doing this and I want it to look good. DIYs are too time and money-consuming for them to come out bad!
The next big decision that I’m figuring out is hardware.


Aside from the shape and structure of the cabinet, hardware is where I will likely diverge from the original piece. Originally, I thought I would do a version of the large circle maybe wood, maybe not, but I really love the look of these micro knobs that DISC Interiors made for this incredible nightstand. I can’t get enough of the entire design. Using a knob similar to this could lean into that balance I was talking about earlier since that pattern is so big and bold.


Then there’s this incredible piece by Hachi Collections. I love those medium chunk brass knobs! Plus they add an additional layer of “custom” with how they are inset in the wood. But then…
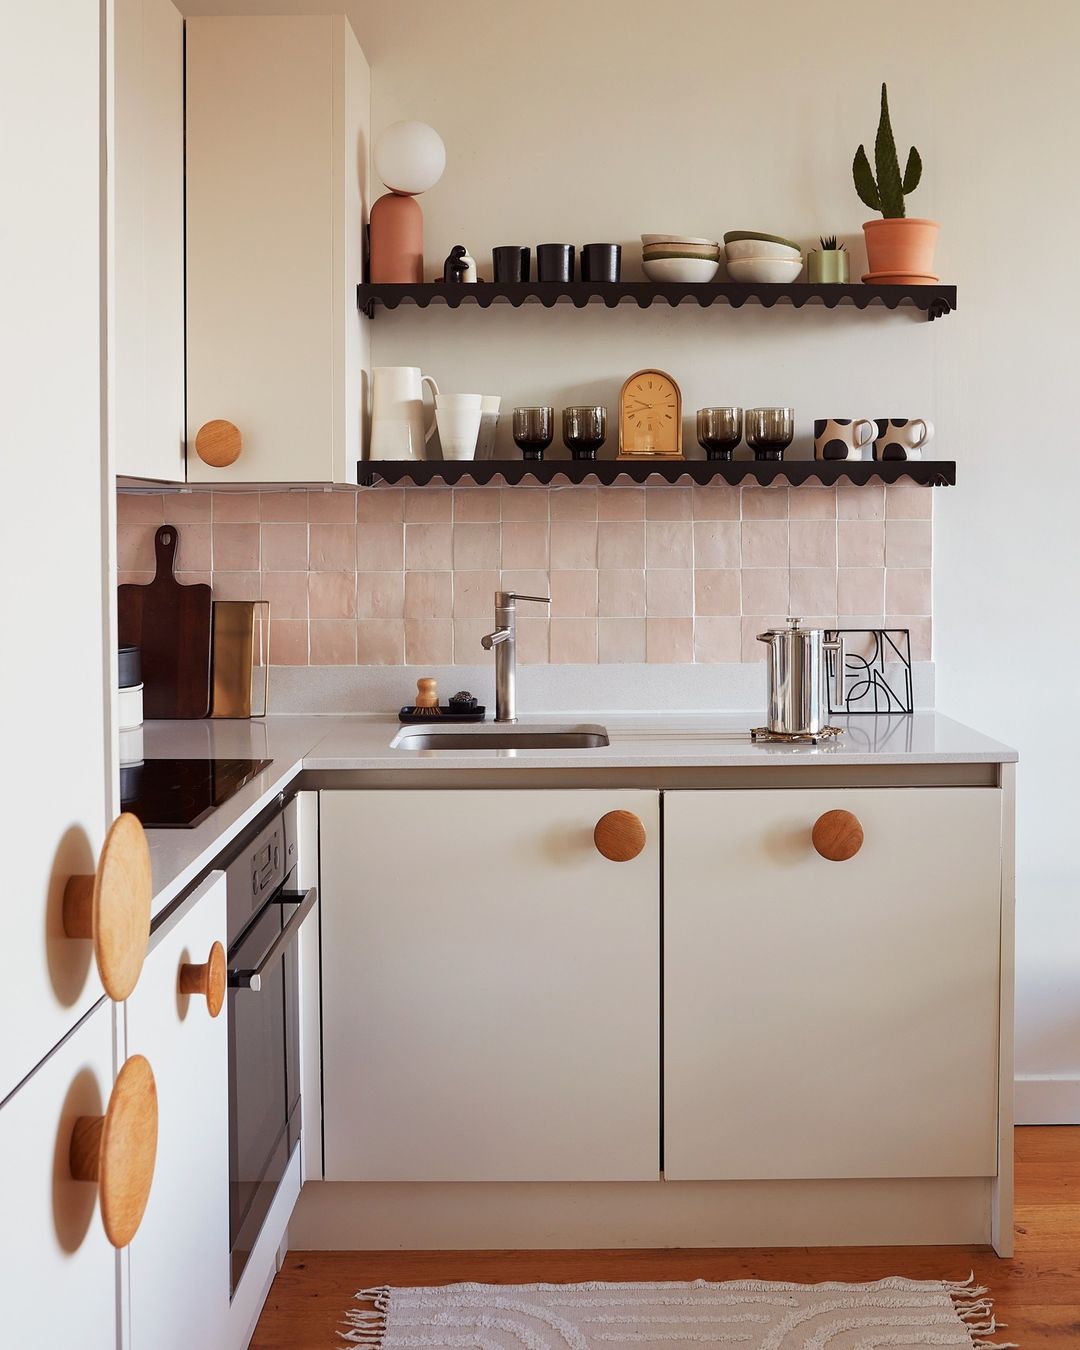
…I look at these big wood knobs and think maybe I should just do something like that. I know it will totally work (and are probably cheaper).


Then there’s the option to still do a larger circle but mix it up. I couple go for a more modern look with something like the black ones on the left OR try and find a sick two-toned option like the ones on the right.

I just stuck this photo in here because I love those handles so much and has me thinking outside the box. Not sure what will come of it but it’s fun to think about.


My last hardware idea is no hardware at all! OOF I love these double finger holes by Atelier Steve. So simple, so special, and so affordable.
So as I think about the hardware I need to think about hardware placement too. I thought it would be fun to talk through where I started with the door design, where I ended up (which you already saw earlier), and the hardware placement options I’m considering.

This was my initial plan. Two inset doors that swing out from the center with two knobs. I liked the simplicity of it since the circles were going to be visually very powerful. But in the final hour, as my dad was cutting the doors, I made a different decision…
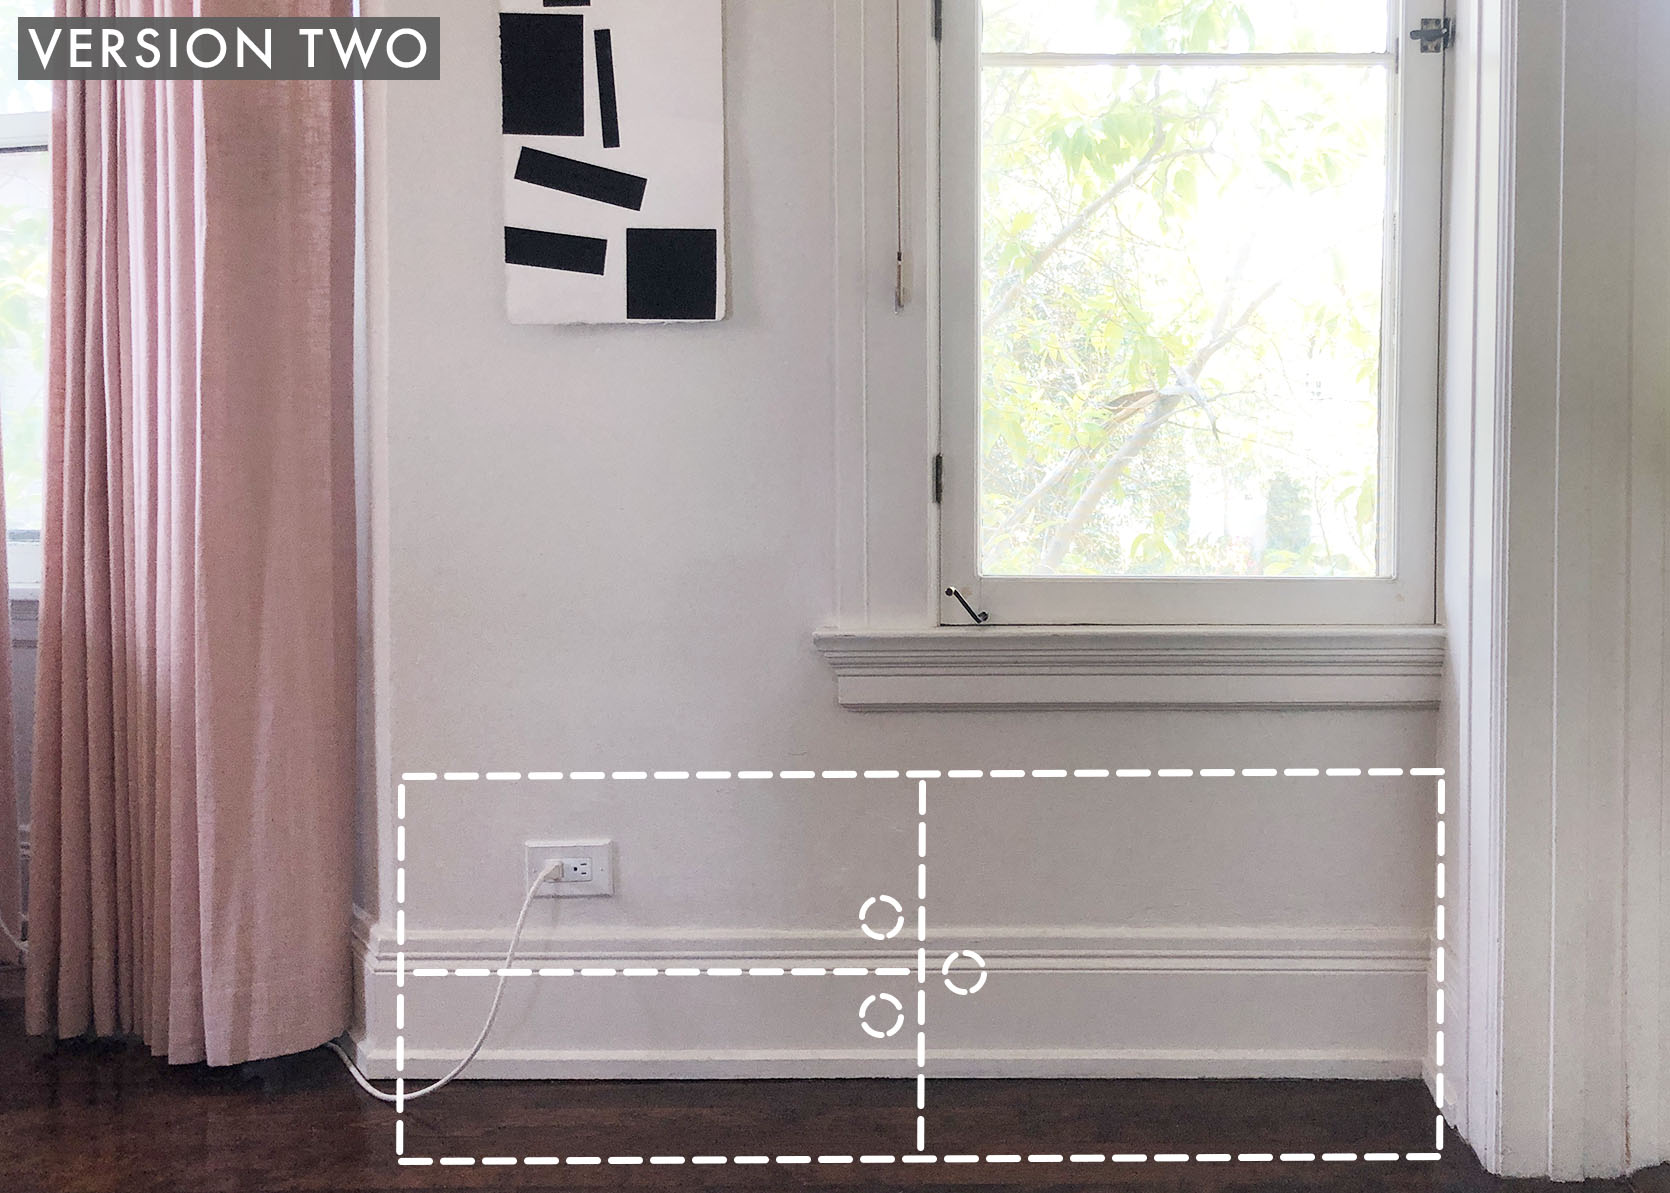

TADA! Three inset doors. I thought, “let’s take this up a notch!” So I had my dad cut one of the doors in half, horizontally. We even added a shelf (that was his idea, I think) so that there was an actual reason for the two skinny doors. I would have been fine either way but again, some added function never hurts.
But now we have more options for knob placement. Knob size will obviously play a factor, but I think that versions two and three are my favorite but I’m open to all of them.


What is your vote?? I won’t be opening and closing these a ton so don’t worry too much about the placement being near the edge. In the meantime, let me show you some actual hardware options I’m looking at.

1. Round Wooden Coat Hook | 2. Mid Century Ball Knob Brass Hardware | 3. Black Brass Knob | 4. Solid Brass Cabinet Knob | 5. Tall Mushroom Cabinet Knob | 6. Knurled Knob | 7. Teakhook Knob | 8. Teardrop Door Pull | 9. Gateway Ring Pull | 10. Larkin Finger Pull | 11. Solid Oak Drawer Pull | 12. Dish Knob | 13. Circle Drawer Knob | 14. Solid Brass Cabinet Knob | 15. Round Cabinet Knob
I love #2 since it’s real small and works with the micro look but #8 and #14 are great for that too. #1 and #15 would need to be stained and I’m not 100% into them. I’ve loved #6 forever and love that it comes in a matte bronze. That could give it some instant age! What do you all think? Do any of you have cool vintage hardware resources?
So that’s where I’m at in my cabinet bench process and my secret ploy to get all of y’all’s advice! Can’t wait to chat in the comments.
Love you, mean it.


Just for giggles I Googled “how to thicken wood stain” and quite a few ideas came up. There’s also a gel stain that might work (although I’ve never used it)? In the paint section at craft stores there are sponge paint applicators, or “dabbers”, that make perfect circles with paint. Those may work for making a perfect circle with stain? I can’t wait to see what you come up with.
My husband tried a gel stain on some shelves in our son’s room and found it very difficult to work with. The shelves came out much darker than we wanted and terribly streaky. That being said, you would be sort of “stamping” circles, not trying to get even coverage on a shelf, so maybe it would work just fine?
Thanks for the info Kelly!
Emie, thank you so much for doing some reaseach! I’ll look into gel stain as an option.
Do you thinnly chisel out or drill out your circles and inlay a high quality veneer or wood “pucks” of a different stain color? I am certainly no woodworker, so I may have naively suggested the stupidest idea ever.
not the stupidest idea ever because I had the same idea (can’t have 2 stupidest ideas ever if it’s the stupidest, right?). I was thinking of the drill “bit” that cuts the circles on a door for the door knob. Cut the circles and back with a thin sheet of wood stained to the color you like. Maybe one circle on each door has an undercut so you could use it to open the doors?
I was thinking this too. Or, stain the doors darker, take a big sheet of veneer in the golden color, and cut holes in it? Would add texture, too much?
Kristen, that’s definitely a great idea! But when we were cutting the doors, this wood chips SO EASY along the cut line. I think it would end up creating a lot of problems. If we had a nicer/more solid wood I think that would be an awesome way to go!
okay. i seriously LOVE any reason to look at your old apt’s bench situation. i’ve seen it so many times but get so excited every time! also, now any reason to look at your new desk situation. my eyeballs are so happy. that $52,000 vintage cabinet is soooooo beautiful. i love polka dots and i love good wood grain. so it’s pretty much my favorite. i like version 3 for knob placement. all of the knob options are awesome. i kind of love the finger hole idea.
Thank you so much and also for your input!
Lol @ “I did not do what he asked”.
Love this plan! Can’t wait to see what the creative Bunge team does!
lol thank you!
Finger holes…if you ever plan on sitting on the bench then the holes will be the most comfy for legs. Also a CNC machine could help with your polka dots…if you know someone who has one. You could do a veneer or epoxy to fill your polka dots!
Libraries here have 3D printers, laser cutters, Carvey CNC machines, sublimination printers, and other machines to use. Lots of rules of course, but something you could look into.
Kj…you are a font of useful knowledge!!! Seriously!?
I just looked up the ones in LA and the machines are too small but that’s so cool to know about!!
Something to definitely think about! Thank you!
The comment from Jo on finger holes being most comfy for a bench gave me an idea. OK, picture version 2…but instead of knobs, you have 3 circular finger holes for each of the drawers, and then on the other side you would have a total of 7 circular holes. Three each would line up with the three on the drawers and then another one that lines up with the seam/shelf between the drawers. So it would be two parallel horizontal lines of small circles, kind of close together. Almost like two rows of stitching. I don’t think I am describing it well, hopefully that makes sense?!
I was thinking something along the lines of “what if the polka dots WERE the knobs somehow.!?” -is that kinda what you’re suggesting..?
in other words: fusing form with function : )
This is a great idea! I was concerned that there is little to no ventilation and my experience at our office is that those tech devices tend to heat up .
Great point, Ellen! Love all this!
I’d have to see how it would all lay out but it’s not a bad idea! thank you!
This bench is going to be awesome, and I’m definitely Team Fingerholes.
Thank you!
Such a great, functional, stylish idea! Les and Jess, “it’s the law”! On the design side, have you considered photoshopping a cropped version of your inspiration piece into the photos? with a cushion on top? I only bring this up to be a “wet blanket”. 🙁 I think, personally, the polka dots may be too much when you add the awesome cushion, and the hardware. On that note, if it will be a bench, the hardware can’t stick out, so the fingerhole idea does make sense! or very lateral hardware to leave room for the seated person’s legs in the middle. Right now I think the view of the piece is primarily as the fabulous functional cabinet that it is, but if it is also a bench, a good time to view it that way. With that in mind, I would nix the polka dots, or maybe go for one big bold inlaid polka dot (out of a darker wood?) in the center of each drawer, or something equally cool that is inspired by your dream piece, gets in your rounded shapes that you love, but is considerably less busy and won’t compete with a cushion so much visually. I’d… Read more »
Thanks for your input! The cushion will be super thin and solid so I don’t think it’s going to be visually too much. And I totally hear you on the knobs but since the bench is fairly narrow, it would be almost impossible for someone’s legs to hit one (unless it was a child whose feet couldn’t touch the floor:)). But again I really appreciate it and will think on the cushion!
I would paint it the color of your wall but use the design and knows you love.
Knows not knows
Knobs
I really want to add some warmth so I’m pretty set on staining but for a different look that would be pretty!
Just want to say I love Les & Jess and Caitlyn & Brenda posts!
Thank you!!
Your casement window is so charming. I recognize the latch and butt hinges, but what is the iron piece on the lower left? It almost looks like a shutter dog? Is it some type of casement stay?
It’s the removable window crank handle!
Omg I grew up with those! Had those cranks on every window in the house, haven’t seen them since. ?
I love a Jess and Les project! A couple notes: Poly will deepen the tone of the wood, so likely will bring out more orange. Definitely try gel stain for your dots, but getting that perfect circle with any stain could be tricky as it will naturally bleed into the wood. I would suggest using slightly watered down paint for your dots then stain over that. I can’t wait to see the end result!
Yeah I would also caution against the possiblity of stain bleed, I don’t know of any way to get rid of that – sadly I don’t have another solution but burning the dots like you suggested sounds like a really great idea!!
Thanks, Lisa! I think the brand is still the top contender:)
Thank you kim!
I like the idea of using paint for the dots, or at least putting the dark stain down first, then the overall stain. I’m looking forward to all the trials!
One thought is to use glossy and flat to differentiate the circles. I don’t think shellac will absorb into the surrounding areas. If you like the idea, it’s worth a test!
Shellac can run too. It’s tricky.
Staining is just so hard!! Well at least I’ve made it hard;)
I like versions #3 and #5 for knob placement! Also – do you still like your banquet back cushions, or do you wish you’d gone with pillows that people can adjust to their liking?
Thank you for your votes! And those were in my last place but I loved them till the end.
The other thing to consider is airflow for the electronics so that they don’t overheat. It might be best to turn door #3 into a frame that has caning so that you let air circulate among the electronics.
there’s no back on the cupboard and a small space to allow for the molding. do you think that would be enough breathing space?
exactly and because of the floor mouldings there’s about an 1.5″ of gap space. hopefully that’s enough!
Will there be any kind of little leg? I think it would look more finished with something. It wouldn’t need to be big, just a little something to get it up off the floor.
Since I want a cushion I don’t think there’s going to be enough space for any kind of leg.
Think about the pull or pull hole placement in relationship to the dot pattern. In the original the pulls are all in line with the dot pattern. It makes for a much more intentional design.
I agree 100% Ali, and was going to leave a comment regarding that.
The circle pattern placement is really something that needs to be well thought out, and I think may end up being too challenging, especially since there are now 3 doors and not a symmetrical 2 doors. I think nob placement will likely be dependent on the circle pattern you design.
Love that you and Les are making a great custom solution to a very annoying problem and can’t wait to see the final result, which based on your previous teamwork, will be fabulous!! 🙂
Agreed. The knob will likely be smaller so I’ll have to really plan it all out so it looks ok:)
It also looks to me like the knobs are the same diameter as the dots and form part of the overall pattern as well as being functional. That’s part of what makes that piece so appealing – form and function.
I like version #2 and then #3 for knob placement.
Thanks for your votes!
Version 2! Cluster them, it will be easier to know which way to pull the doors. Centered knobs go well on drawers, but not so much on doors.
I was thinking I might want to break the rules a little and since I won’t need to open them very often I’m more willing. But I do love version #2:) We’ll see!
I agree about ventilation if you’re going to have electronics stored. But if you are in love with the dot idea you could cut the dots into the door with a circle bit and have dots and ventilation. If you still want to go with the stain dot look, you could try a stain pen. The kind they use to “touch up” nicks etc… it may give you more control. Maybe raise it off the floor in that case and cut holes or slats for ventilation through the bottom?
Definitely an important point but because of the floor mouldings there’s about a 1.5″ of gap space. fingers crossed that’s enough!
I have used clear contact paper for DIY screen printing. Maybe that would work here as well?
o that’s interesting! thank yoU!
Dear Jess, I have used “betún de Judea” with good results, I think it is bitumen judaicum in EN. It is a very good tint, the more you use the darker the color, you can use it diluted, and wax over it when is it died.
I’ll look it up! Thank you!
Go Les!!! Fancy a trip to Australia?!? ?
Okay … knobs – my votes are #2 & #14. Sleek, understated elegance.
If you’re fixated on trying to replicate the furniture piece, I suggest a stencil, but maybe cut your own if you find the ready-made ones too “sticky”? No way would I do branding, because it can go terribly, terribly wrong. Spesh if you haven’t done it before (trust me, K?!).
However, I have two alternative, special and creative suggestions:
Use a hole-cutter (I’m sure Les already has one) and cut holes! Then either –
A). Glue pieces of rattan behind said holes (natural or stained),
OR
B). Glue a thin piece of dark-stained wood on the back.
This would make it a Bunge Original instead of a copycat and would add additional texture which is always a good thing.
Whatcha think, Team Bunge??!???
yass, girl!
?
Great ideas Rusty!! 🙂
I was thinking of “A” myself, but I really love your “B”!
Rusty, I was thinking of your idea B. It would add texture and allow ventilation for the tech.
Thanks for all the suggestions! The problem with cutting holes is that the particular wood chips super easy. When we cut the doors it was very hit or miss. I don’t want to take the chance with the holes looking bad because the edges get messed up. It’s a reallll bummer. I’m going to get a brand and just do a lot of trials before I use it on the actual piece.
You tape the wood first (like you do when drilling into tile/glass), then, begone splintering!!
It works! I’ve done thiswith thin plywood which can be tricky. (Well the “I” was someone else, but … we did it).?
I like KNob #8, version 2 placement
Thanks for your vote!
I think what works about your inspo cabinet is that the handles are the same size and shape as the colored dots and they fit into place in the pattern. Have you drawn out your pattern of dots on the doors and played around with different sizes and colors to see how well you like them? I don’t really like the huge ones, and I also think the tiny ones might not achieve the desired effect. I like the brassy ones you show in the second example but I still think you would want to place them with the dots to see how you like them before you decide? How fun, though, and based on your prior projects with your dad, I predict it will be a huge success!
I’m not really too hung up on the handles being the same size as the knobs but I will definitely be testing the sizing of the dots before I make any permanent decisions:) Thank you!!
Oh, also- I agree with others that cutting out the dots m ight be easier to achieve, and then you can play with leaving them open or putting something in front or behind them. Or simply glue on cut-out dots. And I do think the stain you show is too orange!
The problem with cutting holes is that the particular wood chips super easy. That’s why I’m trying to get creative:)
I’m on team skip the dots, but I’m sure I’ll love whatever you do. I love the rest of the room so much.
thank you:)
I had an unfortunate encounter with tea lights that were on a wood floor and left darkened burn marks on a stage in college. The circles were perfect and based on how long the tea light had been left on the wood and how hot the metal was, the color was more or less saturated in places. It’s a total gamble but I wonder if this approach could possibly be a solve for the stencil situation? Best of luck with bench 2.0!
Oooooh that’s very interesting!
I would get some small sample bottles of Rubio Monocoat for the dots! It’s about the consistency of maple syrup, I would say, and you do have to wipe it in, but much more even in color and way easier to apply than other stains I’ve used. And it absorbs and seals into the wood, so a second color on top would not change any wood already sealed. I think you could possibly mask off the dots, seal the background with a light color (or natural coat), and then the darker stain could get rubbed into the raw wood on the dots and not mess with the sealed parts. I THINK. it would be fun to experiment!!
I’ll look into it! thank you!
You didn’t talk about ventilation with all the electrical equipment in an enclosed space. You will need venting through the back or with the finger holes, either way, it will be warm inside the bench.
There are floor mouldings that create about a 1.5″ of gap space in the back (which is open). Fingers crossed that’s enough!
Did you ever watch a TV show where one of your favorite characters only showed up once in a great while? That is how I feel about Les Bunge…..just when we think he didn’t renew his contract…..he’s back and we all love
a Les and Jess project. I think after reading the comments that Rusty is on to something with her ideas
and with cut out circles you can change up what you put on the back side so the circles could be dark stained pieces or cane or just about anything your heart desires.
You just have to adhere them from the backside with something that would allow you to pop them off when you wanted to change them. I do love knob #2.
Let’s offer Les a contract show that he shows up a little more frequently.
First off, Les Bunge is going to LOVE that you said this and I guarantee will say something along the lines of “Ya, I’m a star” haha. Secondly, and unfortunately, The problem with cutting holes is that the particular wood chips super easy. Rusty’s ideas were great but sadly I don’t think possible:(
#Tape.It
I like Rusty’s idea – and it’s the closest to the original – which if you look closely on the photo at the link you included, is not stained circles, but inset pieces of contrasting wood (probably veneer?).
The problem with cutting holes is that the particular wood chips super easy. I would love to be able to do this.
hhmmmm, is changing the wood a possibility..?
I can not stress enough #2.
I’m just one lady on the internet who has no influence who has spent the last 3 years building a house on Mt. Desert Island, ME and has spent every waking moment making design decisions, so, what do I know?
I can not stress enough,
#2.
First off, we ALL have influence!! 🙂 And I do really love #2
What about using a hole saw to make the finger holes — version 2 is my favorite — then painting the edges of the holes — perhaps black or bronze. Of course, you would have to photoshop the pattern and then trace it carefully onto the doors because there is no going back from cutting holes…. If you want polka dots, they could be done the same way, but version 2 finger holes might not work with an all-over polka dot pattern, but the polka dots would then be the finger holes for opening the doors.
The problem with cutting holes is that the particular wood chips super easy. I fear that a hole saw is going to create a lot of chipping that will make it look even more DIY than it already is:) I wish I could!
These might end up looking super childish, but here are a couple ideas for polka dots that haven’t been mentioned yet:
1) get removable wall decals in circle shapes and stick them on
2) use a protractor to draw a circle, then color it in with a pencil or charcoal
3) search for “wood veneer dots” on Google and use those
I like the idea of combining the “branded” polka dots with the cut-out finger holes. In other words, plan / lay out the polka dots so that three of them land where you want the finger holes to be–and then cut out those three dots. I think this would look awesome!
You might try frisket film for making stencils. It’s designed for art use, and I’ve used it for watercolor on paper and had good edges and it didn’t damage the paper coming off. I usually adhere it to a glass surface and cut it with an xacto knife.
I haven’t used this myself, but there are also compass cutters that should help you cut a perfect circle.
I’m wondering if you could score the wood with a blade in the shape of a circle to keep the stain from traveling beyond the circle? Love the inspo photo! I’m currently designing a new bathroom vanity and love seeing all the knobs and case piece photos. 🙂 Can’t wait to see how it turns out!
I have stained loads of things (old furniture, my kitchen cabinets, shutters on the front of my house) and all I will say is the brand of the stain really matters. My favorite is General Finishes. DO NOT Use minwax it is garbage. Good luck, you have great taste in furniture!
Suggestion 1, stain and glue on pre-cut plywood circles such as (you can tape them on first to see if you like the effect)
Or suggestion 2, stick on pre cut vinyl circles and then spray on a tinted poly, then remove the stickers to expose the unstained wood underneath (if it looks terrible can always just sand it off)
Or suggestion 3, use a circle cutter to cut into the wood just a few mm (not really sure if this would work but you could try on a scrap piece of wood) and then stain inside that circle, hopefully your eyched boundary would keep it from bleeding.
For the window bench. Paint the circles first. Next stain with pecan for the golden highlight color. It will fill the wood pores and prep the wood for the next step. Don’t wait for the pecan to dry. Wipe off the excess. Then, generously( it should puddle) apply the gunstock and very quickly wipe most it off with paper towels ( Bounty absorbs quickly and doesn’t leave pieces behind). You work the gunstock in sections and as long as the margins stay wet it won’t show.
3 or 5!
Masking fluid (liquid latex) might be an option to consider for staining the circles – I’ve only used it on paper, but there are reviews online for peel-tek on wood used with stain – best of luck!
Oooo, so fun! For the circles what about watered-down paint (“white”wash/graywash or red-ish-wash in your case)? There are also tinted waxes. Kate Scott and Transcend Furniture gallery on YouTube do a lot of this type of treatment. For knob placement, I would draw the circle placement on your digital mock-up to see how the extra knob element is going to affect the composition. The original inspiration is so clean bkz the knobs are one of the circles. There a half circle knobs that could straddle the center door line. Or some sort of cut-in edge pull could compositionally become part of the door edge and interfere less with the pattern.