
All Things Renovation
Mountain House Update: The Kids’ Bunk Room & A Genius Wall-to-Wall Carpet Hack
Progress has been made on the “bunk” room in the mountain house. Reveals are about to begin (TOMORROW!!) but don’t think you can just show up tomorrow without the back story of this room (above photo is just another progress, OBVIOUSLY). It would be like reading the fourth Harry Potter book without having ever touched the first three. You need the tale of woes and heartfelt plight in order to root for the room. Also how else are you going to learn about Brian and my second biggest “mountain house design debate” right behind the wood ceiling? One must read on…
The kids’ room started out as the “master,” below.


It was a big room, with the largest closet ever, no windows and a finished attic above it only accessible by a pull-down terrifying ladder in the hallway. We had to completely reconfigure the space, moved both doorways, got rid of fireplaces, added stairs, added windows, squared off all the corners, replaced the carpet…geez, I’m only now realizing how much work it was.
The Carpet.
I think it’s important to note that this is my first foray into wall-to-wall—the jeggings of flooring. Oh, folks. When you find the right wall-to-wall carpet (and then put 2″ memory foam underneath it) it’s like discovering that “pajama-level-comfortable” outfit that you can actually wear to your corporate job. You feel like maybe you just created the genius hack that no one else has ever thought of.

The house had all wall-to-wall carpet apart from the kitchen and some baths, and frankly, it was WONDERFUL. Once you experience that carpet comfort, it’s hard to go back to cold. hard. wood. So we chose to do carpet in the kids’ and upstairs guest rooms and then in our room, we have the biggest, thickest rug ever that I’m obsessed with. But the main rooms, living areas and hallways are all hardwood.
But the “debate” didn’t stop just on a “yes” or “no” to do carpet in the bedrooms. As you can imagine, the best carpets that fit our casual-mountain-Scandi vibe were low pile and more simple and expensive. We didn’t want a beige poly plush for this house (although we used builder grade in last week’s secret room reveal and it’s great). No. For my intro into wall-to-wall and for this house, I wanted something special that made my heart respond with a happy beat. I wanted low pile and sophisticated, Brian wanted our children to be able to walk on what felt like a heavenly cloud made of whipped cream and feathers.
You’ll see more tomorrow, but we decided on Stark’s Treemont Stria in the indigo finish and put a 2″ memory foam pad underneath it. The result is indeed HEAVENLY. The memory foam does double the cost of the pad (and make sure your doors have clearance for it), but it’s basically like giving them a padded room, but it looks all sophisticated with nary a ’70s shag vibe.
The Windows.

This room had no natural light and that’s unacceptable. So when we went to put them in, we had to place them awkwardly due to the roofline of the kitchen below. So as you can see, we have two high small ones, with two lower bigger ones (sharing the same header height to help it look a little more intentional). These windows are casement with window locks, and to be placed between load-bearing studs, so while it was a bit tricky, I’m so glad we did.
The Stairs.
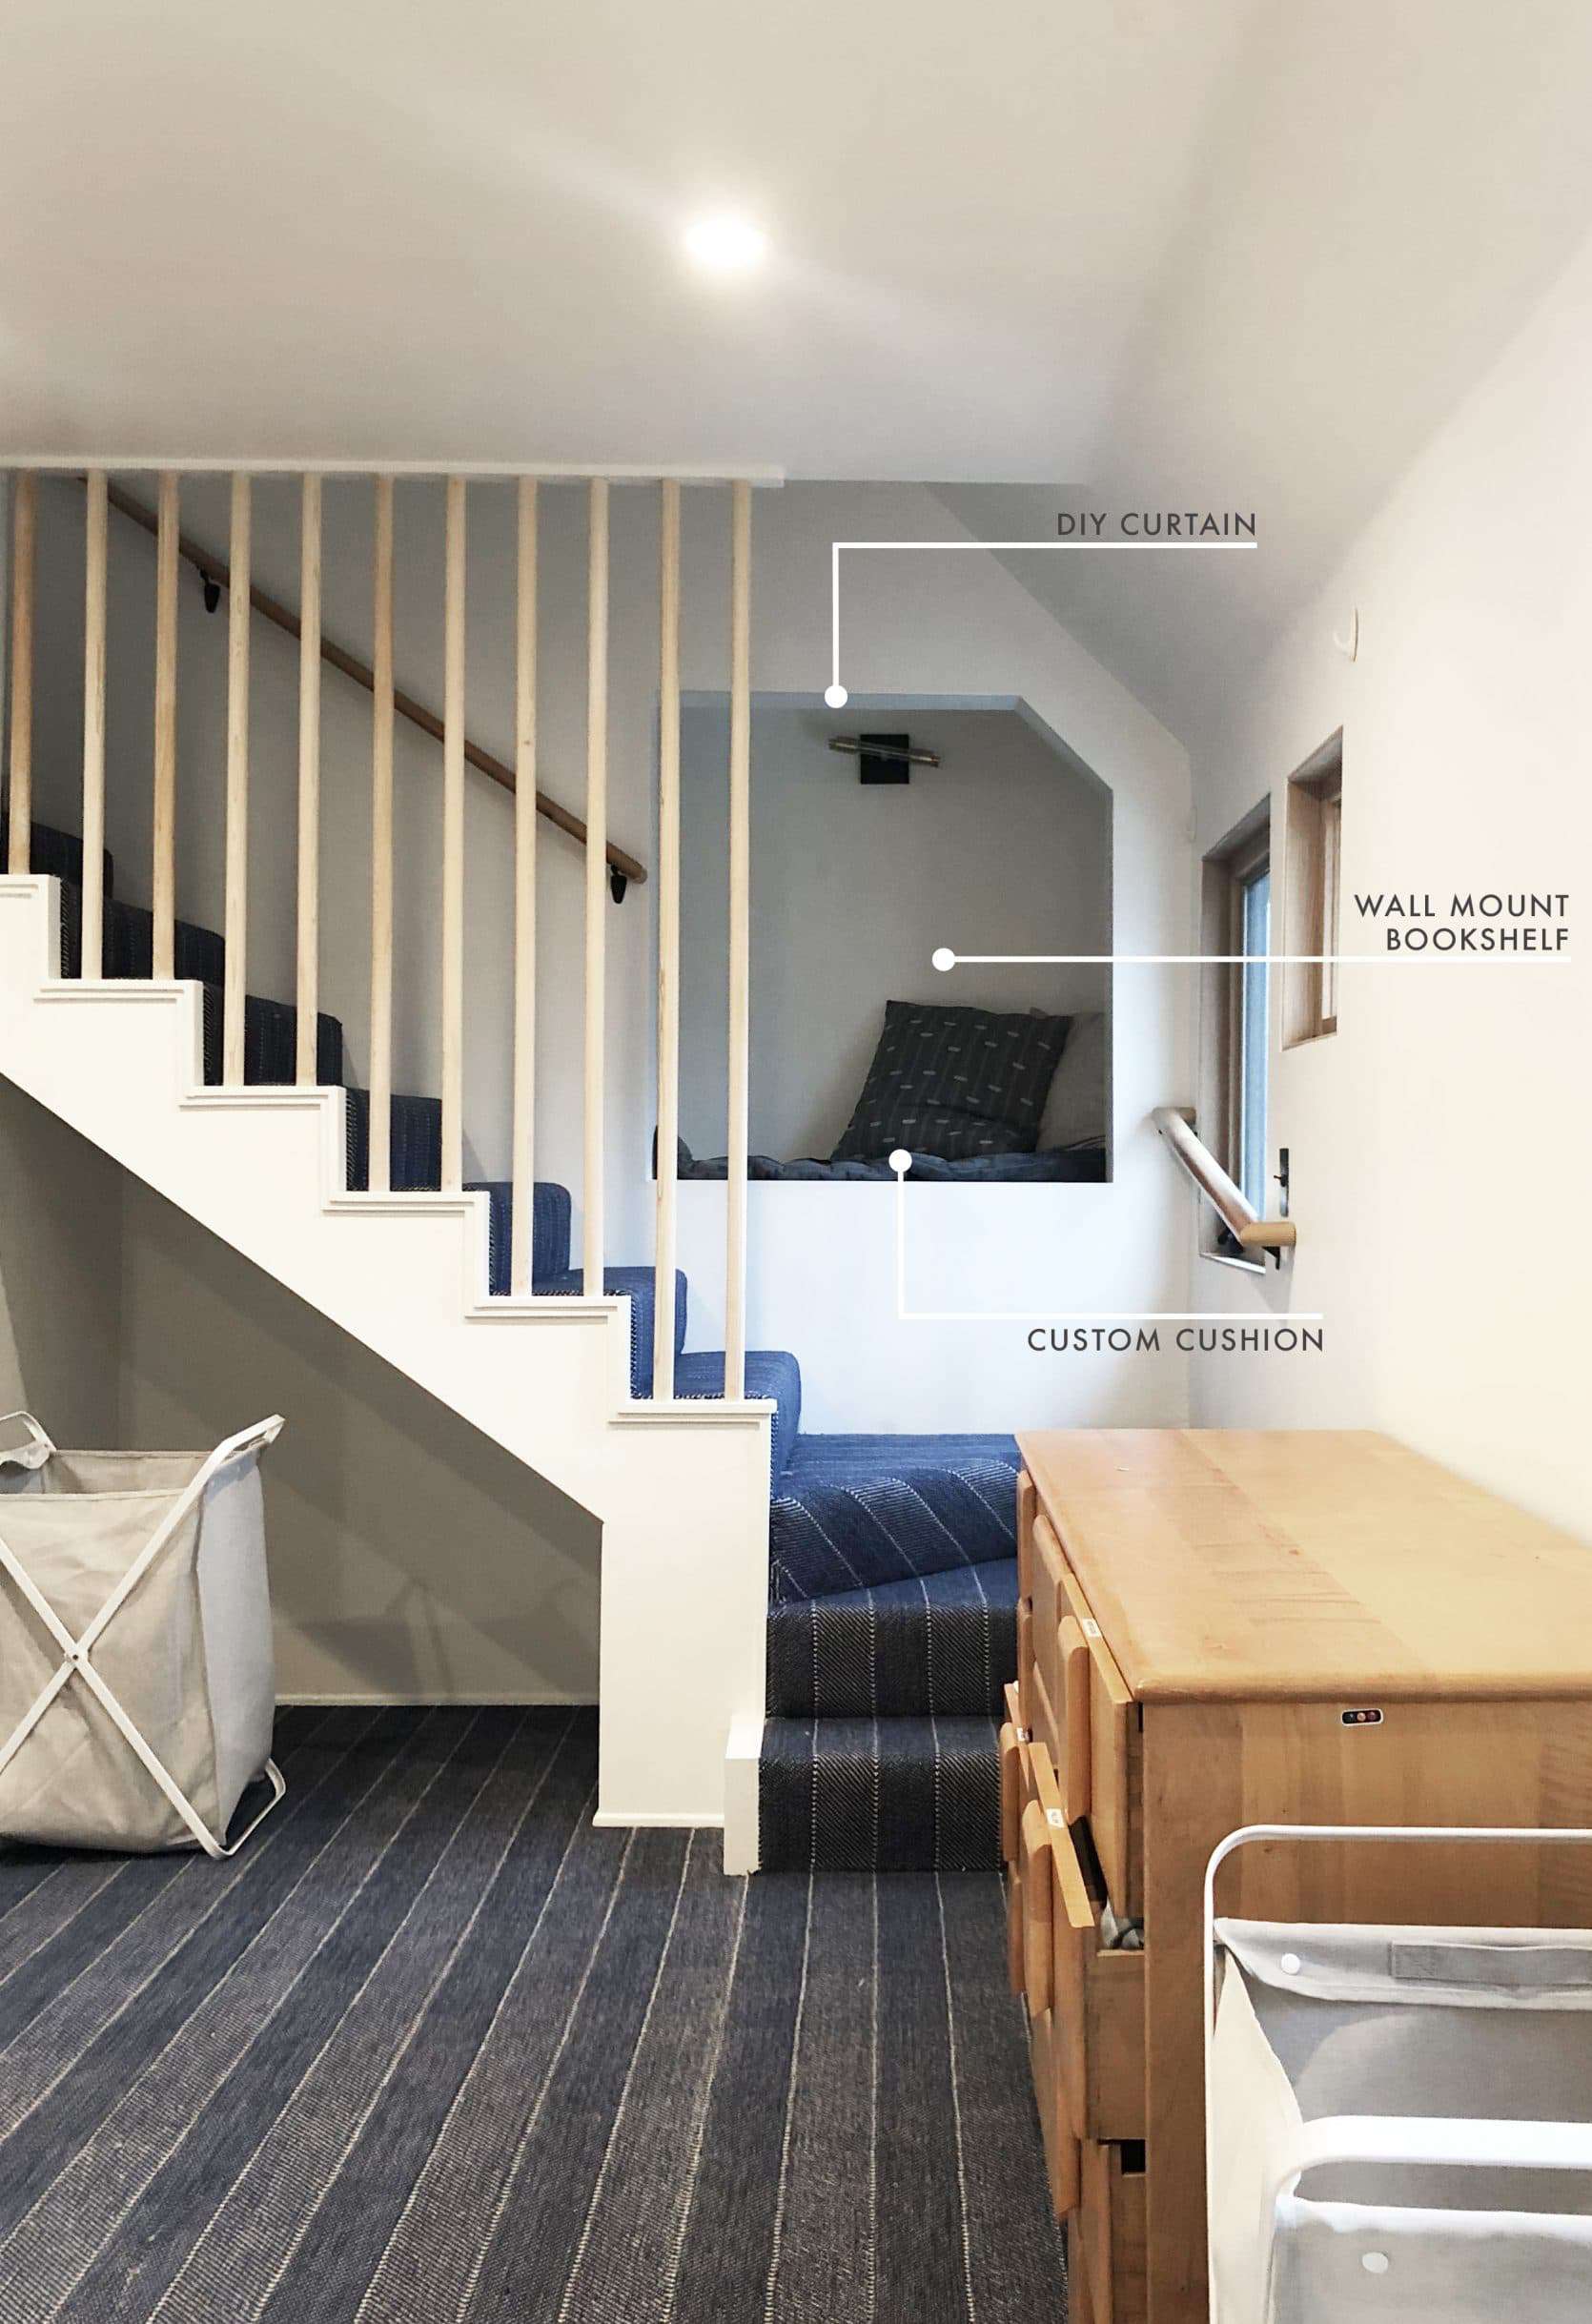
Well, one of the reasons this is the kids’ room (without a bathroom) and not just a guest room is the attic playroom upstairs. We had this fantasy that this would be where they sleep and upstairs is where they could feel like they had a kid headquarters. So we built these stairs where the closet was, with the intent of the underneath nook to be storage for them (not done yet, don’t get too excited about that).
The Built-Ins.

Do you remember when this was our intent? Do a big fancy built-in bunk room wall like you see all over Pinterest? Well, we got them a bunk bed for our LA house (after they begged to share a room) and well, it didn’t go well. It was six nights of hell, with both of them up 4-5 times each night because they just felt uncomfortable—Charlie up high and Birdie down on the bottom. Granted, we bought an inexpensive IKEA one that isn’t that big, so that could be it, but regardless, it just made us realize that we are spending real money on a huge built-in bunk bed that our kids might not actually want or need. And when we have more kids up here, we can always just roll out some mats because the 2″ memory foam is certainly comfy enough.

Plus, we were done spending money and this was going to be part of “stage 2” both for money and time. And then when we did our survey with you guys and you said that you wanted more approachable ideas and more of a “make it work” attitude, I was SO RELIEVED. I thought the world wanted fancy built-ins (and according to Pinterest, we do). Sure, there were hours upon hours of wasted design and rendering time, but it’s a sunk cost and we have since moved forward with a make-it-work plan. Besides, we can always do this plan. We have the renderings done, and in a few years, we’ll have a better grasp if the twin over full thing is really what we want in life. It feels so good AND FREE to push off some major life decisions.
The Awkward Half Wall That We Need Access To.

But we still had some challenges. BIG challenges. The plumbing to my precious steam shower and micro-bubble bathtub is housed in this room —it’s a long story. So that long white box you see up there has to be removable or accessible, it has to have some air vents, and it would be nice it if muffled the sound a bit in case I want to micro-bubble after the kids go down (prime micro-bubbling time).
Plus, both kids want to sleep near the ground. What you can barely see up there is that Charlie actually loves to sleep in between the two beds, on two couch cushions. As an “internet famous” interior designer, you can imagine how proud I am of his design choice. This is the same at our LA house. Two low twin beds, with a couch cushion in between. It’s because they want to be close. I’m just like “why can’t they share a big king bed??” It would certainly make all our family reading sessions easier…
The Sconces.

We originally had our electrician put in the J-boxes for all four bunks, but now that we are temporarily nixing it, we still wanted to utilize the bottom two, despite them being far apart (they were meant to be the power source for sconces at the heads of the bunks). So that’s a challenge.
So we had to come up with a design plan that addressed all of these trying bits. As a quick recap, all those challenges were:
- An unmovable big box full of plumbing that we need access to (AKA we can’t just drywall it or even make it a full height wall).
- Oddly placed and sized windows.
- The fact that our kids like low-to-the-ground beds…
It doesn’t seem like that should be much of a challenge, but trying to make two short beds look cool isn’t that easy.
Wanna know what we did? COME BACK TOMORROW.
But here’s a sneak peek…

A Few Favorites

Ok I’m excited
Me, too 🙂
Emily, that carpet made me love the … carpet. It looks so good! I am eager to see the finished room, so count on me for tomorrow 🙂
I LOVE the carpet!!! Where do we get the memory foam pad?
As a diehard fan of wood floors, I have to say: That striped carpeting looks great. Like, really great.
My boys totally sleep in a king bed made of 2 twins. Best thing for book reading before bed!!
okay see…we’re onto something here.
I can’t wait for tomorrow!!
What brand is carpet? Did you have to cut doors down to fit pad?
It’s Stark! We added the link above but here it is for easy access:
Love that carpet! I still want to rip out all of ours in the main living areas- but for bedrooms I’m team carpet.
We just took our kids to Room and Board this weekend to see how they reacted to the mini bunks…. it was NOT going to be safe. Sometimes our kids can really spoil the vision we have… lol. Glad I found out before purchasing.
Ok but who’s that giant man-child in the preview photo???
Thanks for sharing!
Very interesting! Can’t wait for the reveal. I currently have three young kids (2 boys, 1 girl) sharing a bedroom, so this is very relatable to me. Strangely, one of my kids prefers the top bunk, so at least that part is simple. But coordinating bedding for three tiny humans? It’s not easy.
Where is the carpet from? It’s great!
it’s from Stark linked up above in the “carpet” section, but don’t worry, it’ll also be mentioned in tomorrows reveal
I’ve never heard of memory foam padding. Do furniture legs sink in and make dents in the foam?
Does it make the carpet higher than the surrounding rooms? What does the threshold between the hardwood and this thicker carpet look like?
These are all of my questions as well!
we customized the doors AFTER the carpet install so . yes, be careful about this or you’ll likely have to shave your door down. And yes, they say that legs of furniture might make a longer lasting dent. we are fine with that 🙂
Is that tall, gangly, dude you are wrestling around with in the sneak peek picture CHARLIE? No way!
ha, yes it is!
Oh yeah, talk to me about that carpet! Would you pretty please post a source? We’re dealing with the same carpeting need, but for a new basement. In the past, we’ve had great luck with padding that has a rubber backing (facing the concrete floor). Cushy but also water resistant since basements can face so much moisture.
Added above, but it’s Stark:
As a wood floor enthusiast I would have said never to carpet but that might just be the jumpsuit of flooring.
PS – “carpet aside from kitchen and some baths…” If this means there was carpet in a bathroom let me present this question to the world: WHY???? (Obviously, you’d never let that stand! But I hate that it exists at all, ever.)
ha no kidding! I remember my parent’s bathroom in the first house I lived in (back in the ’80s) had green…or maybe it was burgundy…shag rug in it. I remember thinking (as a 4 year old) how cool it was. What a nightmare!
I would really love to get more on your take about carpet and flooring decisions, and especially how to transition between the two. I grew up in your typical midwestern house with carpet all over the upstairs, in all bedrooms, and I just can’t seem to let go of the idea that bedrooms should have carpet upstairs. Is it okay to have wood/laminate flooring in the hallways and carpet in the bedrooms? How do you transition between the two?
Looks so great! In 5 years, your kids are totally going to vote for the bunks ;). For their current ages, what you have going is perfect.
Love the wall to wall carpet. And that camping theme? Wow.
I also was debating the built-in bunk bed route in a room that was screaming for it (English barn with double height ceiling in their room, but not a big footprint). But I too was worried I was going to spend all that money and they weren’t going to like it. I eventually found a very affordable, very cute cabin bed that has a roof and windows and it’s amazing. Every adult loves it. My children refuse to sleep in it. Well, one slept in it, the other slept on the floor…without a cushion, NEXT to it. I’m happy we didn’t do the built in but the dilemma continues. We gave up on that bed for the minute and they sleep in the guest room in a queen bed together (they are nearly 5 and nearly 3). It’s kind of great, except their actual room basically doesn’t get used and whenever we have guests we have to relocate them. After years of living in apartments and doing the guest shuffle, we finally have a 3 bed house and are still shuffling! Not sure when to call it a day and do something different with their room, or give them some… Read more »
That canopy?! omg. can’t wait for tomorrow.
I have 3 boys ages 4-10 and they share one king bed. It’s working for them right now. They do all have their own rooms with their own beds but like sleeping together. Hope it lasts!
I think I echo the sentiments of other commenters by saying “more info on this memory foam situation please!!” I need the whole scoop. Also do you have a source for rug pads? I know you’ve talked before about using thick ones at home, I’ve been thinking about upgrading mine.
Thank you!
Can’t wait to see this! So glad you nixed the bunkbeds; I would hate to think you were making major decisions based on what you think the internet wants, rather than what works best for your family and budget. Pinterest is dreams, but I’m here for reality!
“sharing the same sill height to help it look a little more intentional” — I think you mean they share the same head height.
ha. yes 🙂
Charlie looks HUGE, OMG. I can’t.
This is exactly the sort of in-process post I am SO craving for the mountain house! More, more, more of these, please!
And I can’t wait to see it tomorrow!
I love how you address real constraints, like kid’s wanting to sleep near to the ground and near to their sibling. Excited to see tomorrow’s reveal!!
“Why can’t they just share a king bed?” Will the answer to that be revealed tomorrow?
That fireplace is almost what I dream of for my living room (but I want a hearth to sit on). In a few years they could’ve gone to sleep with embers glowing (and you’d hear any problems flaring up from your tub)
That carpet is amazing and I don’t think you will regret not doing bunks. While they look cool having low beds makes it easier for you to jump into bed with the kids too. Whether it be to read them a story or just snuggle with them. Great choice. Plus they grow up soooo fast and their needs change. This allows you so much more flexibility to make changes down the road.
Can’t wait to see the rest! And also, where was this blog post when I was trying to decide on carpet for my stairs?? LOVE IT!!!
Holy cow, I hate carpet, but not that! It’s so beautiful!
Excited to see what you did with the beds. I have a doggie with bum knees so my bed has been sitting in the floor for years! (the things we do for those we love most!) I’m no young pup myself and getting up is challenging some days! 🙂 But really I just want it to look good!
The bunk room wasn’t a total loss! My parents recently bought a lake house with a room that they wanted to turn into a bunk room, so I sent them the link to your website. They used the concept with slightly different colors and 3 sets of bunks vs 2 and it came out awesome. My niece (3) and nephew (4) LOVE it. To each kid their own!
Send photos, please! Would love to see how it turned out.
Yes please send along photos!
Done! (I think…)
Love that you are “dealing with” structural issues like the rest of us . Budget busters and “nay” saying husbands put a quick damper on “brilliant ideas some days. Lol
I’d love more “good” carpet ideas. And more info on the padding! And why can’t they just sleep together in a king-size bed?
YES to this round-up post idea!
WE need to do it. I would have KILLED for a good wall to wall carpet guide. it sounds so boring but for those of you who want it, we should deliver.
Yes, please!
I cannot imagine having to put sheets on those built in bunks. They look great, but seem very impractical to me. Making the bed on a ladder.. really?
Okay, not design related at all, but I actually did pick up the 4th Harry Potter book and try to read it without having read the first 3 hahaha I totallyyyy get your point!
I’m a closet wall to wall carpet lover and this brought so much joy to my heart hehe. I know, I know…I’m part of the unpopular opinion crowd but I have no shame with my love of comfort.
ME TOO. we love this room because of it. xx
My boys used to have 2 separate rooms, and one day on vacation they slept on the same bed. I’ve never heard them laugh so hard. They had so much fun sleeping together. As soon as I got home, I’ve moved the king size bed from our guest room and put it in one of their rooms. They loved it! They’re closer than they ever been! And it’s been 2 years and I still hear the giggles coming from down the hall and I just love it!
Looks super cute! I’m excited to see how you guys used your creativity to make it work for your kids! Thank you for sharing. I really appreciate your blog!
Kids sleep where they want to! My two brothers and I spent a year sleeping in a tent on the floor in the room my brothers shared. My parents would kiss us good night and zip us in. Another year was spent sleeping in one of those kids teepees – all three of us! Then there were the years where my brother and I would sleep in the top bunk and the younger had the bottom bunk (complete with his Thomas the Tank Engine toys hidden in the slats for after hours play time). I always had my own room (the only girl) but I think we all slept in the same room until I was like 10 or so? We even got grandma up in the top bunk with us one night!
Never ever would I thought I would say I love the carpet! Stunning and fun room.
Hello Em! I am sure that the people need more ideas easy and cheep. Why? because they are thinking oh! this is great! I can do it!. You understund me? Have a great day, Ana (I´m Interior Designer in Argentina).
Interesting! My son sleeps on a floor bed (extremely low wood structure) since he’s 6 months and it’s one of the best parenting decisions we made 🙂 (thank you Montessori). I always thought I would put bunk beds whenever we’ll have our second (he’s in the belly now:)) but now you make me wonder if my eldest is going to like sleeping this way. I had an expensive project in mind but now I think it’s definitely worth it to try with an inexpensive ikea bunk bed to see if it works. Thank you, you might have saved our nights 🙂
Holy crap I love this carpet so much that I’m now rethinking all of my deeply held beliefs.