
All Things Renovation
How Ajai Transformed Her Kitchen In Just 2 WEEKS
I’ve been doing a lot of reflecting about pretty and organized kitchens. I know a lot of us tend to strive for this utopia of a place (I’m guilty of this for sure) but now that I have a little one and am always making meals, bottles, snacks, cleaning up messes (after my little guy has rummaged through the cabinets), looking for pots and baby utensils, I’ve grown quite close to the kitchen. My relationship with the kitchen has evolved, as I’ve come to care more about function and durability.
Would you believe me if I told you we renovated our kitchen in two weeks? Well hold onto your knickers, because that’s exactly what happened here. Last we left off, my husband and I were knee–deep in an infested kitchen with water damage and learning a new city. This kitchen renovation was very similar to our last one, so we understood the importance of sourcing materials for a kitchen with an emphasis on durability. Though I’m all for a beautiful kitchen reveal, I am a big believer in curating a space that will stand the test of time, and function well for normal day-to-day use.
BAR HEIGHT OR COUNTER HEIGHT?


Book Easel (vintage) | Scalloped Plates | Copper French Press & Coffee Storage | Egg Holder | Polished Brass Bars (vintage/antiqued) | Copper Pots and Utensils (vintage/antiqued) | Outlet Cover
In my experience, the key to completing a renovation or design project quickly is to be decisive, along with considering how you’ll use the space. Having product knowledge from previous kitchen renovations also helps a ton. When it comes to sourcing products, I love to use my past experience (good and bad) with appliances, fixtures, and flooring. Moreover, my husband and I are planning to rent this space out next year, so it was important that we think through how our tenant would utilize the kitchen, in addition to how we’d be using the space. One of the decisions we had to make early on, was whether we should keep the height of the breakfast bar or take it down to a counter height, so I took to my Instagram to ask people for their experience with this sort of setup. With 81% of people voting to cut the bar wall down (and for good reasons), we decided to go this direction and bring it down to a counter height. A special thank you to all of you amazing folks who shared why we should go this route. It was important for me to know what layout people typically prefer. Many shared how they loved the idea of cleaning one surface instead of breaking it up into two. Some shared that they preferred a counter height because it; creates a larger work surface, makes it easier for short people to sit up to the counter, feels more inviting, and it would be easier to see out into the dining area. Aesthetically, I love counter height for a cohesive and cleaner site line. Even though we went in this direction, I received some very good reasons as to why people love a bar-height situation for instance: if there is a sink in this area, having the backsplash up against a bar height sitting area really helps, hiding cooking messes from guests, and separating the counter space for keys and tchotchkes. Let’s get into the floors we chose.
THE FLOORS

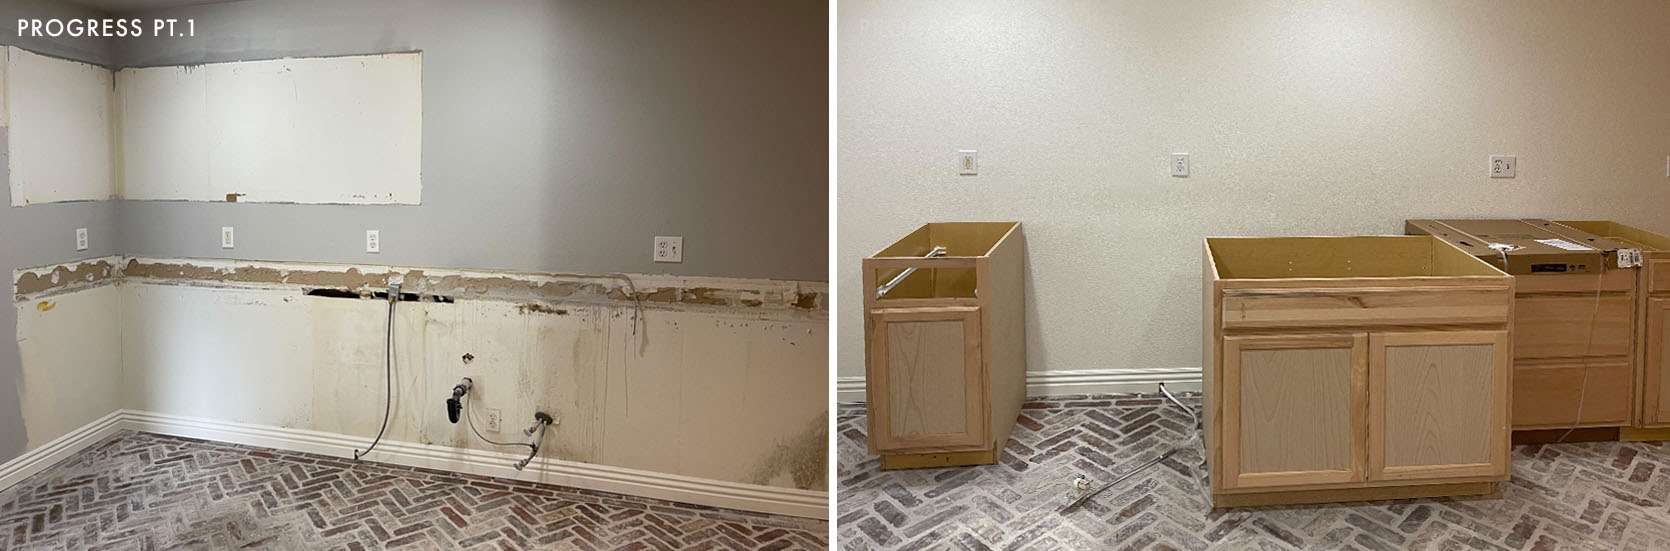
To reiterate, we had to get rid of the laminate floors and kitchen cabinets because of massive water damage. The laminate floors were bubbling and they smelled horrendous. We discovered puddles of water under the floors once they were removed, and hundreds of roaches nesting in the cabinets. Everything was pretty much falling apart, except for the granite countertops, so we donated those to our contractors for them to use on another project. With the previous floors in such bad shape, I wanted to source a floor that could stand up to all knicks, scrapes, and puddles, so I chose a brick because it can withstand extreme conditions. There’s a good reason why we see so many brick floors all throughout Europe with these brick streets and homes lasting for hundreds of years. After install, to turn it up a notch, we had the floors sealed.

Before I get too far into the kitchen reno, I should mention that my husband and I were driving down to Las Vegas once a week from Los Angeles (one-day turn-around trips) to monitor the work being done in the rest of the condo. This was becoming a bit taxing on us, so we quickly decided to move into the condo. We figured we could manage the project easier that way (or so we thought… living in a renovation with a one-year-old was bananas). This is the primary reason we pushed to finish the kitchen sooner rather than later. I was exhausted with cluster feeding our little one and coming up with healthy family meals that didn’t have to be prepared on a stove. All that to say, it was time to get-er-done!
THE CABINETRY

Cabinets | Cabinet Color | Cabinet Pulls | Cabinet Knobs

Our kitchen budget was pretty tight, and after seeing how the renter was living in the condo before we’d purchased it, I was okay with opting for non-designer cabinetry. In fact, I went for an option I’d used for a few other budget-friendly projects (one of those projects being our last home). These cabinets were sturdy in our Atlanta home, and allowed me to customize the space without splurging. I was able to go to our local store, select in-stock cabinets, end panels, kicktoes, soft pulls, etc., and have them delivered the following day.
THE APPLIANCES +

Stove | Hood | Towels (unavailable) | Art (gift to me from my husband’s grandmother)
I ordered a black sink that I love and have used on other projects. It’s perfect for long-term use because you don’t have to worry about cracks, scratches, or discoloration. It’s a pretty large and deep sink too – great for housing and rinsing dishes (which we have plenty of) while prepping for the dishwasher. The sink arrived the second to last day of the renovation (we understood our plumbing situation very well, so we saved plumbing for the end). Speaking of dishwashers, these are typically the item with the longest lead time (the stove is one too) so as soon as we closed on the condo, I took measurements of the existing appliances and ordered new ones asap! The current faucet is temporary and will be replaced with a more functional faucet with a spraying ability (this is just the one that had the best lead time, and we grew tired of washing dishes in the bathtub).
The previous owner wanted to take the appliances (which we were completely fine with – seeing as how the originals were being occupied by creepy crawlers). As for the stove, we chose a convection electric range with a back panel. We cook a lot in our household, and we also noticed that every place we’ve ever rented came with this style of range. I should mention I love how quickly these ranges boil water, (makes for faster cooking) and I’m on board with its eco-friendliness. I’m also a fan of easy cleanup.

Dishwasher | Paper Mache Bowl (similar) | Seagrass Baskets (unavailable)

As pretty as no stove back looks, we were constant victims of food falling in between the crack of the backsplash and stove. I’d grown so tired of pulling the stove out and trying to clean behind it. So… feel free to smite me design gods, my husband says we’ll always have a stove with a back panel (he was really the one pulling the stove out all of the time haha..)
Now let’s get to this range hood. We wanted a hood that was simple enough to have a handyman come in to access and/or fix it. This one is a convertible range and doesn’t have any ducting. It’s similar to the one we had in our Atlanta home, which we loved.

Refridgerator | Faux Pothos Plant
We are avid meal preppers and tend to like a lot of space in a refrigerator, so we chose a 28.2 cu.ft. french door refrigerator (I could fit inside of it comfortably during the hot Las Vegas summers). I should also mention that we got a killer bundle deal during Black Friday and didn’t have to break the bank on these appliances, so we’ll be leaving them for our renter. The appliances arrived during the second week of the renovation.
THE COUNTERTOPS
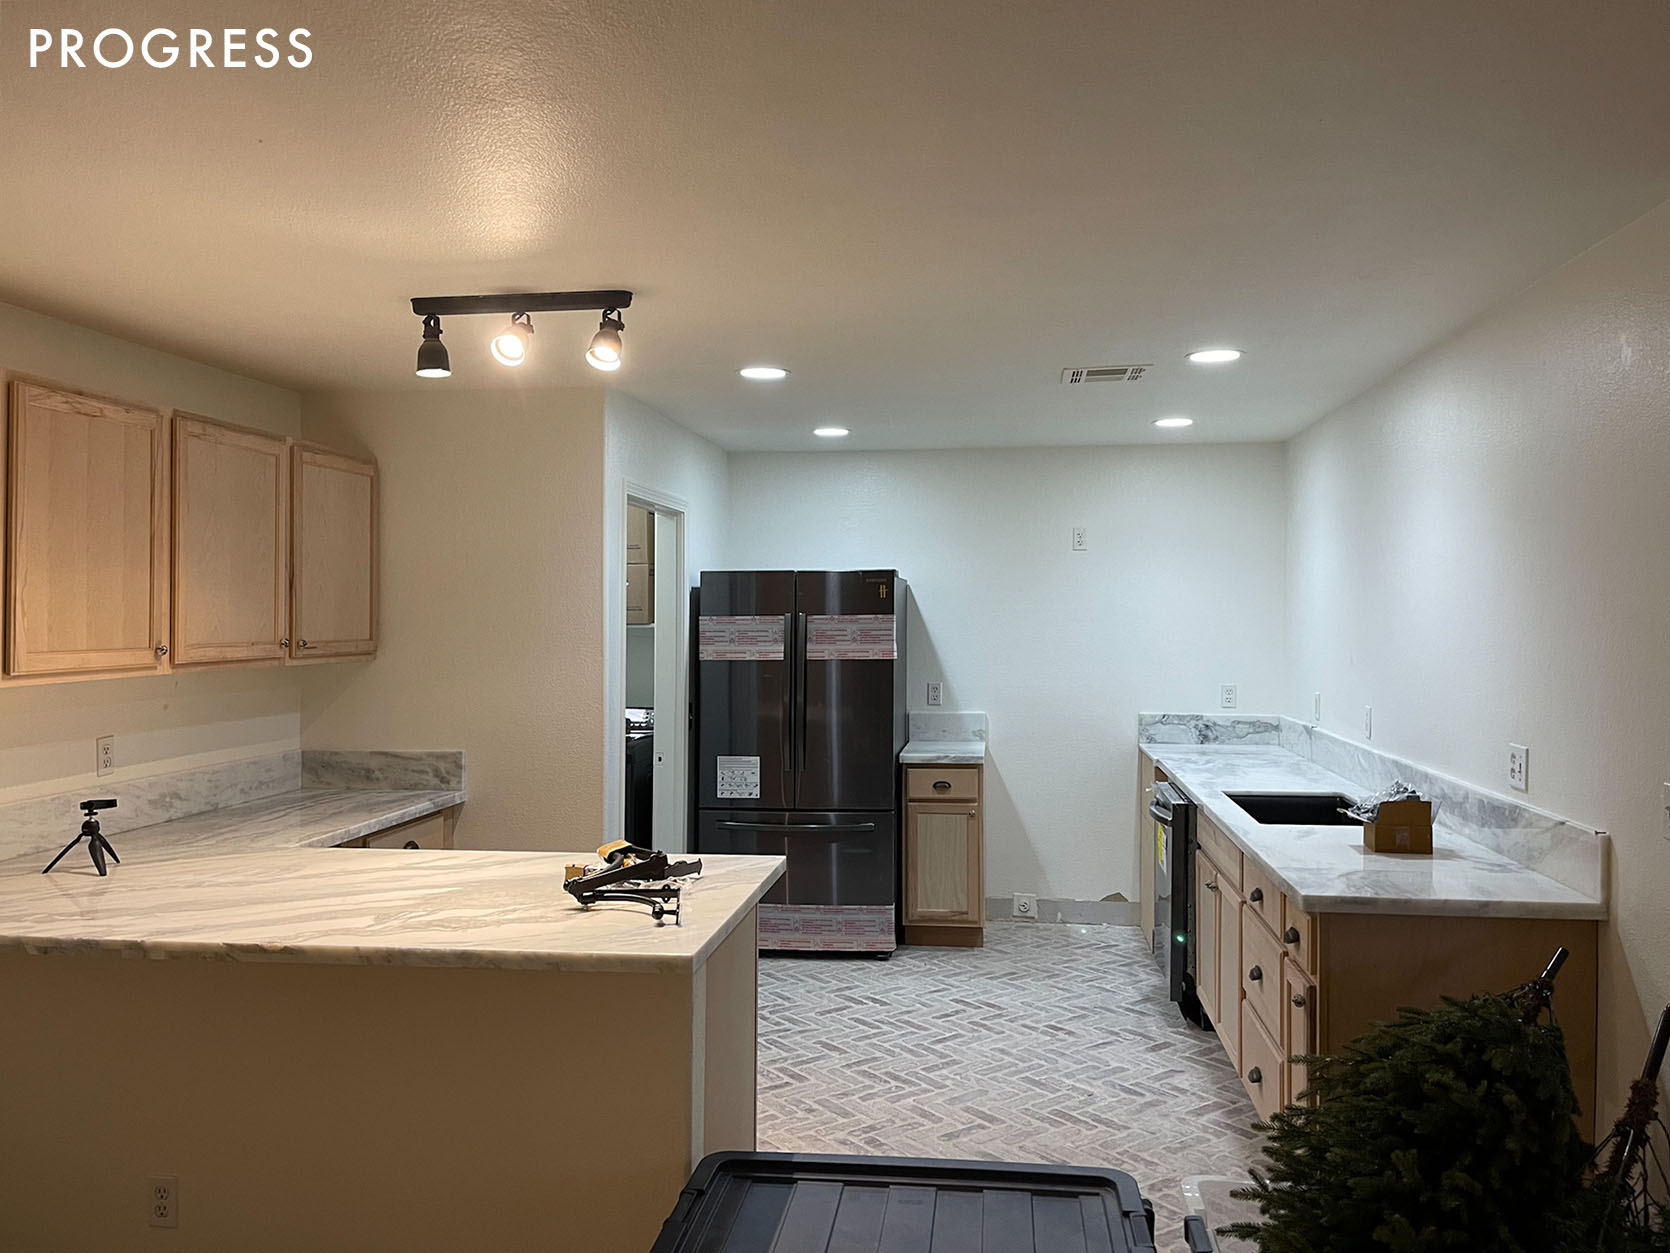


Now here’s where durability gets a bit tricky… we chose marble counters for this kitchen, but hear me out… marble is a strong/sturdy material and the cost of these counters was much more affordable than quartz and granite. I chose all of the salvageable pieces that had minor chips (which my contractors very easily cut around) and I also utilized my trade discount, so these counters were nearly free. When we were leaving the warehouse, I felt like we should have been speeding off. I understand that marble is porous, which is why the counters we chose are sealed. But honestly, I love good ol’ natural material and really don’t mind the aging of this. Given the amazing discount, the counters were the only area of the kitchen I was willing to sacrifice in terms of extreme durability. Nonetheless, the counters are very shiny and are holding up quite well.
THE PRETTY (BUT PRACTICAL) STUFF

Shelf (custom) | Brackets | Vintage Metal Wall Sconce
If you know me, you know that I love an open shelf, but I’ve come to realize just how important it is to have closed uppers for extra storage and food. Not everyone loves their ceramics on display. However, I love easy access to my everyday plates, cups, bowls, glasses, and bread jars. In addition, it was important to me to have a sturdy shelf with good depth to hold the previous items, so I drew up a plan and had my contractor create a custom shelf for me. I had the sconces hung a bit higher so that future renters would have to intentionally access them (less room for bumping this hardware and breaking bulbs). Adjacent to the shelf are upper cabinets, which house our food items. We also have a butler’s pantry off the kitchen/ behind the door. Further why I was okay with creating a long open shelf.


While we are on the topic of cabinets, let’s get into the cabinet colors. I’m a big fan of black cabinetry, especially in high-traffic areas. I was intentional about having the cabinets with all of the appliances next to them painted in“Blackest” by Clare Paint. As for the breakfast/coffee bar, I wanted a warm and light feel in this area, after all, we use this space primarily during the mornings. We took it up a notch with the gloss finish and chose Clare’s “No Filter.” The rest of the kitchen is painted in “Whipped”.
THE BREAKFAST BAR

At the breakfast bar, I’ve repurposed vintage polished brass towel racks to hold our vintage copper pots and utensils (which we actually use to cook and make tea and coffee). I mean it when I say, I like to leave out the items we use every day (I’m all for a grab-and-go), especially in the morning. We’ve just got to cave in and get a toaster (we haven’t had one in years… we fry our toast haha). We also need to invest in a microwave – let me know if you have any good suggestions.
A BREAKDOWN OF “FAST RENO” TIPS
- We’ve covered being decisive in terms of selecting products
- Researching products in advance
- Choosing in-stock cabinets and hardware that are ready to ship
- Ordering appliances in advance because they have the worst lead times
- Try not to relocate the plumbing or cabinetry layout so you don’t have to go through permitting (but this varies from state to state).
- Having good contractors that are knowledgeable and can cut counters and do carpentry onsite to address custom needs in the moment/on install day
- Opt for swapping out lighting instead of installing new light fixtures (in our case, we were able to speed things along with electrical because our contractor was buddy-buddy with the inspector).


I’m still in awe of how quickly this became a place for me and my family to gather comfortably while we cook, laugh, and eat. Along with creating a durable kitchen space, I’m embracing the truth of everyday life. There is so much joy and happy moments that happen in this space, and my goal is to continue normalizing a lived-in kitchen, because that too is beautiful. I hope whoever moves into our condo after us can appreciate what we’ve done here. I believe this kitchen will have a long lifespan. I’ll check back in with you all in about 30 years with an update.
*Design and Photos by Ajai Guyot


This is UNBELIEVABLE! The before and after shots are truly magical. And I’m sure I’m not the only one who will be overjoyed to see that a complete kitchen rehaul doesn’t have to take months on end (a fear I’ve always had as we start talks to begin our own renovation).
I NEED to hear more about those floors. My #1 choice for my kitchen reno is brick. I absolutely love the warmth and character they provide. We have a cottage like home that looks out into beautiful gardens and I just feel like the brick would be perfect. HOWEVER-my partner has some concerns. How do they stand up to being cleaned, considering the kitchen floor is a high-clean area? Are they wildly uncomfortable to stand on while cooking? Will we get tired of them in a few years? I’m so torn. Anyone have long term experience with these?
Second Vanessa’s comment – this is an unbelievable transformation and I too would love to hear more on the brick flooring. Is it comfortable? Do you ever find yourself catching your toe and tripping (I’m a bit wonky on my feet sometimes)? Is it full brick or a brick tile, as in did you have to dig out the floors to accommodate the depth of the brick or is it just a slice of brick? I’d love to know!
It is a thin tile brick, and there was a tile floor under the laminate floor (we got rid of both). There is a reducer transitioning the floor into the living/dining room floor. It’s very smooth, but the texture allows for grip (which is why I let me little one (who getting the hang of walking) walk on it. Hope that helps! 🙂
Yes…these questions about brick please!
Thank you so much! So far we are LOVING the brick! I’ve had my mother and father, little baby, in-laws (MIL and grandmother in law) walking on and testing out the brick. I’ve also had contractors and technicians give me their opinions on it (because we don’t allow shoes in our home). They all LOVE it. Which really surprised me as it relates to my parents – my parents think a lot of things are uncomfortable, as it pertains to materials and furniture. In addition, I had some folks test it out before deciding to install. It was important for me to have a variety of people with feet issues (my parents and in-laws) and different age ranges to give me their honest opinion on it’s comfort. My husband was also a big reason I went for it, he’s very particular about floors because he loves to be barefoot. the brick is very comfortable as long as it is sealed. We used a thin tile brick and had it sealed twice. The cleanup is very easy, I use a small mop for my BIG cleaning day and it slides easily across the floor. I use my Swiffer Sweeper for smaller… Read more »
Hi Ajai,
Thanks for sharing your kitchen with us! 🙂 It is gorgeous! Could you please send the link for the brick you used on the floor. I am lost in my on-line search to find the proper floor bricks.
Elham
Thank you! And of course! My apologies, I thought I’d linked it in the blog. Here is the link:
For some reason, it won’t let me respond and post the link. I’ll have my editor update the article with the link.
Thanks Ajai! The link came through! Elham
Hi! Thought I’d put my two cents in as someone with brick interior flooring (though not in the kitchen). I personally regret installing brick flooring. While it hides dirt very well (which is a huge perk), it’s so hard to clean (sweeping is frustrating and you can’t easily mop/swiffer) and simply feels dirty all the time. I constantly feel like I need to be wearing socks or slippers. Just my personal opinion…it definitely can work well-just depends on your preferences!
Also, have you considered terracotta tiles? Those have a similar cottage-y look and are much easier to clean!
Outside of dealing with pandemic supply chain issues it really depends on your contractor and how “custom” you insist on going. We did a gut reno including opening up a wall (which needed a beam) and the whole thing took a month start to finish. We accomplished this primarily by being having our ducks in row by making all the decisions on finishes in advance and not starting demo until everything, including the new semi custom cabinets, were delivered. If you want fully custom cabinets you have to do all the demo and reconstruction first so you can then take final measurements and place the order which usually means at least 6-8 weeks of waiting with no kitchen.
Black and white, dark and bright… What a beautiful design.
Thank you so much! 🙂
quick typo if you want to fix it early. in the paragraph about the appliances, you wrote “– great for housing and rinsing dishes (which we have plenty of) while prepping for the dishwater. ” i think you meant “dishwasher”.
Oh thank you! I’ll let my editor know (dishwater sounds funny though lol).
looks really good! the counters are beautiful. i like the art work you chose for the kitchen. question: you store bread in jars? is there a reason? i’ve never heard of this and i’m actually very curious.
Thank you! Yes, we eat so many sandwiches around here, I need to know how many slices we have left. I like being able to see through and count them out haha… also easy to grab and go!
Well THIS is genius! Thank you!
OMG. You just invented bread jars! Congrats. Seriously, tho… the kitchen is A++
What an incredible transformation! I love the clean neutrals and I’m surprised by how much I love the brick floor- a material I hadn’t really considered. My favorite part might be those sweet sconces!
Thank you! The brick adds a nice amount of warmth. The sconces might be my favorite too! 🙂
I love the sconces to distraction…and I especially love the height location.
It really looks beautiful! Our kitchen renovation took 4 months pre pandemic so this is amazing!
Thank you Beth! I know all about long kitchen renovations. I was so thrilled to finish this one so quickly!
Amazing. Truly amazing! I love seeing designs like this – beautiful but accessible. Congratulations on a wonderful reno – I think I’m obsessed with those brick floors, what a great idea!
The power of quick decision making. Nice work
Absolutely love this kitchen! But what caught my eye was – bread jars 🙂
Never have I seen bread stored in a jar & I love it!
Sooooo gorgeous! I enjoy these kinds of projects best if I am honest. It’s easy to create a gorgeous kitchen where budget and time aren’t issues. The real magic happens when you have to stick to a tight budget and work with what is available. Wonderful work!
Beautiful! An ah ha….I hate austere, cold kitchens. They seem to shout “I”M A KITCHEN!” with no nuance. Dawned on me that the brick floors, two colored cabinets, maybe even the lack of backsplash was making this so homey. It has layers, complexity, dimension, surprise (instead adhering tightly to rules, consistency)
Stared at the previous floor. Many may prefer a wood floor but seeing/appreciating how much complexity the brick floor adds. Thanks for the learning this morning and beauty.
Thank you for being so dang practical. Sometimes we just need a pretty space that will get the job done so we can get on with it. This is fabulous.
This was helpful, useful, realistic. I especially love how you show the use of stock cabinets, because let’s be real- it’s the route many of us in the real world end up going. you show us how it can look beautiful and intentional. Thanks
Impressive!
Love it! Beautiful and functional–and amazing that it only took 2 weeks.
I would LOVE a larger post about brick floors, especially in the kitchen! These look amazing and they’ve always been on my wish list but I want to hear more about install, upkeep, cleaning, etc.
Ajai, you are so gifted! This is the kind of renovation I love to see – ingenious and practical use of natural and relatively inexpensive materials. Anyone can throw money at a project but to accomplish this beautiful, functional kitchen in two weeks time is a masterful feat!
This is fantastic, especially the floor! (LOL that your 1-year-old seems to “love it too much.” I concur.)
Also, thanks for insidery tips like the advantage of a stove back and buying marble with small flaws that were easily cut around. The end result is so pretty & welcoming — really inspiring
Jenna Sue Design Blog posted a whole tutorial on brick flooring this morning. Very informative. I’m so impressed with this gorgeous kitchen and the length of time it took. It’s absolutely gorgeous! Love the mix of cabinet colors. And bread in a jar! Love it!
Hi Ajai, I wanted to say I LOVE this post and how you made a beautiful kitchen that is durable and budget friendly. I’m a high-end residential designer and constantly feel like I have to spend $$$$ because of these imaginary “rules” but you’ve shown so well here that you don’t have to have custom cabinetry, a shrouded hood, $70 sq/ft backsplash tile, etc etc etc to achieve a designerly space in the end. The styling as well is so wonderful. Thank you for sharing this with us! I feel so inspired today!
Gorgeous, and styling is 100 100 100 100!
Ajai, I love your approach to design! This kitchen is thoughtful and a delight!
two weeks?
TWO WEEKS!
I’m dead.
This is amazing! Thank you for sharing your beautiful space and making it feel attainable. I would love a post on tips for hiring to do a job like this- how to vet a contractor, reasonable timelines, standard contracts, or who one should hire if wanting to do something like this & manage the project themselves, etc.
Maybe this stuff is covered in Emily’s new book?
How nice to see that a full on kitchen renovation can also be quick with a good looking end result!
Very nice job and impressive that it only took 2 weeks. Thanks for commenting on the limited amount of upper cabinets. I’d be interested to hear about the butler’s pantry (i.e. how big, how much and type of storage) because for me there wouldn’t be enough cabinet space without more upper cabinets.
One thing we struggle with living in a condo with a small kitchen is where to store all of our emergency food supplies (at least enough food and water per person and pet to last 3-7 days.) It became very noticeable during the pandemic when we wanted to stock up on dry and canned goods to avoid trips out to the grocery stores. Living in earthquake territory, the need for emergency supplies will never go away.
Last question is the cabinet to the right of the stove. It looks like the door swings open on the left. Does it clear the stove? I wonder if that could have been a pull out drawer instead to avoid bumping into the stove?
I love this! This kitchen renovation is so very relatable and very similar to the kitchen reno we did in December. It took us about two weeks, but it felt like a very long two weeks.
How does the brick floor compare in price to other options…? I’m guessing materials were inexpensive and labor was HIGH…? Looks like they almost did the “smear” technique in grouting.
Hi Kristi! Materials were inexpensive, as I had half of the flooring from another project (I mentioned this in my last post on EHD) – I purchased the second half. Labor was also inexpensive, as these thin brick tiles came in the form of sheets. The herringbone pattern was already there. I also asked for this sort of grouting, as I wanted the floors to feel aged with character. Hope that helps! 🙂
Thank you. It totally did.
This turned out great!
Would you mind sharing the sources for your counters? I live in Las Vegas and am looking for replace some countertops in my home.
Looks great! As someone who doesn’t have windows in the kitchen either (only a skylight), I love how bright and open it looks. It’s also inspiring to see an update that’s relatable to scope/budget.
Questions about the kitchen cabinets – Were they painted with a paint sprayer or brushed/rolled on? Topcoat used?
Our kitchen cabinets need repainting. I love the colors and that it’s zero VOC, but curious how it holds up vs. using an enamel paint specific for cabinets/trim. Anyone have experience using Clare paint for cabinets?
Unless you have a sprayer for touchups, I recommend painting with a brush. Ours are sprayed, but when I use the exact same paint for touchups, you can tell a difference. The perfectionist in me cringes every time I see those touchup spots!
Excellent point! Thanks for sharing.
This looks amazing! Congrats on an awesome transformation!! I love how all the colors/textures work together! and so interesting to hear that marble was the least expensive choice!! I loveeee how it looks!
so inspiring! Did you have the cabinets professionally painted? Would you mind sharing the cost? I love what you did here with a combo of low cost materials and high end finishes. This feels very accessible to the average renovator (me). I would love to see more of your condo reno!!
Hi Mindy! Thank you! So happy to inspire! This was a budget-friendly project, so I painted the cabinets myself. I’ve done this on a few projects in the past as well. No cost for paint labor (all me). I plan to share more of my condo Reno. I’m working on blogs for the other spaces now. 🙂
Was there much natural lighting in this space? I don’t see a window by the kitchen, which is my current predicament. I would love to hear some tips on how design choices can “brighten” up a dark kitchen.
Whoa, the texture and warmth coming from those brick floors is truly the most memorable thing about this kitchen and something I’m going to keep in mind for any future designs. There is just something about natural materials, right? Also it took me a few slides to realize there’s no windows or natural light and yet it’s a beautifully pleasant place to be. Super impressive!
Hi Cheryl! I was waiting for someone to notice the lack of windows in a space. This played a major part as to why I chose the paint and lighting that I did. Thank you so much, I appreciate it. 🙂
in the space*
I really appreciate this project reveal because it feels accessible financially. Reviews of affordable appliances are a huge plus. It is hard to find makeovers with affordable design and appliance choices that fit our style. Thank you for this!
This is beautiful and looks very functional. I am so impressed with all the details and how quickly this came together — a huge testament to your design chops and confident choices.
Amazing transformation. It is absolutely gorgeous. I didn’t see a link to the ceiling semi-flush mount light above the breakfast bar. Could you please share it? Thanks!
AMAZING ! gorgeous, thrifty, heartfelt and warm! !And strangely enough, I realize that I too need nearly free marble counters! ! Can you shed any more light on getting them for us non discounted civilians? Did you use tons of little pieces and do lots of careful fabricating? They look fabulous1
It looks modern and cozy. Good job!!
Beautiful! I’ve considered brick tiles, how do they do with dirt collecting in the grout lines?
Ajai, another one of your magical transformations! Your makeovers are so attainable for the ordinary person, yet so stylish and filled with so much charm. I look forward to every new post by you!
Ooh, please could we have a post in 6 months’ time with a review of how the marble counters have held up? With before and after photos of what etching actually looks like? I can’t seem to find any photos of what an old marble counter will actually be like, and some people hate the marks and some think they’re characterful.
I love/hate the brick floors! They’re gorgeous. We used pavers and then pulled them all up. A royal PIA to clean, had to reseal the traffic areas all the time. Hopefully you used some kind of different brick or sealer. Beautiful kitchen, especially the counter top.
I love everything about this – the beauty of the space, the accessibility, and the reminder that memories made in a space hold immeasurable value. Thank you, Ajai!
Beautiful job! I’m in love with the floors (countertops a close second). I’m curious if you put a whitewash on the brick? It looks so much softer/ lighter and better than the image on the F&D site. As for the range, I totally understand budget constraints but I’m not sure why you had so much trouble with crumbs (I’m assuming your talking slide-in vs free-standing ranges). We have a slide-in w/glass cooktop and quartz counters. The glass has a slight overhang and snug fit with the counters on all 3 sides so crumbs are never an issue. Maybe I’m missing something but I would think free-standing would be worse for crumbs falling between on the sides where there is a gap.
Wow! What a great job and the floors to me were unexpected and quite wonderful! I would love to read more from designers on the subject of window less kitchens and their approach to address them, (besides putting in a window)